


Adding Gmail to your app sounds like a small task. You get OAuth working, read a few emails, maybe send a few, and you're done.
And honestly, the code part really is small. The hard part is everything Google asks from you before you can put that feature in front of real users.
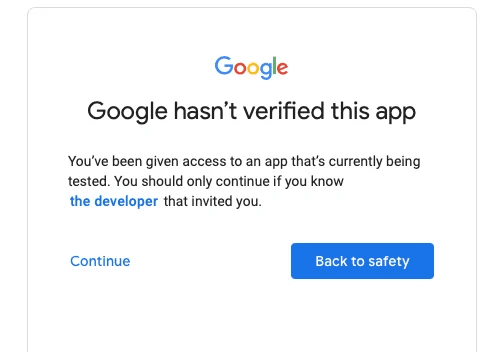
The moment your app asks to read someone's inbox, it's asking for a restricted scope. That means Google app verification, a privacy policy review, a demo video, and a CASA security assessment from a third-party lab, which you have to redo every freaking year. Until you do all that, your users see the "Google hasn't verified this app" warning, and your app can't have more than 100 users.
That's a lot of work.
In this guide, I'll show you how to skip all of that. We'll build a small FastAPI app that connects a user's Gmail, reads their inbox, sends emails, and reacts when a new email arrives.
The Google OAuth app your users consent to belongs to Composio, so you don't need your own Google Cloud project, and verification and CASA are handled for you by:
Let's get into it. ✌️
What's Covered
Why shipping a Gmail integration is painful (scopes, verification, CASA)
How Composio's managed OAuth takes care of that
Building a FastAPI app that connects a user's Gmail account
Reading the inbox with Gmail search queries
Sending emails and saving drafts
Reacting to new emails with triggers and signed webhooks
The trade-offs, and when you should bring your own OAuth app
Why Gmail integrations are painful to ship
Before we write any code, let's look at what Google actually requires for a Gmail integration. It also makes it clear why this post's approach is useful.
Gmail scopes come in three tiers
Google puts every Gmail scope into one of three tiers:
Tier | Scopes | What it means for you |
|---|---|---|
Non-sensitive |
| Basic verification |
Sensitive |
| App verification |
Restricted |
| App verification plus an annual security assessment |
You can find the full list in Google's Gmail API scopes reference.
If you look at the restricted row, you'll notice that reading emails at all needs gmail.readonly or something wider. So pretty much every useful Gmail feature puts you in the top tier.
That makes doing all of this yourself pretty painful.
What the restricted tier asks for
For restricted scope verification, Google wants:
A verified domain and a privacy policy hosted on it
An unlisted YouTube video showing your OAuth consent flow and how you use each scope
A CASA (Cloud Application Security Assessment) from a Google-approved assessor, repeated at least every 12 months
Google itself says the restricted scope review "can potentially take several weeks to complete", and that's after brand verification is done.
ℹ️ The assessment fee itself isn't the biggest problem. Third-party estimates put a CASA Tier 2 assessment anywhere from a few hundred to a few thousand dollars a year. What actually costs you is the time.
And if you skip it?
Not if you want real users. Until your app is verified:
Users see the "unverified app" warning screen.
Your app is capped at 100 new users, and that cap applies to the entire lifetime of the project.
If you keep the app in "Testing" mode instead, refresh tokens expire after 7 days, so your users get logged out every week.
That's a weird amount of friction when all you want to know is whether people even like the feature.
How Composio gets you around this
Verification and CASA apply to the OAuth app that asks for access, and that app belongs to whoever owns the Google Cloud project behind it. That's the important part here.
With Composio's managed auth, Composio registers and maintains the Google OAuth app for the Gmail toolkit. Your users consent to Composio's OAuth app, not yours. You never create a Google Cloud project, so Google has nothing of yours to verify.
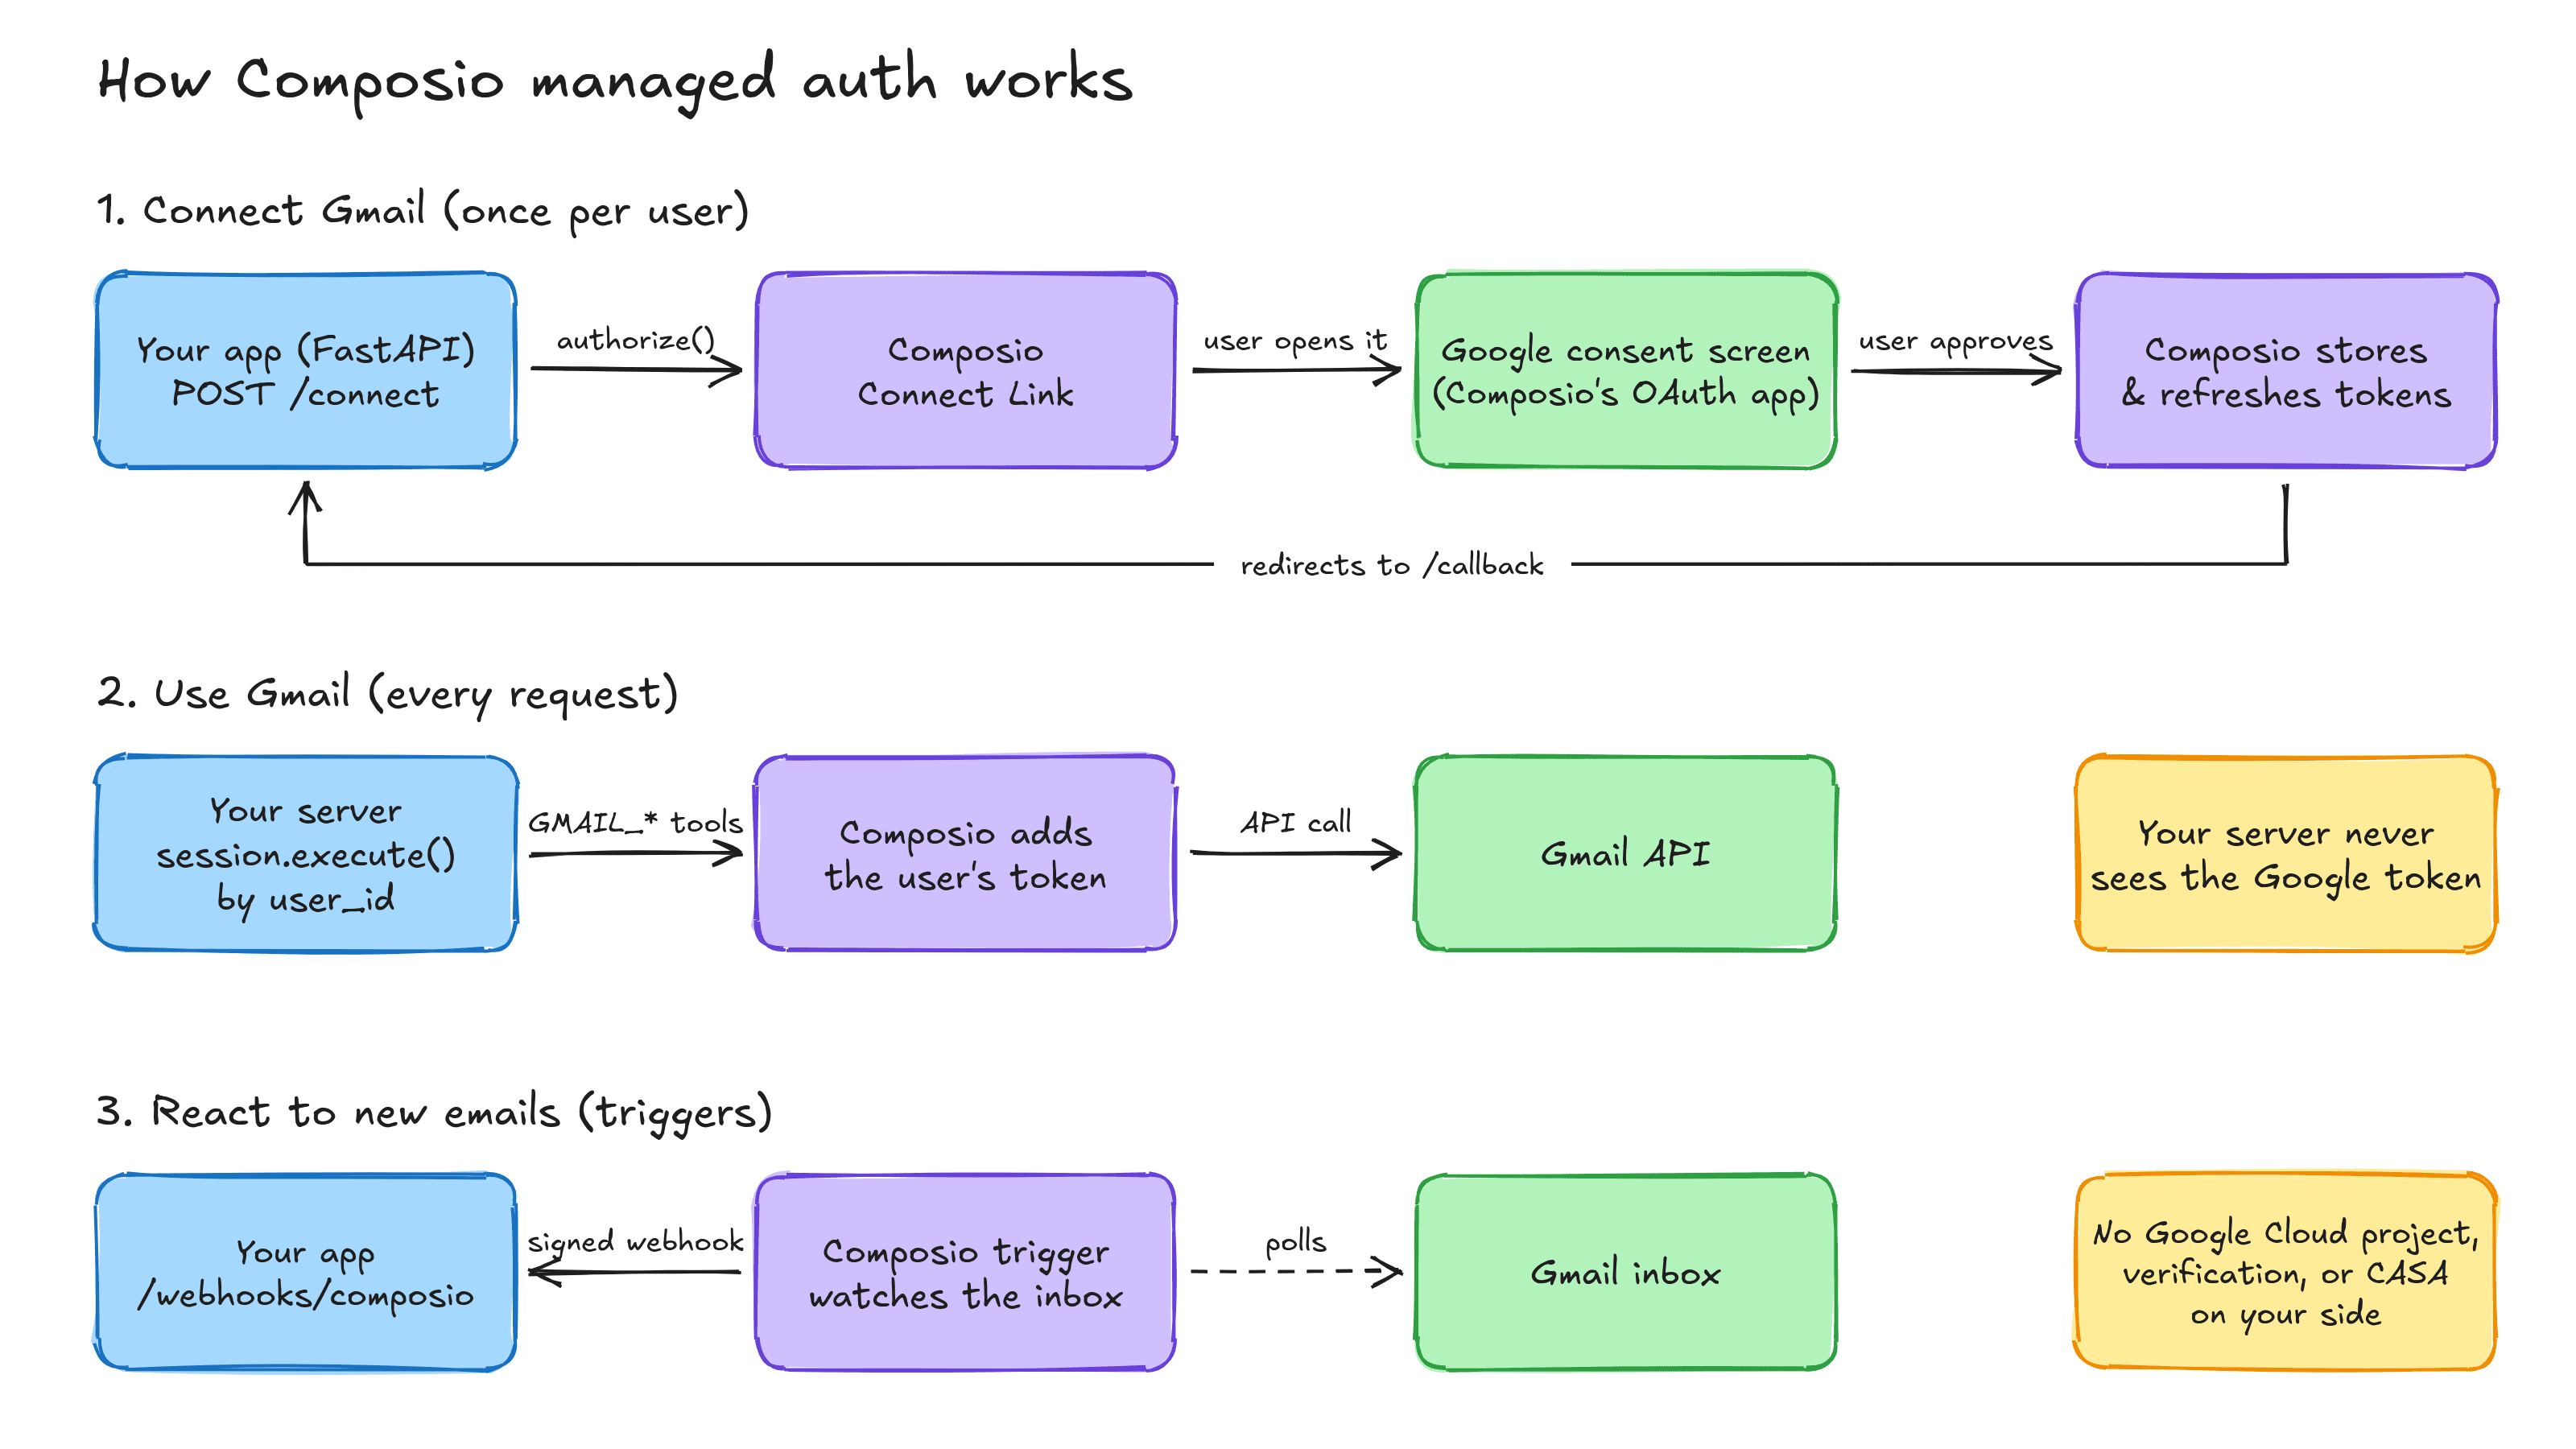
Here's how the flow works:
Your app asks Composio for a Connect Link for one of your users.
The user opens it and approves access on Google's consent screen.
Composio stores the tokens and keeps refreshing them against that user's ID.
Your server calls Gmail tools like
GMAIL_FETCH_EMAILSorGMAIL_SEND_EMAILby user ID. Composio injects the token on its side, so the Google token never touches your server.
💁 One thing to clear up before we begin. "No verification on your end" only means that "you" don't go through verification or CASA. It doesn't mean Google has approved "your" app for anything. This approach also comes with some trade-offs, and I'll cover them later.
Before you start
Here's everything you need:
Python 3.10 or newer
A Composio account (free, with 100K tool calls a month 🔥)
A Gmail account to test with
About 30 minutes
Building the Gmail integration
We'll build this step by step. By the end, you'll have a FastAPI app with these endpoints:
Endpoint | What it does |
|---|---|
| Returns a Connect Link for the user to connect their Gmail |
| Where the user lands after connecting. Verifies the connection |
| Tells you if the user has an active Gmail connection |
| Reads the inbox using Gmail search queries |
| Sends an email, or saves it as a draft |
| Turns on new-email events for the user |
| Receives new-email events from Composio |
The whole app is a single main.py of around 190 lines. You can find the entire source code in the repository.
Step 1: Get your Composio API key
Head over to the Composio dashboard and sign up if you haven't already.
Once you're in, go to Settings -> API Keys and copy your API key. We'll need it in the next step.
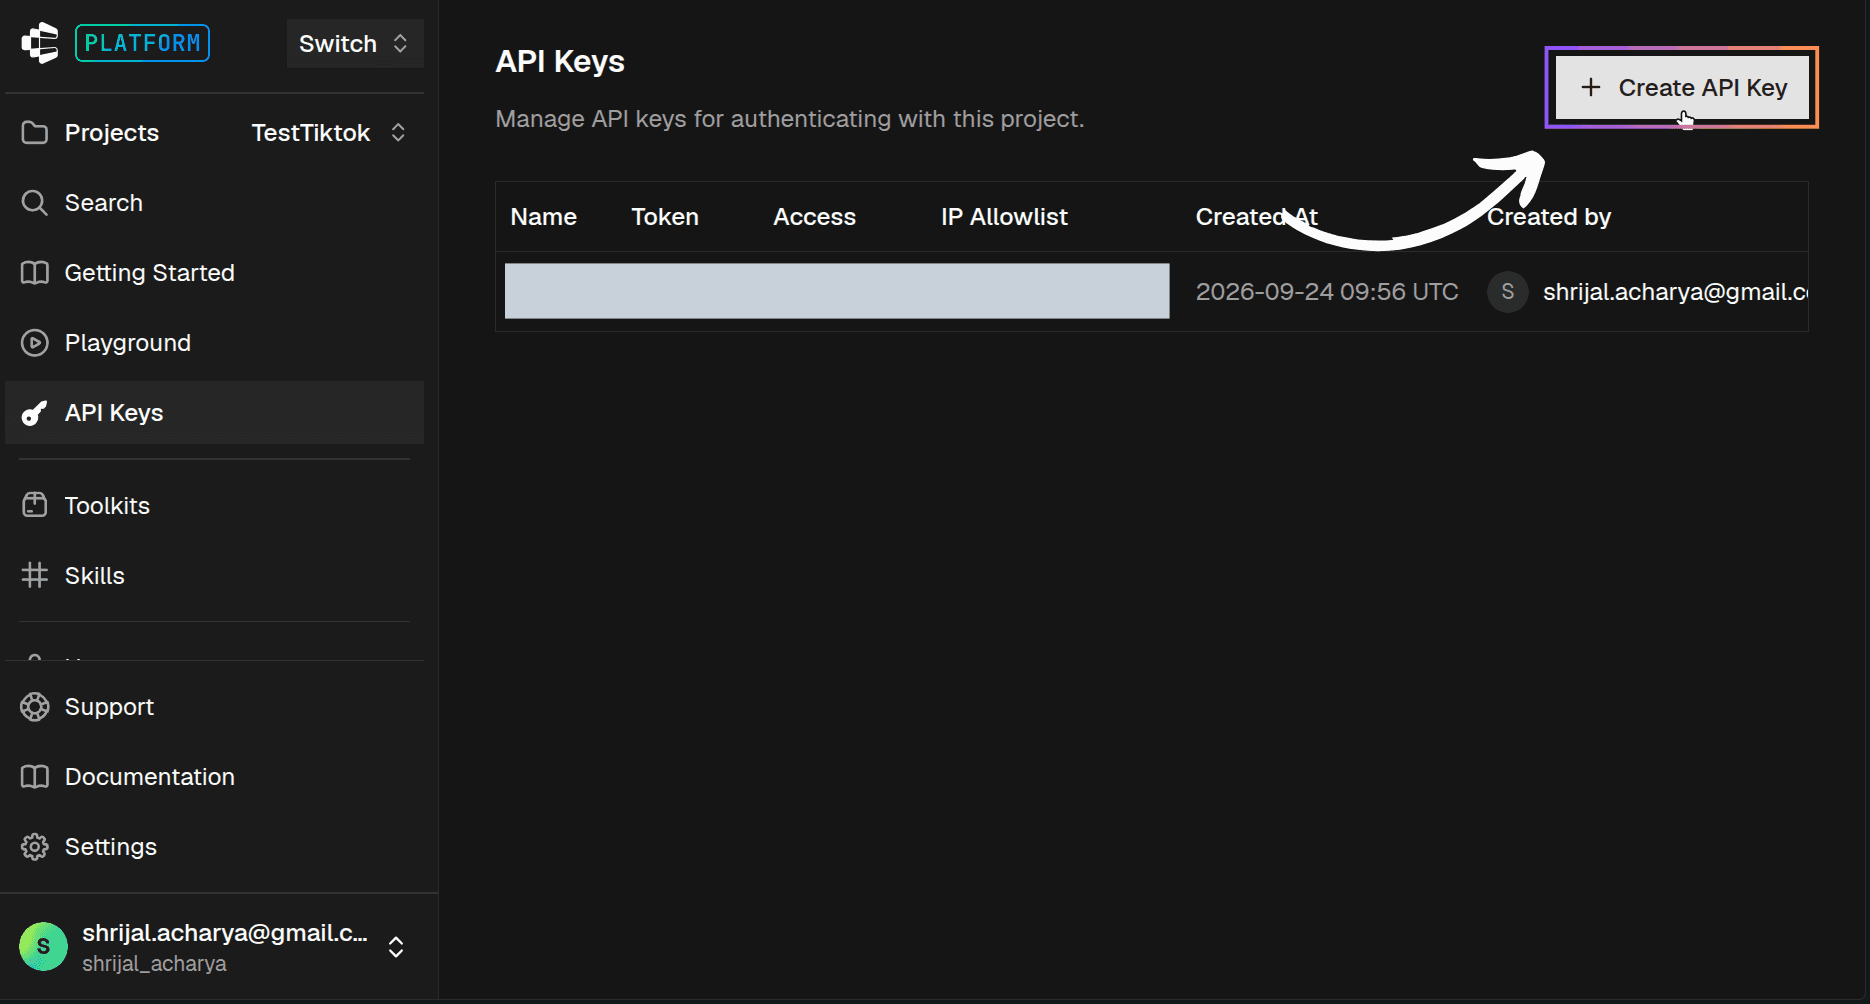
⚠️ NOTE: I probably don't have to say this, but keep it in
.env, and never commit it.
Notice that we didn't touch the Google Cloud Console at all. There's no OAuth client to create, no consent screen to configure, and no scopes to pick. Composio already handles that part.
Nice.
Step 2: Set up the project
Run the following command:
mkdir gmail-composio-fastapi && cd gmail-composio-fastapi
python -m venv .venv && source .venv/bin/activate
pip install composio fastapi "uvicorn[standard]" python-dotenv
ℹ️ Just
composiois enough here.
Now create a .env file in the project root:
COMPOSIO_API_KEY=your_composio_api_key
COMPOSIO_WEBHOOK_SECRET=we_will_fill_this_in_step_7
APP_BASE_URL=http://localhost:8000
APP_BASE_URL is where your app runs. We'll use it to build the callback URL that Google redirects back to after the user connects.
Step 3: Initialize Composio and FastAPI
Create main.py and add the following:
# 👇 main.py

import os

from composio import Composio
from composio.exceptions import (
    ValidationError,
    WebhookPayloadError,
    WebhookSignatureVerificationError,
)
from dotenv import load_dotenv
from fastapi import FastAPI, HTTPException, Request
from pydantic import BaseModel

load_dotenv()

# One client for the whole app. Reads COMPOSIO_API_KEY from the environment.
composio = Composio()
app = FastAPI(title="Gmail integration (Composio managed auth)")

BASE_URL = os.environ.get("APP_BASE_URL", "<http://localhost:8000>")

# In-memory dedupe for webhook deliveries. Use Redis or your DB in production.
seen_event_ids: set[str] = set()


def gmail_session(user_id: str):
    # `user_id` is YOUR app's user ID, not a Gmail address.
    # manage_connections=False: we drive the connect flow ourselves via /connect.
    return composio.create(
        user_id=user_id, toolkits=["gmail"], manage_connections=False
    )


def run_tool(user_id: str, slug: str, arguments: dict):
    result = gmail_session(user_id).execute(slug, arguments=arguments)
    if result.error:
        raise HTTPException(502, f"{slug} failed: {result.error}")
    return result.data
A few things are worth explaining here:
composio.create(user_id=...)Creates a session. It's the recommended way to work with Composio now. A session is scoped to one of your users and the toolkits you add, which is just Gmail here.user_id** is your user, not a Gmail address.** Use whatever ID your app already has for that user: a database ID, a UUID, anything. Composio maps it to the user's Gmail connection behind the scenes.run_tool()is a tiny helper. Every Gmail action in this app goes throughsession.execute(), and if Gmail returns an error, we return a502with the error message.
💡 QUICK TIP: Stick with
session.execute()rather than the older directcomposio.tools.execute(). Sessions are the recommended path, and they always use the latest toolkit version.
Step 4: Let users connect their Gmail
This is usually the longest step. With Composio, it comes down to three small endpoints.
Add the following to main.py:
# 👇 main.py

# ...rest of the code

@app.post("/connect")
def connect(user_id: str):
    request = gmail_session(user_id).authorize(
        "gmail", callback_url=f"{BASE_URL}/callback?user_id={user_id}"
    )
    # Send the user here. They see Google's consent screen for Composio's OAuth app.
    return {"redirect_url": request.redirect_url}


@app.get("/callback")
def callback(
    user_id: str, status: str | None = None, connected_account_id: str | None = None
):
    # Query params are not proof of anything. Re-check the account server-side.
    if status != "success" or not connected_account_id:
        raise HTTPException(400, "Gmail connection failed or was cancelled")

    account = composio.connected_accounts.get(connected_account_id)
    if account.user_id != user_id:
        raise HTTPException(403, "Connected account does not belong to this user")
    if account.status != "ACTIVE":
        raise HTTPException(409, f"Connection is {account.status}")

    return {"connected": True, "connected_account_id": account.id}


@app.get("/status")
def connection_status(user_id: str):
    items = gmail_session(user_id).toolkits(toolkits=["gmail"]).items
    gmail = next((t for t in items if t.slug == "gmail"), None)
    return {"gmail_connected": bool(gmail and gmail.connection and gmail.connection.is_active)}
Here's what each one does:
/connectcallssession.authorize("gmail"), which gives us a Connect Link./callbackis where the user lands after connecting./statusis a quick way for your frontend to show a "Connected" or "Connect Gmail" button.
⚠️ NOTE: Anyone can edit a URL, so query parameters on a callback aren't proof of anything. Without the ownership check, someone could hit your callback with another user's
connected_account_id. Also, in a real app,user_idshould come from your own auth session, not from a query parameter like it does in this demo.
Now let's try it. Start the server:
uvicorn main:app --reloadAnd in another terminal, ask for a Connect Link:
curl -X POST "localhost:8000/connect?user_id=user_123"This is roughly what you'd get back:
{ "redirect_url": "https://connect.composio.dev/link/lk_..." }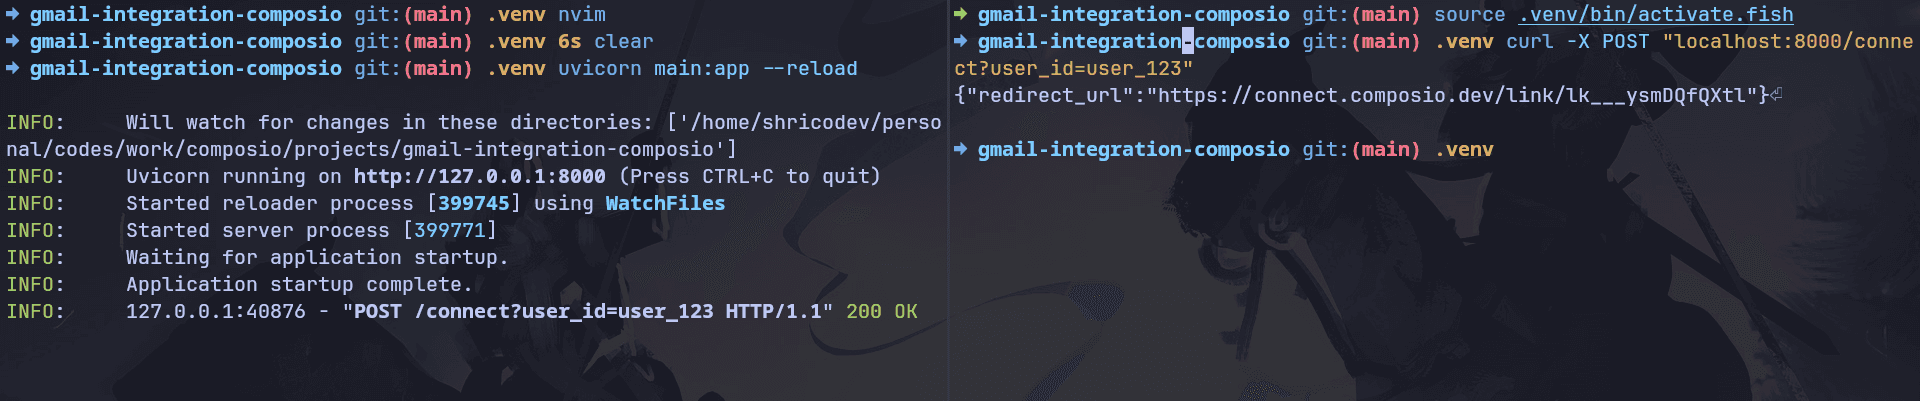
Open that URL in your browser. You'll land on Google's consent screen.
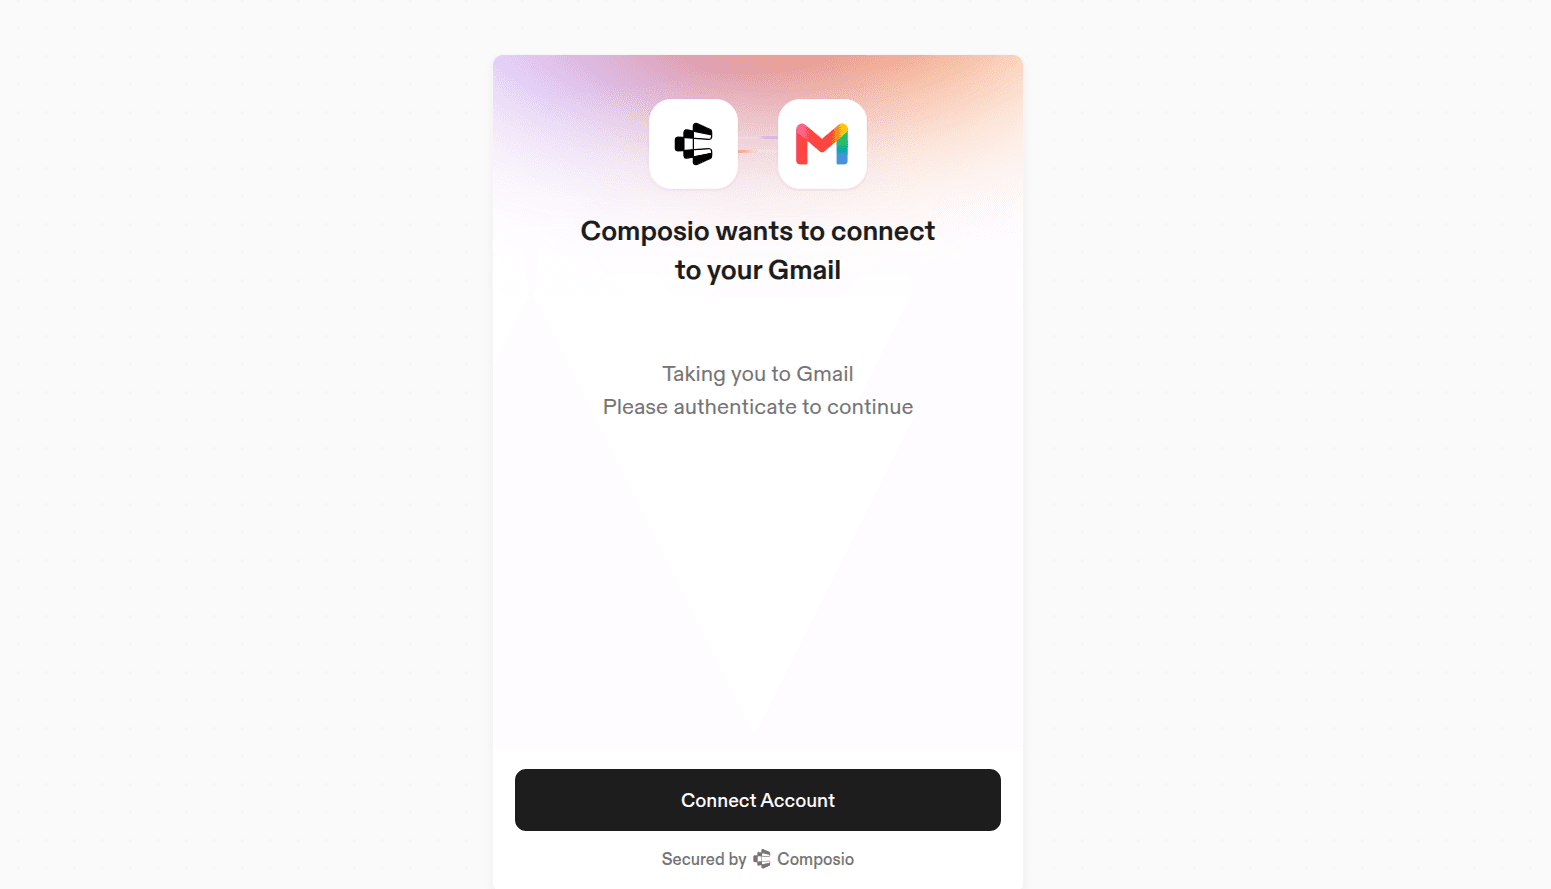
You'll notice that the screen says Composio, not the name of your app. That's because the user is consenting to Composio's managed OAuth app. That's what makes this flow work.
You can also white-label the Composio Auth screen with your logo and branding.
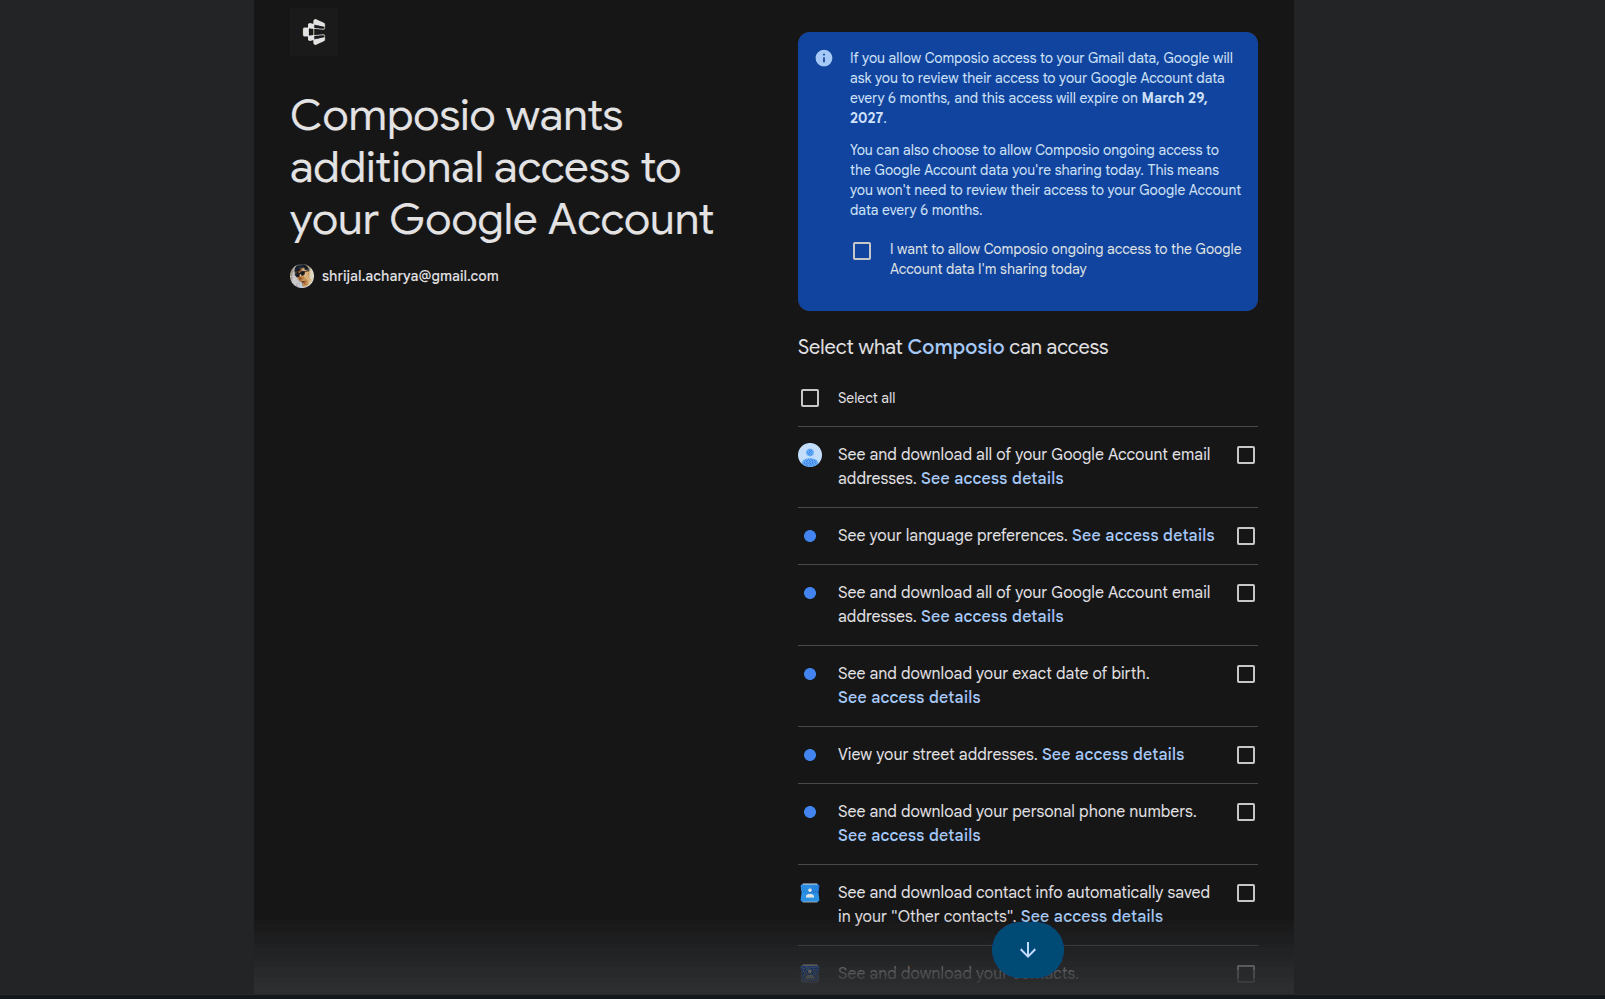
Approve it, and you'll get redirected to your /callback:
{ "connected": true, "connected_account_id": "ca_..." }
Let's double-check with the status endpoint:
curl "localhost:8000/status?user_id=user_123"{ "gmail_connected": true }
And that's it, your user's Gmail is connected. We didn't need a Google Cloud project or an OAuth client, and nothing on our side had to go through verification. 🎉
ℹ️ Completely out of curiosity, I checked which scopes the managed connection actually gets. The Gmail scope granted is
https://mail.google.com/, which is full mailbox access, along with basic profile and email.
Step 5: Read the inbox
Now let's actually read some emails. Add the following to main.py:
# 👇 main.py

# ...rest of the code

@app.get("/emails")
def list_emails(user_id: str, q: str = "in:inbox", limit: int = 5):
    data = run_tool(
        user_id,
        "GMAIL_FETCH_EMAILS",
        {
            "query": q,
            "max_results": limit,  # defaults to 1 if you leave it out
            "include_payload": False,
            "verbose": False,  # fast metadata-only fetch
        },
    )
    messages = data.get("messages") or []
    return {
        "count": len(messages),
        "next_page_token": data.get("nextPageToken"),
        "emails": [
            {
                "id": m.get("messageId"),
                "thread_id": m.get("threadId"),
                "from": m.get("sender"),
                "subject": m.get("subject"),
                "date": m.get("messageTimestamp"),
            }
            for m in messages
        ],
    }
We call the GMAIL_FETCH_EMAILS tool and trim its response down to the fields a UI actually needs.
The query argument takes regular Gmail search syntax, the same thing you'd type in Gmail's search bar. So queries like is:unread, from:someone@example.com, or has:attachment after:2026/09/01 all work.
⚠️ NOTE:
max_resultsdefaults to 1. If you leave it out, you only get a single email back, which is easy to mistake for a bug.
Setting verbose to False makes Composio fetch just the metadata (sender, subject, time, labels) concurrently, which is a lot faster. If you need the email body, set verbose and include_payload to True, or fetch a single message with GMAIL_FETCH_MESSAGE_BY_MESSAGE_ID.
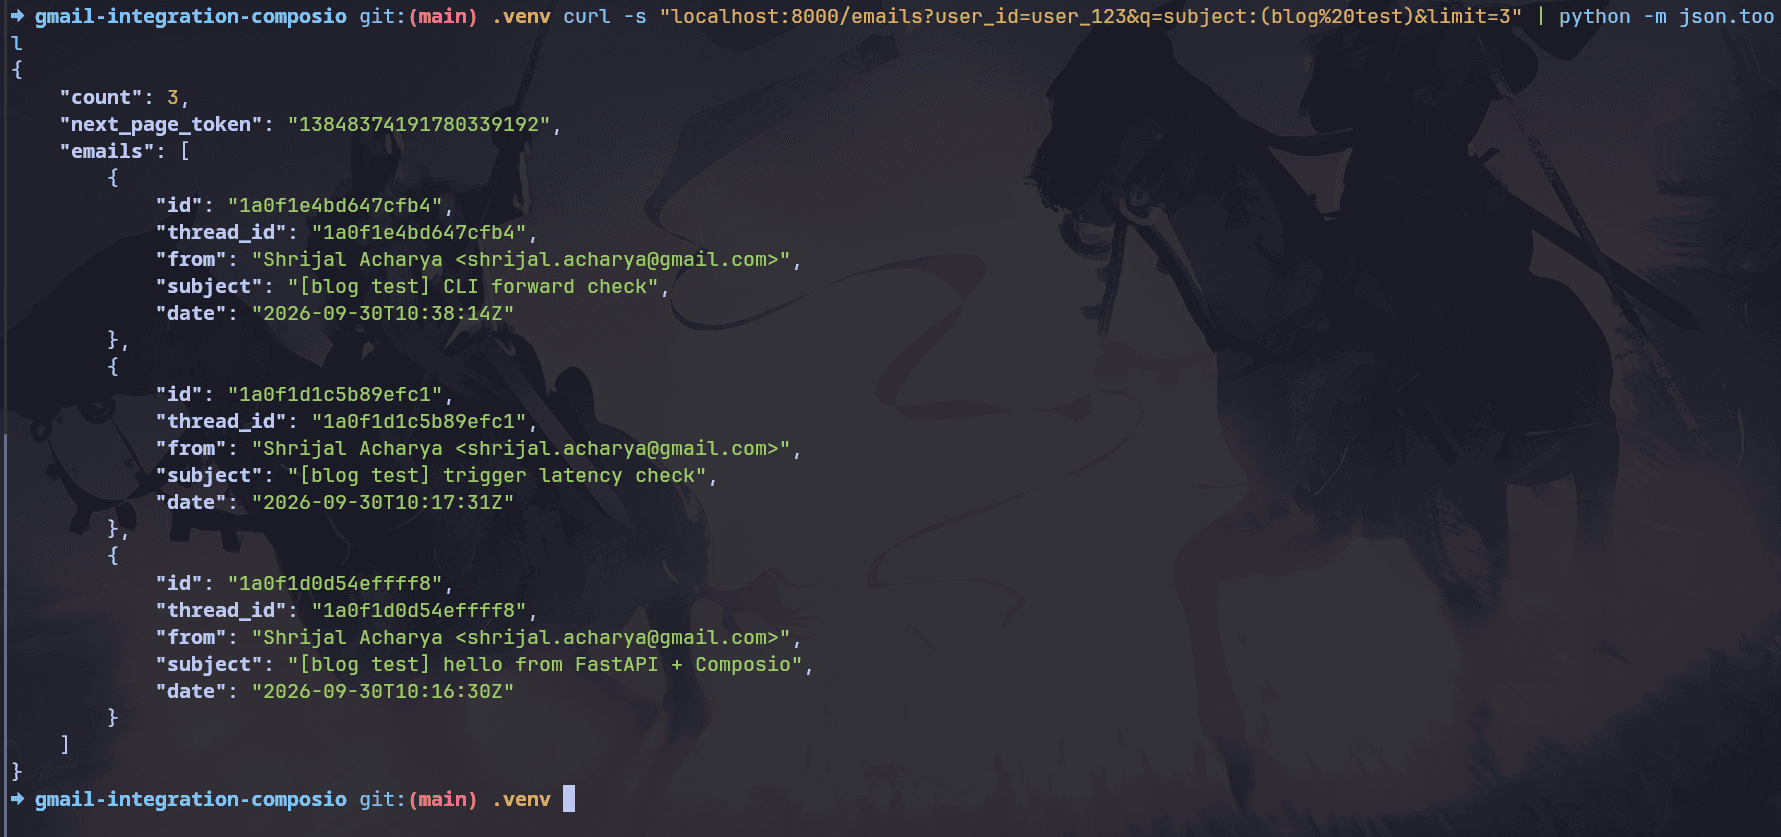
Let's test it:
curl "localhost:8000/emails?user_id=user_123&q=is:unread&limit=3"This is roughly what you'd get back:
{
  "count": 3,
  "next_page_token": "0923...",
  "emails": [
    {
      "id": "1a0f1d1c5b89efc1",
      "thread_id": "1a0f1d1c5b89efc1",
      "from": "Jane Doe <jane@example.com>",
      "subject": "Quick question about the demo",
      "date": "2026-09-30T10:15:28Z"
    }
  ]
}
Need pagination? The tool also accepts a page_token argument. Add it as a query parameter.
Step 6: Send an email (or just save a draft)
Sending is one tool call. Add the following to main.py:
# 👇 main.py

# ...rest of the code

class EmailIn(BaseModel):
    to: str
    subject: str
    body: str
    is_html: bool = False
    draft_only: bool = False


@app.post("/send")
def send_email(user_id: str, email: EmailIn):
    slug = "GMAIL_CREATE_EMAIL_DRAFT" if email.draft_only else "GMAIL_SEND_EMAIL"
    data = run_tool(
        user_id,
        slug,
        {
            "recipient_email": email.to,
            "subject": email.subject,
            "body": email.body,
            "is_html": email.is_html,
        },
    )
    return {"action": "draft" if email.draft_only else "sent", "result": data}
The same endpoint either sends the email with GMAIL_SEND_EMAIL or saves it as a draft with GMAIL_CREATE_EMAIL_DRAFT, based on the draft_only flag. Both tools take the same arguments.
The draft option is more useful than it might seem. If you're building anything AI-powered, creating a draft and letting the user review before sending is a much safer default than sending on their behalf.
Let's save a draft first:
curl -X POST "localhost:8000/send?user_id=user_123" \
  -H "content-type: application/json" \
  -d '{"to":"you@example.com","subject":"Hello from FastAPI","body":"It works.","draft_only":true}'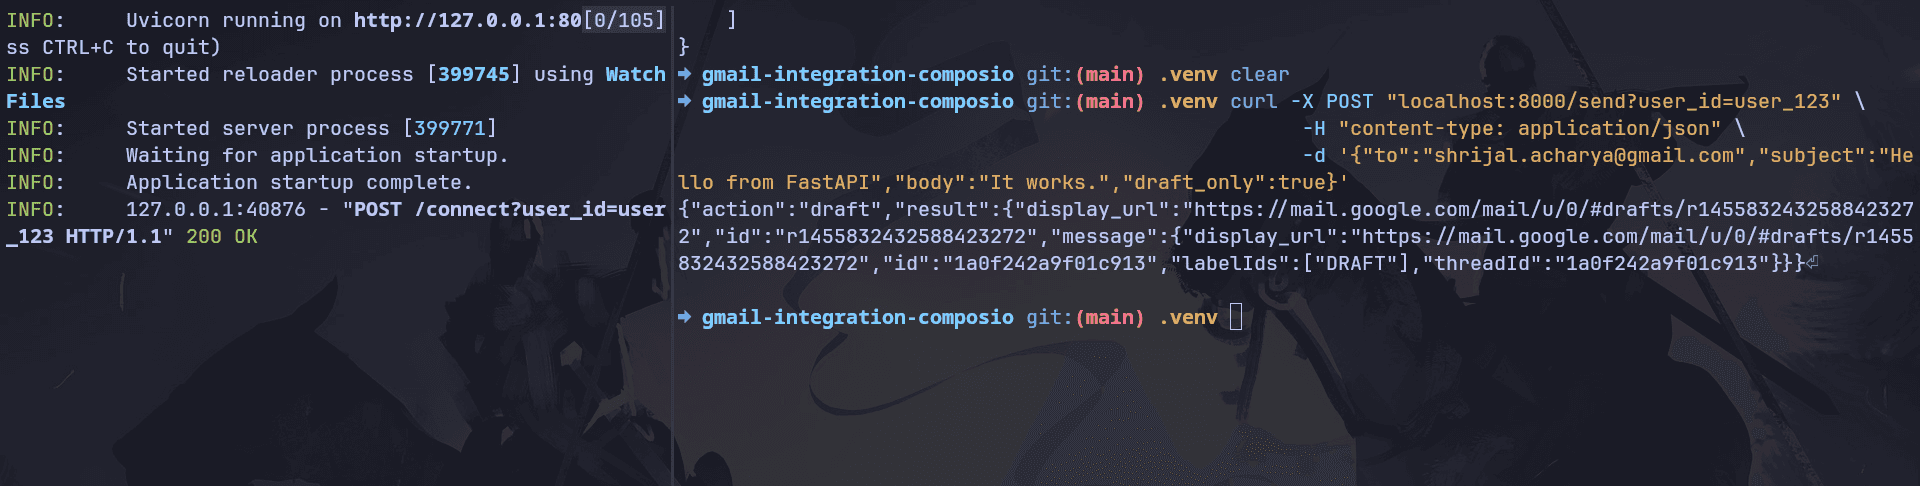
If you check your Gmail drafts folder, the draft should be there.

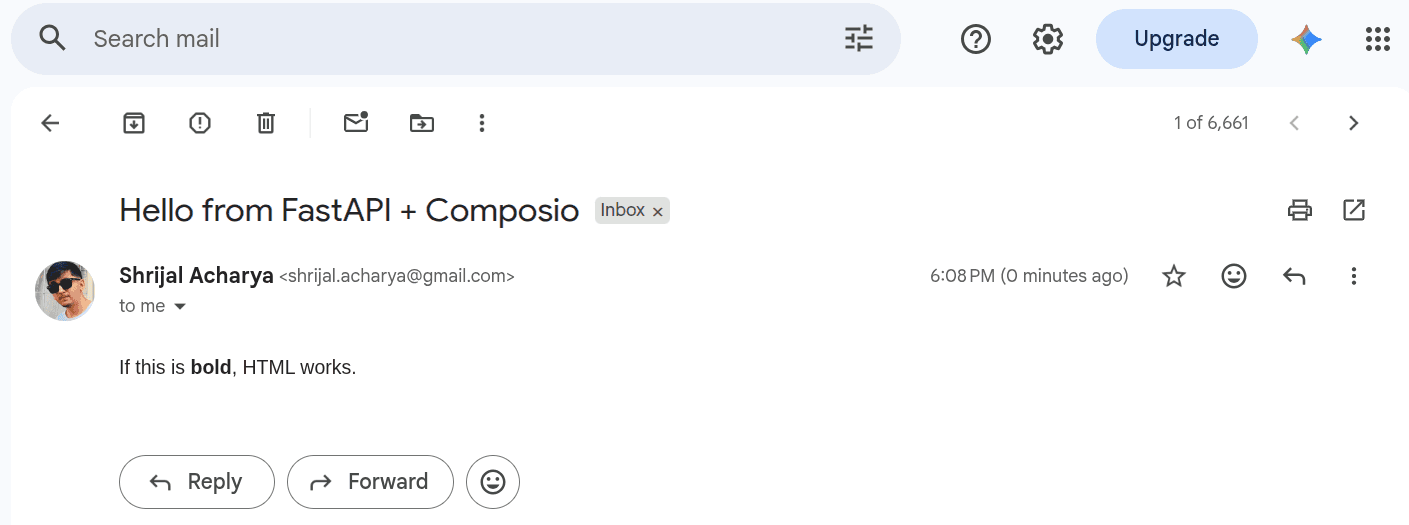
Now let's send a real one. Send it to your own address, since we'll use this email again in the next step:
curl -X POST "localhost:8000/send?user_id=user_123" \
  -H "content-type: application/json" \
  -d '{"to":"you@example.com","subject":"Hello from FastAPI + Composio","body":"<p>If this is <b>bold</b>, HTML works.</p>","is_html":true}'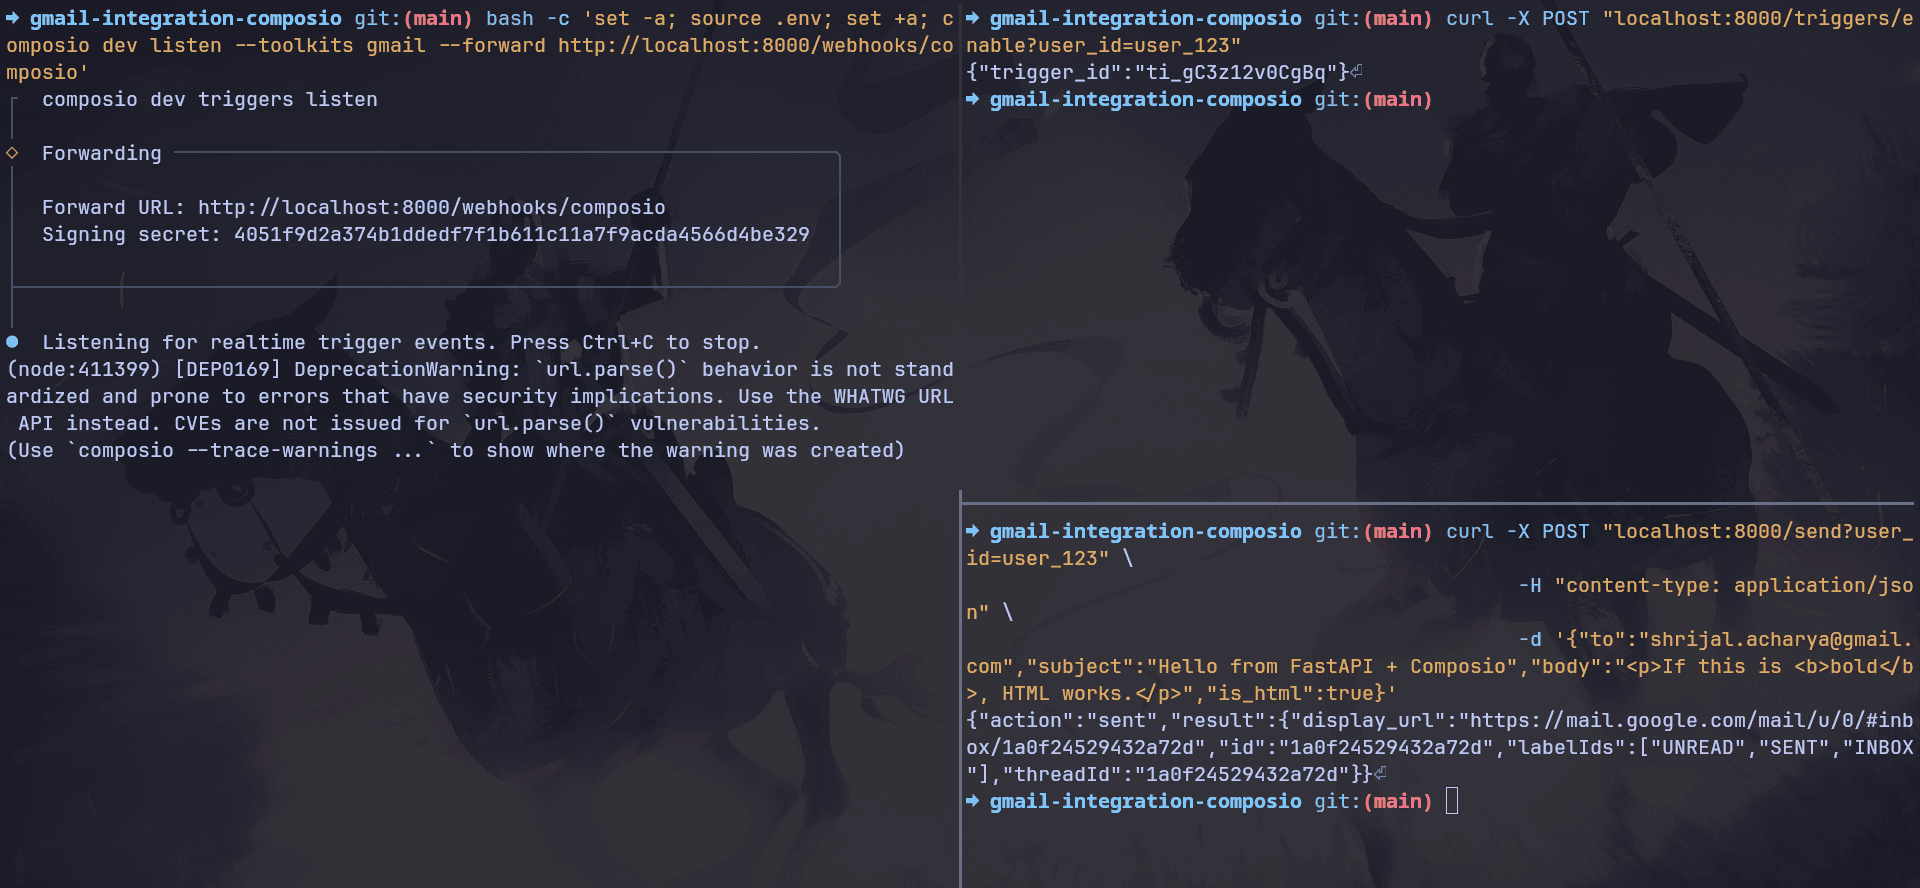
This is roughly what you'd get back:
{
  "action": "sent",
  "result": {
    "id": "1a0f1d0d54effff8",
    "threadId": "1a0f1d0d54effff8",
    "labelIds": ["UNREAD", "SENT", "INBOX"]
  }
}
⚠️ NOTE: Sending is irreversible, and sends are not retried automatically.
Step 7: React to new emails with triggers
Reading emails on demand is useful, but most real features need to know when an email arrives.
This is where triggers come in. Composio watches the user's inbox for us and sends a signed webhook to our app whenever a new email arrives.
This has two parts: turning on the trigger for a user and receiving the events.
Turn on the trigger
Add the following to main.py:
# 👇 main.py

# ...rest of the code

@app.post("/triggers/enable")
def enable_new_email_trigger(user_id: str):
    # Without connected_account_id, Composio uses this user's active Gmail connection.
    trigger = composio.triggers.create(
        "GMAIL_NEW_GMAIL_MESSAGE",
        user_id=user_id,
        trigger_config={"labelIds": "INBOX"},
    )
    return {"trigger_id": trigger.trigger_id}
GMAIL_NEW_GMAIL_MESSAGE fires for every new email that matches the config.
💡 QUICK TIP: You can pass a
queryintrigger_configinstead oflabelIds, using the same Gmail search syntax as before.
Receive the events
Composio signs every webhook, so we verify the signature before trusting anything in it. Add the following to main.py:
# 👇 main.py

# ...rest of the code

@app.post("/webhooks/composio")
async def composio_webhook(request: Request):
    try:
        event = composio.triggers.parse(
            body=await request.body(),  # raw bytes, or the signature won't match
            headers=request.headers,
            verify_secret=os.environ["COMPOSIO_WEBHOOK_SECRET"],
        )
    except (ValidationError, WebhookPayloadError, WebhookSignatureVerificationError):
        raise HTTPException(401, "Invalid webhook")

    envelope = event["raw_payload"]

    # Delivery is at-least-once. Dedupe on the envelope ID.
    event_id = envelope.get("id")
    if event_id in seen_event_ids:
        return {"ok": True, "duplicate": True}
    seen_event_ids.add(event_id)

    event_type = envelope.get("type")

    if event_type == "composio.connected_account.expired":
        # Token revoked or expired. Send this user back through /connect.
        account = envelope["data"]
        print(f"[expired] {account['toolkit']['slug']} connection for user {account['user_id']}")
        return {"ok": True}

    if event_type == "composio.trigger.message":
        trigger = event["payload"]
        if trigger["trigger_slug"] == "GMAIL_NEW_GMAIL_MESSAGE":
            email = trigger["payload"] or {}
            print(
                f"[new email] user={trigger['user_id']} "
                f"from={email.get('sender')} subject={email.get('subject')!r}"
            )
            # Hand real work off to a queue and return 2xx fast.

    return {"ok": True}
A few things are worth explaining here:
composio.triggers.parse()verifies the signature and turns the raw request into a normalised event. Pass it the raw body, not the parsed JSON.composio.connected_account.expired****. When a user revokes access or their token dies, Composio tells you. That's your signal to show a "Reconnect Gmail" prompt instead of failing silently.The new-email payload includes fields like
sender,subject,message_text,thread_id, andmessage_id. That's usually enough to act on the email without another API call.
Register your webhook URL
Composio needs to know where to send events. That's a one-time setup per project, so let's put it in its own script. Create setup_webhook.py:
# 👇 setup_webhook.py

"""One-time setup: register this app's webhook URL with Composio.

Run once per project (and again whenever the public URL changes):
    python setup_webhook.py <https://your-app.example.com>
"""

import json
import sys

from composio import Composio
from dotenv import load_dotenv

load_dotenv()
composio = Composio()

if len(sys.argv) != 2:
    sys.exit("usage: python setup_webhook.py <public-base-url>")

subscription = composio.triggers.set_webhook_subscription(
    webhook_url=f"{sys.argv[1].rstrip('/')}/webhooks/composio",
    enabled_events=[
        "composio.trigger.message",
        "composio.connected_account.expired",
    ],
)
print(f"Webhook URL: {subscription['webhook_url']}")
print(f"Add this to .env -> COMPOSIO_WEBHOOK_SECRET={subscription['secret']}")

# Print the trigger's config schema so you can check the field names
trigger_type = composio.triggers.get_type("GMAIL_NEW_GMAIL_MESSAGE")
print("\nGMAIL_NEW_GMAIL_MESSAGE config schema:")
print(json.dumps(trigger_type.config, indent=2))
Run it with your app's public URL:
python setup_webhook.py https://your-app.example.comIt prints a webhook secret. Paste it into .env as COMPOSIO_WEBHOOK_SECRET and restart the server.
ℹ️ For this post, I tested the trigger flow locally with the Composio CLI (covered just below), which forwards real trigger events to your app signed with your webhook secret. In production, Composio POSTs the same signed events straight to the URL you registered here, so the handler works as is. Just make sure your server is reachable over HTTPS.
⚠️ NOTE: By default, the webhook subscription only includescomposio.trigger.messageevents. If you want the connection-expired events too, you have to ask for them explicitly withenabled_events, like we do above. This one is easy to miss.
ℹ️ There's one webhook subscription per Composio project, so running this again replaces the existing URL. If you share a project between environments, give each environment its own project.
Testing it locally
Your laptop doesn't have a public URL, so Composio can't reach localhost directly. You have two options:
Use the Composio CLI (Recommended). It listens for your project's events and forwards them to your local server, signed with the
COMPOSIO_WEBHOOK_SECRETin its environment:composio login composio dev init # links this directory to a Composio project set -a; source .env; set +a # so the CLI signs with the same secret as your app composio dev listen --toolkits gmail --forward <http://localhost:8000/webhooks/composio>
⚠️ NOTE:
composio dev initlinks the directory to a project, and it has to be the same project yourCOMPOSIO_API_KEYbelongs to. Otherwise, the CLI listens to the wrong project, and you'll be waiting for events that never show up. It also writes a.env.localwith a CLI API key, so add that to your.gitignore.
Use a tunnel like ngrok or cloudflared, and run
setup_webhook.pywith the tunnel URL.
With one of those running, turn on the trigger:
curl -X POST "localhost:8000/triggers/enable?user_id=user_123"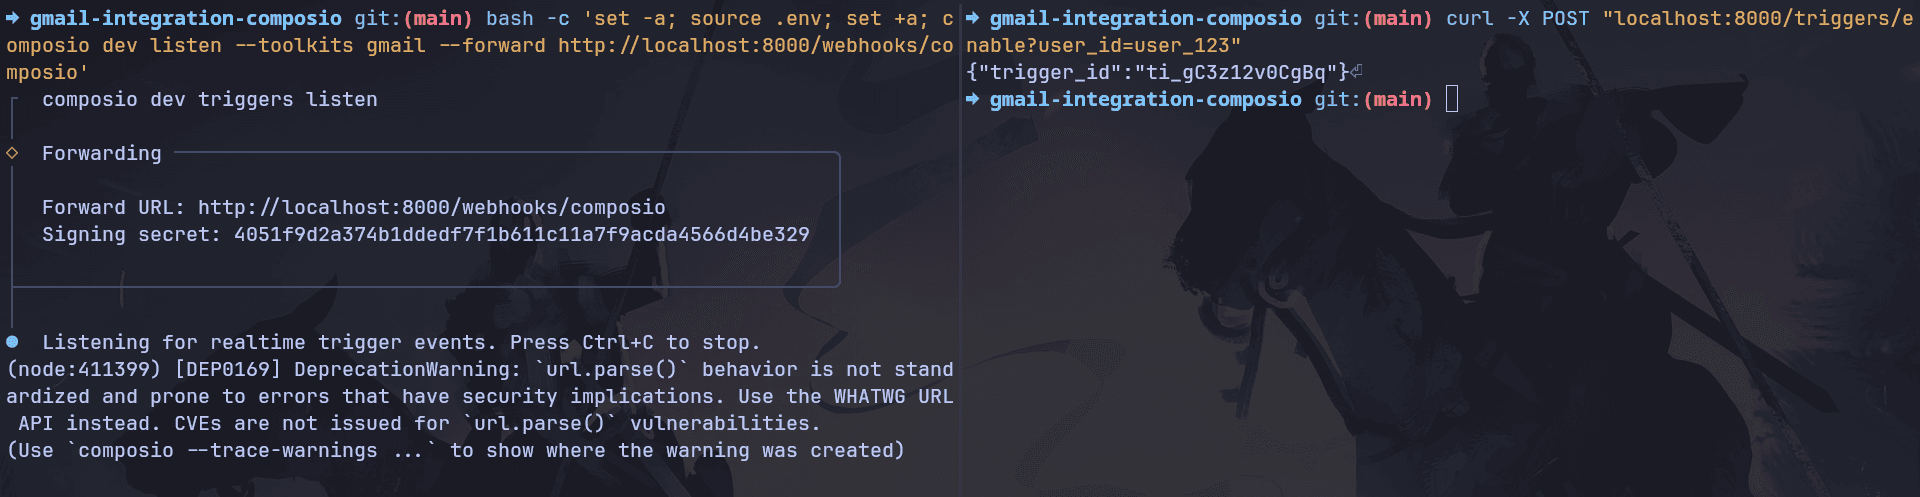
{ "trigger_id": "ti_..." }Now send yourself an email (the curl command from Step 6 works) and watch your server logs:
[new email] user=user_123 from=You <you@gmail.com> subject='Hello from FastAPI + Composio'
INFO:     127.0.0.1:34540 - "POST /webhooks/composio HTTP/1.1" 200 OK
ℹ️ Triggers are polling-based, so events aren't instant. In my testing, a new email reached the webhook in anywhere from about 40 to 75 seconds. The trigger polls every 2 minutes by default, and Composio managed auth can enforce a longer minimum interval. So it works well for "do something when an email arrives", but it's not a good fit for anything that needs to react instantly.
And that's it! You now have a working Gmail integration that can connect accounts, read and send emails, and react to new ones. 🎉
Going to production
Everything above works, and you can ship it as your v1. But managed auth comes with trade-offs, and you should know them before you commit.
What you're trading off
Composio managed auth | Your own Google OAuth app | |
|---|---|---|
Google verification + CASA | Not on you | On you, every year |
Setup time | Minutes | Weeks to months |
Consent screen shows | "Composio" | Your app's name and logo |
Scopes | Fixed defaults | Whatever you get verified for |
Google API quota | Shared across Composio users | Dedicated to you |
Trigger polling | Can have a longer minimum interval | Configurable |
Here's what those mean in practice:
Branding. Your users see "Composio wants to access your Google Account." For internal tools, prototypes, and early users, that's usually fine. For a consumer product, it might feel odd. You can white-label the Connect Link page with your logo, but not Google's own consent screen.
Fixed scopes. You get the default scope set. If you need something beyond it, like
gmail.settings.basicfor managing filters, managed auth can't request it.Your data path. Email content flows through Composio's infrastructure when you call tools.
When to bring your own OAuth app
The good part is that you don't have to rewrite anything to switch. When you outgrow managed auth, you create your own Google OAuth app, add it to Composio as an auth config, and pass its ID when you create the session:
composio.create(
    user_id=user_id,
    toolkits=["gmail"],
    auth_configs={"gmail": "ac_your_auth_config_id"},
)
Every endpoint we built keeps working as it is. Composio still stores and refreshes the tokens for you.
Keep in mind that it's now your OAuth app, so Google verification and the annual CASA assessment become your responsibility again. The difference is that you go through it after you know people actually want the feature, not before, which is a much better time to spend a few weeks on compliance.
Where Composio fits
We built a Gmail integration here, but Gmail is rarely the only app your users care about. Sooner or later, they'll ask for Google Calendar, Slack, Notion, or Linear too.
You could build each of those yourself. That means registering an OAuth app for each one, going through each provider's review, storing and refreshing tokens, and keeping up with every API change.
Or you can use the same pattern from this post. Composio gives you 1,500+ toolkits, and most include managed auth. Adding Google Calendar to this app is just one more entry in the list:
composio.create(user_id=user_id, toolkits=["gmail", "googlecalendar"])The rest stays the same. You use the same authorize() and execute() calls, the same triggers, and the same webhook handler.
And if you want to put an AI agent on top, the same session can hand its tools to your agent framework, with auth already handled for each user. So you can focus on the parts of your product that are unique, while Composio handles the integrations.
Conclusion
Shipping Gmail should not start with weeks of OAuth and compliance work. With managed auth, you can get the integration working first and deal with your own OAuth setup later, when you actually need it
With Composio's managed auth, we built a Gmail integration that connects accounts, reads the inbox, sends emails, and reacts to new emails, all in a single FastAPI file. We didn't need a Google Cloud project, and we didn't have to handle verification or CASA. A big relief!
You can find the entire source code here: composio-integration-fastapi
If you find a bug or want to improve something, feel free to open an issue or PR.
That's all for this one. I'll see you in the next one. ✌️
FAQ
Do I need a Google Cloud project for this?
No. With managed auth, Composio owns the Google OAuth app. You only need a Composio API key.
Does Google verification still happen somewhere?
Verification applies to the owner of the OAuth app, and here that's Composio, not you. That's why you don't need to submit anything. The moment you switch to your own OAuth app, verification and CASA become your responsibility.
What do my users see on the consent screen?
Google's consent screen lists Composio as the app requesting access. You can brand the Connect Link page with your own logo, but changing the name on Google's consent screen needs your own OAuth app.
Which Gmail permissions does the managed app get?
In my testing, the connection was granted https://mail.google.com/ (full mailbox access) plus basic profile and email. The consent screen also requests some contacts and profile scopes.
Can I ask for fewer scopes, like send-only?
Not with managed auth. The scopes are fixed. For a custom scope set, create your own OAuth app and pass it as an auth config.
How fast do new-email triggers fire?
They're polling-based. In my tests, events arrived in about 40 to 75 seconds. Expect a delay of around a minute, and don't rely on triggers for anything that needs to be instant.
What happens when a user revokes access?
The connection expires, tool calls start failing, and Composio sends a composio.connected_account.expired webhook if you subscribed to it. Send the user back through /connect to reconnect.
How much does it cost?
Composio's free Hobby plan includes 100K tool calls a month. With managed auth apps, up to 20K of those are free, and after that, it's $0.0005 per tool call. Check the pricing page for current numbers.
Can I build this with Node.js instead?
Yes. The TypeScript SDK (@composio/core) has the same concepts: composio.create(userId), session.authorize("gmail", { callbackUrl }), session.execute(...)and webhook verification. Everything in this post maps over directly.

 Get started