How to connect multiple Stripe accounts to Claude

Connect two or more Stripe accounts to Claude with Composio. Give each account a name, check the connections, and tell Claude which one to use.

Stripe logoStripe
Api KeyOauth2

Stripe is a global online payments platform offering APIs for managing payments, customers, and subscriptions. Trusted by businesses for secure, efficient, and scalable payment processing worldwide.

415 Tools7 Triggers

Introduction

Claude's built-in Stripe connector works well if you use one Stripe account. But when you connect a second account, it replaces the first.

If you manage separate Stripe accounts for different products, regions, or business units, that quickly becomes frustrating.

Composio fixes this by keeping each Stripe account separate and giving it a simple name, such as main, eu-store, or test. Claude can then use the right Stripe account when you mention that name.

What you'll end up with

  • One Composio connector in Claude
  • Two or more Stripe accounts connected behind it
  • A clear name for each account
  • The ability to work in the right Stripe account from a single Claude chat

For example:

Search my main and eu-store Stripe accounts for failed payments from the last 14 days. Tell me which account each payment came from.

Using the main account, list all unpaid invoices with the customer name, amount, and due date.

Before you start

  • A Claude account
  • A free Composio account
  • Access to each Stripe account you want to connect

If you use Claude Free, you can have one custom connector. If you already use that slot, you will need to remove the existing custom connector first.

If you use Claude Team or Enterprise, an Owner may need to add the connector for the organisation. Each member can then connect their own accounts.

Connect multiple Stripe accounts to Claude

Step 1: Add Composio to Claude (one-time process)

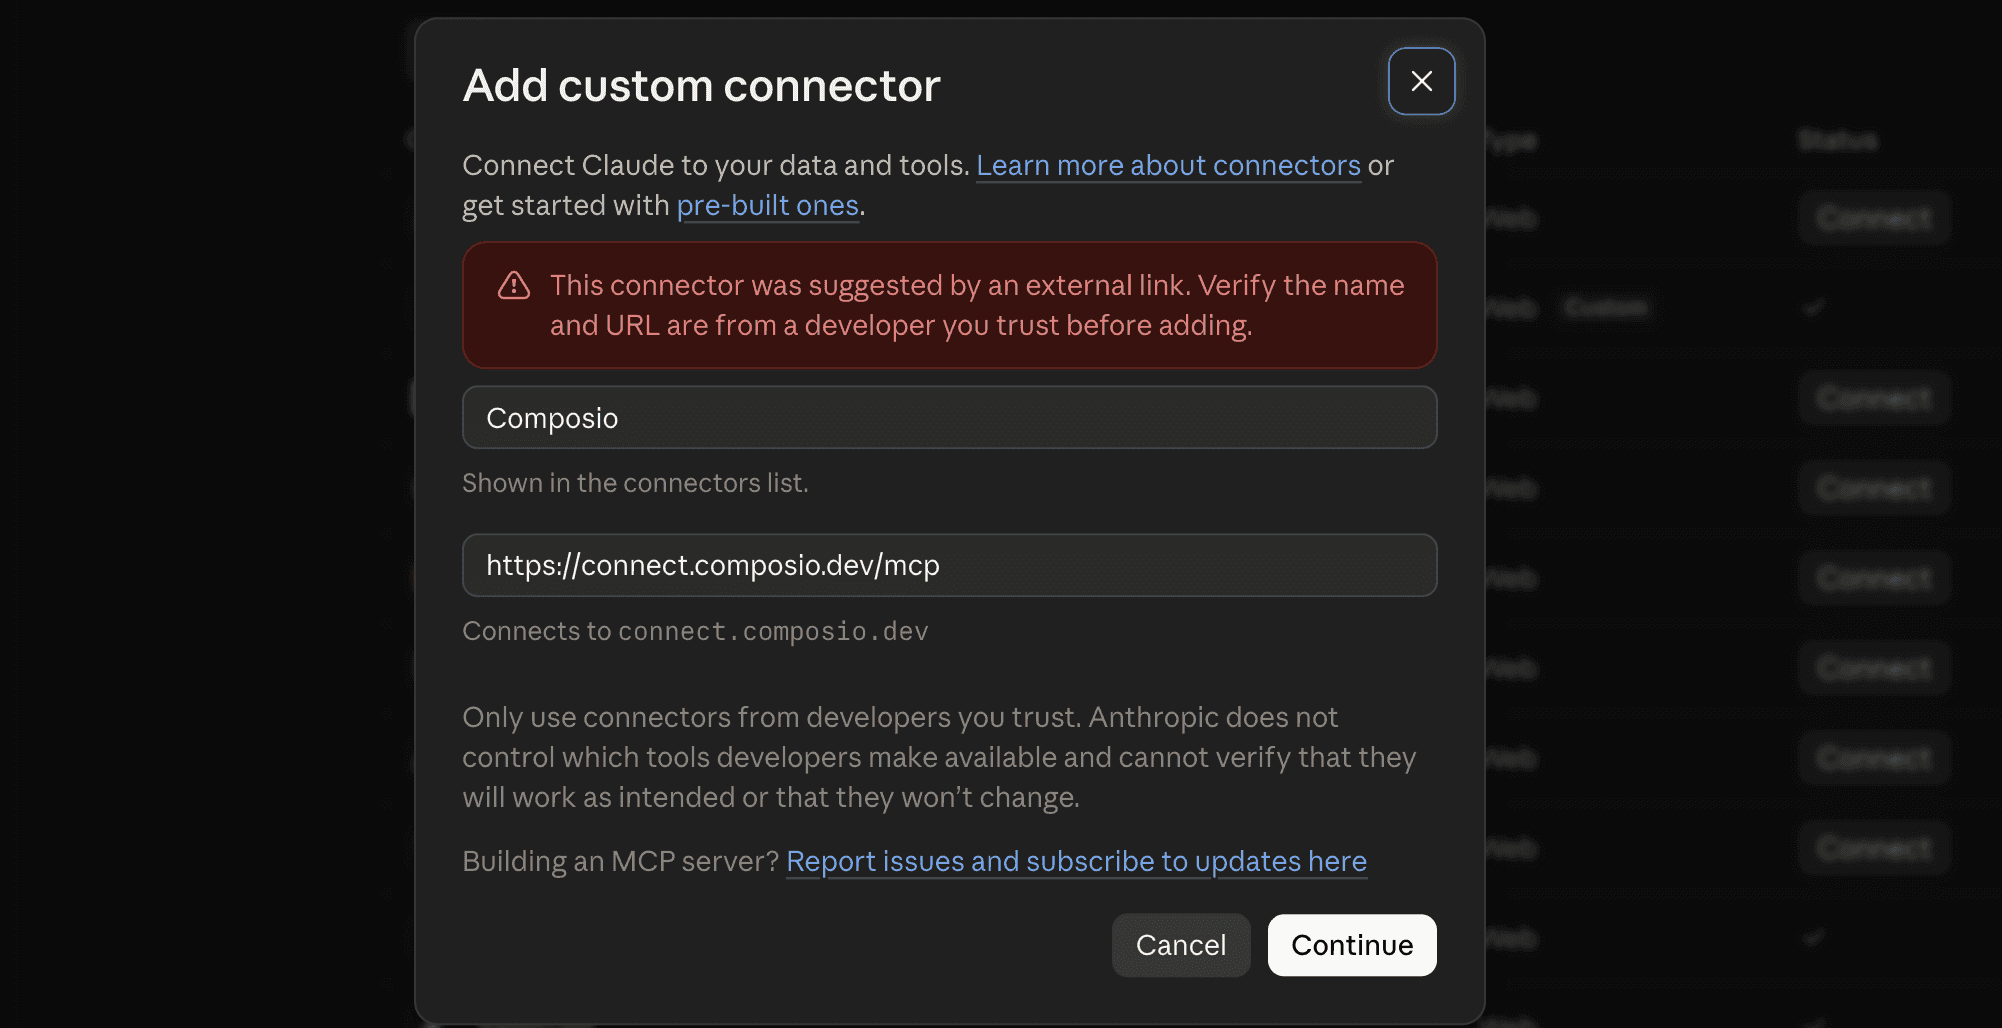
  1. Click the button below. This will take you to the Claude Custom Connector modal.

Add to Claude

  1. Click Continue
Claude's Add custom connector dialog with the Composio name and MCP URL filled in
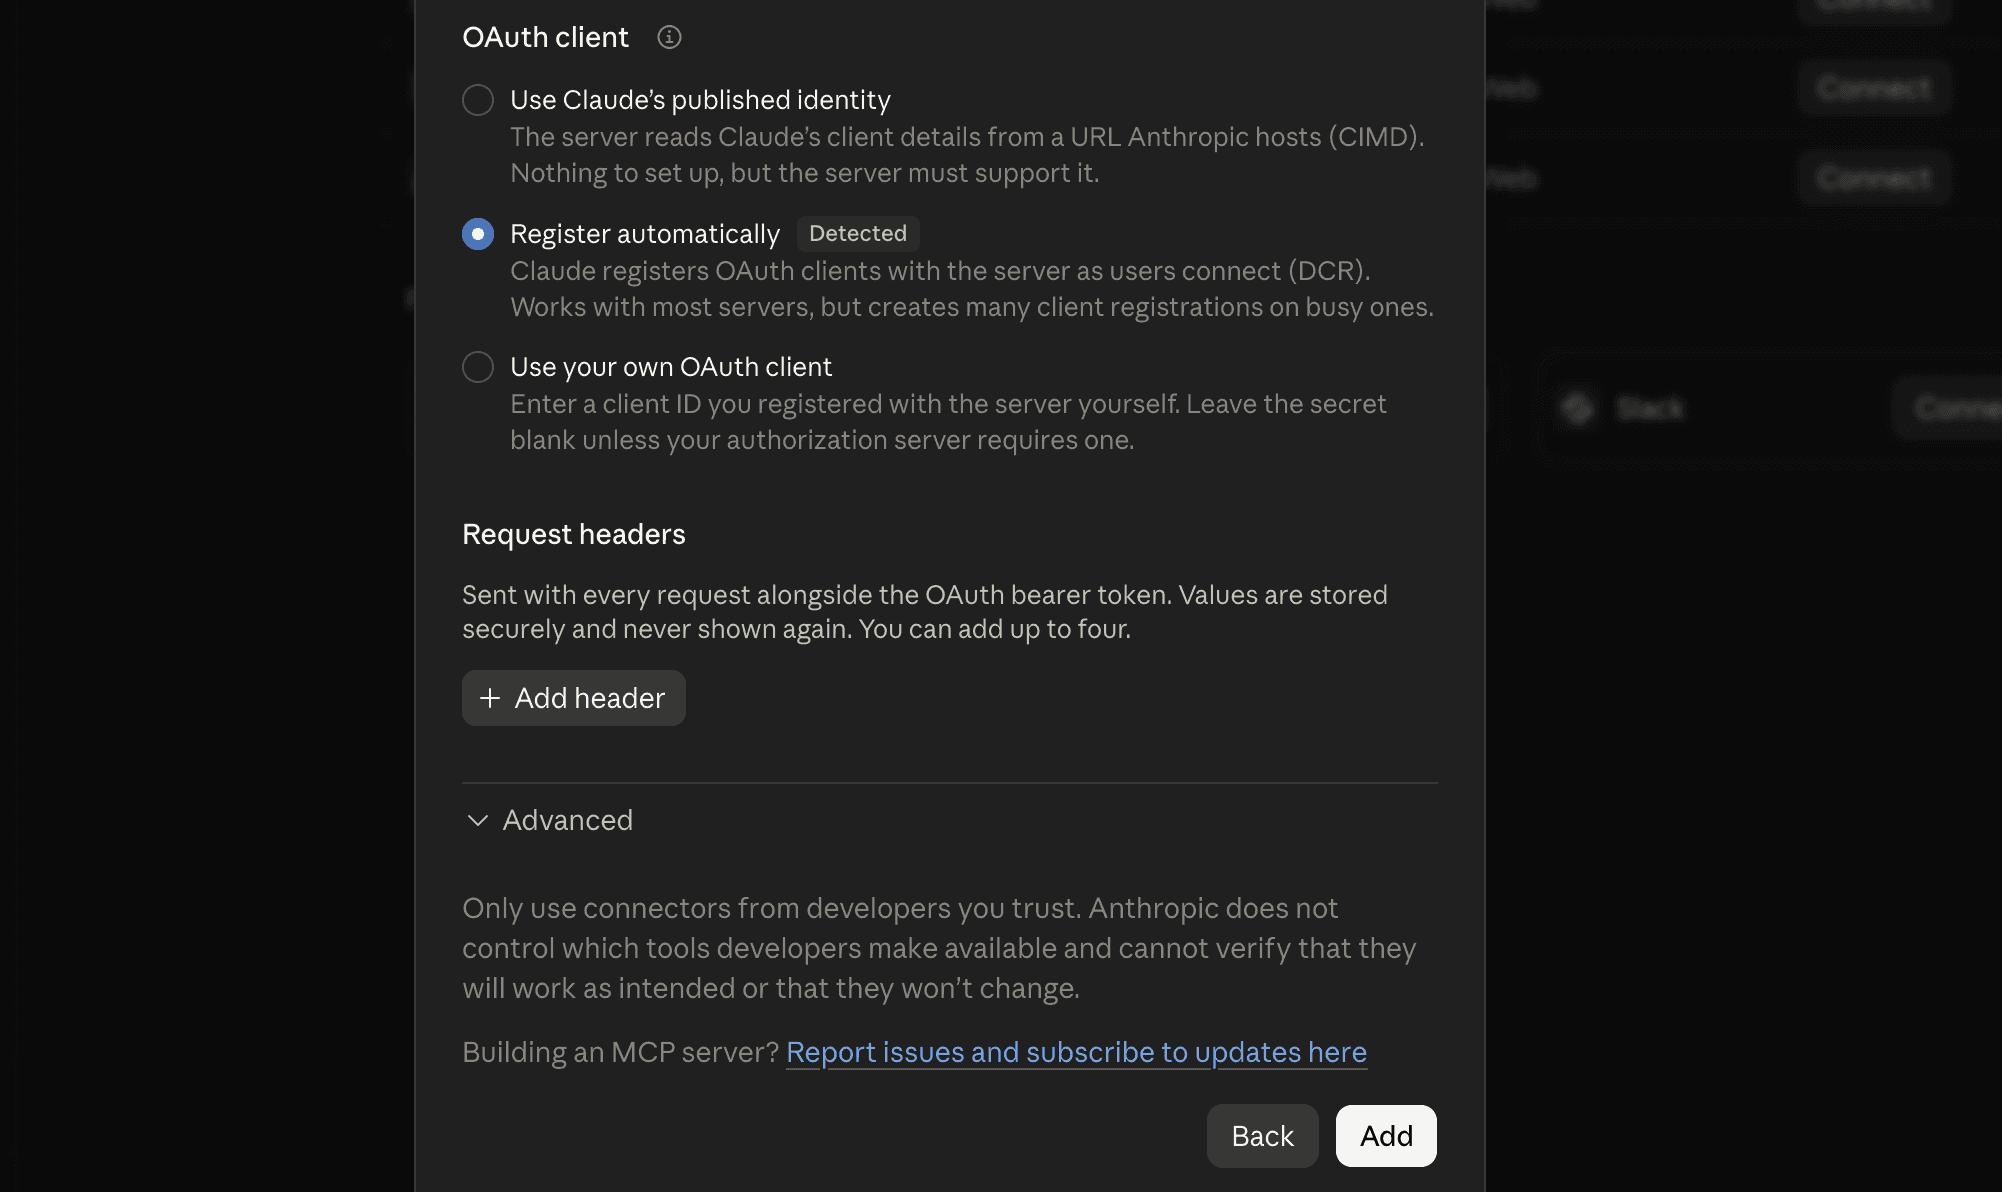
  1. In the next modal, click Add
Second step of the Add custom connector dialog with the Add button
  1. It will take you to the authentication page. Sign in to Composio and approve the connection.
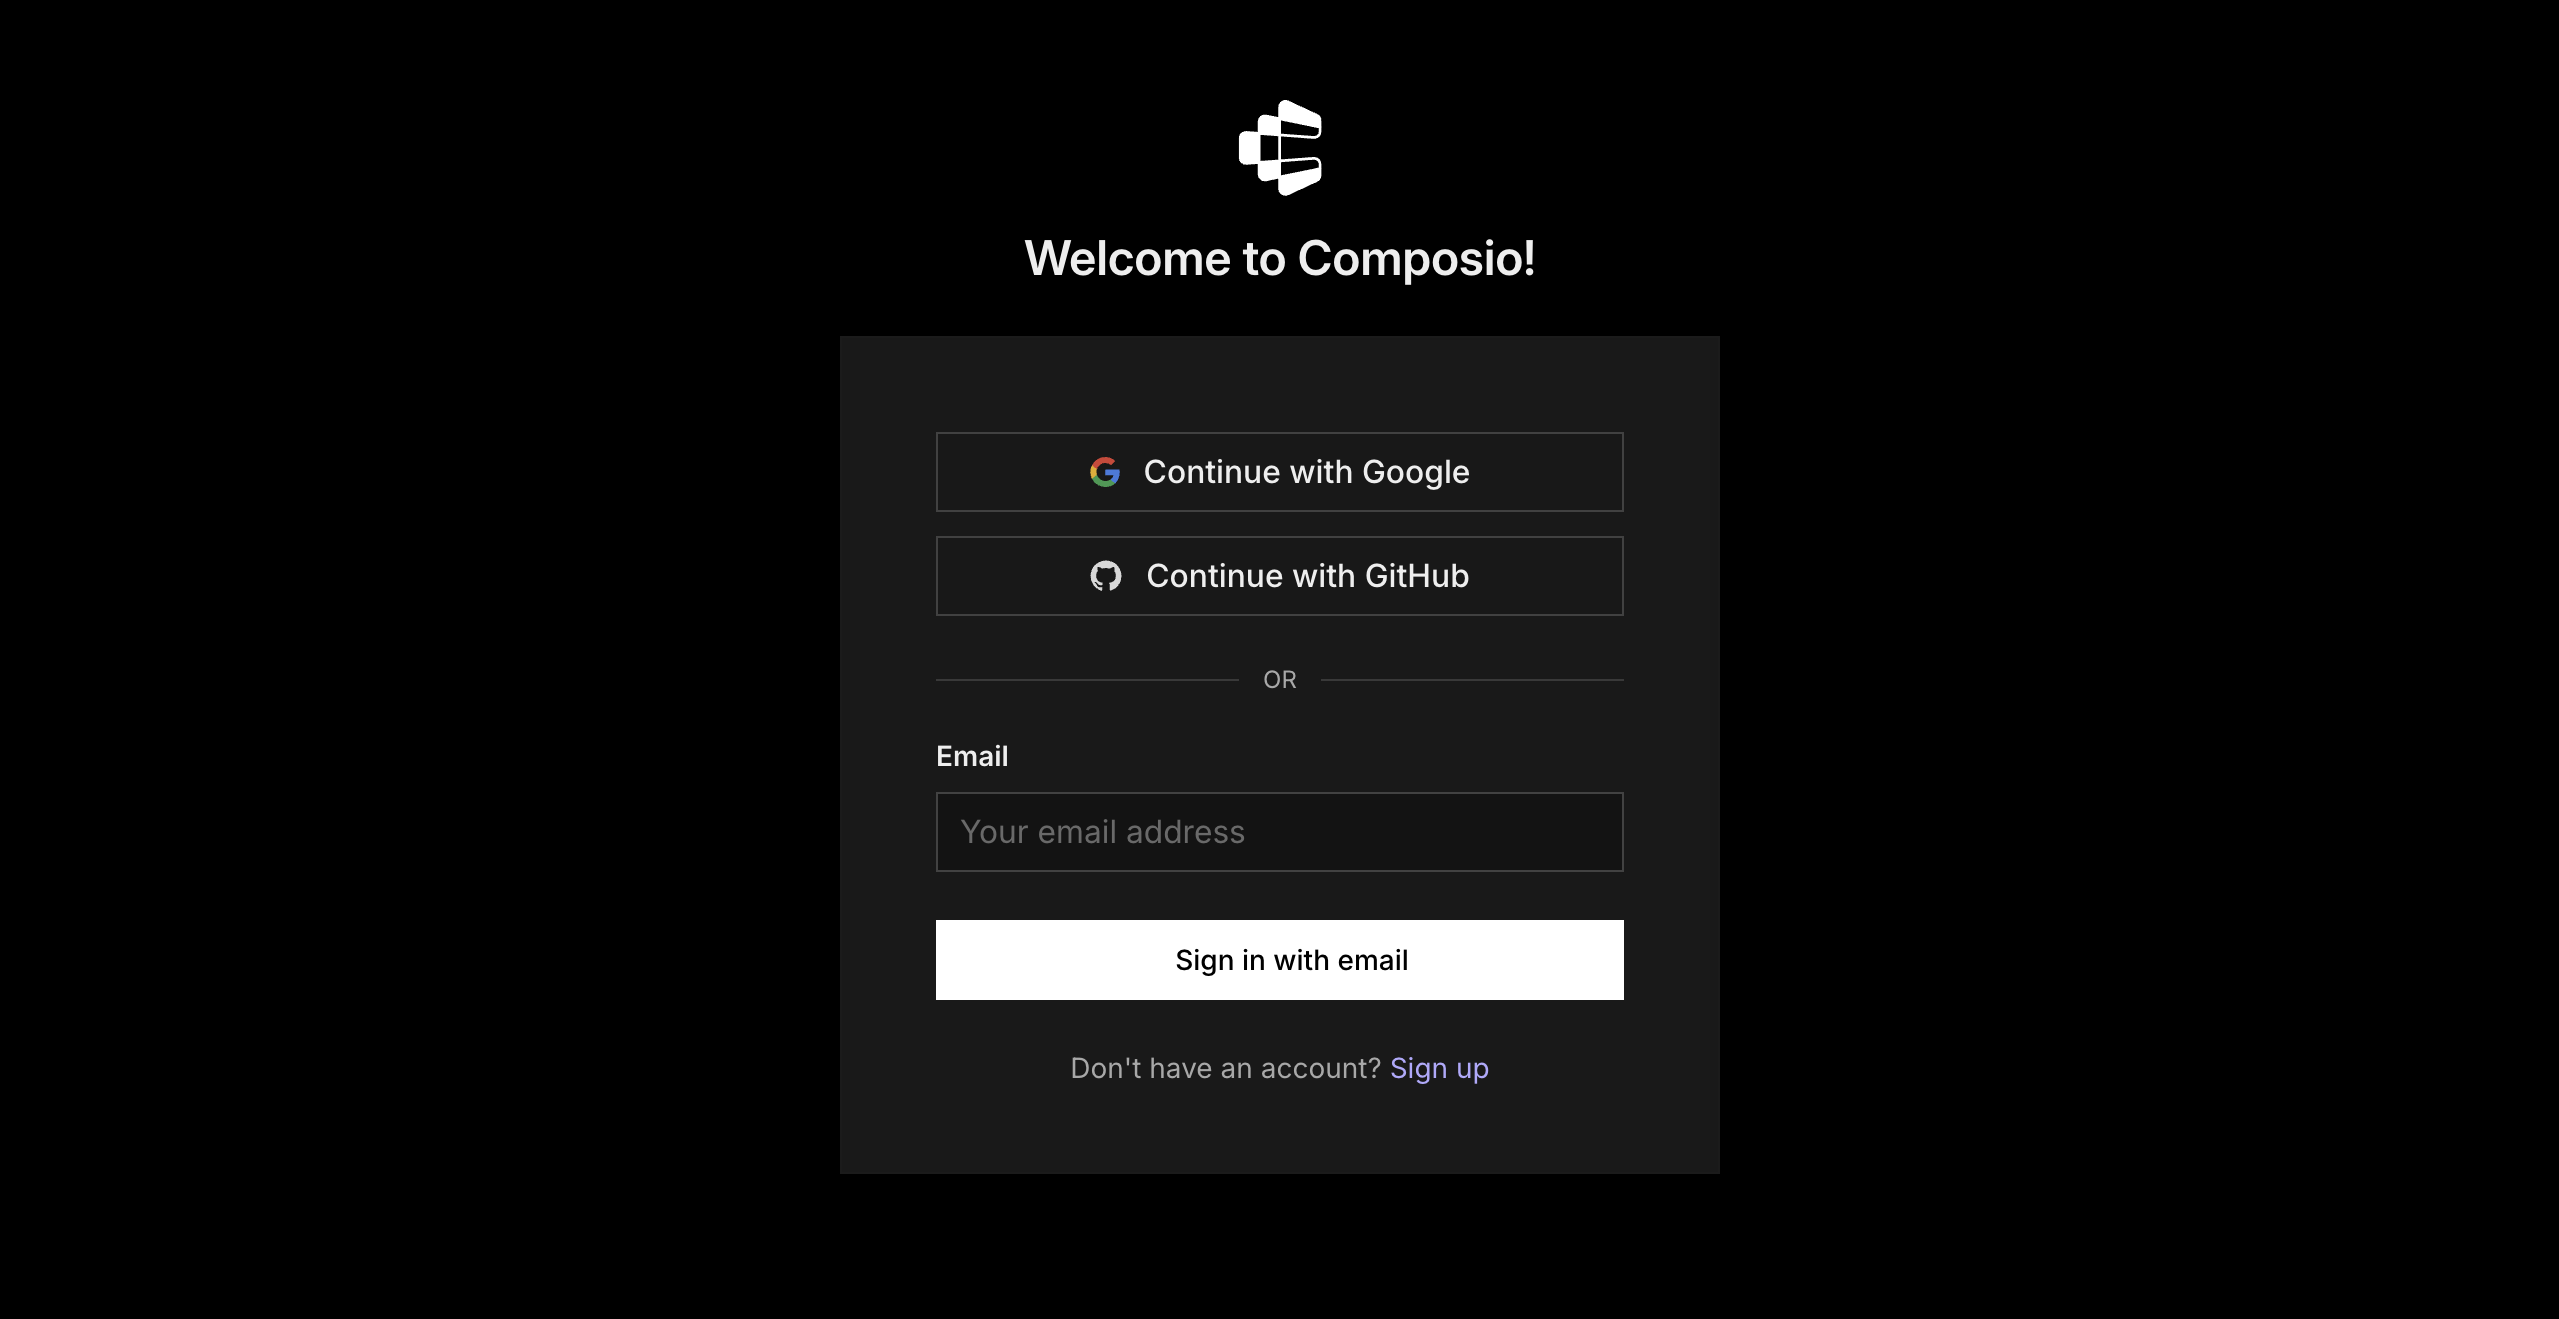
Composio sign-in page with Google, GitHub, and email options

Then return to Claude and make sure Composio is enabled.
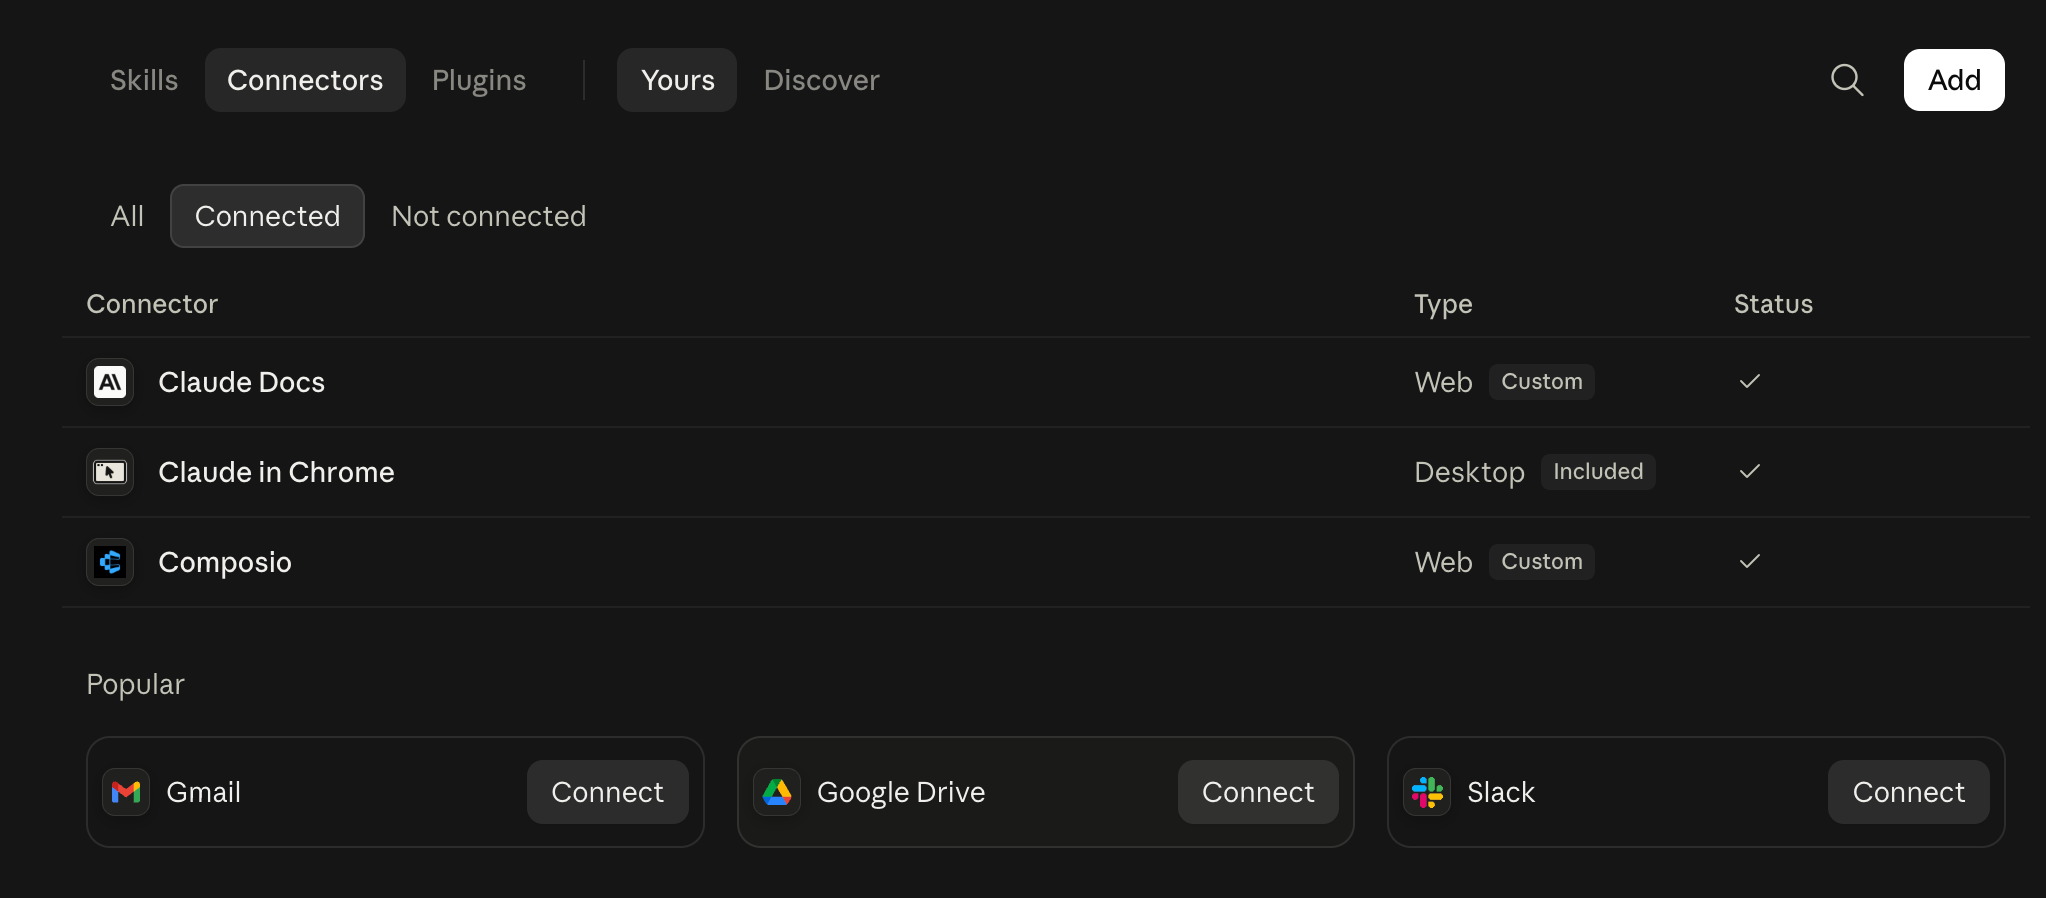
Claude connectors list showing Composio as a connected custom connector

Step 2: Connect your first Stripe account

In a new Claude chat, type:

Connect my main Stripe account to Composio. Call it main.

Claude will give you a sign-in link.

  1. Click the link.
  2. Sign in to your main Stripe account.
  3. Review and approve Stripe's permission request.
  4. Return to Claude.

Claude should confirm that the account is connected.

The name main is how Claude knows which Stripe account to use. Choose short, obvious names. Good examples include:

  • main
  • eu-store
  • test

Step 3: Connect your second Stripe account

In the same Claude chat, type:

Connect another Stripe account. Call it eu-store.

Claude will give you a new sign-in link.

  1. Open the link.
  2. Sign in to the second Stripe account.
  3. Review and approve Stripe's permission request.
  4. Return to Claude.

Claude should confirm that eu-store is connected.

Important: Check that Stripe is showing the second account before you approve access. If the wrong account appears, sign out or open the link in an incognito or private window.

Repeat this step for every other Stripe account you want to add. Give each connection a short, descriptive name such as main, eu-store, test, or client-acme.

Step 4: Check your connected Stripe accounts

Ask Claude:

List my connected Stripe accounts in Composio. Show each account's name and connection status.

You should see every account you added, and each connection should show as ACTIVE.

For an extra check, ask:

Show the Stripe account ID and business name for each connected account.

This helps you confirm that every label points to the correct Stripe account and that you did not connect the same account twice.

Step 5: Use the right Stripe account

Mention the account name whenever you ask Claude to work with Stripe. This is especially important when an action could change data.

Review failed payments across accounts

Check main and eu-store for failed payments from the last 14 days. Group the results by account and include the customer, amount, currency, and failure reason.

Check unpaid invoices in one account

Using the main account, list unpaid invoices due in the next seven days. Include the customer, amount, and due date.

Compare payment volume

Compare successful payment volume in main and eu-store for the last 30 days. Keep totals separate by account and currency.

Find a customer across accounts

Search all connected Stripe accounts for the customer email customer@example.com. Show which account contains the customer and summarise their latest payment and invoice status.

For actions such as issuing refunds, cancelling subscriptions, or changing customer data, ask Claude to show you the planned action first and wait for your confirmation.

Make account selection more reliable

Add this to your Claude preferences or project instructions, replacing the examples with your own account names:

My Stripe accounts are: main = our primary production account, eu-store = our European storefront, and test = our sandbox account. Always use the named account when I specify one. If I do not name an account, ask me which one to use. Before issuing a refund, cancelling a subscription, or changing customer data, show me the planned action and wait for confirmation.

If Claude's built-in Stripe connector is also enabled, Claude may use it instead of Composio. For a clearer setup, turn off the built-in connector or explicitly tell Claude to use Stripe through Composio.

Manage accounts from the Composio dashboard

The chat method is the quickest way to connect accounts. Use the dashboard when you want to add, rename, reconnect, or remove a connection.

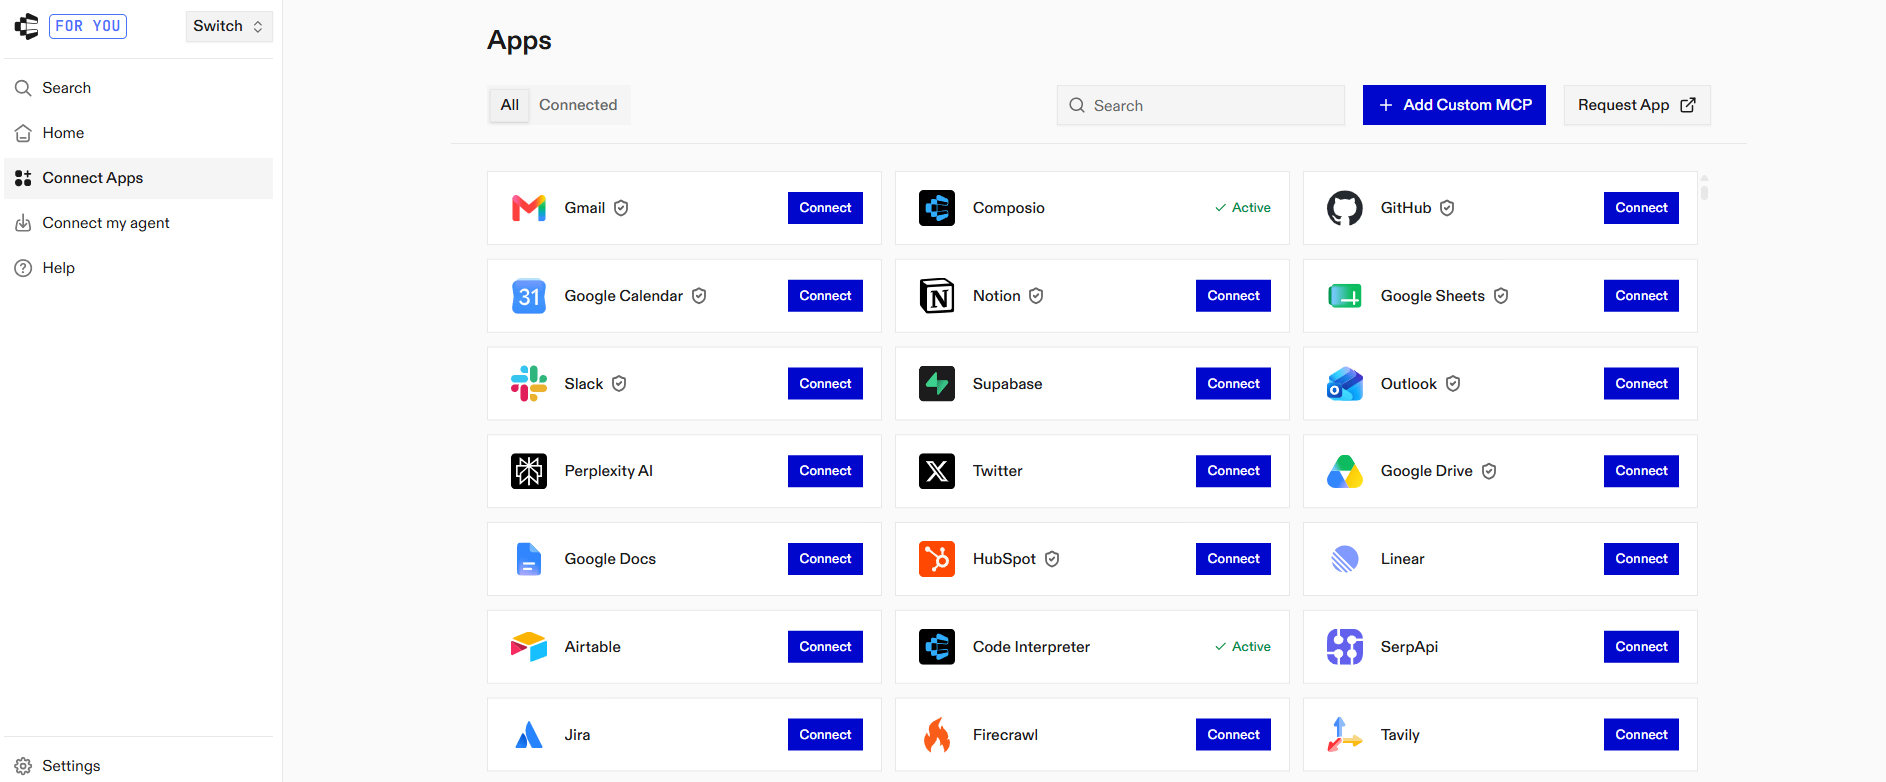
  1. Go to dashboard.composio.dev.
Composio dashboard Apps page with Connect buttons for each app
  1. Sign in with the same Composio account you connected to Claude.
  2. Open For You from the product switcher.
  3. Find Stripe.
  4. Click Connect and complete the Stripe authorisation flow.
  5. Click Connect again to add another Stripe account. Composio keeps it as a separate connection instead of replacing the first.
  6. Give each connection a clear label, such as main, eu-store, or test.

If Stripe opens the wrong account during authorisation, sign out first or use an incognito or private window.

From the dashboard, you can also:

  • Rename a connection when a default label such as stripe-2 is no longer useful.
  • Disconnect or delete an account you no longer want Claude to access.
  • Re-authorise an expired or revoked connection.

Troubleshooting

Why isn't the Composio connector appearing or staying enabled in Claude?

Open Claude's connector settings and confirm that Composio is installed and enabled for the current account or workspace. If you use Claude Team or Enterprise, a workspace Owner may need to add or approve it. If the connector was removed, add it again and sign in with the same Composio account you used before.

Why is Claude using the wrong Stripe account after I specify an account name?

Ask Claude to list your connected Stripe accounts, including each connection name, account ID, and status. Make sure your prompt uses the exact name shown in Composio. Rename vague or duplicate labels, then try again with a clear instruction such as: Use Stripe through Composio with the eu-store account.

Why is Claude using its built-in Stripe connector instead of Composio?

Turn off Claude's built-in Stripe connector, or explicitly tell Claude to use Stripe through Composio. If Claude keeps choosing the built-in connector because of earlier chat context, start a new chat and mention the Composio connection name in your first request.

Why isn't my second Stripe account appearing as a separate connection in Composio?

The second authorisation may have reopened your first Stripe account. Check the account ID for each connection in Composio. If both connections point to the same account, remove the duplicate and reconnect using an incognito or private window so you can sign in to the correct Stripe account.

Why does my Stripe connection show as expired or inactive in Composio?

Open the Composio dashboard, find Stripe, and reconnect or re-authorise the affected account. Complete Stripe's permission flow, then return to Claude and ask it to list your connections again. The account should now show as ACTIVE.

FAQ

Frequently asked questions

Yes. Repeat the same connection process for each Stripe account and give every connection a unique name, such as main, eu-store, or client-acme.

No. You add Composio to Claude once. Composio then manages the individual Stripe connections behind that single connector.

Claude uses the connection name you provide. Include that exact name in your prompt, for example: Use the eu-store Stripe account through Composio. If you do not specify an account, ask Claude to confirm one before taking action.

Yes. Connect them separately and use clear names such as main and test. Always include the account name in prompts that create or change Stripe data.

Yes. Open the Composio dashboard and find Stripe to manage your connections. You can give a connection a clearer name, re-authorise an expired account, or disconnect an account you no longer use.

Claude can only perform actions made available through the connected Stripe tools and the permissions you approved. For sensitive actions such as issuing refunds, cancelling subscriptions, or changing customer data, ask Claude to show the planned action and wait for your confirmation before proceeding.

Start with Stripe.It takes 30 seconds.

Managed auth, hosted MCP servers, and every Stripe tool your agent needs.Free to start.

Start building