MCP is evolving at a rapid rate, driven by the massive adoption of users and enterprises alike. The ease of integrating external applications into the AI assistants has opened up a new gateway into AI-enabled automation. However, it is still in its early stages; neither the technology nor the education surrounding it is yet mature. But the good thing is it's constantly improving, and the introduction of OAuth 2.1 was a step in the right direction.
LLMs, however capable, are still not trustworthy. You absolutely wouldn't want to wake up to a deleted database or worse, a pwned one. Permissioning is essential; your server users should be able to determine what resources an agent should have access to. This brings us to OAuth, which authorises the server users and only lets them access the resources they have permission to access.
Now, the AI assistants working on behalf of the users will not be able to access prohibited resources. This makes the MCP server much less prone to exploits.
In this blog post, we will implement OAuth 2.1 for an example MCP server.
Let's get started!
What is OAuth?
OAuth or Open Authorisation is a security protocol that allows websites and applications to access resources or data from other web applications on behalf of a user, without sharing any personal or sensitive information (e.g. password). Here is how it works in short…
Here is a quick rundown on OAuth concepts:
Actors
Resource Owner (user): The one who permits access to their data.
Client (AI agent): The MCP client that requests primitives (tools, prompts, resources) from the MCP server.
Resource Server (MCP server): The backend that validates access and serves the data to the MCP Client
Authorisation Server: Authenticates users and issues tokens. It can be separate (OAuth Flow) or part of the MCP server itself (traditional method)
Credentials and flow mechanics
Authorisation code: A short-lived token used in the authorisation code flow. It represents the user's approval for data exchange and gets exchanged for tokens.
PKCE Proof Key for Code Exchange: An OAuth extension that protects public clients by binding the authorisation code to the client. Required in OAuth 2.1
Access token: A short-lived credential, often a JWT that proves permissions when calling APIs
Together, these pieces enable apps to securely perform tasks for users without requiring the app to access sensitive credentials directly.
Actors
Resource Owner (user): the person who grants an app access to their data.
Client (AI agent): the MCP client that requests access on behalf of the user.
Resource Server (MCP server): the backend that validates access and returns the requested data.
Authorisation Server: the component that authenticates the user and issues tokens. It can be a separate service or part of the MCP server.
Credentials & flow mechanics
Authorisation Code: a temporary credential issued during the authorisation code flow. It represents the user’s consent and is exchanged for tokens.
PKCE (Proof Key for Code Exchange): an OAuth extension that protects public clients by binding the authorisation code to the client. It is required in OAuth 2.1.
Access Token: a short-lived credential, often formatted as a JWT, used to prove permissions when calling APIs.
Together, these parts enable apps to act on behalf of users without ever handling their sensitive login details.
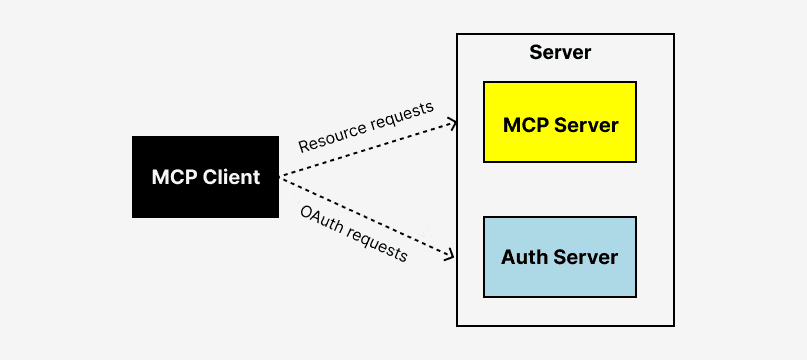
How MCP Authentication Works vis-à-vis OAuth 2.1?
The flow diagram for OAuth in MCP looks something like this.

For MCP, there is an addition of the Authorisation Server, which handles all the authentication logic previously handled by the MCP Server itself.
Now, the MCP Server only act for validating the token & providing back the resources requested by the client, the rest remains the same.
Here’s a clean segmentation of that flow into phases:
1) Discovery & Bootstrapping
MCP Client requests the MCP Resource Server without a token.
MCP Resource Server returns 401 Unauthorised with a
WWW-Authenticateheader pointing to a metadata URL.MCP Client fetches the resource metadata and determines the appropriate Authorisation Server.
2) Dynamic Client Registration (optional)
After metadata is fetched, the client can register itself dynamically with the Authorisation Server using a
POST /registerrequest.
3) User Authorisation (Auth Code + PKCE)
MCP Client opens the user’s browser and redirects to the server’s authorisation endpoint with OAuth parameters (including
code_challengeandresource).The Authorisation Server authenticates the user and displays the consent screen with the requested scopes.
User accepts or denies the request.
Upon acceptance, the Authorisation Server redirects back to the client with an authorisation code.
4) Token Exchange
MCP Client sends the authorisation code and
code_verifierto the Authorisation Server’s token endpoint to exchange for an access token.Optionally, the MCP Client stores the access token for future use.
5) Resource Access
MCP Client makes the request to the MCP Resource Server with the access token in the header.
Resource Server verifies the token and responds with the requested data.
In essence, auth servers are responsible for:
Issuing signed access tokens with embedded claims
Supporting OAuth 2.1 flows (e.g., Authorisation Code with PKCE)
Presenting consent screens
Enforcing token lifetime, refresh logic, and revocation
And more
Now the real question is, who provides those Authorisation servers?
Authorization Servers
In the MCP ecosystem, there are two ways to implement an authorisation server:
Self-Embedded: In embedded authorisation servers, the MCP server acts as the Identity Provider, handling all the work of the authorisation server. - As discussed in the traditional approach. (previously available, now outdated)
Delegated: In the delegated approach, the task is delegated to external authorisation server providers, such as Auth0, which handle all tasks, from centralised login and consent to token issuance.

Here is a simple comparison:
Category | Self / Embedded | Delegated / OAuth Approach |
|---|---|---|
OAuth role | MCP server acts as Identity Provider (Auth Server) and Resource Server | MCP server acts as the Relaying Party |
Token issuance | MCP server issues its own tokens | Auth server issues tokens |
Auth responsibility | The entire identity flow is handled within the MCP server | Delegated to external auth server or auth service |
Integration effort | High: requires building and managing an OAuth provider | Low; leverages existing external auth services and auth providers |
Here is how to implement an oAuth flow via code!
Implementing Demo Authorisation Servers - OAuth MCP Server & Client
This flow aims to show how a user can authorise the MCP client once, and then the client can safely call protected MCP tools on their behalf.
For this, we will run an authorisation server, a resource server, and a client (VS Code for me) to see how one can implement the OAuth login, so that users can approve tools without sharing passwords / any sensitive credentials, as was the case with the API-based approach.
To start, head to the terminal and clone this repo.
git clone <https://github.com/devloper-hs/oauth-demo.git>
cd oauth-demo
Once in the directory, you will see that the codebase consists of two folders: simple-auth (server) and simple-auth-client (client). ‘
Here is an overview of both:
📂 simple auth
This folder contains the complete OAuth 2.0 backend server, which protects MCP tools with authentication.
It contains everything needed to create a login system where users must authenticate before accessing protected MCP resources, like:
auth_server.py- handles login and issues tokens.server.py- protects MCP tools & resources.simple_auth_provider.py- core OAuth logic.token_verifier.py- validates access tokens.Along with
pyproject.tomlthe configuration.
In essence, it contains everything needed to create a login system where users must authenticate before accessing protected MCP resources & tools.
📂simple-auth-client
This folder contains the frontend application, which provides users with an interface to log in and access protected MCP tools after authentication.
It contains:
__init__.py: Empty file for modularisationmain.pyOrchestrate everything: manage OAuth flows, store tokens, and facilitate interactive tool calling sessions.Along with
pyproject.tomlthe configuration.
Yes, we need to run the client and server separately so that we can start them next.
In the 1st terminal, start the authorisation server by navigating to simple-auth the older and starting the server at port 9000.
cd simple-auth
uv run mcp-simple-auth-as --port=9000
Now open a second terminal and use the same. simple-auth Folder: Start the resource server at port 8001 & point it to the Terminal 1 auth server. The MCP transport used here is HTTP, as it's now a standard.
uv run mcp-simple-auth-rs --port=8001 --auth-server=http://localhost:9000 --transport=streamable-httpNotice we have two different ports running two distinct components of the same MCPs at two other ports.
This allows for modularity and scalability, which were lacking in the previous MCP spec, as any part can be easily replaced with another without affecting the main functionality. - Next time, initiate the client.
In the 3rd terminal, navigate to simple-auth-client, start the mcp-simple-auth-client script and point it to the authorisation server with type HTTP ****stream.
MCP_SERVER_PORT=8001 MCP_TRANSPORT_TYPE=streamable_http uv run mcp-simple-auth-clientOnce you are done and everything runs as expected, a webpage opens where you can log in. If successful, the client will authenticate, and you can then use the MCP server.
Here is a quick demo of doing so from the start!
Be sure to check out the README.md file in the repository.
Note: The initial code was forked from the original MCP repo, but I tweaked it a lot. The core changes include:
Addition of new resources (tools) in
servers.py.support for a resource consent in
simple_auth_server.py&main.py.Complete revamp of the UI/UX screen, including the addition of
templates.Error fixes.
But how does everything tie up? Time to look under the hood!
How does our oAuth 2.1 Flow work?
Here is what’s happening behind the scenes:
Whenever the client is run, it waits for OAuth to complete and access the resource. The client initiates OAuth and involves the user in logging into the Authorisation Server via a web browser. This is done in the following phases:
Discovery Phase
The client's attempt to access the protected resource triggers a 401 Unauthorised error.
This prompts the client to use the GET
.well-known/oauthendpoint to discover the Authorisation Server's details and present the OAuth link to the user.Behind the scenes, the
SimpleAuthClientinmain.pyautomatically finds where the Authorisation Server lives and what OAuth features it supports.
Now, the user clicks the provided link, and the process proceeds to the Authentication Phase.
Authentication Phase
The first login attempt fails due to an incorrect password, resulting in a
401 Unauthorized error. This is intentionally done to showcase the failure case.Behind the scenes, the
SimpleAuthProvide**r**class inauth_server.pyhandled this by checking the credentials against what the user typed.On the 2nd attempt, after entering the proper credentials, the
SimpleOAuthProviderserver creates an authorisation code, and the client receives it from the Authorisation Server.In the meantime, the
CallbackServerinmain.pywaits for the OAuth redirect while the user logs in through their browser.
However, the client is not authorised, so the process moves to the Token Exchange & Validation Phase.
Token Exchange & Validation Phase
Once the user logs in, the client trades its authorisation code for an access token that it can use later.
The
InMemoryTokenStorageclass inmain.pyis used to keep the retrieved token safe in the client's memory.Important: The terminal output confirms 200 OK responses when the token exchange happens in the
/tokenendpointauth_serverpowered by Brain.simple_auth_provider.
Flow then moves to the Validation Phase:
Then an API call is made to POST **
/**introspectwhich validates the access token.The
IntrospectionTokenVerifierclass intoken_verifier.pydoes this job by calling the Authorisation Server and asking, "Is this token still good?".This introspection process enables the Resource Server to verify the validity of tokens and grant access to previously protected resources.
Now that the user is logged in, the only remaining task is to fetch the resource in the Access Resource Phase.
Access Resource Phase
Finally, the client uses this validated authentication to call a protected resource successfully.
get_timetool.It calls the
get_timefunction that lives inserver.py. If you check the function, it is decorated with@app.tool()make it a protected MCP tool.@app.tool() async def get_time() -> dict[str, Any]: """ Get the current server time. This tool protects the system information by OAuth authentication. User must be authenticated to access it. """ ... return appThe Resource Server checks the token through the
verify_tokenThe method confirms its validity and, if valid, returns the current server time along with the time zone information.
In short, the whole system works like a three-part team.
The Authorisation Server (
auth_server.pyIt is like a security guard who checks if the user knows the password.The Resource Server (
server.py) is like a treasure keeper who has the good stuff but always asks the security guard, "Is this person allowed?".The Client (
main.py) is like a user, trying to get the treasure by first proving to the security guard that the user belongs there.
This clarifies how the OAuth server and client can be implemented and used. In case you want to learn more, and want custom integration, you can check it at docs📚.
However, it's of no use if someone can gain access to the server and access the data / spoof the authentication flow, so MCP 2.1 introduces a few standards that must be followed.
MCP Auth Safety Guidelines
Most of the time, an oAuth provider handles all the safety guidelines; however, if you are creating a custom oAuth flow, you need to ensure you meet most of the specs mentioned in MCP 2.1 Spec Doc
These are considered best practices according to the ecosystem. A few important ones are:
PKCE: All MCP auth flows must follow the OAuth 2.1 standard, which requires using PKCE to protect authorisation code exchanges.
Authorisation Server Metadata: MCP servers should share standard metadata (RFC 8414) so clients can easily find supported endpoints and features.
Dynamic Client Registration: MCP servers should enable clients to register automatically, making onboarding faster and simpler.
Apart from this, some best practices can be followed by anyone building for production:
Use established providers: Services like Composio handle security updates and compliance.
Implement proper scoping: Grant only the minimum permissions necessary.
Monitor access: Keep track of what your AI agents are doing.
Regular token rotation: Ensure tokens expire and refresh properly.
Secure storage: Never hardcode credentials or tokens in your applications.
These fundamental measures ensure that MCP authentication is robust, discoverable, and scalable, promoting interoperability across diverse clients and authorisation servers.
But how is oAuth flow helpful in the real world & why is it not widely adopted!
OAuth Benefits – A Real-World Use Case
Let’s say you are using an AI coding agent that connects to my GitHub account.
Without OAuth
You have to create a personal access token (like a secret key) on GitHub and paste it into the agent.
The problem is that the token might give the agent way too much power, like deleting repos, even if you only wanted it to read issues.
And what if the token were ever to leak? Anyone could use it until you deliberately go in and remove it.
With OAuth
The agent sends me to GitHub’s login screen.
You see precisely what permissions it’s requesting, such as “read-only access to issues and pull requests.” If you agree, GitHub gives the agent a temporary token.
Later, if you change your mind, click “revoke” in my GitHub settings, and boom—the agent loses access right away.
So, basically, OAuth makes things safer (with short-lived tokens), more precise (you know exactly what you are allowing), and easier to control (you can revoke access at any time**).**
But then, why don’t we see many implications of oAuth?
The answer is two reasons:
Most MCP servers are local and use
stdiotransport which doesn't require authentication.Relatively new method in the context of MCP. Formally introduced in the March 26, 2025, MCP specification revision, so slowly companies are moving on!
However, as MCP standardises agent communications and moves toward remote deployments, integrating OAuth 2.1 will be essential for secure interactions.
With this, we have reached the end of this guide. Let me close the post with some final thoughts.
Final Thoughts
It’s interesting to see how fast the ecosystem is growing. OAuth is already becoming the standard way of doing things, rather than just an optional add-on.
MCP used to rely on API keys for authentication, which, to be honest, wasn’t the most secure setup. People used to say “MCP isn’t secure,” and back then, they were right.
However, it is now shifting to OAuth 2.1, which feels like a significant upgrade in terms of security and scalability. With OAuth in place, that’s not really the case anymore.
Primarily, as MCP is adopted in remote/enterprise setups, delegated authentication (such as through Composio) is an efficient solution. It’s both safer and easier to work with.
If you want to check out more about MCP, here are some links I found helpful: