Everyone's building AI agents these days, and everyone's teaching you how to do it in Python or JavaScript. Nothing wrong with Python. It's fast to prototype with and has a mature ecosystem. But I wanted to try something different. What if we could build a multi-agent system that orchestrates different specialised agents, each connected to real-world tools via MCP (Model Context Protocol), and what if we built it in Rust?
That’s exactly why I built Codepilot, a multi-agent system that can handle Linear project management, GitHub repository operations, and Supabase tasks, all through a beautiful terminal UI.
It’s a fun side project, and if you’re curious and want to try things with Rust, maybe you'll find this useful. The source code is available on my GitHub here: rohittcodes/codepilot.
Why a Multi-Agent System and why Rust in particular?
Traditional AI agents are great, but they often struggle when you need to handle multiple domains or complex workflows. What if you want to:
Create a GitHub issue and link it to a Linear project.
Query your Supabase database and create a summary report.
Manage repositories across different services.
A multi-agent system solves this by having specialised agents that can collaborate and orchestrate complex workflows.
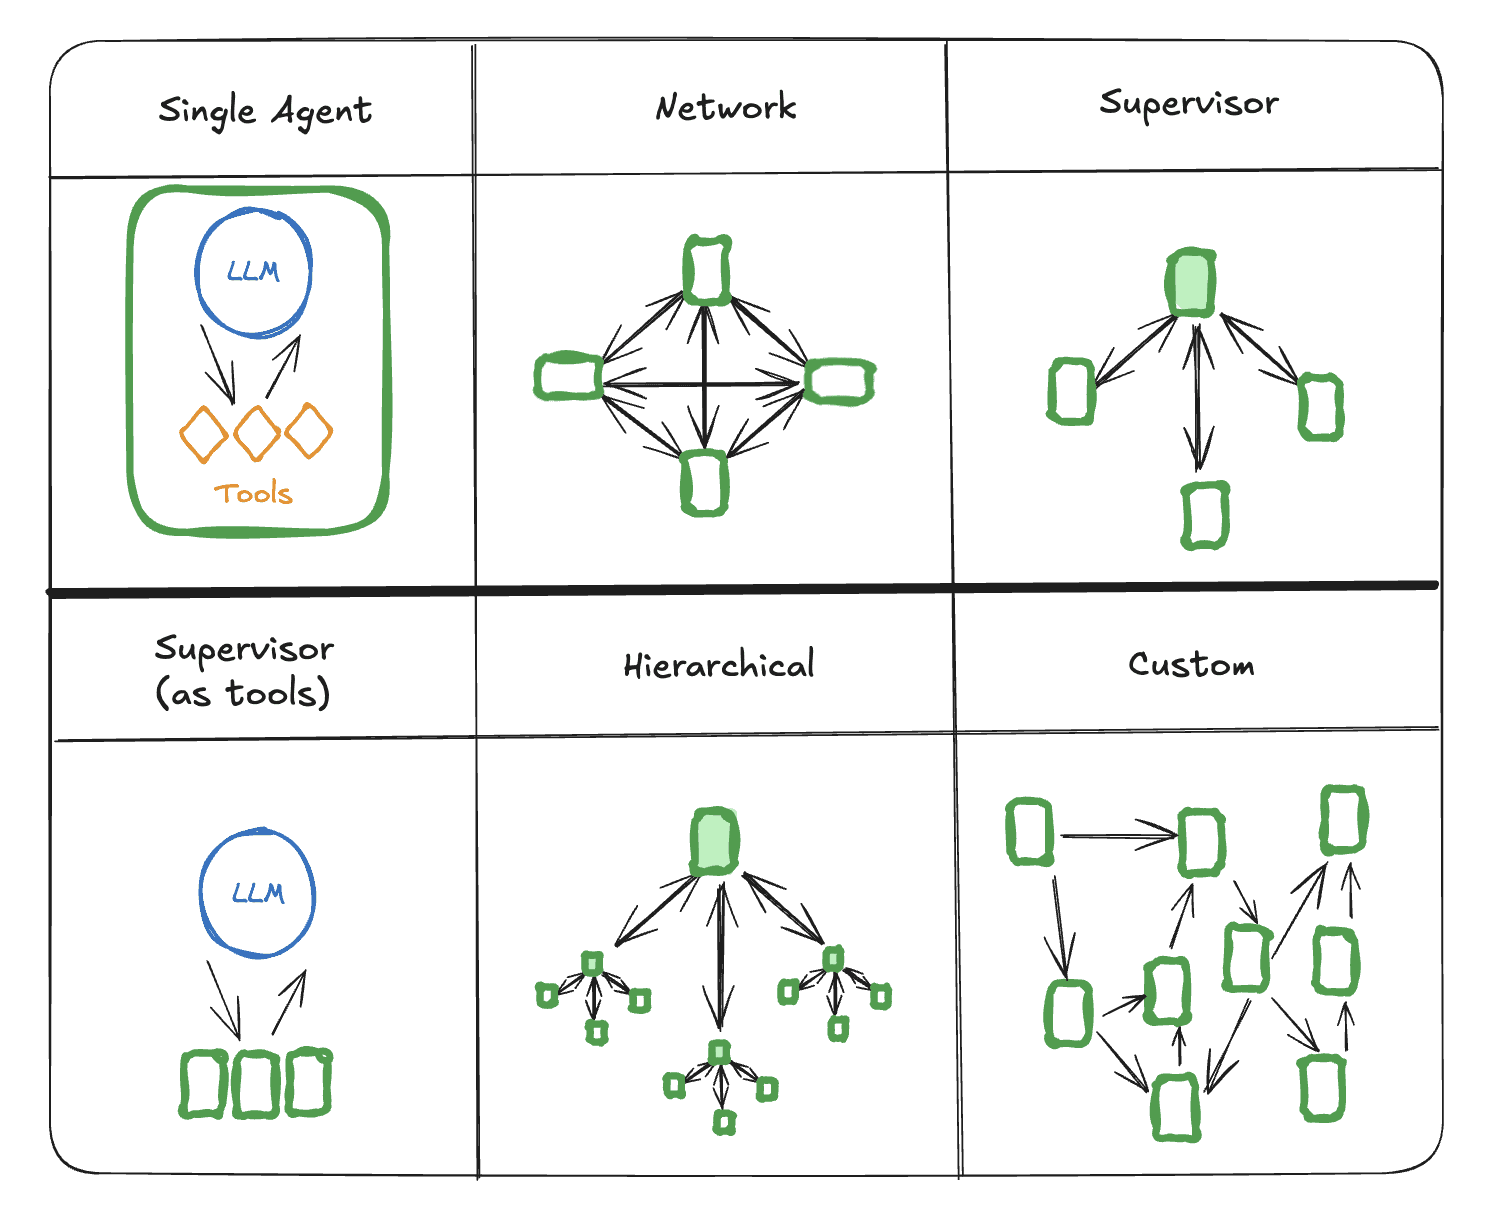
credits: Langchain
And why Rust??
Rust isn’t the usual go-to for AI, but it has some killer benefits on its side:
Performance: Zero-cost abstractions and memory safety mean your agent runs fast without eating resources
Type Safety: Errors can be caught at compile time, not when your agent’s halfway through a task.
Ecosystem Potential: Although the AI ecosystem is more mature in Python, Rust’s async/await model and strict typing make it ideal for agents to juggle between multiple tools, APIs, or tasks.
And now, if you wish to build something fast, reliable, and scalable, Rust becomes a solid choice there. So, before we dive deep into building it, let’s start with the basics.
What is an AI Agent by the way?
An AI agent is a program that can understand your intent and take actions on your behalf. Think of it as one of your intelligent assistants that doesn't just chat, it does things. In our case, the agent understands when you're asking about Linear issues, GitHub repositories, or Supabase data, and then calls the appropriate APIs to retrieve the information, combining it with natural language responses.
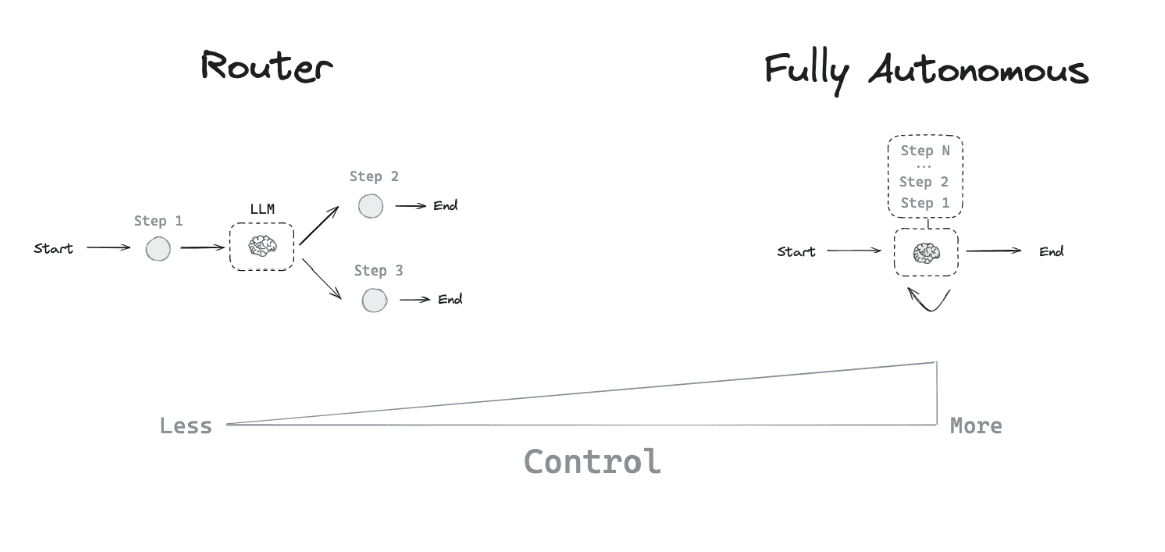
Agentic Architectures (credits: Langchain)
One of the key insights here is that LLMs excel at understanding intent (what you want to do), but struggle to access real-time information. By combining LLMs with APIs, we can create a program that automates tasks for you, eliminating the need for manual effort. Now you can get the best of both worlds: natural language understanding plus real-time information access.
Getting started with the Rust AI Agents
Alright, let’s build the thing. I didn’t want to overthink about the setup, just a plain Rust binary project, a few crates to make async work easier, and enough structure to plug the tools.
Setting up the project
First, we create a new Rust binary project (not a lib):
cargo new codepilot
cd codepilot
Add these dependencies to your Cargo.toml:
[dependencies]
anyhow = "1"
chrono = { version = "0.4", features = ["serde"] }
dotenv = "0.15"
tokio = { version = "1", features = ["full"] }
tracing = "0.1"
tracing-subscriber = { version = "0.3", features = ["env-filter"] }
swarms-rs = "0.1.9"
serde = { version = "1.0", features = ["derive"] }
serde_json = "1.0"
reqwest = { version = "0.11", features = ["json"] }
crossterm = "0.27"
tui = "0.19"
ratatui = "0.24"
regex = "1.10"
Building my first agent in Rust
The core idea is simple: A multi-agent system with specialized agents, which will have tools that the LLM can call, then let the LLM decide which agent to use based on the user’s query. Here’s the basic structure:
// src/agents/linear.rs
pub struct LinearAgent {
    agent: Box<dyn Agent>,
    linear_client: LinearMCPClient,
    available_tools: Vec<ToolInfo>,
}

impl LinearAgent {
    pub async fn new(api_key: String, config: &Config) -> Result<Self> {
        // Initialize agent with dynamic tool discovery
    }
}
Integrating Composio MCP Servers
To connect each agent with real-world APIs, we use Composio MCP Integration. These servers expose authenticated API actions your agents can call, without you having to handwrite integrations.
For Codepilot, I’ve set up MCP servers for:
GitHub: To handle repos, issues, PRs, etc.
Linear: For project and issue management
Supabase: For querying and updating data
You can create your own MCP server configs in a few clicks.
How to add your own MCP config in Composio
If you want to integrate your tools (or replicate what I’ve done), here’s the flow using the new Composio dashboard:
Log in and go to MCP Configs.
Click “Create MCP Config”
Give it a name (like
linear-agentorgithub-bot)Choose the toolkit (e.g.,
Linear,GitHub,Supabase)Select how you want to handle authentication.
Paste your API keys or use OAuth to connect.
Pick the tools you want your agent to have access to
Hit “Create MCP Server”. This will prompt you to a dialog where you can copy the MCP server URL. Paste it in the
.envfile with appropriate variable names.
Codepilot Architecture:
The core architecture is built around three core principles:
Specialized Agents: Each agent (Linear, Github, Supabase) is an expert in its domain.
MCP Integration: All agents connect to the MCP tools via Composio Integrations.
Intelligent Orchestration: A central orchestrator that routes queries to the right agent.
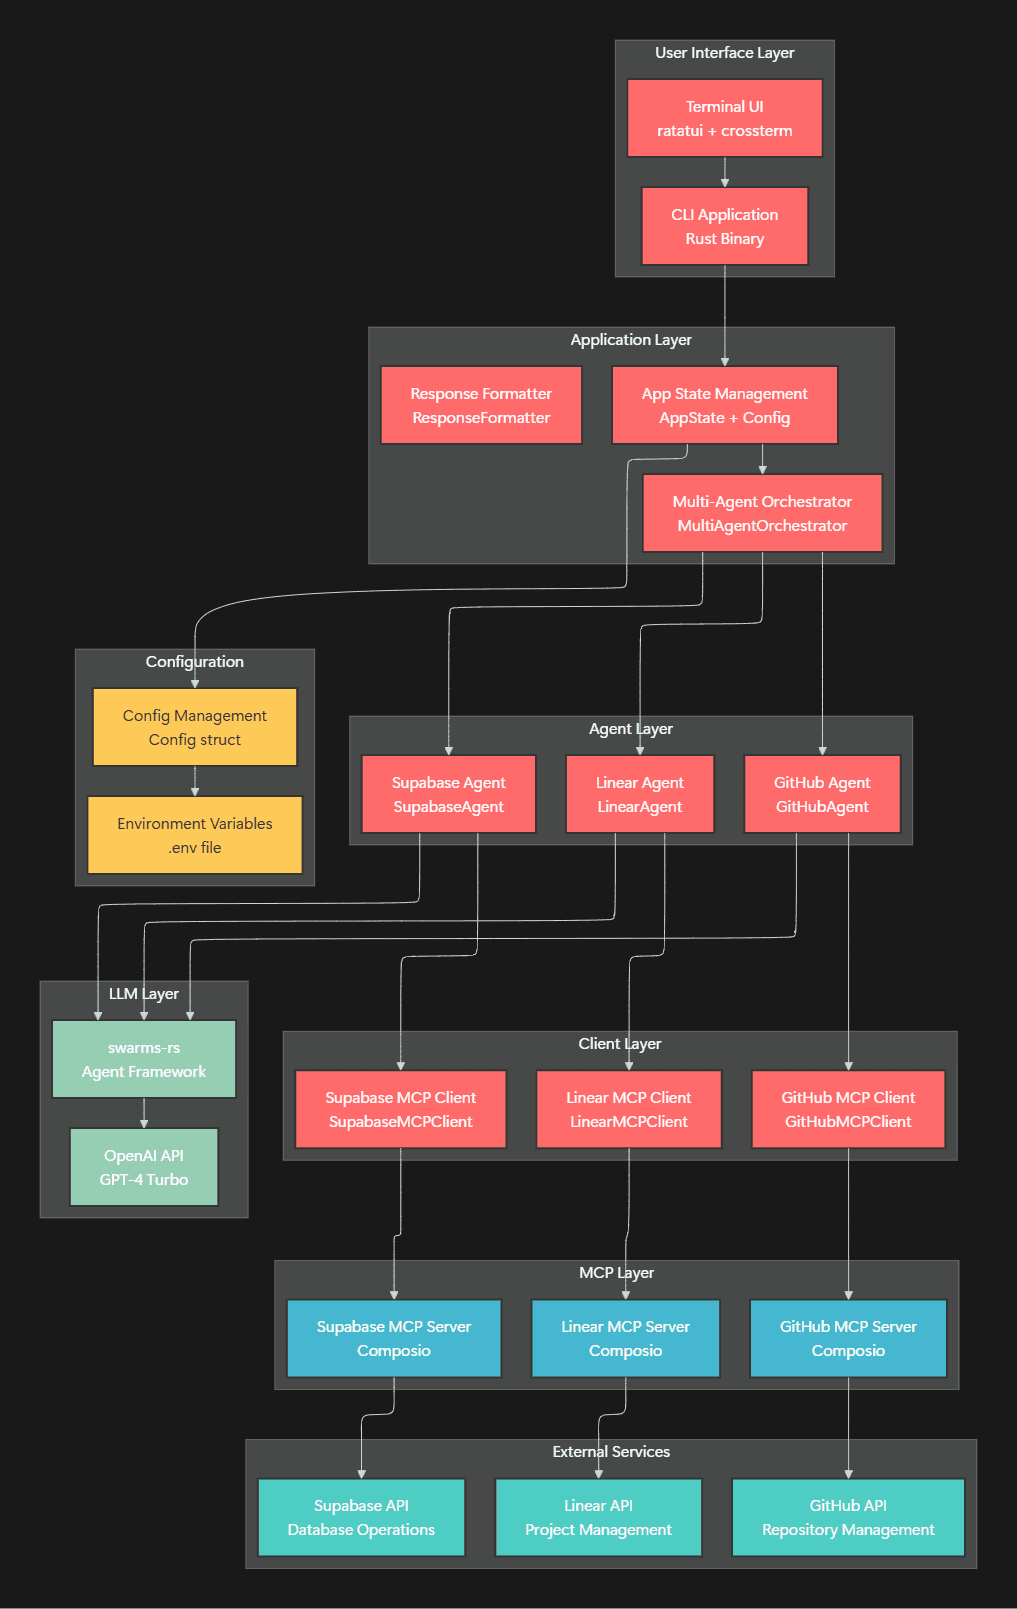
The Core Components
pub struct MultiAgentOrchestrator {
    linear_agent: LinearAgent,
    github_agent: GitHubAgent,
    supabase_agent: SupabaseAgent,
}

pub struct LinearAgent {
    agent: Box<dyn Agent>,
    linear_client: LinearMCPClient,
    available_tools: Vec<ToolInfo>,
}
Each agent is a specialist who knows how to work with its specific domain tools, fetched dynamically from MCP Servers.
Dynamic Tool Discovery
One of the coolest features is that each agent discovers its tools dynamically from MCP servers:
impl LinearAgent {
    pub async fn new(api_key: String, config: &Config) -> Result<Self> {
        let linear_client = LinearMCPClient::new(config);

        // Get dynamic tools from the MCP server
        let tools_response = linear_client.get_tools().await?;
        let available_tools: Vec<ToolInfo> = tools_response
            .iter()
            .map(|tool| ToolInfo {
                name: tool["name"].as_str().unwrap_or("unknown").to_string(),
                description: tool["description"].as_str().unwrap_or("No description").to_string(),
                input_schema: tool["inputSchema"].clone(),
            })
            .collect();

        // Create dynamic system prompt with actual tool descriptions
        let tools_description = available_tools
            .iter()
            .map(|tool| format!("- {}: {}", tool.name, tool.description))
            .collect::<Vec<_>>()
            .join("\\n");
	   }
}
This means, no hardcoded operations - the agents automatically adapt to whatever tools are available on their MCP Servers!
What's happening here?
The system uses pure LLM-based tool selection with intelligent fallbacks. When you ask a question, here's what happens:
True LLM-Based Tool Selection
The agents use a sophisticated approach where the LLM analyses your request and mentions specific tools:
// 1. LLM analyzes the query and mentions specific tools
let llm_response = self.agent.run(query.to_string()).await?;
// LLM says: "I would use GITHUB_LIST_REPOSITORIES to fetch your repositories"

// 2. Parse LLM guidance to extract tool selection
for tool in &self.available_tools {
    if guidance_lower.contains(&tool.name) {
        // LLM mentioned this tool - execute it
        return self.execute_tool(tool, arguments).await;
    }
}

// 3. If LLM doesn't mention tools, provide a clear error message
return Ok("I don't have a tool for that request. Available tools are: [list tools]");
Constrained Agent Configuration
To prevent the LLM from calling internal tools, we use a constrained configuration:
let agent = client
    .agent_builder()
    .agent_name("GitHubAgent")
    .system_prompt(system_prompt)
    .user_name("User")
    .max_loops(1)  // Single loop to prevent tool calling
    .temperature(0.1)  // Focused responses
    .max_tokens(2048)  // Shorter responses
    .build();
Clear Tool Constraints
The system prompt explicitly constrains the LLM only to use available MCP tools:
let system_prompt = format!(
    "You are a GitHub agent. You can ONLY use these GitHub MCP tools:

{}

CRITICAL: You are NOT allowed to use any other tools.
You can ONLY mention and use the tools listed above.

When a user asks you something:
1. Look at the list of tools above
2. Find the most appropriate tool for their request
3. Mention the exact tool name you would use
4. Explain why you chose that tool

Example responses:
- 'I would use GITHUB_LIST_REPOSITORIES to fetch your repositories'
- 'I would use GITHUB_CREATE_ISSUE to create a new issue'

If no tool matches the request, say: 'I don't have a tool for that request. Available tools are: [list tools]'

Remember: ONLY use tools from the list above. Never use any other tools.",
    tools_description
);
When you ask "List all my GitHub repositories", the system:
Orchestrator LLM → "USE_GITHUB_AGENT"
GitHub Agent LLM → "I would use GITHUB_LIST_REPOSITORIES to fetch your repositories."
Tool Execution → Executes GITHUB_LIST_REPOSITORIES with proper arguments.
Result → "LLM Analysis: [reasoning] + GitHub Operation: [tool execution result]"
Understanding the code
At the core of everything here is the MultiAgentOrchestrator struct, which wires everything together:
pub struct MultiAgentOrchestrator {
    linear_agent: LinearAgent,
    github_agent: GitHubAgent,
    supabase_agent: SupabaseAgent,
}
Each agent here resides in its own module, making it easy to plug in or swap out components. The LLM is guided by a system prompt that tells it exactly what tools are available and how to use them. Something like:
You are a multi-agent orchestrator. You have access to these agents:
- Linear Agent: Project management and issue tracking
- GitHub Agent: Repository and code management
- Supabase Agent: Database operations and queries

Based on the user's query, determine which agent(s) to use and provide a helpful response.
Pretty clean, right? You get reasoning, tool usage, and a conversational reply, all in a single setup.
Demo of what I’ve built and how things work (High Level)
Here’s what the interaction looks like:
The multi-agent system intelligently routes each query to the appropriate agent, then combines the LLM's conversational response with real data.
Conclusion
This was a fun little project to work on, given the usual Python-heavy agent world. Rust isn't traditionally the go-to for these AI workflows, but it's surprisingly too good at handling real-world agent logic once you get past the initial obstructions. The type system gives you confidence, async works well enough, and once you have your tools in place, everything seems quite simple to plug.
Not production-ready yet, but as a weekend project and to learn things, I'd say it's totally worth trying to build things like this. Again, the complete source code is here: rohittcodes/codepilot. Try it out and let me know what you come up with.