


Antigravity is the coding editor from Google. Built on a VS Code-style editor and powered by models like Gemini 3.5 Flash, Gemini 3.1 Pro, Opus 4.6 and more. It treats the AI agent as a first-class teammate — planning, coding, and validating work through an Agent Manager dashboard with deep browser connectivity.
In this short blog, I will explain how you can connect MCP server with it and actually unlock it's true potential.
Connect Antigravity with MCP Servers
Antigravity doesn't ship with one-click custom MCP install links yet, so configuration goes through the IDE's raw config file. The process takes under a minute.
We will use Composio MCP for the demonstration but you can use any MCP servers following the steps.
1. Open the MCP Config
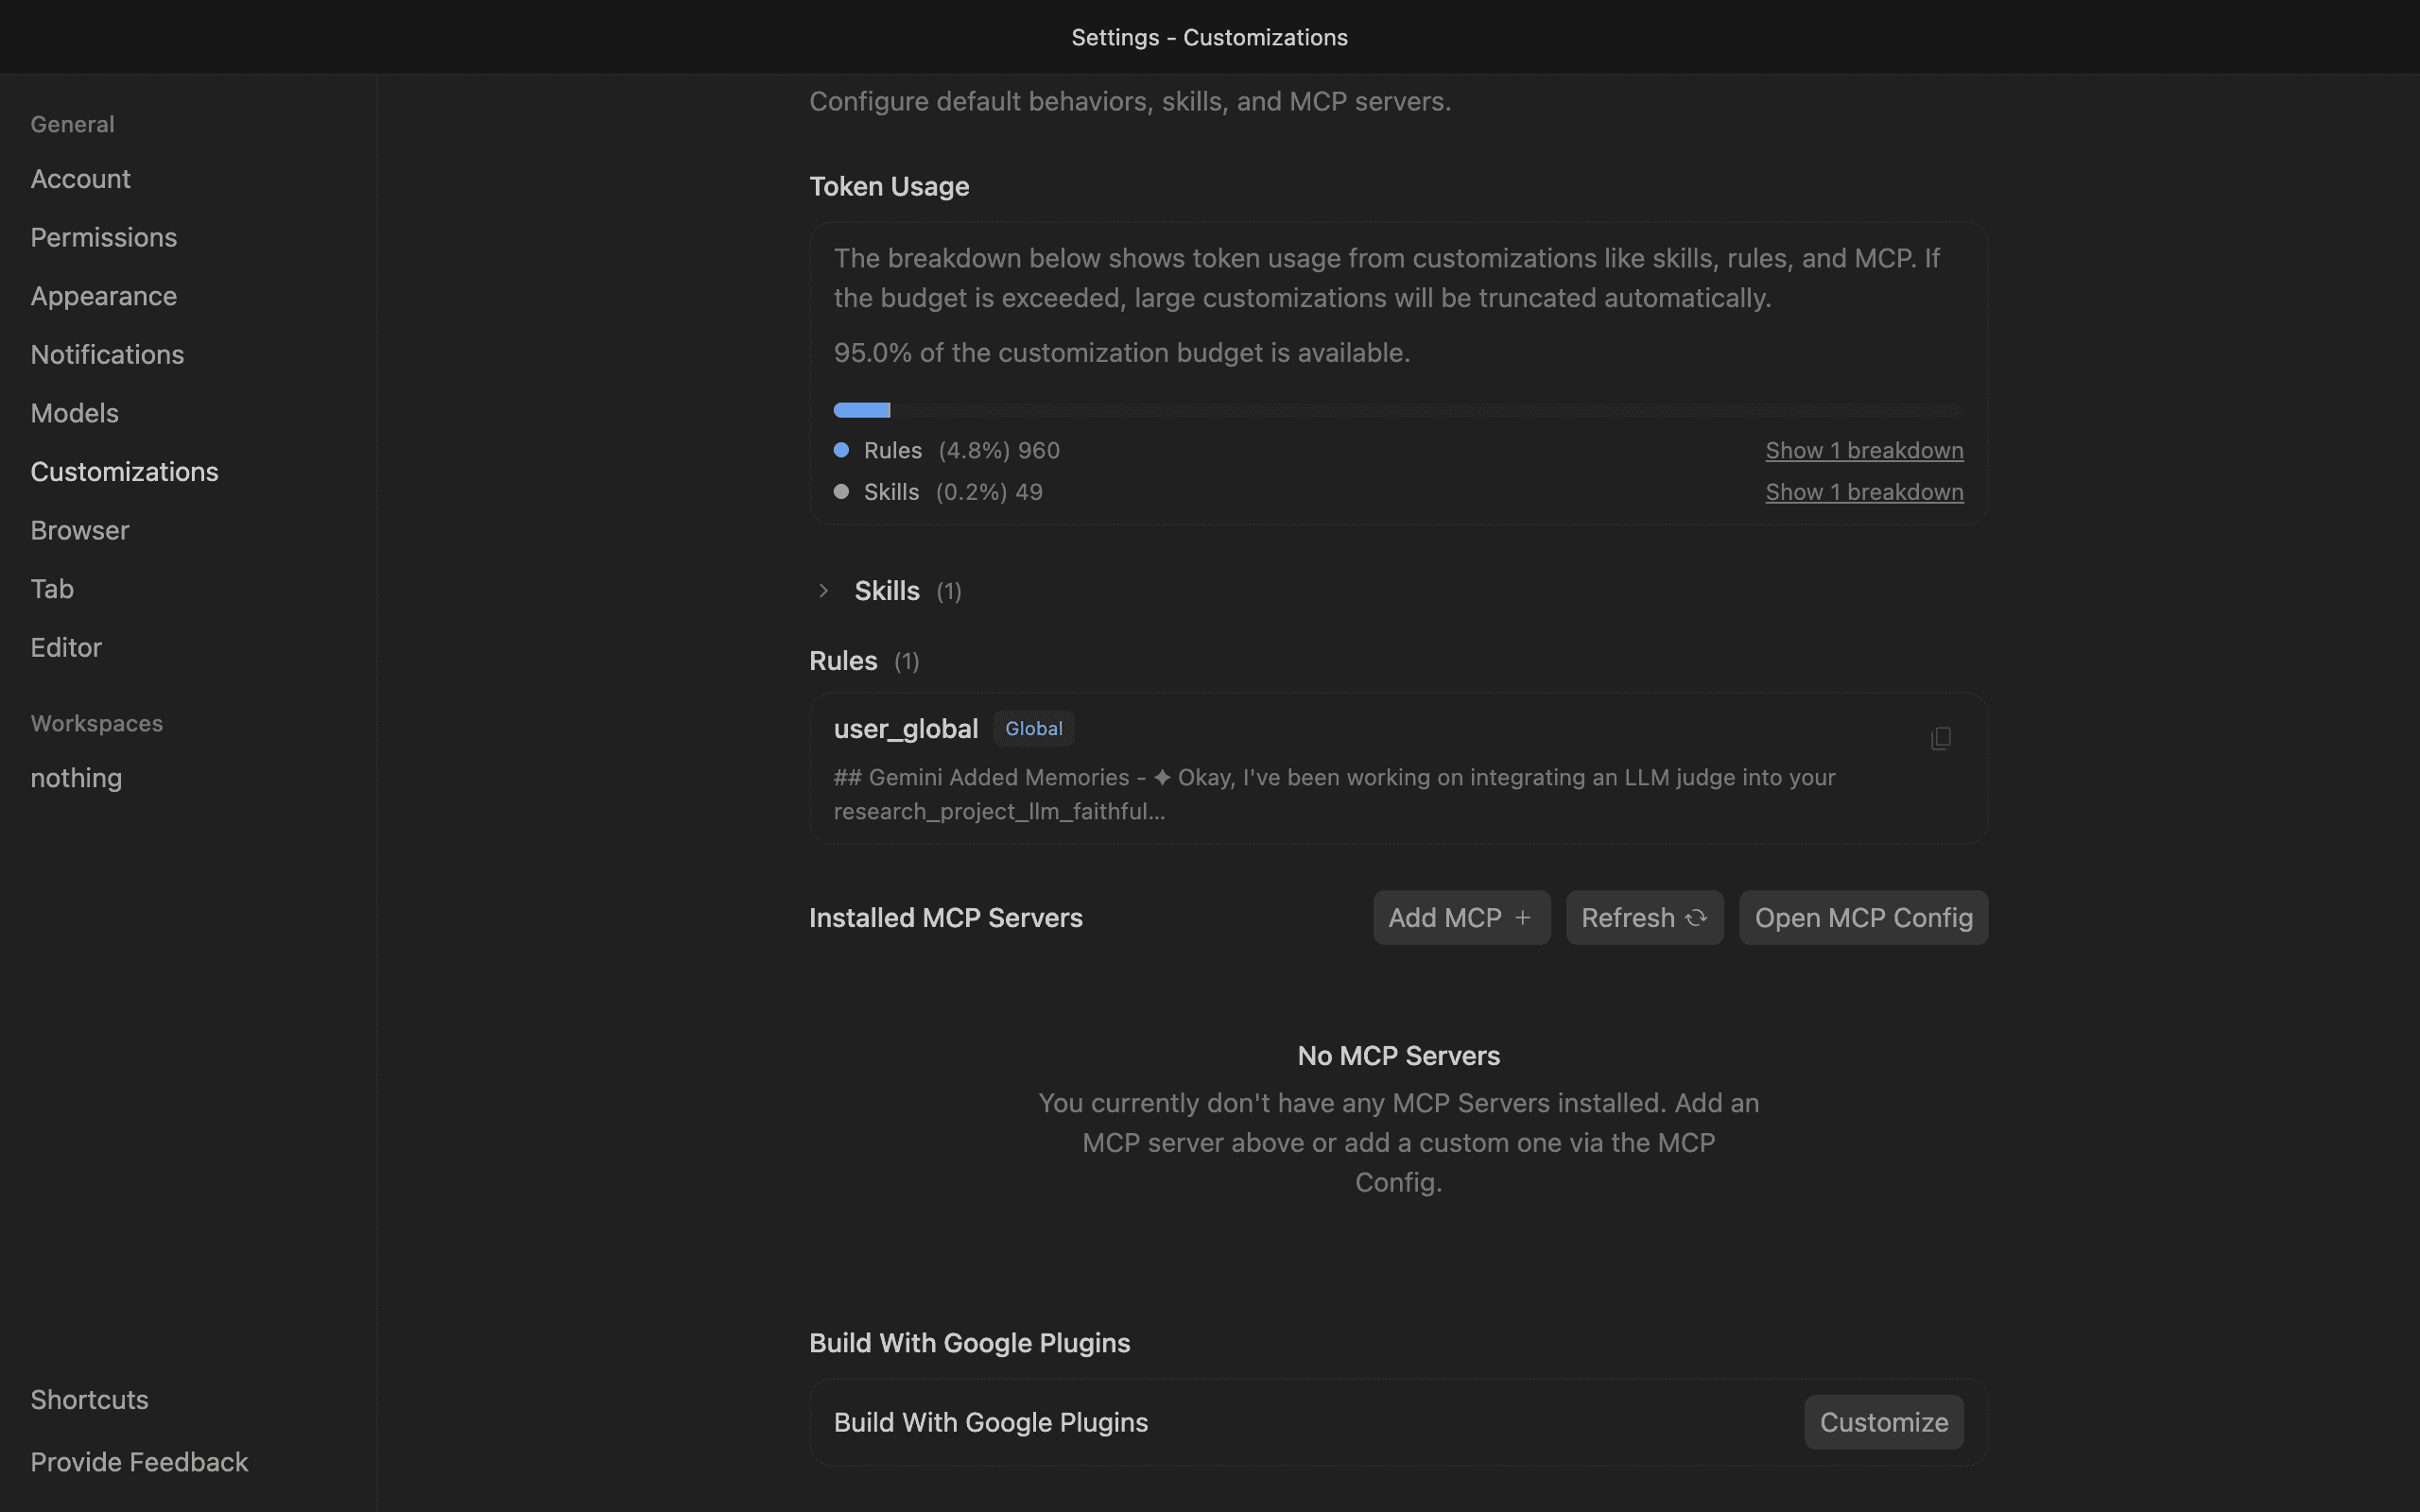
Go to the Antigravity Settings and click on the Customizations Tab, then click on the Open MCP Config button to open the mcp_config.json file in the editor.
2. Get your API Key
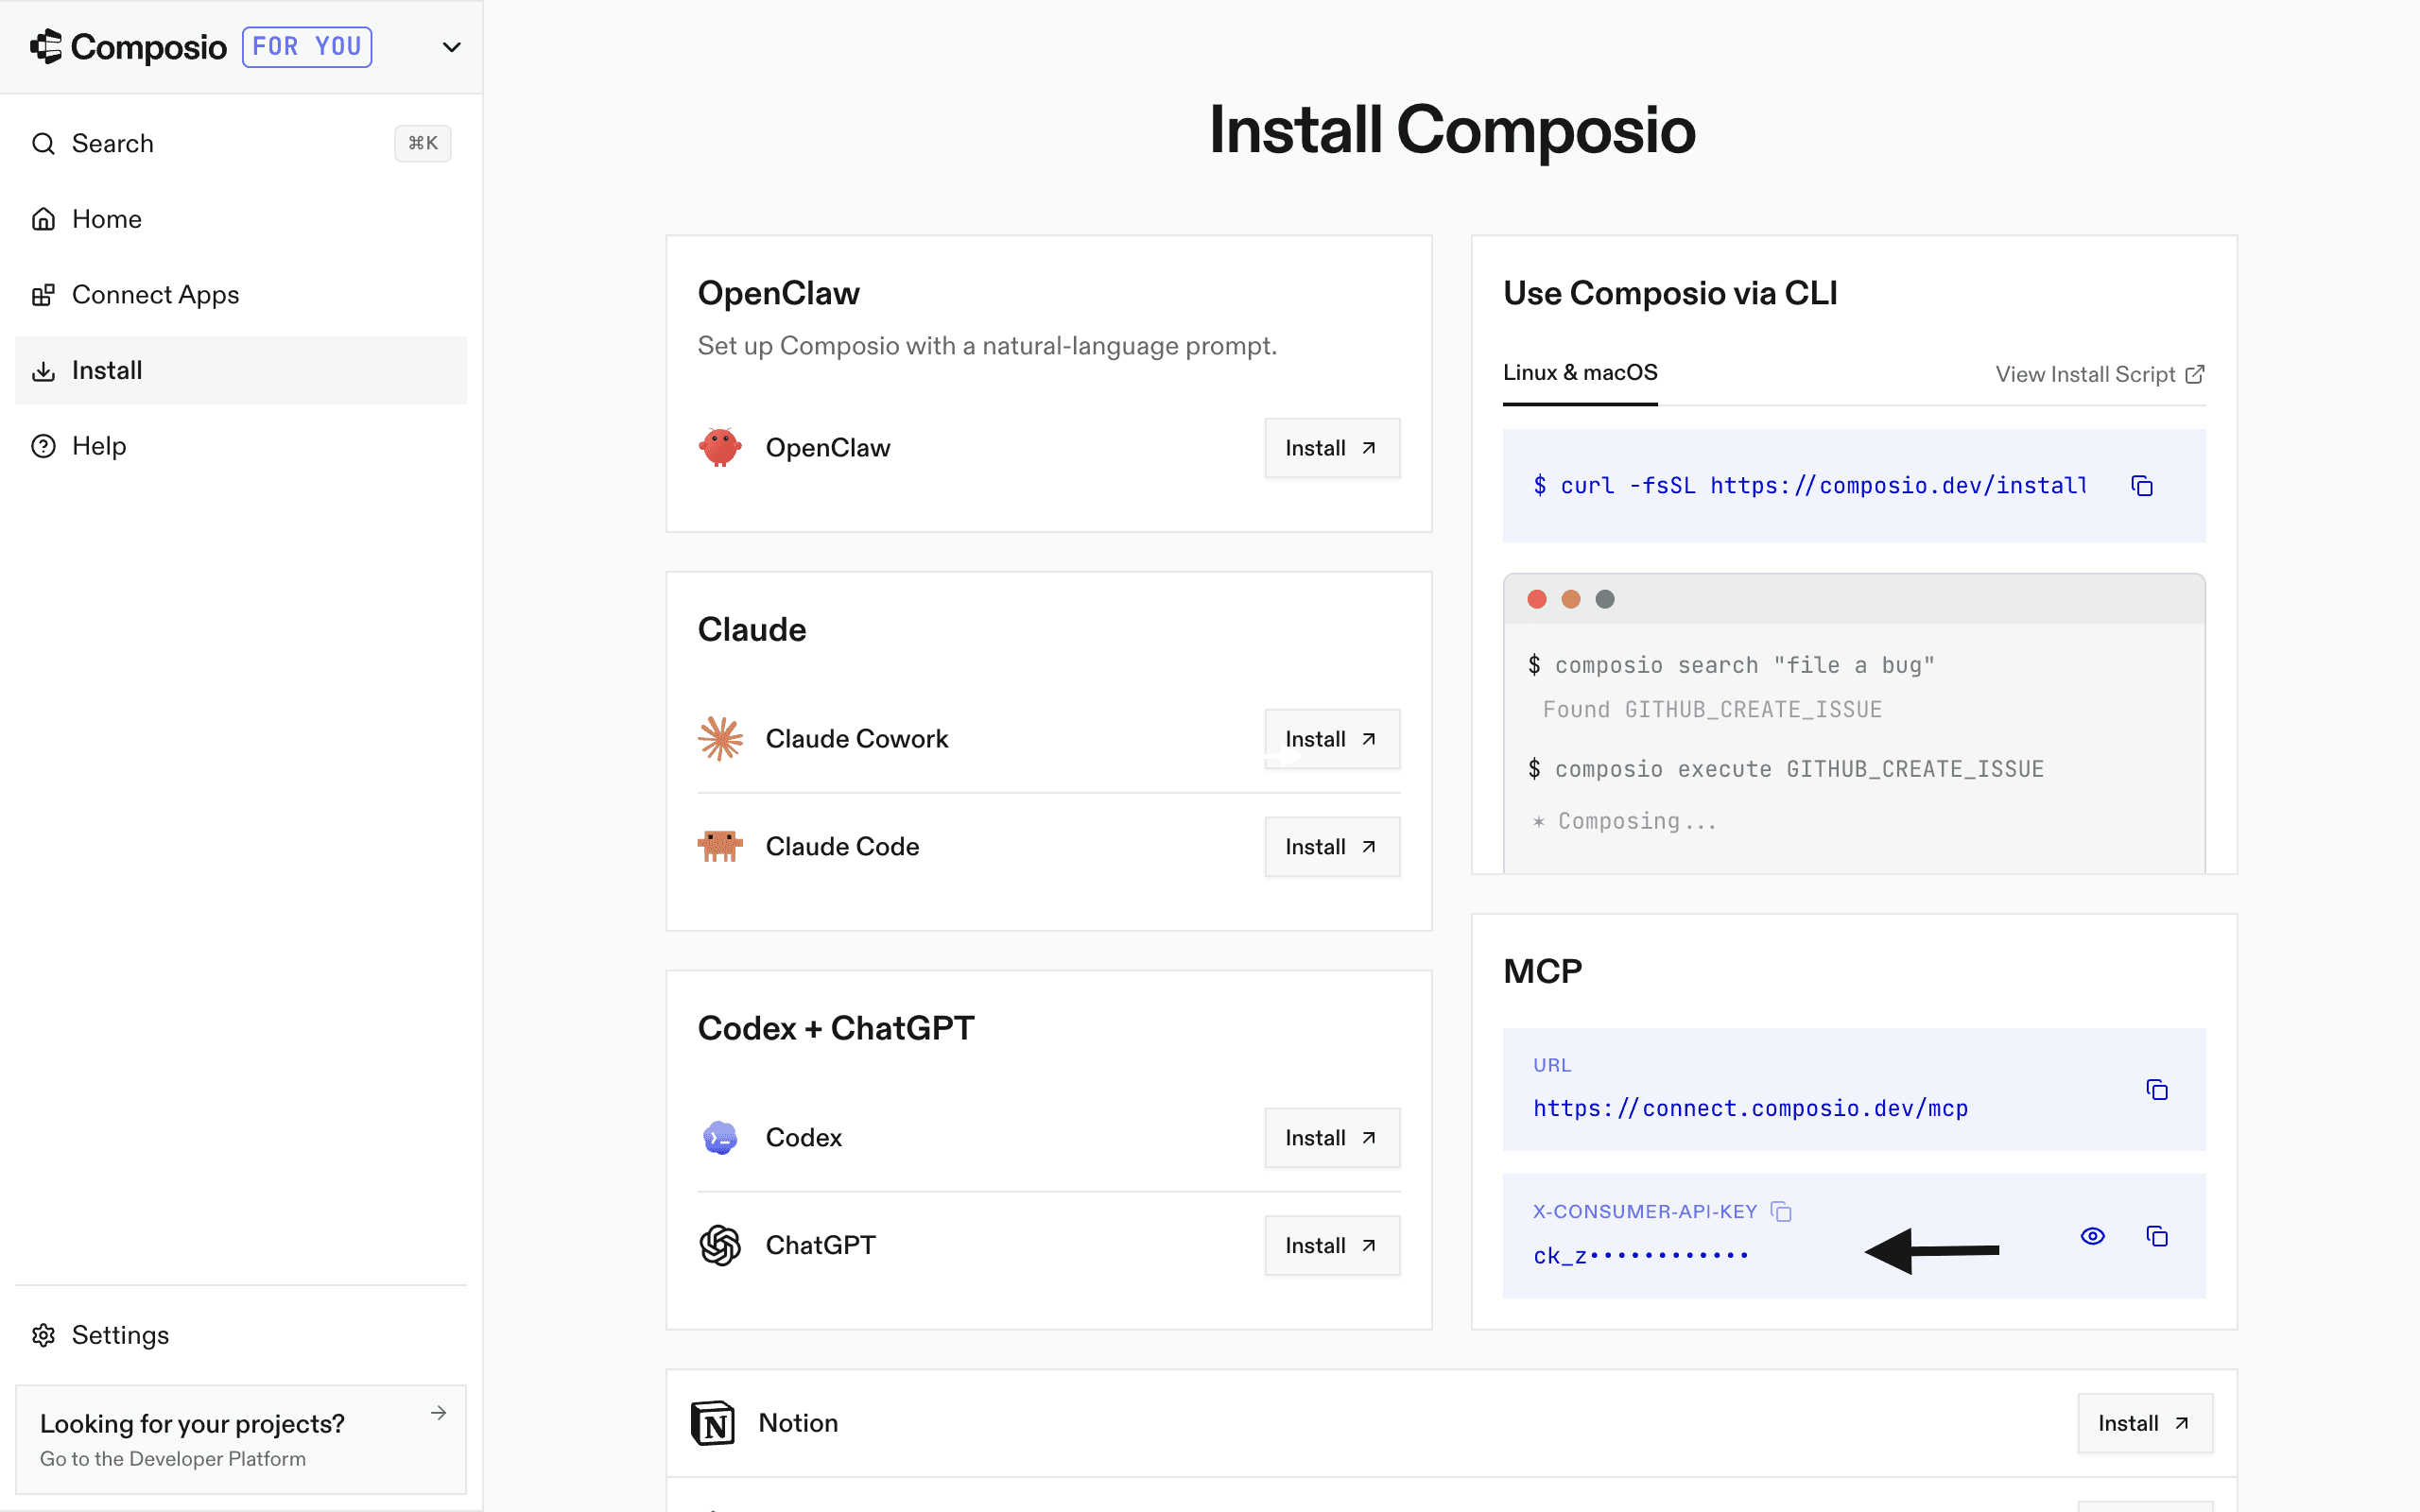
Go to the Composio Dashboard here and get your API Key
3. Add Composio to mcp_config.json
Paste the following configuration into the file:
{
  "mcpServers": {
    "remote-composio": {
      "serverUrl": "<https://connect.composio.dev/mcp>",
      "headers": {
        "x-consumer-api-key": "your-composio-api-key"
      }
    }
  }
}
Note: Antigravity uses
serverUrl(noturl) for remote HTTP-based MCP servers. This is different from theurlkey used in Cursor and VS Code configs.
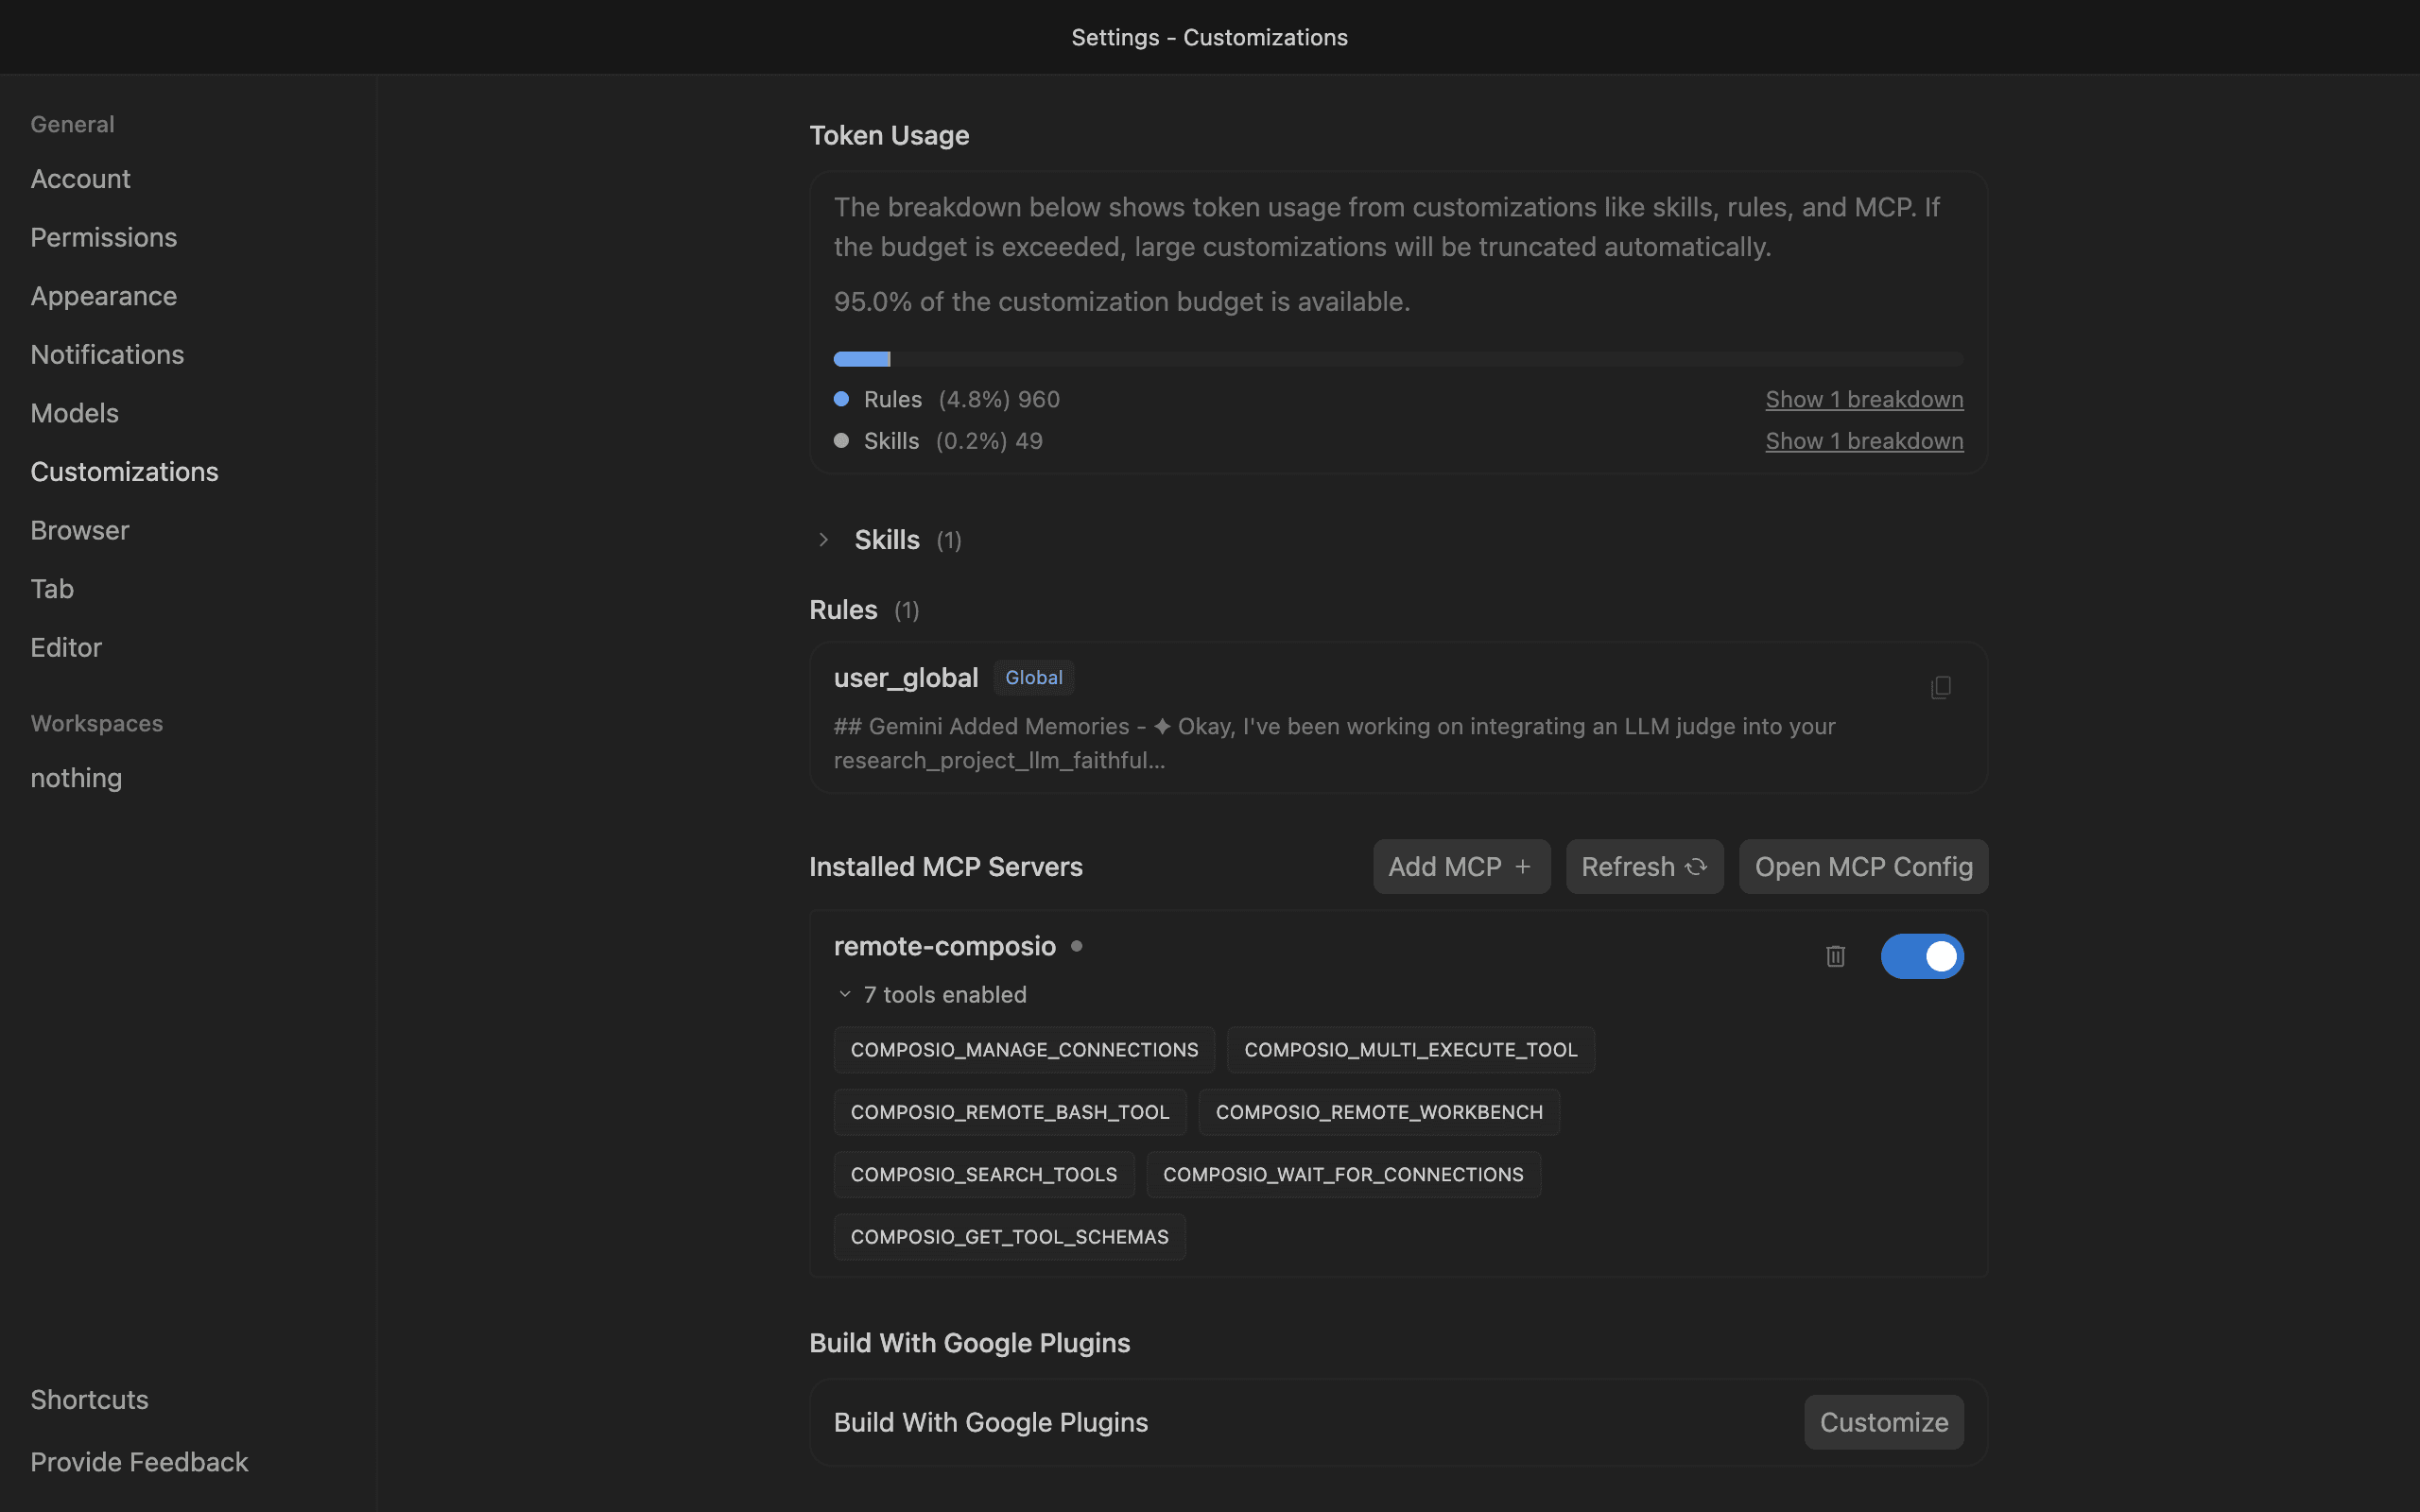
Save the file and hit refresh in the Installed MCP Servers section.
Connect your Gmail account
Back in the Antigravity agent panel, ask the agent to connect to Gmail or give it any Gmail-related task.
For example, ask it to:
"Summarize unread emails from this morning"
"Create draft replies to urgent messages"
"Fetch contact details for recent senders"
It will prompt you to authenticate and authorize access to Gmail.
That is it. Composio tools are now available in Antigravity, and your Gmail account is ready to use.
Why Use Composio?
Composio provides a single MCP server (or CLI tool) that exposes a set of meta-tools, allowing you to:
Connect to 1,000+ apps with on-demand tool loading, so you don't fill your LLM's context window with unnecessary tool definitions.
Use programmatic tool calling through a remote Bash tool, letting LLMs write their own code to handle complex tool chaining. This reduces back-and-forth for frequent tool calls.
Handle large tool responses outside the LLM context to keep conversations lean.
Usecase with Antigravity and Composio
1. Using Composio MCP to automate Code Review & Update
Senior developer often analyse intern codebases, pointing out errors, summarising them and sending them to their Slack/Gmail.
This can be a time-consuming, mundane & repetitive task. So, they can delegate it to Antigravity + Composio combo.
So here is a prompt to paste in the agent window prompt box (much like VS Code)
Prompt
Find the bugs in @agent.py @requirements.txt @__init__.py .
Categorise them in low , medium high priority and create a short summary analysis with proper formating.
Then using @mcp:rube_mcp: Send the summary to devloper.hs2015@gmail.com with title "Code Analysis Summary".
In simple terms, the prompt asks the LLM to review the codebase, identify bugs, generate a summary, and email it to the user. The output should include a summary and a mail link. And all this should be done using rube’s Gmail tool.
We don't have Gmail support in Antigravity, but rube helps here!
Now click > And wait till it's complete. If this is 1st time, rube will ask you to connect your Gmail account to send mail, but that's just OAuth for you.
Finally, it will come back with the draft/task it performed and an email link. Pretty transparent 😅
Here I am performing the same:
Note: You can even ask it to send to team slack, but I went with gmail, as this is just a demo.
Hopefully, now the intern will find the email and fix it all and send a pull request again :)
2. Using Composio MCP to handle Supabase Database for Apps
Backend developers often need to create different database models for different projects. This can be time-consuming, mundane and repetitive.
You can leverage Rube MCP to connect to Supabase, access Supabase, and use the tools to pull real-time data. Best part: Rube loads all the tools on the fly when needed, without overloading your context window.
Here is a prompt to do so:
Build a minimal Student Grade CRUD application using Flask, Jinja, HTML, and CSS. The aesthetic should be "Google Material Minimal"—clean white backgrounds, subtle shadows, rounded corners, and excellent typography.

Phase 1: Database Setup (via rube_mcp)
Use the `rube_mcp` tool to interact with Supabase.
1. Create a table named `students` in the database `student-data`.
2. The schema should include: `id` (serial/int, primary key), `name` (text), `subject` (text), `grade` (int), and `last_updated` (timestamp).
3. Immediately seed this table with 5-10 realistic mock entries (e.g., "Alice Smith", "Mathematics", 92).

Phase 2: Flask Application
Create a single-file Flask app (or standard folder structure if preferred) that connects to this Supabase instance.
1. API/Routes:
   - GET `/`: Render the dashboard showing all students.
   - POST `/add`: Add a new student.
   - POST `/update/<id>`: Update a student's grade.
   - POST `/delete/<id>`: Remove a student.
2. UI/UX:
   - Use Jinja2 for templating.
   - Style using vanilla CSS (no external frameworks like Bootstrap).
   - Design: Center-aligned card layout. The table should look like a Google Docs file list or Google Classroom roster. Use soft gray borders (#e0e0e0) and the system font stack (Inter/Roboto/San Francisco).
   - Add a "Add Student" floating action button (FAB) or a clean top bar button.

Ensure the code is production-ready, handles database connections securely, and renders the frontend cleanly.
In summary: prompt the LLM to create a Google minimal style UI-UX-based CRUD app (for demo purposes) and pull in mock data defined in Supabase student-db using crud api’s. Here, the database was created using. rube_mcp.
Here is how it worked for me!
NOTE: For demo purposes, I have used a CRUD app example, but same flow can be expanded to complex project as well
Tip
Always provide enough context for the LLM to perform the job as expected. For this example, this translates to adding:
db name - student-db
column name - id, name, subject, grade, last_updated
mock data - in tuple pairs.
With this power in hand, backend devs can create a robust, scalable database with just the right instructions! To ensure these generated schemas maintain strict quality standards in production, consider implementing data contracts as part of your governance workflow.
Now off to the final use case of today!
3. Using MCP to generate Frontend Code from Figma Mockups
Frontend developers often have to convert the Figma designs shared into webpages. They can leverage Composio MCP to connect to Figma, fetch the designs, and generate the frontend code for them—best fact: no need to handle the conversion details; all done by rube.
Prompt
Here is the figma file url https://www.figma.com/design/CHX6G247vkQFDYh84Qv9CS/Low-fi-Wireframe-Template--Community-?node-id=123-0&p=f&t=6OH8UhfkjgLRPLpE-0.

Implement a blog based ui base on the given wireframe. Keep ui minimal and clean, similar to google (materialistic design).

Only Tech stack to be used: HTML, CSS. Create the project in new folder called blog-space. I only need Mocup UI for client.

Make sure to fetch the file using rube_mcp and then only start designing
In a nutshell, the prompt provides the LLM with a Figma URL and asks it to replicate the wireframe into an HTML blog page with CSS, all in the same folder.
Again, we don't have Figma support in Antigravity, but rube helps here!.
Output
Tip
For generating a complex frontend, follow these guidelines for optimised results:
Name the layers; include additional details, such as row and column numbers, in the layer names themselves. E.g
memo-card-grid-row0-col0(the leftmost corner).Name the colour styles. E.g. ❌ #FFFFFF, ✔️ background-color-white
Name the file properly. Please don’t keep it generic.
These guidelines provide the model with enough context to generate the complex frontend architecture that developers are expected to deliver.
These were some use cases; the list is endless. But here is the final verdict!
Conclusion
With Antigravity and Composio, the repetitive task became child’s play, and the best part is that this same workflow can be incorporated into various domains.
Though Antigravity is new, it packs some serious punch and with Rube MCP as a partner, the only limit is your imagination.
So, head to Composio MCP, connect it to Antigravity, pull up some PRD doc, give it to Gemini 3 / Nano Banana Pro with a kickass prompt, and let the tool do its thing while you focus on ideating and planning the part.
You can pair MCPs with Antigravity Skills to get the best value out of the ecosystem.
Happy Building….
Frequently Asked Questions
Q1. How do I integrate MCP into Antigravity?
Answer: Generate a token from the Rube dashboard and paste the provided command directly into your Antigravity’s mcp.json raw config.
Q2. How do I verify that my MCP is successfully connected to Antigravity?
Answer: Head to "Manage MCP Servers" in the editor, refresh the page, and confirm that the Rube tool appears in your active list.
Q3. Do I need to configure credentials for all 1000+ tools manually?
Answer: No, you configure Rube once, and it dynamically handles connections, requiring only a one-time OAuth login the first time you use a specific MCP server.
Q4. Can Composio handle tasks for platforms not natively supported by Antigravity?
Answer: Absolutely; Rube acts as a bridge to fetch data and perform actions on external platforms like Figma, Supabase, and Gmail that the native IDE doesn't support yet.

 Get started