


Codex is one of the best coding agents out there, and using it with an MCP makes it even more powerful. However, you have to be careful about MCPs, as they may have serious limitations.
Context pollution: When you overwhelm the models with too many MCP servers with unnecessary tools, it can't take so many requests.
Programmatic tool chaining: While not a flaw of MCP itself, it is where LLMs can write their own glue code to connect to API endpoints. This is done to improve execution reliability but can overwhelm the context window.
Handling large responses: LLMs can write code to parse and retrieve information from the file system. Instead of dumping information right into its context, efficient response handling can improve LLM performance and token consumption.
How do you solve MCP issues?
This is what Composio MCP gateway is built for. It's just one MCP server that connects to 1000+ apps on any AI you use, like Codex, Claude Code and Cursor. The trick is that it doesn't dump every tool from every app into your context. It exposes 7 meta-tools instead, and those give you:
On-demand tool loading. The agent searches the catalogue and pulls in only the tools it needs at runtime (
COMPOSIO_SEARCH_TOOLSandCOMPOSIO_GET_TOOL_SCHEMAS), so your context stays clean.A remote workbench. GPT models can write and run code in a remote sandbox (
COMPOSIO_REMOTE_WORKBENCHandCOMPOSIO_REMOTE_BASH_TOOL) to chain several tools together and finish a task in one pass.Large response handling. Big tool outputs get processed outside the model's context, so you save tokens, and the model stays sharp. It only pulls back what it actually needs.
How to set up MCP for Codex
Codex shows up wherever you work. There are four ways to run it.
GUI Mode. Install the Codex extension in VS Code, Cursor, or Windsurf. It reads your workspace, edits code, and runs tasks right inside your editor.
CLI Mode. If you live in the terminal, install the Codex CLI with
curl -fsSL https://chatgpt.com/codex/install.sh | sh, or withnpm install -g @openai/codex. Then runcodexin your project.Cloud Mode. Hand off heavy tasks to Codex Cloud from your IDE or from GitHub with
@codextags, and let it run builds remotely while you get on with other things.Codex App. The Codex desktop app for macOS and Windows. Clean UI, easy to work in, and it's the option OpenAI now recommends you start with.
To use Composio you just need a bit of setup. Here's how to do it in each mode.
1. Set up MCP in Codex GUI Mode
Heads up before you start: getting MCP servers to show up in the Codex VS Code extension is still rough. The extension officially supports MCP and shares the same config.toml as the CLI, but in practice servers that work fine in the CLI often don't get detected in the extension. That's a live, still-open bug (issue #6465, last updated June 2026). So if a server doesn't appear right away, you're not doing it wrong. Here's the setup I use.
Open the Composio dashboard and sign up or log in.
Add an API key (it starts with ck_).
Install the Codex extension for VS Code and log in.
Open ⚙️ → MCP Settings → + Add server → Streamable HTTP.
Fill in these details:
Name:
composioURL:
https://connect.composio.dev/mcpHeaders: Key
x-consumer-api-key, Value<your-api-key>
Hit Save, then Refresh, then Authenticate, and you're done.
One shortcut worth knowing: with Codex, you can skip the header entirely. Add the server with just the URL, and Composio will use OAuth automatically. Save, click Authenticate, and finish the flow in your browser.
To check the server is live, paste this into the prompt box:
Do you have access to [mcp-server]? Tell me all the tasks it can perform.If it lists the tasks it can do, or the MCP details, you're good. If it comes back empty, that's the extension bug above, so try a refresh, restart the editor, or fall back to the CLI setup below (same config, and the CLI reads it reliably). You can always look at the raw config through ⚙️ → MCP Settings → Open config.toml.
Now let's do the same thing on the CLI.
2. Set up MCP in Codex CLI Mode
There are two ways to add an MCP server on the CLI.
The config file,
config.toml, which is manual and explicit.CLI commands, which are faster.
I lean toward the config file. Everything lives in one place, and it feels native to Codex. Here's the config-file approach.
Install the Codex CLI with
curl -fsSL https://chatgpt.com/codex/install.sh | sh, ornpm i -g @openai/codexif you'd rather use npm (you'll neednpminstalled).Codex keeps its config in a hidden
.codexfolder. Create it withmkdir -p ~/.codexfor a global config, ormkdir -p .codexin your project root for a project-scoped one.Create a file called
config.tomlinside it, paste the following, and save.
[projects."/home/devloper_hs/codex-tests"]trust_level = "trusted"
[mcp_servers.composio]enabled = trueurl = "https://connect.composio.dev/mcp"
[mcp_servers.composio.http_headers]x-consumer-api-key = "<your-api-key>"
A few notes.
Swap the project path for your real absolute path.
Swap
<your-api-key>for the key from dashboard.composio.devSet
trust_level = "trusted"if you're keeping this in a project-scoped.codex/config.toml. Codex ignores project-local config for untrusted projects, so leaving it untrusted means your MCP server won't load. If you want to keep the project untrusted, put the server in the global~/.codex/config.tomlinstead.Prefer OAuth over an API key? Drop the
http_headersblock, save, and runcodex mcp login composioto authenticate.
If you'd rather use commands, the CLI can add both Streamable HTTP and stdio servers. For an OAuth server like Composio, add the URL to your config and then run:
codex mcp login composioFinish the browser sign-in when it pops up.
For stdio-based MCP servers, use:
codex mcp add <server-name> --env VAR1=VALUE1 --env VAR2=VALUE2 -- <stdio server-command>For example:
codex mcp add context7 -- npx -y @upstash/context7-mcpNow let's verify it.
Verify installation
From your project root, run
codexand log in.Run
/mcpto see your active servers. If it says you're not logged in, make sure you log into Composio using
codex mcp login composioTo confirm Codex is actually using the server, run it through a quick validation prompt, like "Send a test Slack message to myself."
Next up, cloud mode.
3. Set up MCP in Codex Cloud Mode
Codex lets you delegate tasks to a cloud instance, so developers can focus on other work.
Sadly, this has been planned for a long time but hasn't shipped. The blockers are: secure tool proxying, credential forwarding, deterministic replays and more.
A smart approach is to use the MCP process locally, then delegate responses and the rest of the work to the cloud.
4. Set up MCP in the Codex App
Click on the Settings gear icon on the bottom left.
Go to MCP Servers. You’ll see some servers that you can authenticate and use.
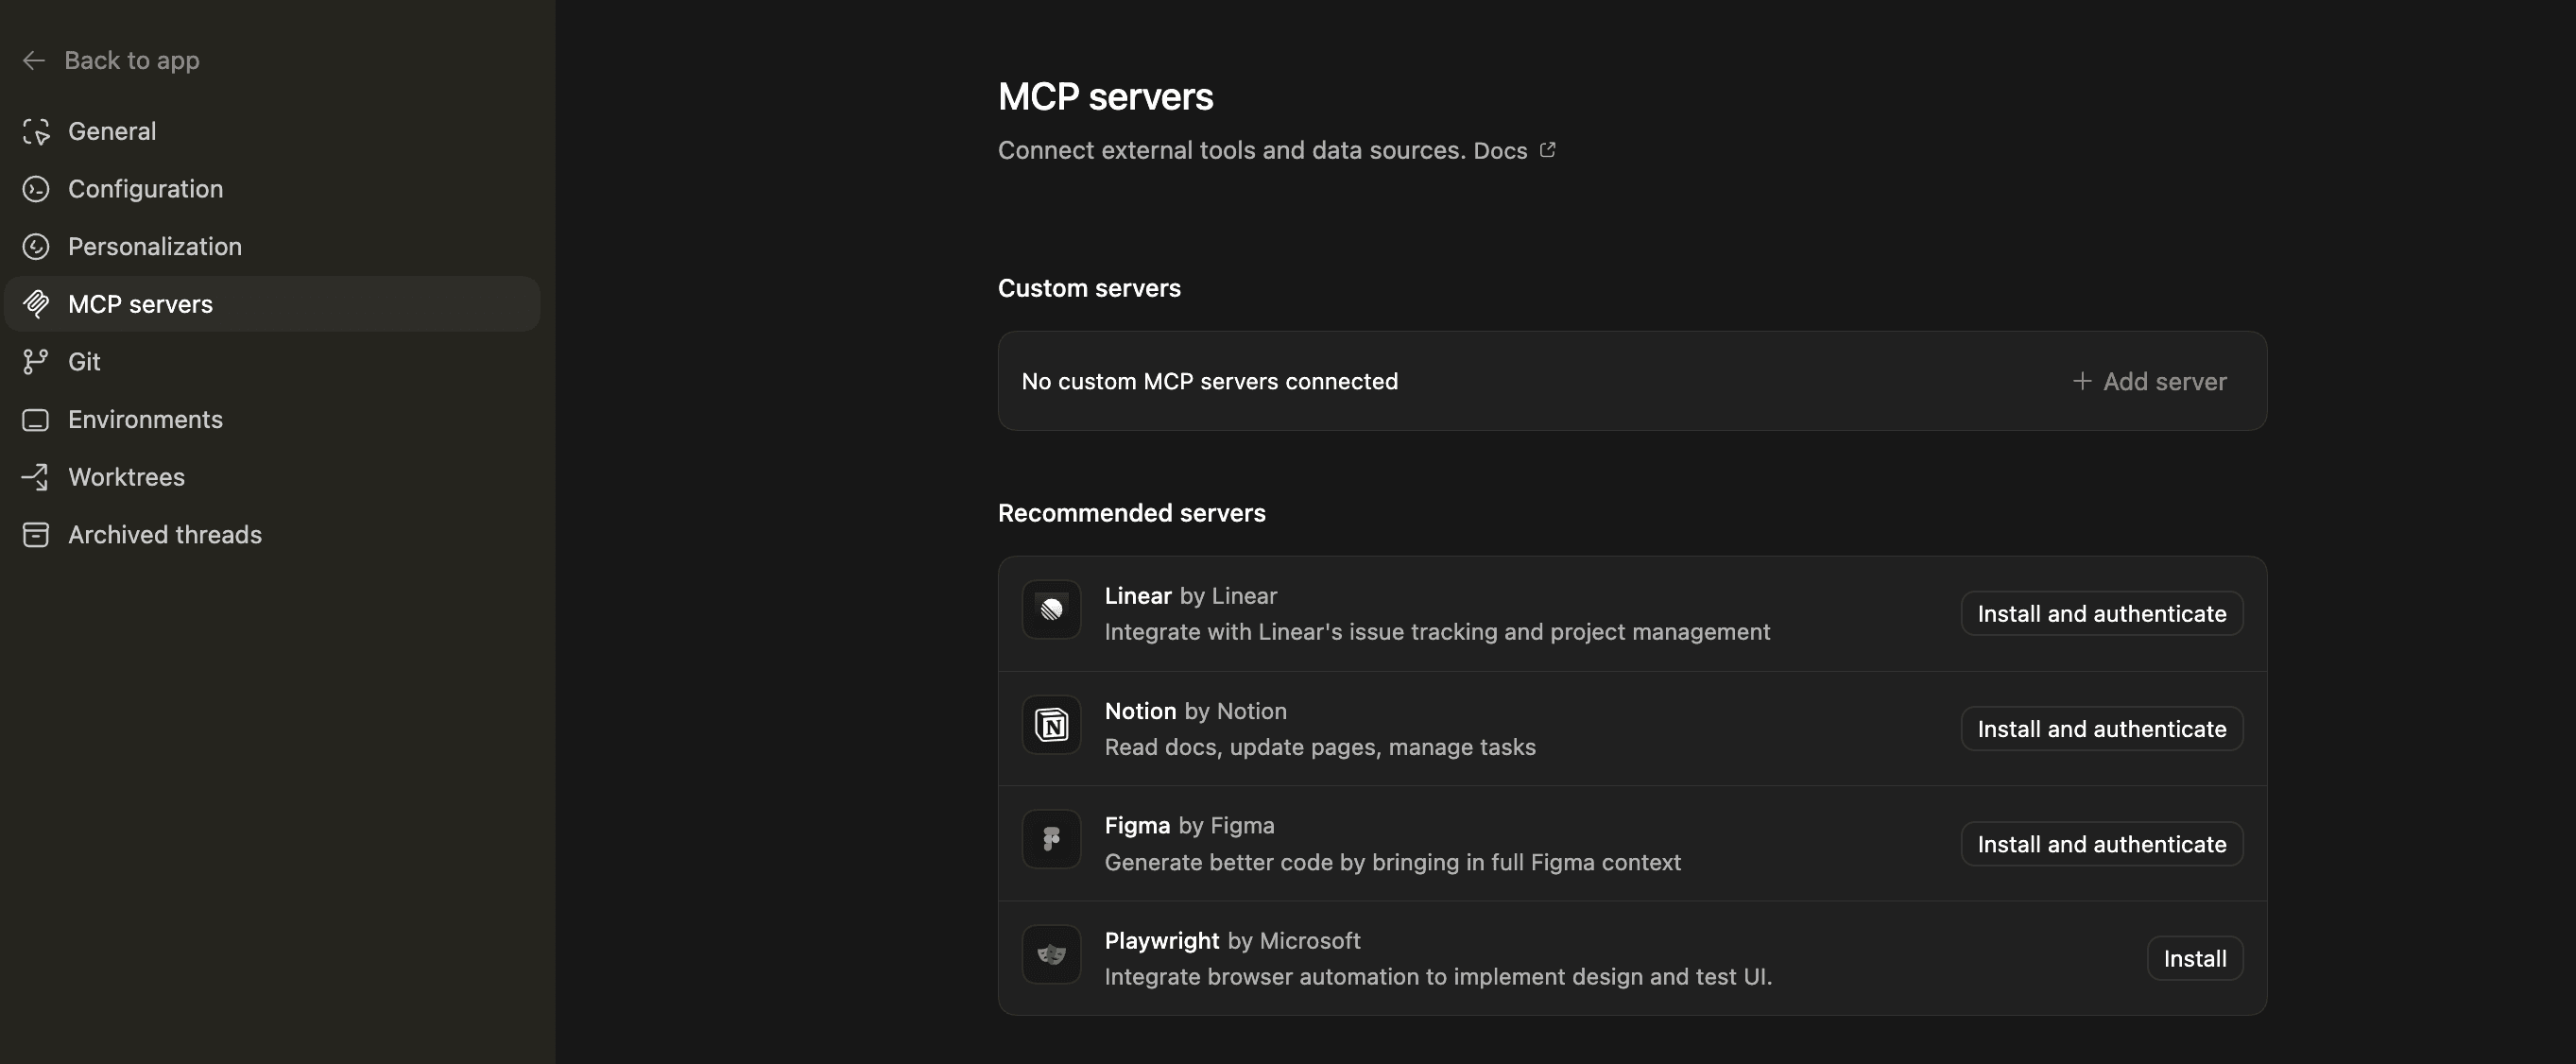
Or, add server
Choose STDIO or Streamable HTTP
Add your MCP server
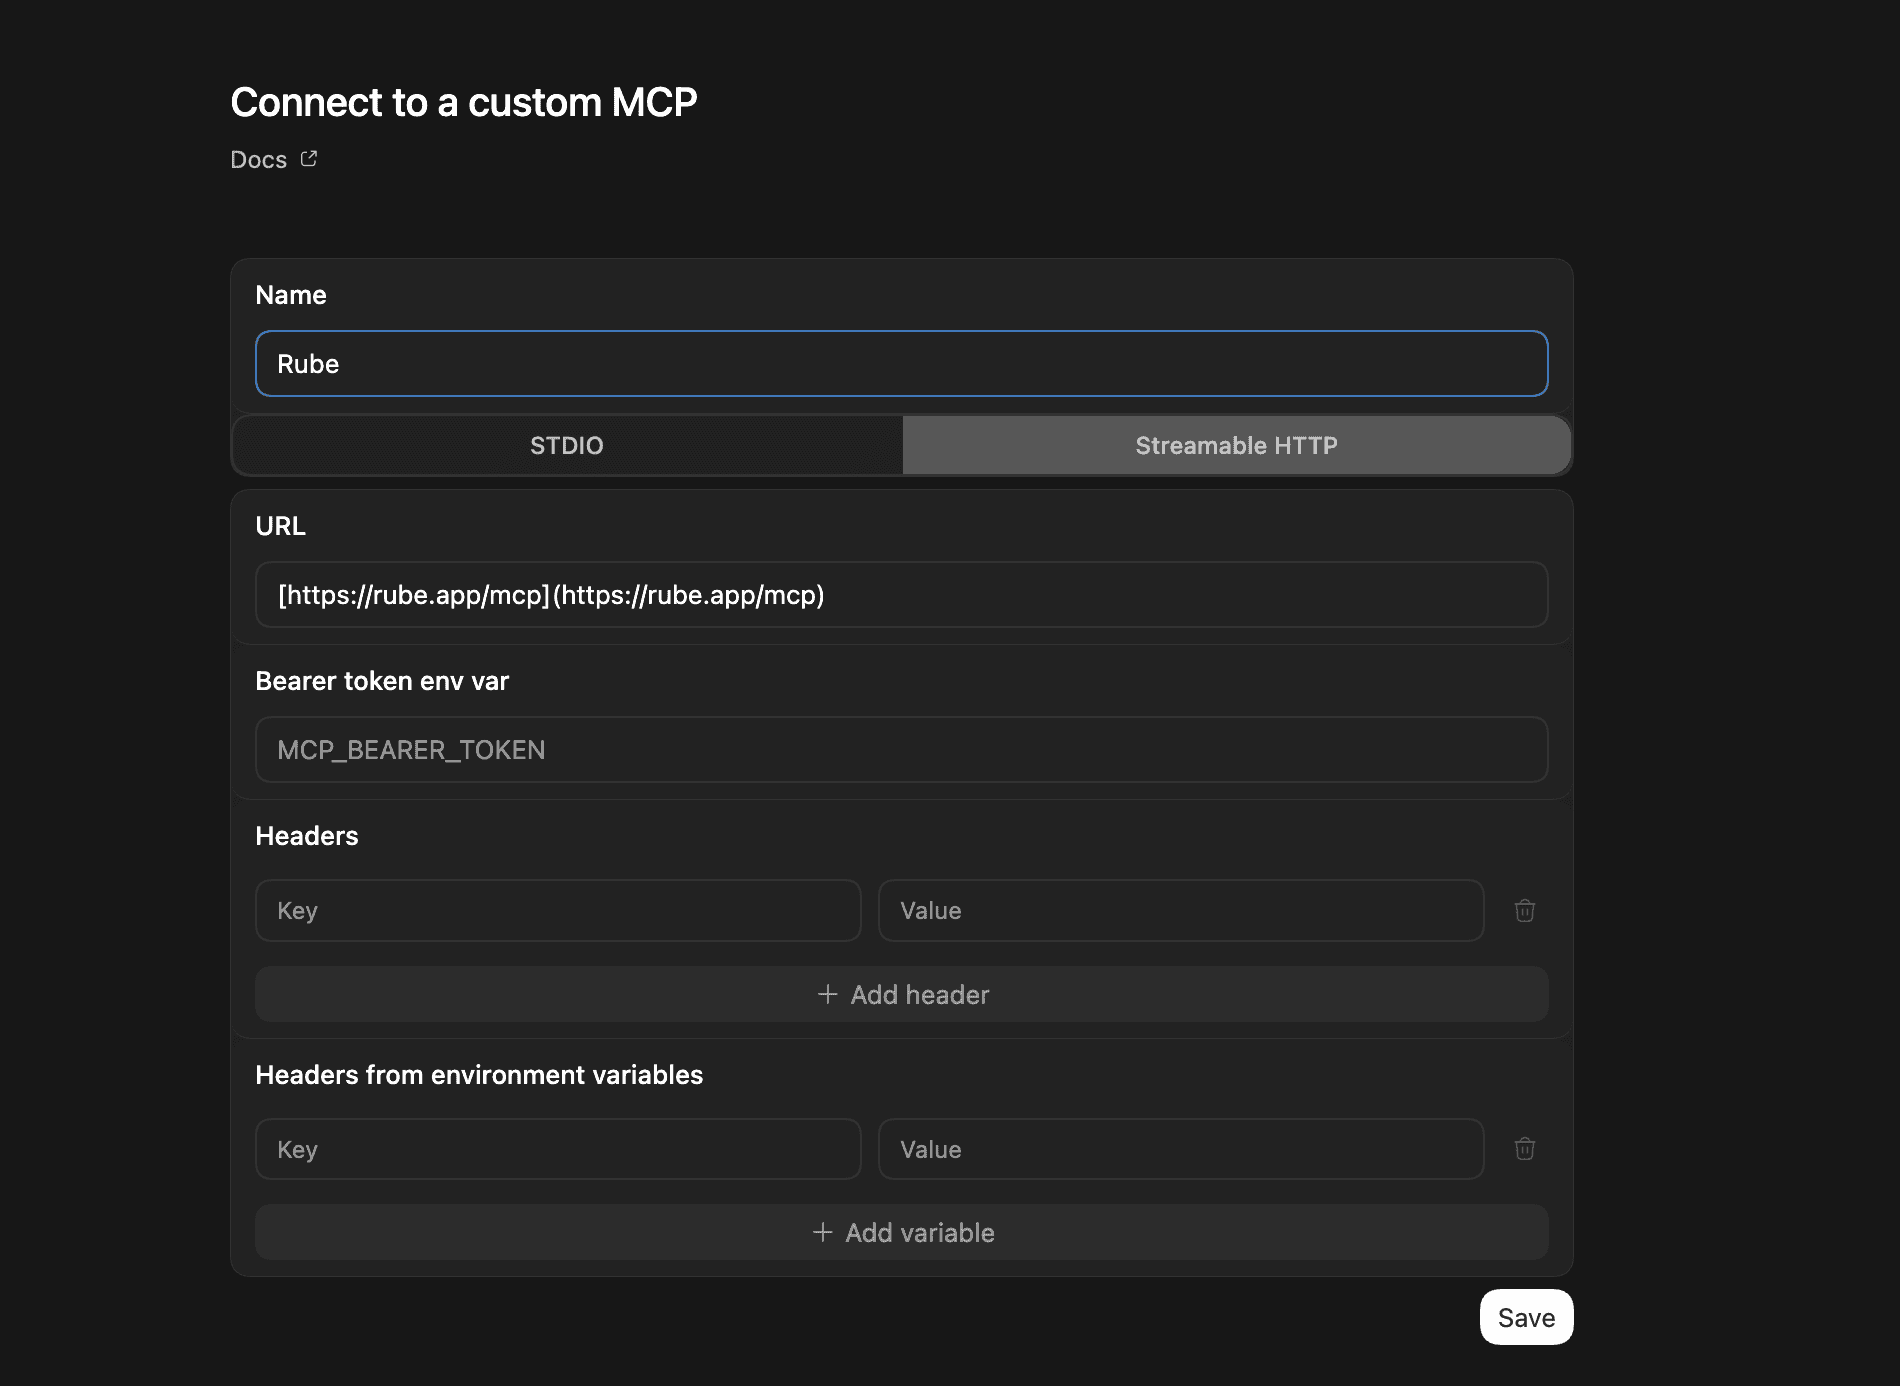
And you’re done.
4. Set up MCP in the Codex App
Click the Settings gear in the bottom left.
Go to MCP Servers. You'll see servers you can authenticate and use.
Click Add server.
Pick STDIO or Streamable HTTP. For Composio, choose Streamable HTTP and use
https://connect.composio.dev/mcp.Add the server and authenticate.
That's it.
Since Codex shares one config.toml across clients, a server you add on the CLI will show up in the app too (the app doesn't have the same detection bug the VS Code extension does).
So, with this, we are all set to look at a few use cases of Codex!
Use Cases of Codex + MCP
1. Pulling old project commits into a sheet for a refresher
Integrations: Google Sheets and GitLab
Create a new Google Sheet and add a summary of my last 10 code activities (PRs, commits, stale branches) from my [project] GitHub and local repository. Give me the sheet link at the end.The output gives me a quick sense of where I left off, so I can jump back in without digging around. No more tedious catch-up.
There's more.
2. Building changelogs and project reports on the fly
Integrations: GitHub and Google Docs
Create a new Google Doc and generate a clean, nicely formatted changelog report for my [project]GitHub repository using all the merged commits. Give me the doc link.This turns my changelog into a tidy Google Doc I can share as a Doc or PDF. Teammates use it to check progress, ask questions, or suggest changes.
That's the productivity side. Here's an actual dev use case.
3. Extracting design tokens from a Figma file
Integrations: Figma
This one changed how I work. I'll be honest, frontend isn't my strength, so I usually take inspiration from Figma designs. Converting a design to code by hand was always a slog. Now I open Codex and ask it to extract design tokens I can use to rebuild the frontend in a similar style.
Analyze the Figma design file at https://www.figma.com/design/ZoE3NGZObwwNBr9Iyv8X9G/Shopping-Website (node-id=2-tokens), and generate a markdown file named design.md at the root of the project containing a professional design system reference. Include token definitions, usage guidelines, naming conventions, and example mappings suitable for engineers to implement directly in code.I still tweak a few things before I ship, but the Codex and Composio combo makes this so much easier than it used to be.
And here's the bonus, this one's for content creators.
Turning Codex into a devlog-to-Medium draft writer
Integrations: Google Docs and Notion
Plenty of developers keep devlogs while they build, just short summaries of what they got done. With Codex and MCP you can feed those logs in day by day and turn them into a blog post worth sharing, the same way bigger companies do it. Here's the prompt I used.
You are tasked with creating an SEO-optimized blog post from development logs for Medium publication.
**Requirements:**1. Read the @devlog file content in chronological order (earliest to latest by day)2. Transform technical devlogs into a narrative-driven blog post with personal storytelling3. Use Composio's googledocs tool to create and format the document4. Follow this structure:   - Engaging title with primary keyword   - Compelling hook/introduction   - Main body with 3-5 naturally flowing sections   - Personal insights and lessons learned   - Conclusion with takeaways   - Call-to-action
**Writing Style:**- First-person perspective ("I discovered...", "My journey with...")- Story-driven narrative that connects technical milestones- Natural transitions between sections (avoid forced segmentation)- Balance technical detail with accessibility- Include challenges, breakthroughs, and reflections
**SEO Optimization:**- Include relevant keywords naturally in headers and content- Use H2/H3 headings for structure- Add meta description (150-160 characters)- Include 3-5 tags for Medium- Optimize readability (short paragraphs, varied sentence length)
**Formatting in Google Docs:**- Bold for emphasis and subheadings- Italics for technical terms or emphasis- Bullet points for key takeaways- Code blocks where appropriate- Proper spacing between sections
Execute the task by:1. Analyzing devlog files chronologically2. Creating the narrative structure3. Applying proper formatting4. Writing the blog post with Composio's googledocs tool
Output the Google Docs URL when complete.
Codex can't touch Google Docs on its own, but MCP fixes that. Codex writes the post, and Composio handles Google Docs. So anyone can take a week of builds and turn it into a finished blog post or shareable content.
That should give you a decent sense of what's possible.
One last thing before we wrap.
Final Thoughts
Vibe coding keeps pushing software forward, but a lot of people still treat Codex and MCP like a magic box you poke and hope. That's where it goes wrong.
None of this works by magic. These tools need clear, structured prompts to give you anything good, and most people haven't built that habit yet, so their results fall apart.
Composio takes some of that pressure off. It gives your prompts real, pre-authenticated tools to work with instead of leaving the model to guess.
This is where things are heading. Getting good at these tools is going to matter, so it's worth starting now.
Head to composio.dev/for-you, connect it to Codex, and start building.
Frequently Asked Questions
What is an MCP, and why would I use it with Codex?
MCP is a way for Codex to talk to external tools like Confluence, HubSpot, Bitbucket, Asana, and Shopify via “servers” that expose actions Codex can call. By using an MCP server, Codex can actually take actions with your apps, not just generate code. The catch is that the more tools you attach, the easier it is to overwhelm the model or get unreliable behaviour, which is why you have to be careful when setting up an MCP with Codex.
What’s “context pollution,” and how do I avoid it?
Context pollution occurs when you connect too many MCP servers or expose too many tools, so the model spends tokens scanning irrelevant tool lists and instructions rather than solving the task. To avoid it, keep your MCP list lean, prefer on-demand tool loading, and only enable servers that match the job you are doing right now. If you notice Codex getting vague, slow, or “forgetful,” tool overload is often the reason.
Why does “programmatic tool chaining” matter if MCP already connects tools?
MCP gives the model access to tools, but tool chaining is about reliability and efficiency. When Codex can generate small glue code that composes multiple API calls, it can reduce back-and-forth tool invocations and handle branching logic cleanly. Done right, it lowers context churn and gets results quicker and more efficiently, especially for multi-step workflows like “pull commits, summarise, write report, publish to Docs.”
How does Composio MCP handle large tool outputs without blowing up tokens?
The main issue Composio solves is large tool call responses. Basically, dumping big payloads straight into the model context wastes tokens and can degrade output quality. Composio MCP’s approach is to keep heavy outputs outside the model context and let the model retrieve only what it needs, when it needs it. In practice, that means faster runs, fewer failures, and better performance on workflows that touch repositories, documents, or design files.

 Get started