TL;DR
Deep research is the hottest AI feature right now. Every LLM provider is adding to their product. But the models are proprietary, and you have less freedom.
Check this out for using Composio's SaaS apps with LangGraph for building deep research agents.
So, I built a local deep research agent. Here’s what I used
LangGraph for orchestrating the agentic workflow
DuckDuckGo search tool for searching content online
Ollama for locally hosting the model
Qwen 3 as the model provider
How It Works
Local Deep Researcher is inspired by IterDRAG.
We will be using IterDRAG approach to build our agent. Here is a simple diagram to help you understand the flow in terms of langraph.
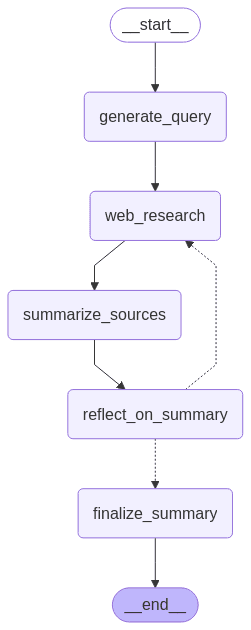
In this approach, we will decompose a query into sub-queries, retrieve documents for each one, answer the sub-query, and then build on the answer by retrieving documents for the second sub-query.
In Langgraph, nodes (rectangular blocks) represent execution, while the edges (arrows) represent flow. I hope the diagram is straightforward.
However, I will explain more details in the respective sections.
The Code
Now that you have understood how our project will work, let’s get building.
For simplicity, I have divided this section into three subparts: Workspace Setup, Main Code, and Running the Program. If you are a seasoned developer, you can skip to the main code; otherwise, kindly follow the workspace setup.
Workspace Setup
Let’s start setting up the workspace to ensure our code runs in an isolated environment.
1. Define Folder Structure (optional)
Head to the terminal and type the following command one by one
# create a base folder
mkdir qwen3_deep_research_agent
cd qwen3_deep_research_agent

# Create files in the root directory
type nul > .env
type nul > langgraph.json
type nul > pyproject.toml

# Create directories
mkdir src
mkdir src\ollama_deep_researcher

# Create files in src\ollama_deep_researcher
type nul > src\ollama_deep_researcher\__init__.py
type nul > src\ollama_deep_researcher\configuration.py
type nul > src\ollama_deep_researcher\graph.py
type nul > src\ollama_deep_researcher\prompts.py
type nul > src\ollama_deep_researcher\state.py
type nul > src\ollama_deep_researcher\utils.py
Once executed, verify that your folder structure is
. (qwen3_deep_research_agent)
├── .env
├── pyproject.toml
└── src
    └── ollama_deep_researcher
        ├── __init__.py
        ├── configuration.py
        ├── graph.py
        ├── prompts.py
        ├── state.py
        └── utils.py
Now that we have the required files in the root, it’s time to fill them out. For simplicity, you can click on each of the filenames and copy the code:
.env– stores all the environment variables, secrets
pyproject.toml – acts as a project config file to standardise & simplify the configuration of Python projects. Or
requirements.txt– Alternatively, you can also create a
requirements.txtfile to store all the dependencies (obviously, you must create it).
2. Virtual Environment Setup
Next, head to the root folder in terminal and type:
python -m venv .venv
.venv\Scripts\activate
Ensure the output shows:
(.venv) path/to.working/dirThis activates the virtual environment.
Next do:
pip install -e .This command looks for a pyproject.toml file and installs all the dependencies present in the dependencies.
The -e means editable mode, which links the project directory to the environment (rather than copying files to the site-package folder), instantly making all edited modules (files) available, rather than re-installing. Pretty handy
With this, our working environment is set up. Time to write the main code
Writing Main Code (agent.py)
Assuming you are clear with the logic in “How it Works”, let’s start by loading all the required libraries
1. Load All Required Libraries
The project uses various libraries for web interaction (httpx, markdownify), LLM agent orchestration (langchain_ollama, langchain_core, langsmith, langgraph), structured data handling (json, dataclasses, typing, operator).
# essentials
import re

# for model
from langchain_ollama import ChatOllama

# for data handling
import operator
from dataclasses import dataclass, field
from typing import TypedDict, Annotated, Literal

# LangChain components
from langchain_ollama import ChatOllama
from langsmith import traceable
from langchain_core.runnables import RunnableConfig
from langchain_core.messages import HumanMessage, SystemMessage
from langgraph.graph import START, END, StateGraph

# Data handling
import json
import operator
import re
from dataclasses import dataclass, field
from typing import Dict, Any, List, Union, Optional, TypedDict, Annotated, Literal
Next, let’s define the local LLM to use.
2. Define Local LLM
I will use the qwen3:8b-q4_k_m model for the demo, i.e., Qwen 3 – 8 billion parameters quantized to 4 bits with low GPU usage. You are free to use your own.
Paste the following code:
I will use the qwen3:8b-q4_k_m The demo’s model is Qwen 3 – 8 billion parameters quantized to 4 bits with low GPU usage. You are free to use your own.
Paste the following code
# imports
from langchain_ollama import ChatOllama

# instantiate the model
local_llm = "qwen3:8b-q4_K_M"
llm  = ChatOllama(model = local_llm, temperature = 0)

# set llm json
llm_json_mode = ChatOllama(model = local_llm, temperature = 0, format='json')

llm_json_mode
The code imports ChatOllama module, loads the qwen3 model, creates an instance of the model, defines a couple of parameters (temperature and format) and activates the json mode.
Next, let’s define the states
3. Define States
In langgraph, states are structures/objects that preserve all the information during the agent’s lifetime. Think of them as memories that store every interaction and update them based on agent actions.
Let’s define 3 states:
SummaryState– to all interaction data of the agent,SummaryStateInput– to store user-input data interaction – in this case,*research_topic*, the only part exposed to the userSummaryStateOutput– to store the agent output
Here is how to define it:
# summary state data class - core & preserves all important information
@dataclass(kw_only=True)
class SummaryState:
    """Summary state data class."""
    research_topic: str = field(default=None) # report topic
    search_query: str = field(default=None) # search query
    web_research_results : Annotated[list, operator.add] = field(default_factory=list) # web research results
    sources_gathered : Annotated[list, operator.add] = field(default_factory=list) # sources gathered (urls)
    research_loop_count : int = field(default=0) # research loop count - for iteration tracking
    final_summary: str = field(default=None) # final report
# summary state input object - to let user define the research topic
dataclass(kw_only=True)
class SummaryStateInput(TypedDict):
"""user input"""
research_topic: str = field(default=None) # report topicA lot is going on here, but let me simplify a bit:
The
SummaryStateclass with fields that track the entire research and summarisation workflow, which includes:research_topicandsearch_query– to capture the focus of the work,web_research_resultsandsources_gathered– lists to store accumulated findings and source URLs,research_loop_count– to track how many iterative steps the research has gone through.final_summary– to hold the completed summary report.
Using
@dataclass(kw_only=True)enforces keyword-only initialisation, improving clarity and reducing errors during object construction.Then, a
Summarystateinput, aTypedDict, defines what the user needs to provide to kick off the research process—currently, just a single field:research_topic.Finally,
SummaryStateOutput, also aTypedDict, holds the result of the process, specifically, thefinal_summary.
Next, let’s add all the required prompts.
4. Define Prompts
Prompt defines how models should act and is often considered the most essential part of any AI application.
As a side note, be specific, explicit and detailed when writing your prompt to generate the best possible output.
For our application, we will define three prompts:
Query Writer Prompt – Generates a query out of the given research topic, kind of an entry point
Summarise Prompt – Summarises all the text fetched by the web research agent to ponder next.
Reflection Prompt – Reflect on the summary, find gaps, and generate a follow-up question for the next web search.
Here are the prompts I have used; feel free to modify them if you like:
# qwery writer prompt - model feeding prompt
query_writer_prompt="""Your goal is to generate targeted web search query.
The query will gather information related to a specific topic.

Topic:
{research_topic}

Return your query as a JSON object:
{{
    "query": "string",
    "aspect": "string",
    "rationale": "string"
}}
"""
# rationale - why this query is important. incourages model to think about generation of a query itself
query_writer_prompt
# summarizer instructions prompt - 1st summarisation
summarizer_instructions_prompt="""Your goal is to generate a high-quality summary of the web search results.
When EXTENDING an existing summary:
1. Seamlessly integrate new information without repeating what's already covered
2. Maintain consistency with the existing content's style and depth
3. Only add new, non-redundant information
4. Ensure smooth transitions between existing and new content
When creating a NEW summary:
1. Highlight the most relevant information from each source
2. Provide a concise overview of the key points related to the report topic
3. Emphasize significant findings or insights
4. Ensure a coherent flow of information
In both cases:
- Focus on factual, objective information
- Maintain a consistent technical depth
- Avoid redundancy and repetition
- DO NOT use phrases like "based on the new results" or "according to additional sources"
- DO NOT add a preamble like "Here is an extended summary ..." Just directly output the summary.
- DO NOT add a References or Works Cited section.
"""
summarizer_instructions_prompt# reflection prompt - for agents internal thinking
reflection_instructions_prompt = """You are an expert research assistant analyzing a summary about {research_topic}.
Your tasks:
1. Identify knowledge gaps or areas that need deeper exploration
2. Generate a follow-up question that would help expand your understanding
3. Focus on technical details, implementation specifics, or emerging trends that weren't fully covered
Ensure the follow-up question is self-contained and includes necessary context for web search.
Return your analysis as a JSON object:
{{
"knowledge_gap": "string",
"follow_up_query": "string"
}}"""
reflection_instructions_promptThe query_writer_prompt passes instructions to the model as a JSON dict, and the same goes for the reflection prompt.
All this continues in a loop till a specific condition is met. (spoiler alert 😉)
Next, let’s add the nodes.
5. Add Nodes & Build Graph
In a language node, the task is executed, and the results are passed to the next node. For our use case, we will define five nodes:
generate_query– generates the query usingquery_writer_prompt, calls the model and store the result as JSON usingllm_json_modedefined earlierweb_research– performs the web research using any search tool/api/mcp, formats the data in a human-readable format, stores the sources in thesources_gatheredattribute ofSummaryStateand increments theresearch_loop_countattribute.summarize_sources– Invokes the LLM to update or create a summary by combining the existing summary (if any) with the latest research.reflect_on_summary– Reflects on the generated summary and creates a follow-up query using llm injsonmode.route_research—Routes the research based on the follow-up query unless the number of iterations is not met or the output is unsatisfactory. Once the output is met, finalized, or satisfied, it routes to thefinal_summarynode.finalize_summary– Combines the current summary with all the gathered sources and creates a final summary in markdown format.
Here is the code for the same:
# generate query node
def generate_query(state: SummaryState):
    """ Generate a query for web search """

    # Format the prompt
    query_writer_instructions_formatted = query_writer_prompt.format(research_topic=state.research_topic)

    # Generate a query
    result = llm_json_mode.invoke(
        [SystemMessage(content=query_writer_instructions_formatted),
        HumanMessage(content=f"Generate a query for web search:")]
    )
    query = json.loads(result.content)

    return {"search_query": query['query']}
# from ollama_deep_researcher.configuration import Configuration, SearchAPI
def web_research(state: SummaryState):
""" Gather information from the web """
# Search the web
search_results = duckduckgo_search(state.search_query, max_results=3, fetch_full_page=True)
search_str = deduplicate_and_format_sources(search_results, max_tokens_per_source=1000)
return {"sources_gathered": [format_sources(search_results)], "research_loop_count": state.research_loop_count + 1, "web_research_results": [search_str]}def summarize_sources(state: SummaryState):
""" Summarize the gathered sources """
# Existing summary
existing_summary = state.final_summary
# Most recent web research
most_recent_web_research = state.web_research_results[-1]
# Build the human message
if existing_summary:
human_message_content = (
f"Extend the existing summary: {existing_summary}\n\n"
f"Include new search results: {most_recent_web_research} "
f"That addresses the following topic: {state.research_topic}"
)
else:
human_message_content = (
f"Generate a summary of these search results: {most_recent_web_research} "
f"That addresses the following topic: {state.research_topic}"
)
# Run the LLM
result = llm.invoke(
[SystemMessage(content=summarizer_instructions_prompt),
HumanMessage(content=human_message_content)]
)
final_summary = result.content
return {"final_summary": final_summary}def reflect_on_summary(state: SummaryState):
""" Reflect on the summary and generate a follow-up query """
# Generate a query
result = llm_json_mode.invoke(
[SystemMessage(content=reflection_instructions_prompt.format(research_topic=state.research_topic)),
HumanMessage(content=f"Identify a knowledge gap and generate a follow-up web search query based on our existing knowledge: {state.final_summary}")]
)
follow_up_query = json.loads(result.content)
# Overwrite the search query
return {"search_query": follow_up_query['follow_up_query']}def finalize_summary(state: SummaryState):
""" Finalize the summary """
# Format all accumulated sources into a single bulleted list
all_sources = "\n".join(source for source in state.sources_gathered)
state.final_summary = f"## Summary\n\n{state.final_summary}\n\n ### Sources:\n{all_sources}"
return {"final_summary": state.final_summary}
def route_research(state: SummaryState, config: RunnableConfig) -> Literal["finalize_summary", "web_research"]:
""" Route the research based on the follow-up query """
configurable = Configuration.from_runnable_config(config)
if state.research_loop_count <= configurable.max_web_research_loops:
return "web_research"
else:
return "finalize_summary" Now, let’s combine all of the nodes and edges to create a graph that resembles the app’s flow.
# Add nodes and edges
builder = StateGraph(SummaryState, input=SummaryStateInput, output=SummaryStateOutput, config_schema=Configuration)
builder.add_node("generate_query", generate_query)
builder.add_node("web_research", web_research)
builder.add_node("summarize_sources", summarize_sources)
builder.add_node("reflect_on_summary", reflect_on_summary)
builder.add_node("finalize_summary", finalize_summary)

# Add edges
builder.add_edge(START, "generate_query")
builder.add_edge("generate_query", "web_research")
builder.add_edge("web_research", "summarize_sources")
builder.add_edge("summarize_sources", "reflect_on_summary")
builder.add_conditional_edges("reflect_on_summary", route_research) # conditional to wether to continue research or finalize
builder.add_edge("finalize_summary", END)

# compile the graph
graph = builder.compile()

# cleaned_summary = re.sub(r'<think>.*?</think>', '', summary['final_summary'], flags=re.DOTALL)
# cleaned_summary = re.sub(r'\n{3,}', '\n\n', cleaned_summary)
# print(cleaned_summary)
Notice the use of add_conditional_edges; this was done to add loop-back logic in route_research
7. Invoking Agent & Post Processing Response
Finally, add the following code:
# test the agent
research_input = SummaryStateInput(
    research_topic="Benifits of Panner"
)
summary = graph.invoke(research_input)

# response format
cleaned_summary = re.sub(r'<think>.*?</think>', '', summary['final_summary'], flags=re.DOTALL)
cleaned_summary = re.sub(r'\n{3,}', '\n\n', cleaned_summary)
print(cleaned_summary)
Now let’s test our local Qwen3 deep researcher.
Run The Program
Open your terminal and type:
ollama pull qwen3:8b-q4_K_M
ollama serve
In another terminal type (within the env):
python agent.pyAs we have hardcoded the research topic Please wait for it to end execution and show the final summary!
I got this as a response to a given query (Benefits of Paneer).
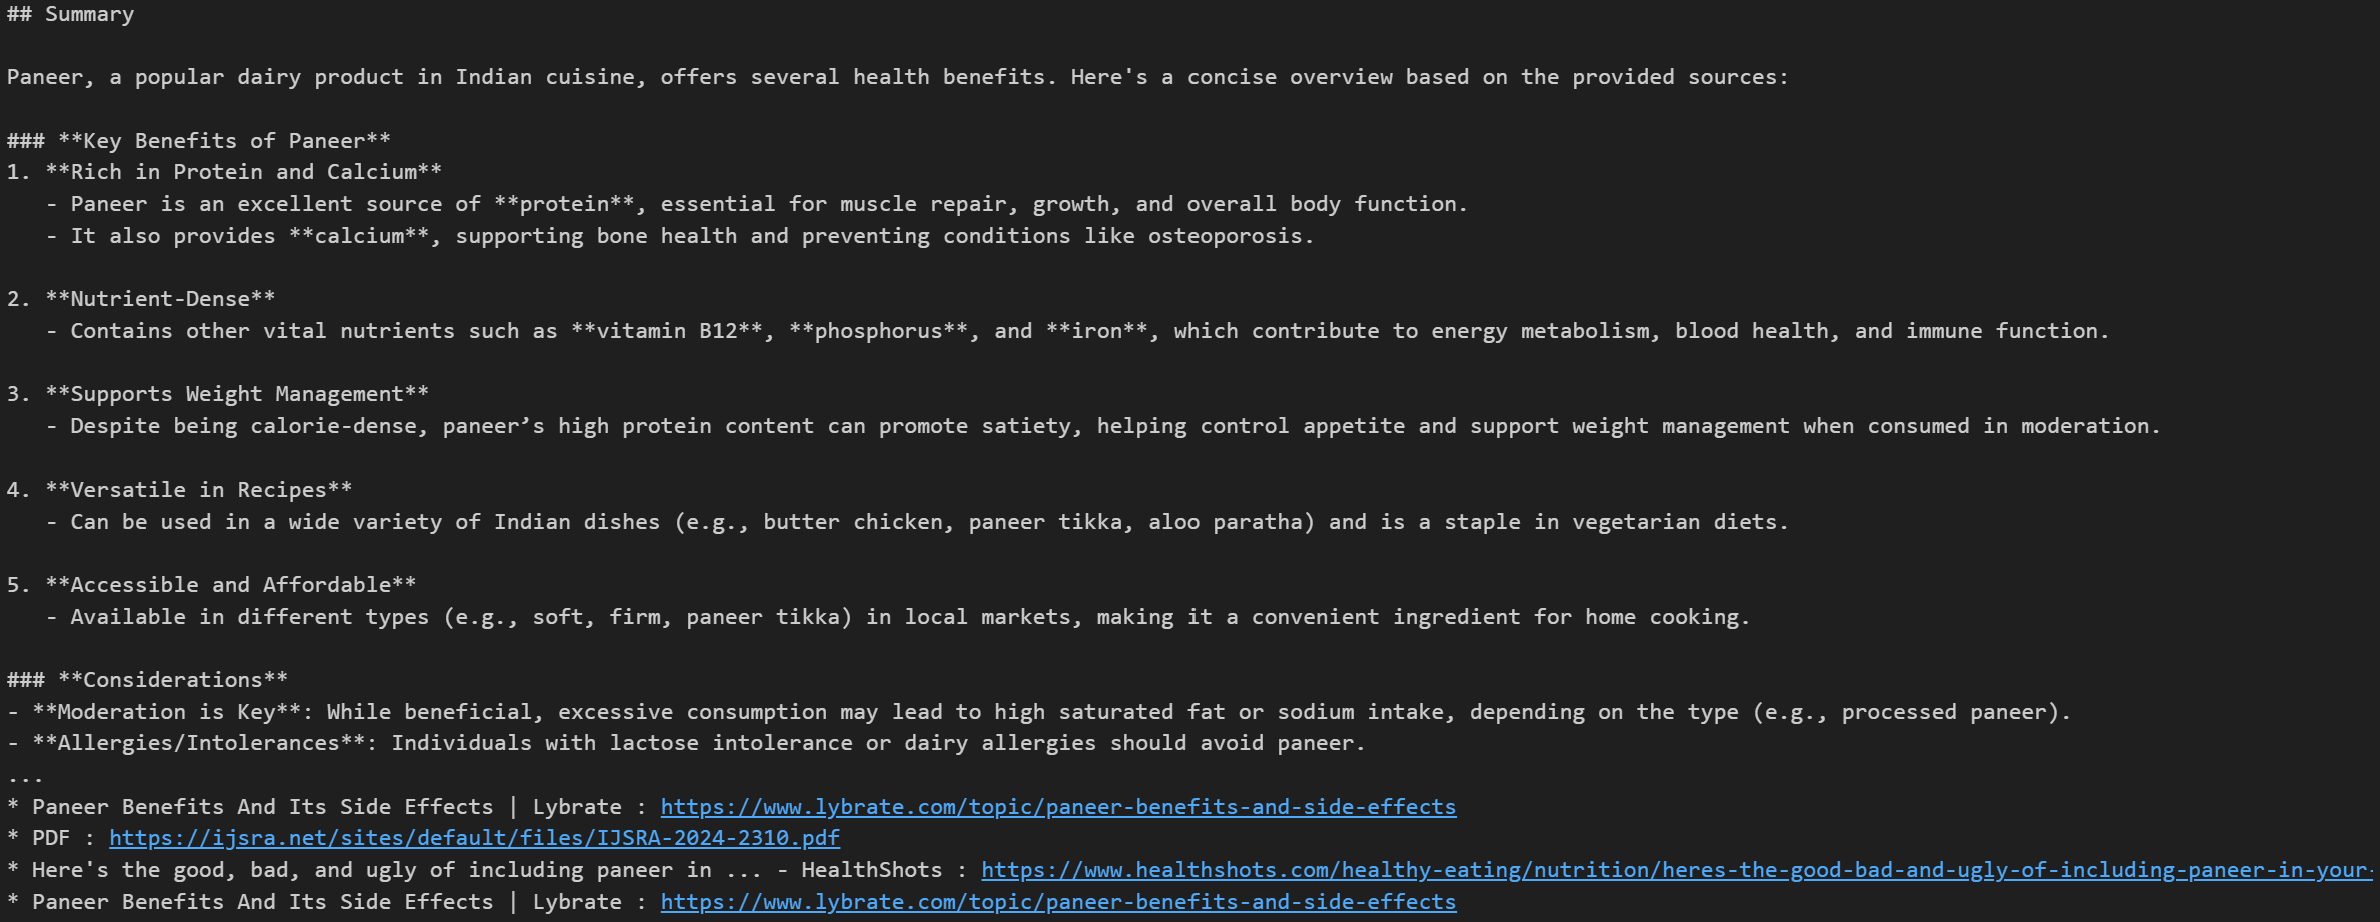
It included key benefits and considerations, balancing the best of both worlds. It also included all the relevant sources, like Google/Openai deep search.
However, as a user, all this feels limited without a UI So, let’s add the UI component to the project (optional).
Extras – Add UI (optional)
To keep things simple, I will use LangSmith for the job (it’s not a frontend, but it works). LangSmith allows me to test the agent in a pleasant UI environment with built-in evaluation and testing. One library to handle them all.
Adding a UI component requires code to be modular and adds a couple more configuration files.
I have added everything to the Project GitHub Repo for simplicity. However, you are free to build your own UI.
Here is the overview of changes:
All states, prompts and graphs are moved to
state.py,prompts.py, andgraph.py, respectively in theollama_deep_researcherfolderNew files like
__init__.py,configuration.py(holds langsmith UI configuration) andutils.py(helper utility function) are added as part of configuration and utilities, if using standalone, don’t need to add them.Readme.md file added for reproducibility.
Make sure you follow the instructions and get your repo set up.
Now let’s set up the langgraph.
Open your terminal and run:
ollama serve
pip install -e .
pip install -U "langgraph-cli[inmem]"
langgraph dev
We ran the llama to serve on a specific port, installed all dependencies in development mode, installed the langraph CLI, and ran the server.
If all is done successfully, you will see the following output:

Go to the green URL, and you can interact with the agent by adding your research topic in the field. You can tweak the settings to see how they affect behaviour.
Here is a video of me using the researcher 👇
I hope you also got a similar output to mine, or even better. To get a more detailed output, increase the Research Depth parameter.To modify options and add extra ones, edit the configuration.py file.We have concluded this comprehensive article, but here are my final thoughts on the project.Final ThoughtsBuilding this project will give you a solid foundation in professionally building agents with Langchain & Langraph.To keep things simple, I have kept the version to core features. But feel free to make it your own by adding a frontend, plugging in RAG, exploring multimodal inputs, or connecting with MCP tools using Composio Toolset / MCP (coming up next 😉) & Others.