Your team already lives in Slack. Code reviews, project updates and what not, it all happens there.
But the moment you need to file a GitHub issue, check a Linear ticket, or send a follow-up email, you leave Slack, do the thing, and come back. That context switch adds up.
What if your Slack workspace had an assistant that could do all of that for you, right in the thread. That too an isolated OpenClaw instance per user with admin control?

In this article, you'll learn how to automate an entire Slack team workspace that connects to your tools, takes actions, without you ever leaving Slack.
What's Covered
To quickly summarize what we’ll cover in this blog post, here’s what we’ll go through:
The idea behind building a Slack bot around OpenClaw.
How Composio lets each user connect their own tools.
How OpenClaw powers replies and tool usage.
These are a few things you'll understand, but there's so many others you'll learn along the way.
So, if you want to build a Slack-first (though not limited to) AI with personal tool access for each user, this will give you a solid starting point.
What we're building
We're building a Slack bot that brings OpenClaw into Slack.
Not necessarily only for Slack, you can use pretty much the same setup for something like Discord with their SDK or your custom app. The idea remains the same.
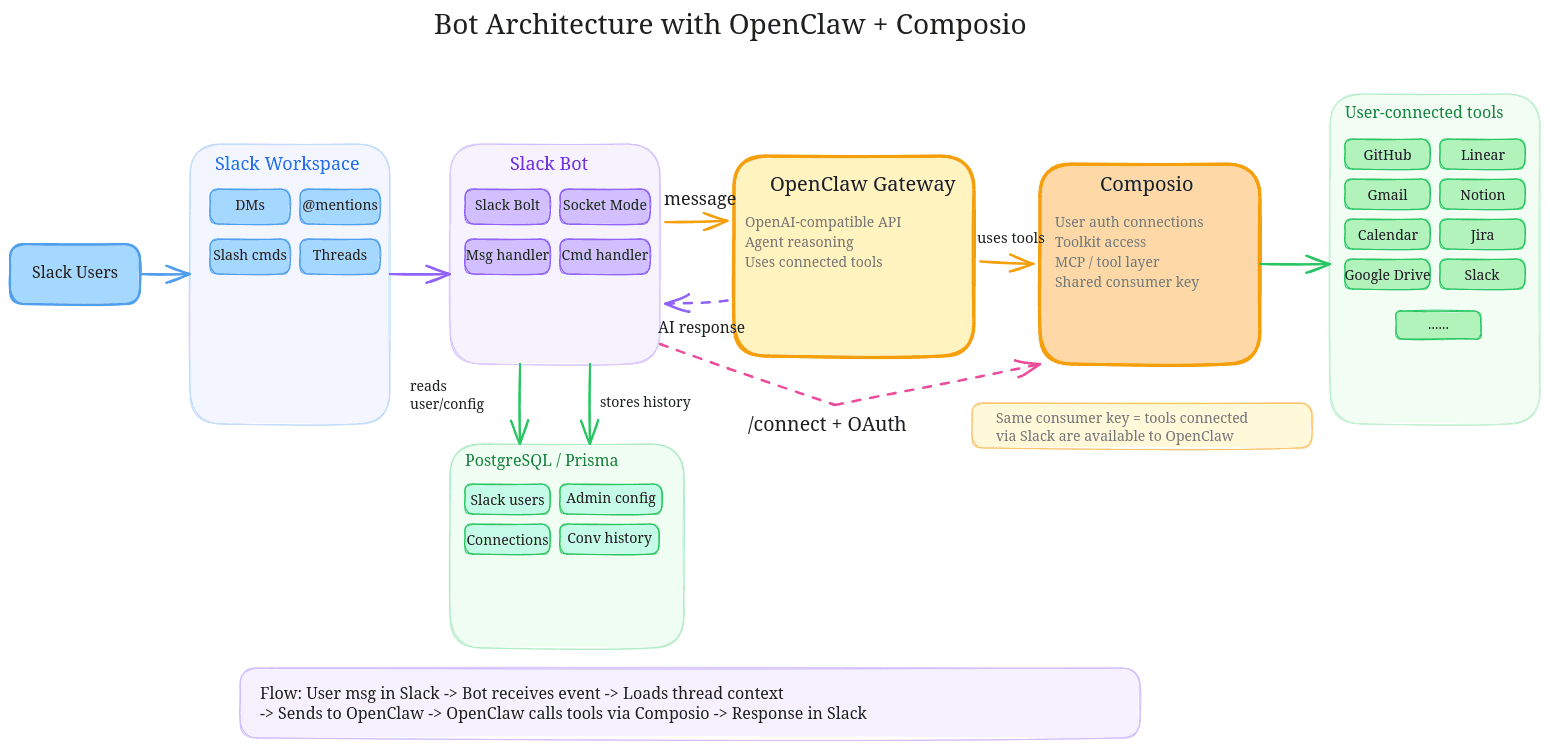
Overall the idea is to build on top os OpenClaw and give every user in a workspace their own single instance of it which powers the AI assistant. The assistant can access apps like Linear, gitHub, Jira, Gmail and more via Composio toolkits.
That way, things are isolated per user and the admin can control/limit the toolkits (GitHub, Linear, etc.) the users get access to.
Each user can connect their own tools with Composio, so the bot can chat, and take actions using the tools they’ve authorized.
Here's a quick architecture.
Why Slack and how to create a Slack App?
No big reason to choose Slack, only because it supports slash commands, and it's mostly where people already work.
For this, we first need to have a Slack app, if you don't already have one, follow the quickstart guide to create one.
Once your app is created, enable Socket Mode so the bot can receive events without exposing a public webhook URL.
Then add at least these Bot Token Scopes:
app_mentions:readchat:writecommandsim:historyim:readusers:read
Subscribe to these Bot Events:
app_mentionmessage.im
And create these Slash commands:
/connect: Use it something like/connect <toolkit>/connections: User lists active connections/help: Shows usage summary/assign: Admin assigns an OpenClaw instance to a user/add-mcp-config: Admin registers an MCP Config from platform.composio.dev/add-auth-config: Admin links a toolkit to its Composio auth config/list-mcp-configs: Admin lists all registered MCP Configs
Finally copy these values to your .env file, which you can find in the app settings:
SLACK_BOT_TOKEN=xoxb-...
SLACK_APP_TOKEN=xapp-...
SLACK_SIGNING_SECRET=...
Your SLACK_BOT_TOKEN is the bot token itself, SLACK_APP_TOKEN is the Socket Mode app level token and SLACK_SIGNING_SECRET is used by Slack to verify requests.
How to Set Up the Project
It's fairly simple to get this project up and running. Follow these steps:
git clone https://github.com/shricodev/saas-openclaw-slackbot.git
cd saas-openclaw-slackbot
Next, you install the dependencies:
npm installThen set up the environment variables and run the development server:
# Slack
SLACK_BOT_TOKEN=xoxb-...
SLACK_APP_TOKEN=xapp-...
SLACK_SIGNING_SECRET=...

# Database
DATABASE_URL=...

# Composio api key (ak...) from https://platform.composio.dev
COMPOSIO_API_KEY="ak_..."
To get the Composio API key:
Log in at platform.composio.dev
Copy your API key (
ak_..) from the Composio dashboard settings, then set it:

Configure Composio Dedicated MCP Server
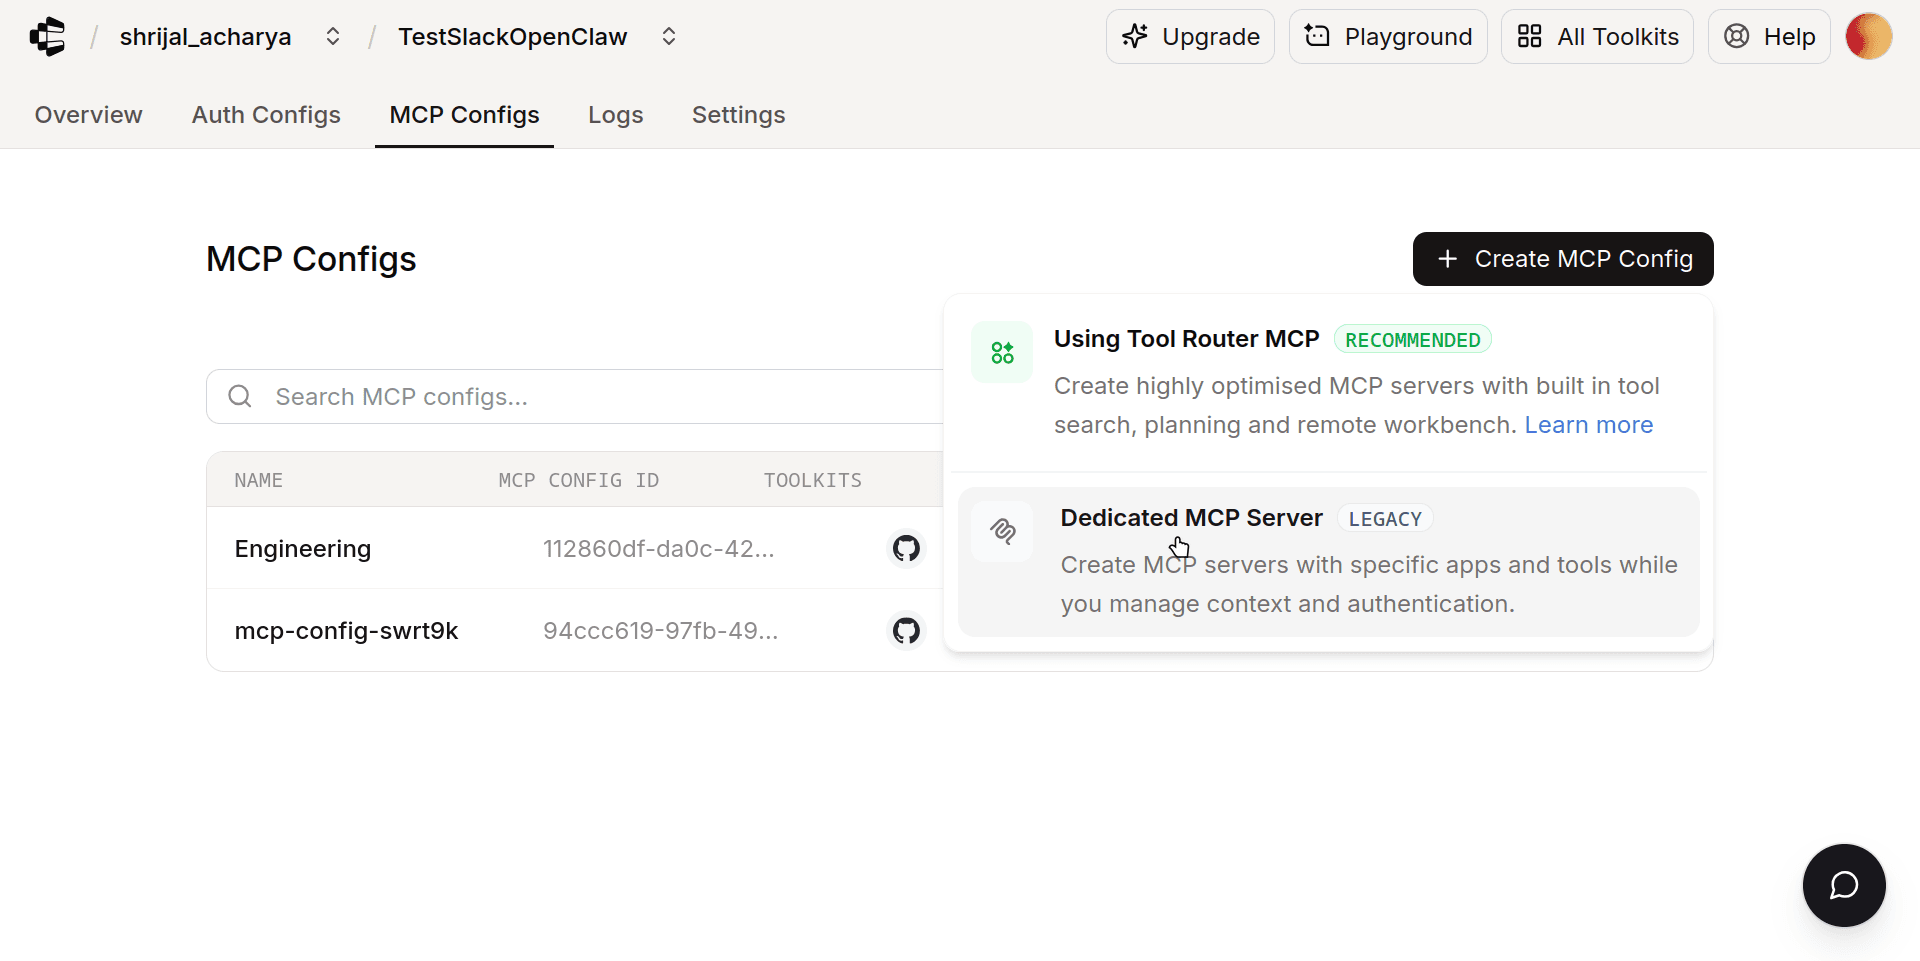
In this section, we'll go through the process of creating a dedicated MCP server in Composio for each user.
In the platform.composio.dev under the MCP Configs tab, create a Dedicated MCP Server. This lets you create MCP servers with specific apps and tools, which is exactly what we want.
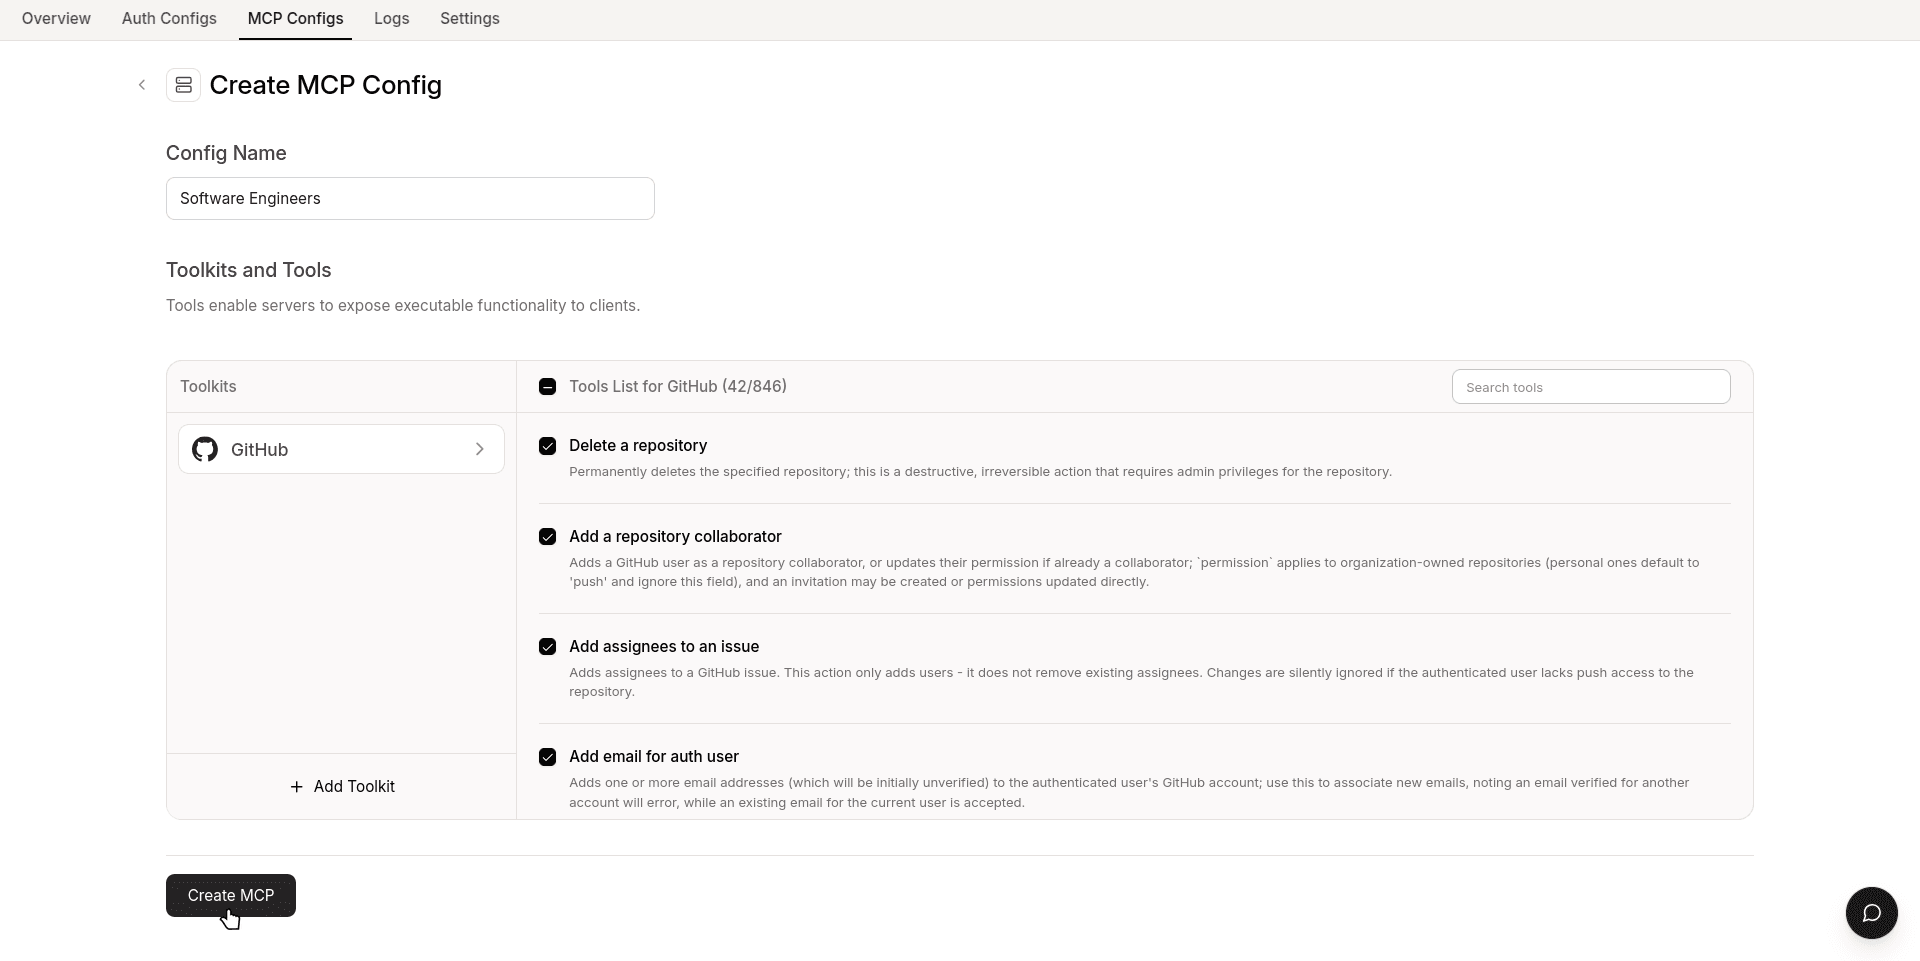
3, Select all the toolkits you plan to assign for the user and create the MCP server.
For the External User ID, use the user's Slack user ID. To get someone's Slack user ID, head over to their profile, click the three dots, and select Copy Member ID.
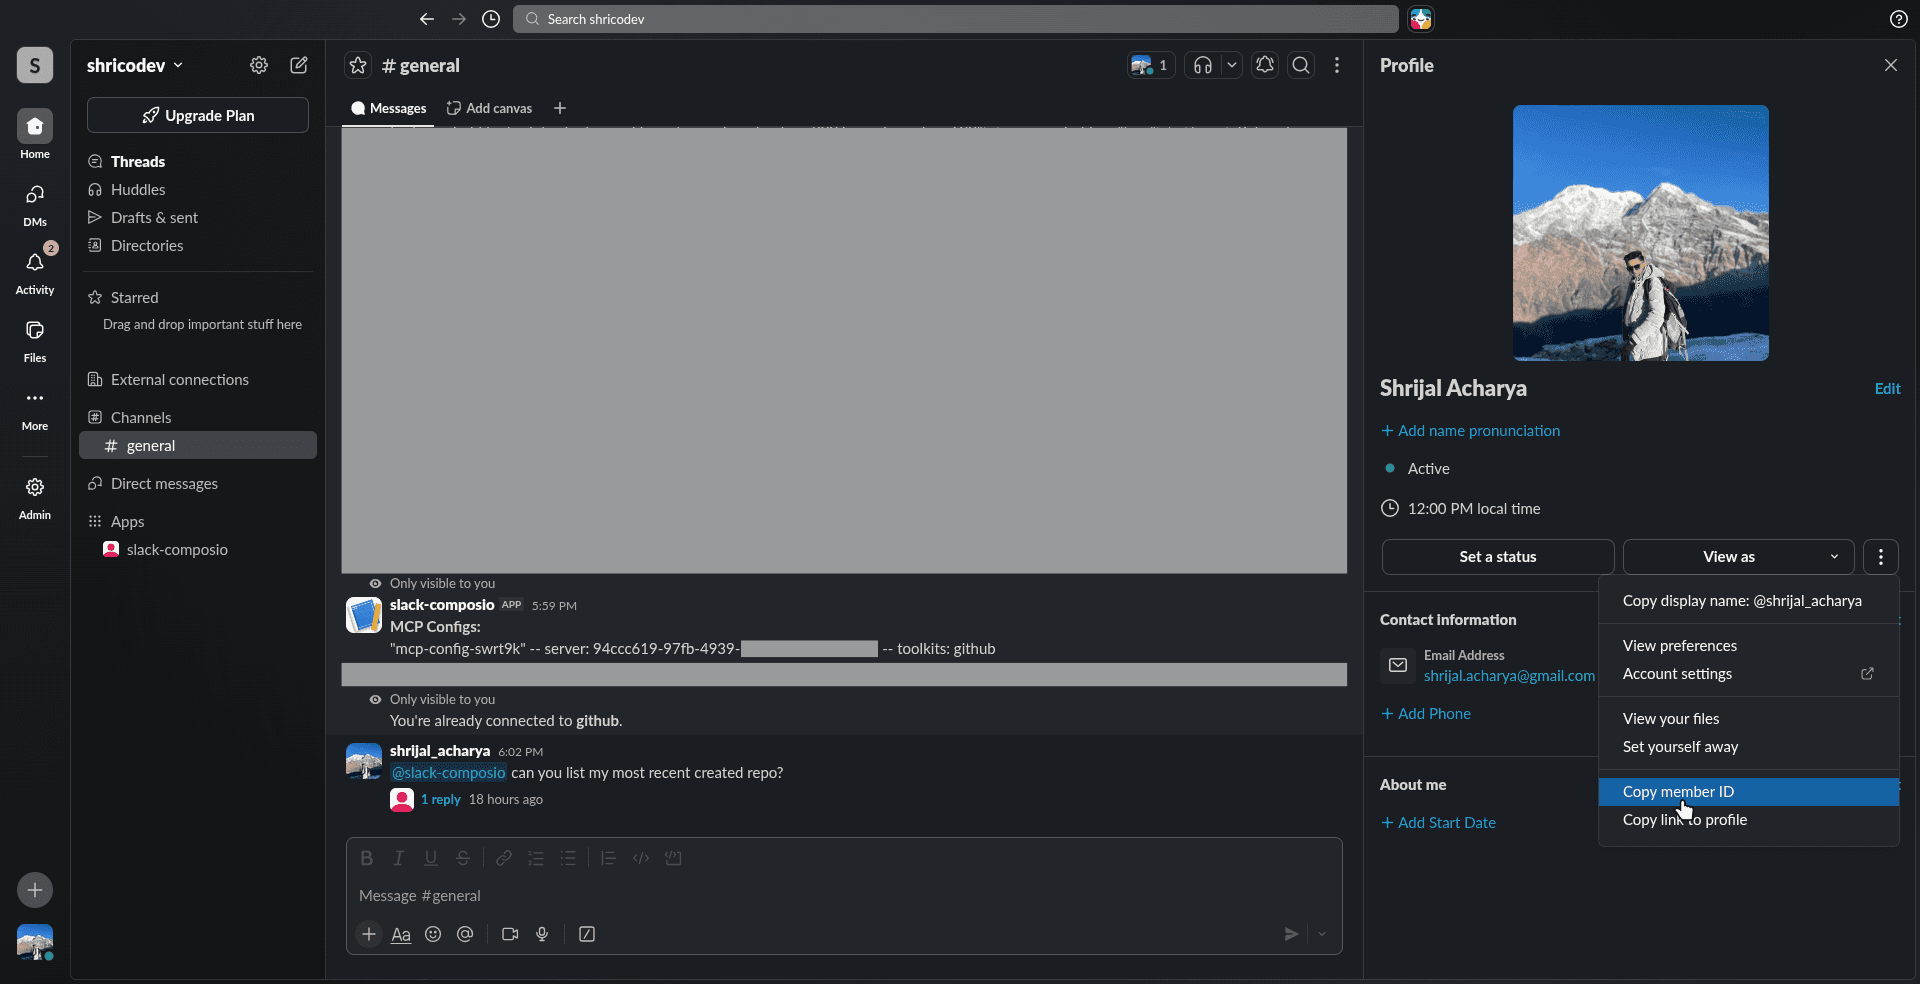
Use that as the External User ID.
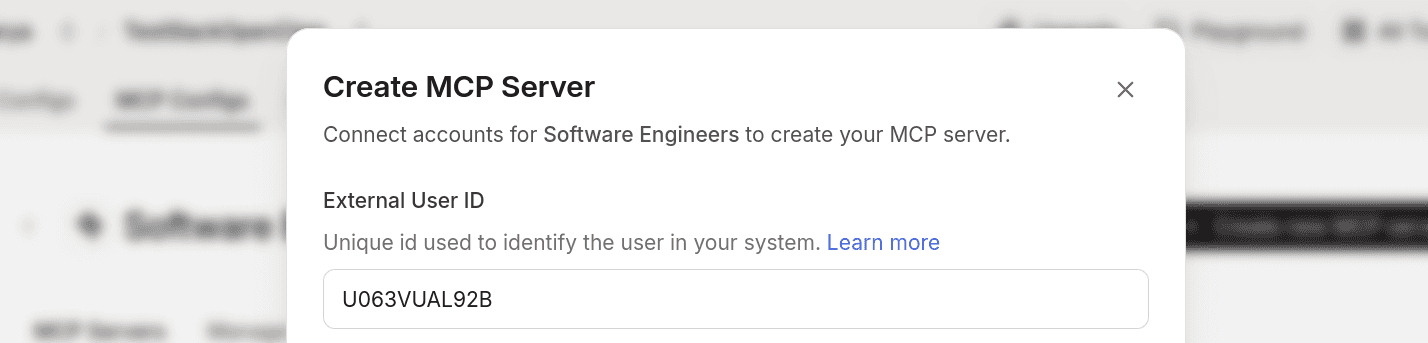
Keep note of the MCP config name and MCP config ID. You will need both when configuring the bot in Slack.
Upon successful creation, you'll find the URL:
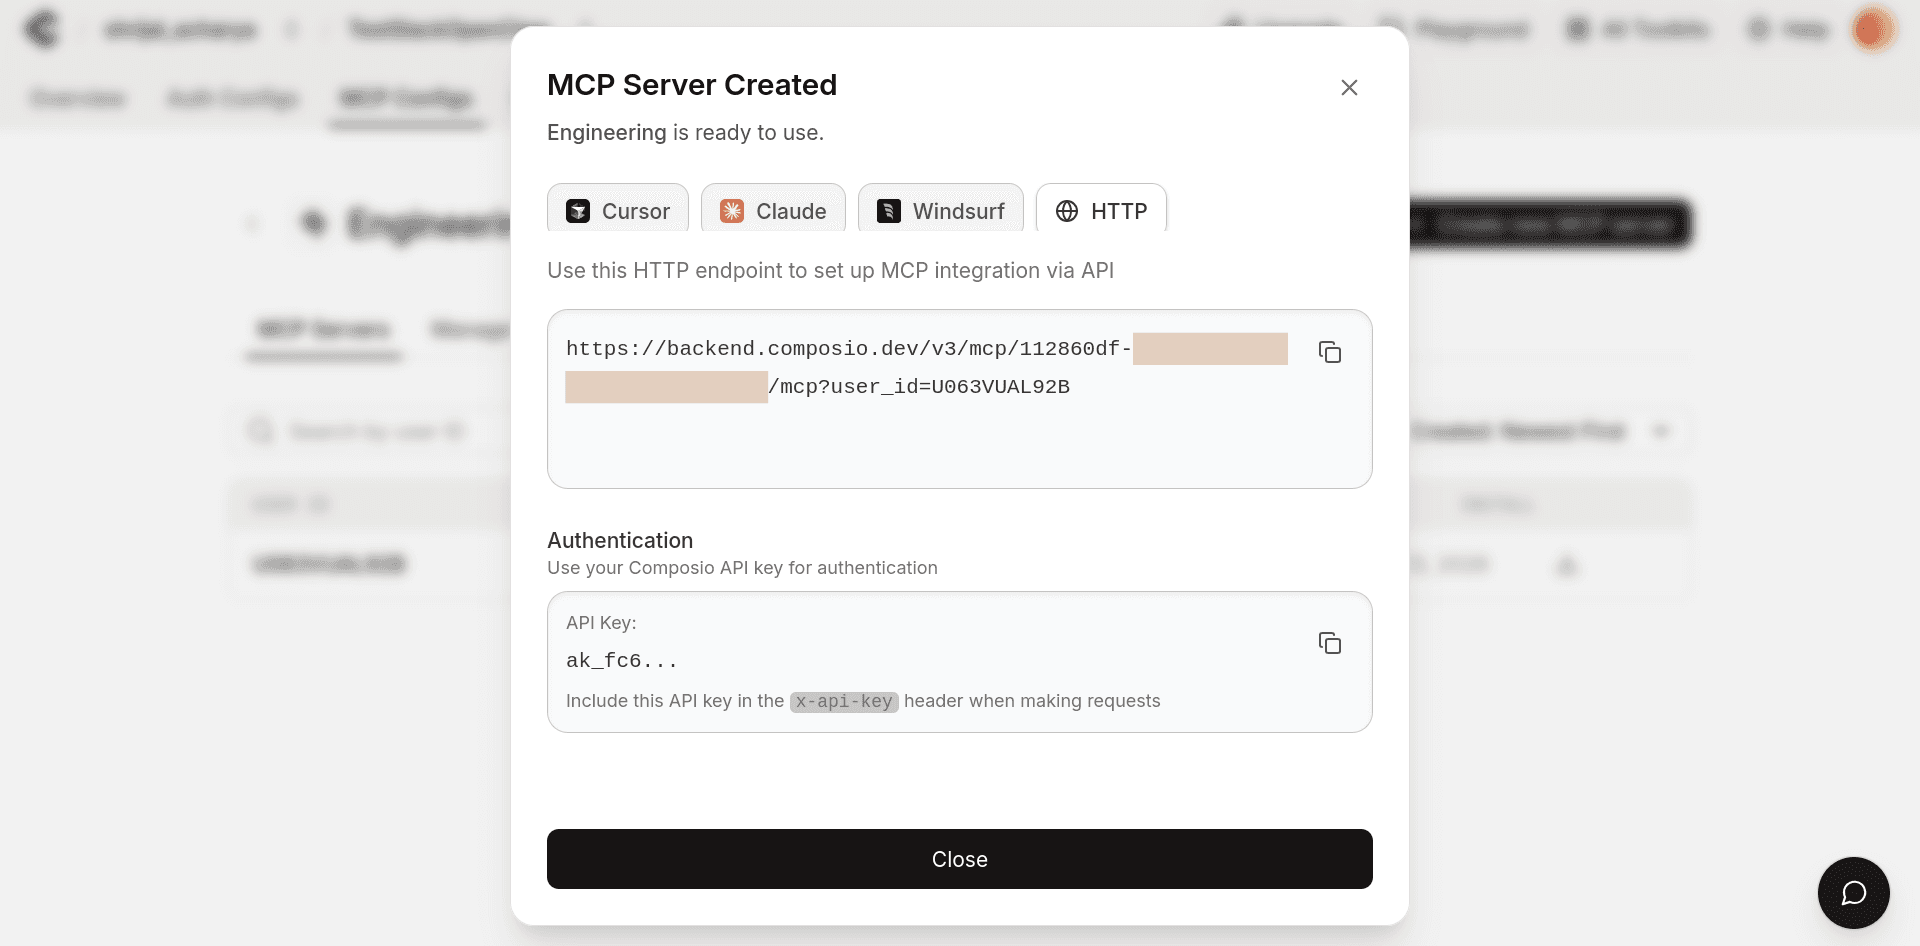
You can copy this URL directly and add it to the OpenClaw config, which we’ll cover later in the Configure OpenClaw with Composio section. Alternatively, the bot can fetch it for you after you run the
/assignslash command, which we’ll configure later.
You will also need the auth config ID tied to the tools you selected. In the MCP server, head over to the Manage Config tab and click Manage Auth Config. The auth config ID is listed on that page.
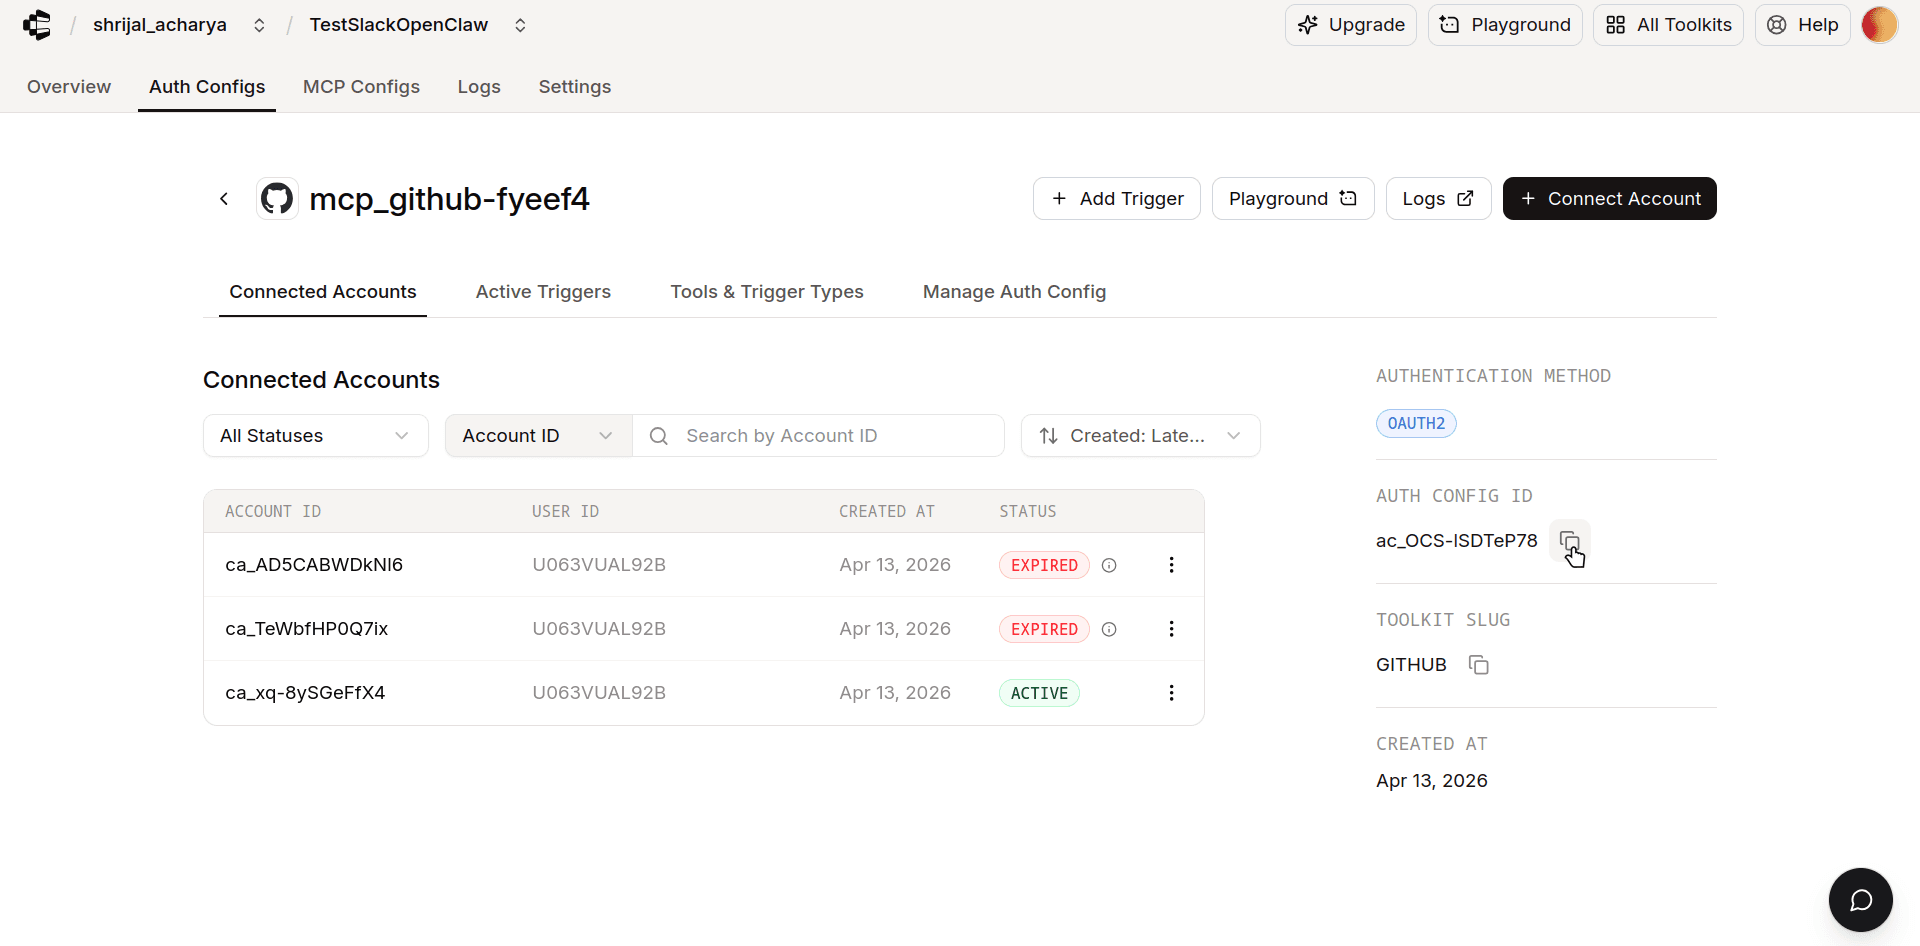
Keep note of this as well. You will need it when running /add-auth-config in Slack.
Core Components in the Application
We're not going to code everything from scratch as that'd be too long and impractical. Let's go over some of the core components in the project.
Before we start with the project core components, here's the project tech stack:
Slack Bolt - Official Slack bot framework. We use it with Socket Mode, which connects to Slack over a WebSocket without needing a public HTTP endpoint.
OpenClaw - The agent layer. Exposes an OpenAI-compatible API but acts as a full agentic gateway that plans, calls tools, and reasons over results.
Composio - The core of the project. Manages OAuth connections to external apps like GitHub, Linear, and Gmail, and exposes them to the agent via MCP.
TypeScript - Obvious choice over JavaScript as we get type safe code.
PostgreSQL + Prisma - Handles user records, connection status, and per-thread conversation history.
Bootstrapping the Bot
This is where everything starts. We initialize the Slack Bolt app with Socket Mode, register all handlers, and start the server.
// 👇 app.ts

const app = new App({
  token: process.env.SLACK_BOT_TOKEN,
  appToken: process.env.SLACK_APP_TOKEN,
  signingSecret: process.env.SLACK_SIGNING_SECRET,
  socketMode: true,
});

registerMessageHandlers(app);
registerCommandHandlers(app);

(async () => {
  const port = Number(process.env.PORT) || 3000;
  await app.start(port);
  console.log(`Bot is running on port ${port} (socket mode)`);
})();
Instead of exposing a public HTTP endpoint for Slack to POST events to, Socket Mode opens a WebSocket connection. This means you can run the bot anywhere could be your local machine, a private server without a public URL.
If you've worked with bots before, this should be pretty straight-forward to understand. 👀
Handling User Messages
This is the brain of the bot. It handles both direct messages and @mentions in channels.
// 👇 message.handler.ts

async function handleUserMessage({
  message,
  client,
  text,
  channelId,
  threadTs,
}) {
  await saveMessage(
    slackUserId,
    slackTeamId,
    channelId,
    threadTs,
    "user",
    text,
  );

  const history = await getThreadHistory(
    slackUserId,
    slackTeamId,
    channelId,
    threadTs,
  );
  const priorHistory = history.slice(0, -1);

  const thinkingMsg = await client.chat.postMessage({
    channel: channelId,
    thread_ts: threadTs,
    text: "_Thinking..._",
  });

  const response = await generateResponse(
    openclawConfig.gatewayUrl,
    openclawConfig.gatewayToken,
    text,
    priorHistory,
    sessionKey,
  );

  await saveMessage(
    slackUserId,
    slackTeamId,
    channelId,
    threadTs,
    "assistant",
    response.content,
  );

  await client.chat.update({
    channel: channelId,
    ts: thinkingMsg.ts,
    text: response.content,
  });
}
There's a few things you might notice right up:
First, we store the user's message to the database before sending it to OpenClaw. But why? This way if the request fails, the history isn't broken. Similar to storing chat history in localhost when creating web chat applications.
I do not know if there’s a better way to handle this, but right now we just show a Thinking... message while the AI is generating the full response, and then replace it once the final output is ready.
A little hacky, maybe, but it gets the job done. There are probably better ways to handle this, like streaming the response, but for now the old-school approach works. 😋
Slash Commands
The bot exposes seven slash commands split into two groups: user-facing (/connect, /connections, /help) and admin-only (/assign, /add-mcp-config, /add-auth-config, /list-mcp-configs).
/connect
/connect <toolkit> starts an OAuth flow for a tool like GitHub or Gmail. But unlike the previous version where any user could connect any toolkit, now the bot checks three things before starting a connection:
Does this user have an MCP Config assigned?
Is the requested toolkit in that config?
Is there an auth config registered for this toolkit?
// 👇 command.handler.ts

app.command("/connect", async ({ command, ack, respond }) => {
  await ack();
  const toolkitSlug = command.text.trim().toLowerCase();
  const apiKey = getComposioApiKey();

  const assignment = await db.mcpConfigAssignment.findUnique({
    where: {
      slackUserId_slackTeamId: {
        slackUserId: command.user_id,
        slackTeamId: command.team_id,
      },
    },
    include: { mcpConfig: true },
  });

  if (!assignment) {
    await respond({
      response_type: "ephemeral",
      text: "You have not been assigned an MCP Config. Ask your admin to run `/assign`.",
    });
    return;
  }

  if (!assignment.mcpConfig.toolkitSlugs.includes(toolkitSlug)) {
    await respond({
      response_type: "ephemeral",
      text:
        "This toolkit is not available in your assigned config. " +
        "Your admin controls which toolkits you can access.",
    });
    return;
  }

  const toolkitAuth = await db.mcpToolkitAuth.findUnique({
    where: {
      slackTeamId_toolkitSlug: {
        slackTeamId: command.team_id,
        toolkitSlug,
      },
    },
  });

  // check if already connected
  const connectedToolkits = await getConnectedToolkits(apiKey, command.user_id);
  if (connectedToolkits.includes(toolkitSlug)) {
    await respond({
      response_type: "ephemeral",
      text: `You're already connected to *${toolkitSlug}*.`,
    });
    return;
  }

  const redirectUrl = await initiateConnection(
    apiKey,
    toolkitAuth.authConfigId,
    command.user_id,
  );

  await respond({
    response_type: "ephemeral",
    text: `Click here to connect *${toolkitSlug}*: ${redirectUrl}`,
  });
});
The response is only visible to the user who ran the command. That's intentional as OAuth URLs are personal and shouldn't be visible to the whole channel.
/assign
/assign is admin-only and lets admins assign a specific OpenClaw gateway to a user. It opens a Slack modal to collect the gateway URL, token and MCP config server ID.
// 👇 command.service.ts

app.command("/assign", async ({ command, ack, respond, client }) => {
  await ack();

  const userInfo = await client.users.info({ user: command.user_id });
  const isAdmin = userInfo.user?.is_admin || userInfo.user?.is_owner;

  if (!isAdmin) {
    await respond({
      response_type: "ephemeral",
      text: "Only workspace admins can assign OpenClaw instances.",
    });
    return;
  }

  await client.views.open({
    trigger_id: command.trigger_id,
    view: assignInstanceModal, // includes gateway URL, token, and MCP Config ID fields
  });
});
The user's MCP URL looks something like this: https://backend.composio.dev/v3/mcp/aaa-111/mcp?user_id=<slack_user_id>
It's the key because it's what connects the user's OpenClaw instance to the toolkits the admin selected for them.

/add-mcp-config and /add-auth-config
These two admin commands register the Composio resources in the bot's database. Both open modals.
/add-mcp-config registers an MCP Config by name and server ID:
// On modal submit:
await db.mcpConfig.create({
  data: {
    slackTeamId: teamId,
    composioServerId, // the UUID from the MCP URL
    name,
    toolkitSlugs, // e.g. ["github", "linear"]
  },
});
/add-auth-config links a toolkit slug to its Composio auth config ID. This is what /connect uses to know which auth config to pass when initiating a connection:
// On modal submit:
await db.mcpToolkitAuth.upsert({
  where: {
    slackTeamId_toolkitSlug: { slackTeamId: teamId, toolkitSlug },
  },
  create: { slackTeamId: teamId, toolkitSlug, authConfigId },
  update: { authConfigId },
});
/list-mcp-configs
A simple admin command that lists all registered MCP Configs for the workspace:
"shrijal_acharya" - server: <server_id> - toolkits: github, linear
"bob_kumar" - server: <server_id> - toolkits: gmail, notion
Sending Requests to OpenClaw
Up until this point we were working on the Slack side and a bit of Composio setup, but how do we actually send these messages to OpenClaw?
OpenClaw exposes an OpenAI-compatible /v1/chat/completions endpoint. Our service code wraps that with a proper system prompt, conversation history, and error handling. Nothing super unknown to most of you.
// 👇 openclaw.service.ts

export async function generateResponse(
  gatewayUrl: string,
  gatewayToken: string,
  userMessage: string,
  history: Array<{ role: string; content: string }>,
  sessionKey?: string,
): Promise<OpenClawResponse> {
  const systemPrompt: ChatMessage = {
    role: "system",
    content:
      "You are a helpful assistant in a Slack workspace. " +
      "You have access to the user's connected tools (GitHub, Linear, Gmail, etc.) through Composio. " +
      "The user's tools are already connected. Do not ask them to connect or authenticate. " +
      "Use the available Composio tools directly to answer questions. " +
      "Be concise. Format responses for Slack (use mrkdwn syntax).",
  };

  const messages: ChatMessage[] = [
    systemPrompt,
    ...history.map((m) => ({
      role: (m.role === "user" ? "user" : "assistant") as "user" | "assistant",
      content: m.content,
    })),
    { role: "user", content: userMessage },
  ];

  return sendToOpenClaw(gatewayUrl, gatewayToken, messages, sessionKey);
}
We also wrap the raw fetch in a custom OpenClawError class with error codes for timeouts, auth failures, and gateway errors. Preferred thing you do in a real-world codebase.
💡 Prefer something built-in like
fetchover third-party tool likeaxios. Especially now after the recent compromise ofaxioswhich is used by hundreds and thousands of applications.
Connecting tools with Composio
You might be familiar working with Composio over the SDK @composio/core.
But with Composio, you can also directly talk to it's REST API. We now talk to the Composio REST API on backend.composio.dev using an API key from platform.composio.dev.
There are only three functions in the service, and each one does exactly what the name suggests 🤌
Check what a user has connected:
// 👇 composio.service.ts

export async function getConnectedToolkits(
  apiKey: string,
  slackUserId: string,
): Promise<string[]> {
  const url = `${COMPOSIO_API_BASE}/connected_accounts?user_id=${encodeURIComponent(slackUserId)}`;
  const res = await fetch(url, {
    method: "GET",
    headers: { "x-api-key": apiKey },
    signal: AbortSignal.timeout(30_000),
  });

  const data = await res.json();
  return data.items
    .filter((account) => account.status === "ACTIVE")
    .map((account) => account.toolkit.slug);
}
Initiate a new connection:
// 👇 composio.service.ts

export async function initiateConnection(
  apiKey: string,
  authConfigId: string,
  slackUserId: string,
): Promise<string> {
  const url = `${COMPOSIO_API_BASE}/connected_accounts`;
  const res = await fetch(url, {
    method: "POST",
    headers: {
      "Content-Type": "application/json",
      "x-api-key": apiKey,
    },
    body: JSON.stringify({
      auth_config: { id: authConfigId },
      connection: { user_id: slackUserId },
    }),
    signal: AbortSignal.timeout(30_000),
  });

  const data = await res.json();
  return data.redirect_url;
}
Build the per-user MCP URL:
// 👇 composio.service.ts

export function getMcpUrl(
  composioServerId: string,
  slackUserId: string,
): string {
  return `https://backend.composio.dev/v3/mcp/${composioServerId}/mcp?user_id=${encodeURIComponent(slackUserId)}`;
}
This last one is the most important. There's no API call, it's pure URL construction.
But this URL is what ties everything together: the composioServerId controls which toolkits are available, and
the user_id scopes which credentials are used. When /assign runs, it computes this URL and shows it to the admin so they can configure it in the user's OpenClaw instance.
Persisting Users and Conversation
Every Slack user that messages the bot gets a record in our database keyed on (slackUserId, slackTeamId) pair. This is a safety net, as the same Slack user ID could theoretically exist across different workspaces.
// 👇 slack-user.service.ts

export async function resolveSlackUser(
  slackUserId: string,
  slackTeamId: string,
) {
  const existing = await db.slackUser.findUnique({
    where: { slackUserId_slackTeamId: { slackUserId, slackTeamId } },
  });

  if (existing) return existing;

  return db.slackUser.create({
    data: {
      slackUserId,
      slackTeamId,
      composioEntityId: `slack_${slackTeamId}_${slackUserId}`,
    },
  });
}
Conversation history is stored per-thread using Slack's thread_ts (the timestamp of the first message in a thread) as the thread id. When the bot receives a message, it fetches the full thread history and passes it to OpenClaw, giving it the memory for the duration of that thread.
Configuration Setup
The bot requires per-user OpenClaw instances assigned by an admin. If a user hasn't been assigned an instance, they can't use any features. /connect, /connections and chat all require an assignment first.
Why not use shared instance?
By shared instance, I mean all the users share the same OpenClaw instance. So why not use it that way?
There's a few reasons:
By default, OpenClaw is not designed to support multiple users connecting to the same gateway concurrently. In practice, which is likely to be the case for our use case.
Also, in general, letting multiple users use the same instance with multiple connected accounts is not safe. A prompt injection by one user could access or destroy another user's data.
Even if there's safety measure (which I'm not aware of). Things could always go wrong. So better safe than sorry.
// 👇 lib/config.ts

export async function getUserOpenClawConfig(
  slackUserId: string,
  slackTeamId: string,
): Promise<OpenClawConfig> {
  const user = await db.slackUser.findUnique({
    where: { slackUserId_slackTeamId: { slackUserId, slackTeamId } },
    select: { openclawGatewayUrl: true, gatewayToken: true },
  });

  if (user?.openclawGatewayUrl && user?.gatewayToken) {
    return {
      gatewayUrl: user.openclawGatewayUrl,
      gatewayToken: user.gatewayToken,
    };
  }

  throw new Error(
    "No OpenClaw instance assigned. Ask your admin to run /assign.",
  );
}
No assignment, no access. The admin runs /assign for each user, providing their OpenClaw gateway URL, token, and MCP Config. Until that happens, the bot won't respond to that user.
Configure OpenClaw with Composio
Great, now the code part is done. There's one thing that's still left.
Now, the actual reason to build the bot i.e. to get tools access is not configured within OpenClaw which we do with Composio. It's the most easiest.
There's multiple ways to configure OpenClaw with Composio. There's standard ways you can find here.
But, we won't follow the standard way, as by default it uses consumer key, which is a way it's designed by default.
But we won't work with consumer key, we directly work with the MCP URL.
Go ahead and modify the OpenClaw config file which lives in the ~/.openclaw/openclaw.json with the following:
// rest of the config...

  "plugins": {
    "allow": [ "composio", "...rest"],
    "entries": {
      "telegram": {
        "enabled": true
      },
      "composio": {
        "enabled": true,
        "config": {
          "enabled": true,
          // put the MCP URL you receive after running /assign for a user.
          "mcpUrl": "..."
        }
      }
    },
  }
This sets up one instance for one user. But how do you about configuring multiple instances for multiple users?
How do you run it for multiple users?
This only configures one user in the entire workspace. But what about the rest?
There are a few ways:
1. Separate machine or VMs:
Each user's OpenClaw runs on a different machine. Each has its own ~/.openclaw/openclaw.json with its own MCP URL. This is the cleanest but most expensive.
2. Use named OpenClaw profiles:
OpenClaw ships with a --profile flag out of the box:
--profile <name> Use a named profile (isolates OPENCLAW_STATE_DIR/OPENCLAW_CONFIG_PATH under ~/.openclaw-<name>)You can use a different profile per user. If you name each profile after the user, you get an isolated config for each one on the same machine. Most efficient.
For example:
openclaw --profile bob
openclaw --profile shrijal
3. Separate OS users on one machine:
Somewhat impractical. You'd run one OpenClaw instance per OS user, which means creating a separate system account for each person. Possible, but not a great approach.
There could be hundreds of other ways to do it. These are just the ones I could think of. Do your own research, and you’ll probably find others.
Slack Workflow
Run these commands in order as an admin before any user can start chatting.
Register your MCP Configs (one per config you created on platform.composio.dev):
/add-mcp-configRegister auth configs (one per toolkit):
/add-auth-configAssign each user their OpenClaw instance and MCP Config:
/assignThis gives you the user's scoped MCP URL. Configure it in their OpenClaw instance.
Once assigned, users run:
/connect <toolkit>That's it. After connecting, they can DM the bot or @mention it in a channel.
Bot in Action
Here's a quick demo of the bot in action:
Conclusion
So yeah, that's the whole idea.
A Slack bot on top of OpenClaw, with Composio handling user tool connections, ends up being a really solid setup.
At this point, you’ve got a good idea of how this bot works with Slack, OpenClaw, and Composio.
We covered the main flow, how users connect their tools, how everything comes together inside Slack, and why assigning one OpenClaw instance per user helps keep things isolated.
It keeps the setup clean and gives you a bot that’s actually useful.
That's all for this one.
You can find the entire source code here: shricodev/saas-openclaw-slackbot