MCP adoption is on the rise; LangChain, the leading agentic framework, has also extended its support for building MCP agents. This enables developers to connect their agents to any MCP server, automating complex agent use cases.
This also makes it easy for developers to rapidly build and iterate on MCP host applications, like Cursor or Claude-based chatbots. By wrapping the MCP client with a chatbot interface, you can quickly create an MCP-compliant chatbot host or extend it to other applications.
To demonstrate this, this guide will utilise the LangChain MCP adapter and Composio’s managed MCP servers to build these agents step by step, connecting to the MCP servers using SSE URLs.
Let’s go! 🚀
TL;DR
Here’s a quick overview of what you’ll learn in this guide.
What is Model Context Protocol (MCP)? Learn how MCP standardises communication between AI agents and external tools, making them easier to integrate and control.
How to connect LangChain agents to Composio MCP: Set up an agent using LangChain MCP adapter and Composio’s ready-to-use tools, all through a single URL per app.
Build a conversational agent from scratch—a step-by-step guide to creating a Node. JS-based CLI agent powered by GPT-4o and LangChain.
Run real-world examples with Gmail, Trello, and GitHub. Use natural language prompts to send emails, manage tasks, and star repositories with working code, output, and videos.
What is MCP?
Model Context Protocol (MCP) is a standard that enables AI agents to consistently and structurally connect to external tools.
Typically, agents must integrate with each tool individually. That means writing custom logic for every API, handling authentication, and figuring out request formats. It gets messy fast.
Take a simple use case. You're building an agent that sends project updates. It needs to pull files from Google Drive, check GitHub issues, and notify your team on Slack.
In a typical setup, you would write custom code for each app. Every integration is different. Everyone adds complexity.
MCP changes this. The agent connects to a single interface. That interface translates the request and routes it to the right tool behind the scenes.
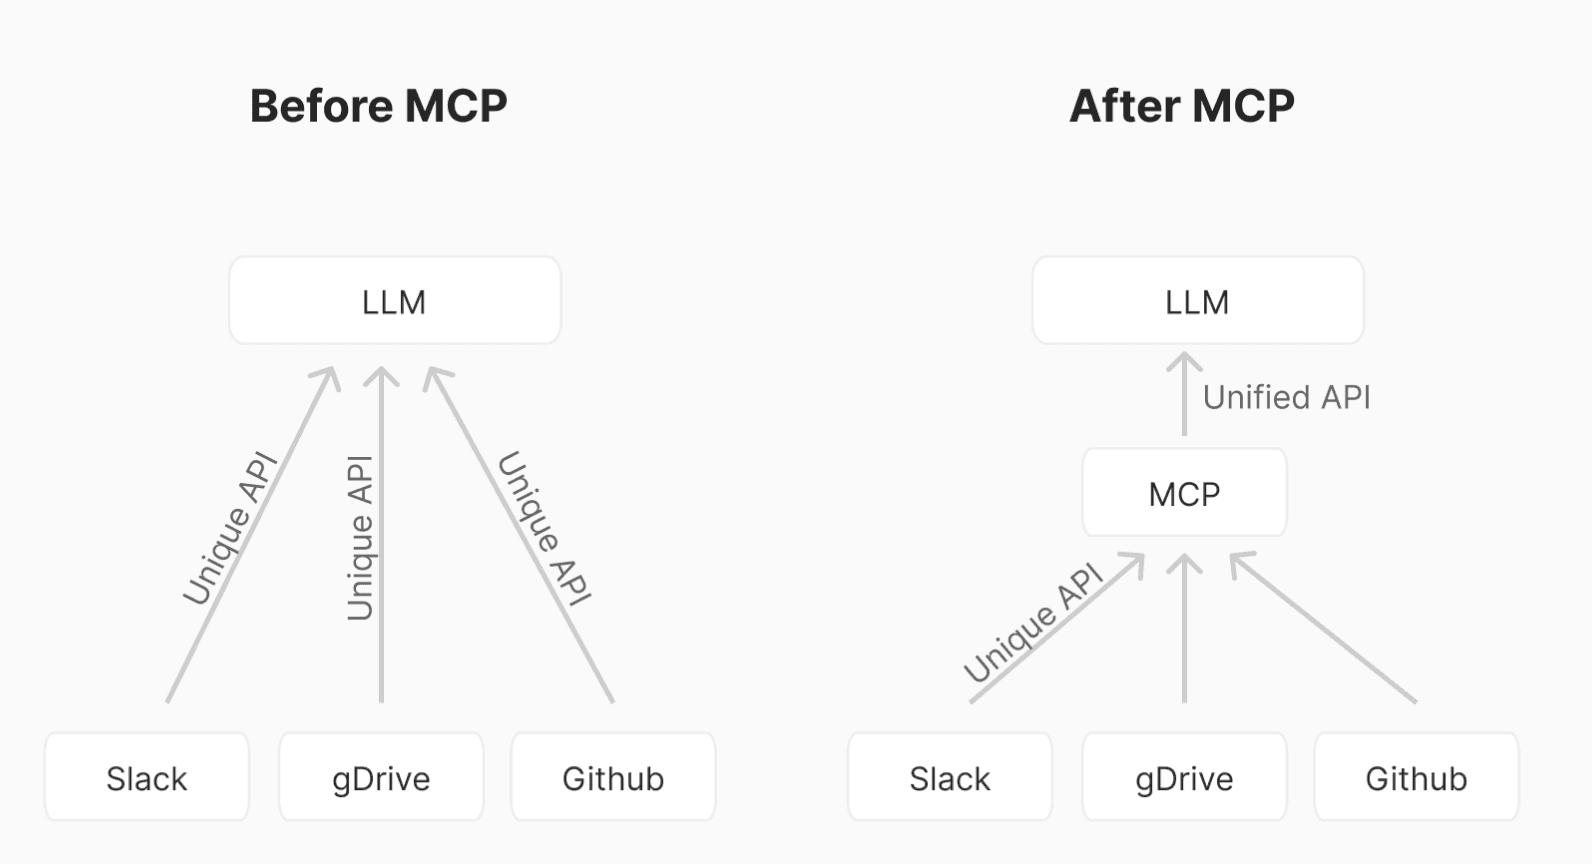
This diagram shows the difference. On the left, the agent is directly connected to every tool. On the right, MCP sits in the middle. The result is a much cleaner and more scalable setup.
If you want to read more about MCP, check out this blog post: Model Context Protocol: Explained
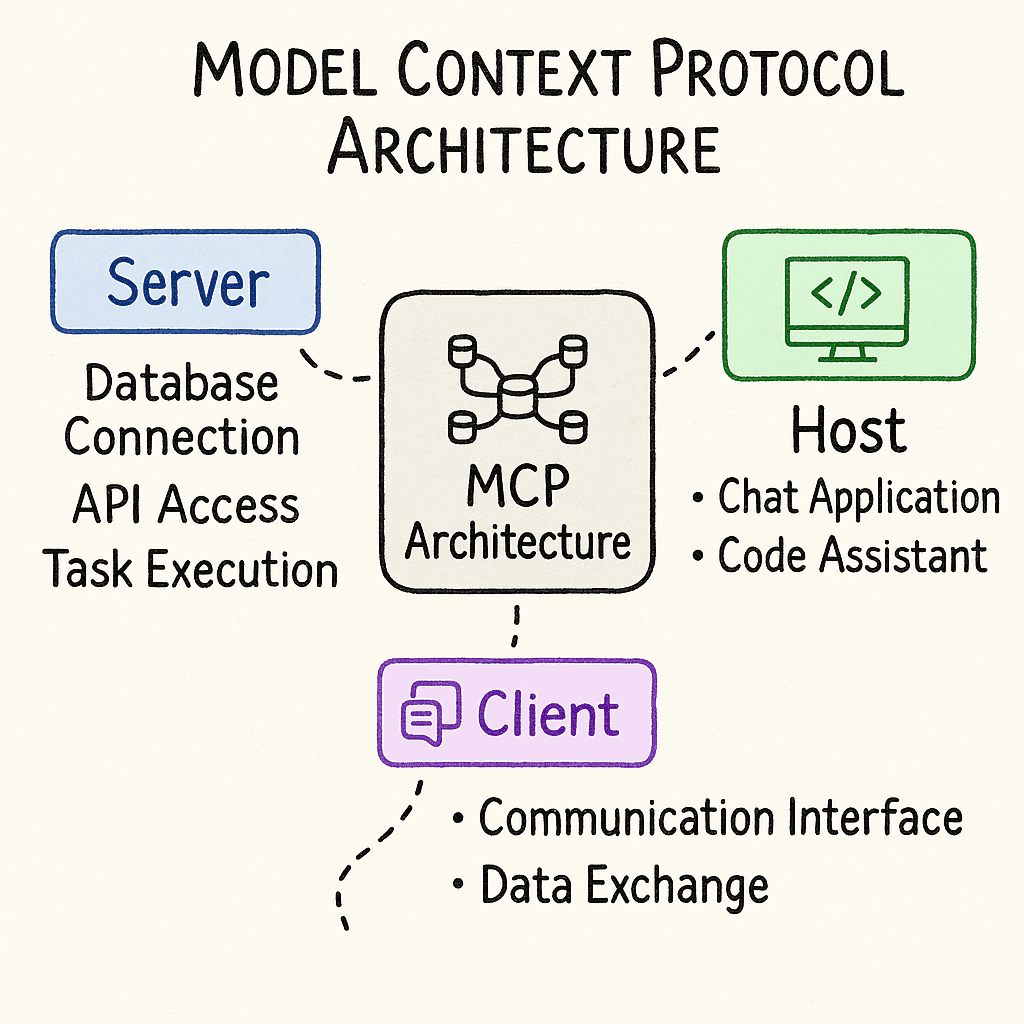
MCP Components
Model Context Protocol is built on a modular system. It’s designed to support reliable, structured communication between language agents and the tools they connect to.
MCP is split into two main layers. The protocol layer handles communication logic. The transport layer moves messages between the agent and the MCP server.
Protocol Layer
The protocol layer defines how agents and tools exchange information at a high level. It handles:
Message framing
Request-response matching
Communication patterns such as notifications, error handling, and streaming
At the centre of this layer is the Protocol class, which manages requests, notifications, and their respective handlers.
Key responsibilities include:
Registering request and notification handlers with defined schemas
Sending requests and receiving results
Sending one-way notifications when no response is expected
Transport Layer
The transport layer is responsible for delivering messages between clients and servers. MCP supports multiple transport mechanisms depending on the environment:
Stdio Transport Uses standard input and output, ideal for local or embedded processes
HTTP + SSE Transport Uses HTTP POST for sending messages and Server-Sent Events (SSE) for receiving updates
All transport methods use JSON-RPC 2.0 as the underlying message format, ensuring consistent, structured communication.
Message Types
MCP defines four primary message types:
Request Sent by the client, expects a corresponding result or error
Result: A successful response to a request typically includes structured output data
Error Indicates a failed request containing a status code, message, and optional debug data
Notification: A one-way message that does not require a response
This message-driven design allows agents to execute actions, receive updates, and handle asynchronous events reliably.
Composio MCP
Composio MCP is a managed and federated implementation of the Model Context Protocol. It provides a ready-to-use layer that allows agents to interact with external applications securely and consistently without setting up their own MCP server.
Why Use Composio MCP
Composio takes care of the infrastructure, security, and integrations so you can focus on building the agent itself.
Built-in authentication: Composio manages OAuth flows and token storage so your agent can securely connect to user accounts without manual setup. Consider handling OAuth flows when you need to access your user's Gmail account, Slack workspace, Linear board, etc. Composio manages OAuth end-to-end seamlessly.
Ready-to-use integrations: It supports 100+ tools and platforms, such as Google Calendar, Slack, Trello, GitHub, and more, each with a number of actions to automate tasks.
Discoverable schemas: Agents can query available actions, understand input and output formats, and decide what to do based on schema definitions.
Secure execution: Every request is scoped to the correct user or workspace, and permission checks are built in by default.
Framework-friendly: It works smoothly with LangChain, OpenAI Agents SDK, and other frameworks, allowing you to add MCP access with minimal effort.
Composio MCP reduces the complexity of building context-aware, action-capable agents by providing everything you need in one place.
LangChain MCP Adapter
The LangChain MCP adapter lets agents connect to any server that follows the Model Context Protocol, including Composio’s managed MCP server.
It works as a bridge between LangChain and external tools. You don’t need custom integrations. You only need the tool URLs from the MCP server. The adapter handles everything else.
Once connected, the adapter pulls tool definitions directly from the server and registers them as LangChain tools using their schema. Your agent knows what actions are available, what inputs to expect, and how to run the task.
This makes the setup flexible. You can work with simple tools or more advanced workflows. You can reason, validate, and call actions in one smooth flow.
It works with all major LangChain agent types. You can use it with memory, build multi-step plans, and swap in different MCP servers when needed.
With just a few lines of code, your agent can access a real-world toolkit, which runs through one interface.
Conversational MCP Agents with LangChain MCP Adapter and Composio
You’ve seen how MCP simplifies tool communication and how Composio makes those tools instantly accessible. Now, it’s time to put it all together.
In this section, you’ll build a live conversational agent that runs in your terminal and performs real tasks across Gmail, Trello, and GitHub just by typing plain English.
This agent uses:
LangChain’s MCP adapter for loading tools dynamically
Composio MCP for instant tool access via SSE URL
GPT-4o for reasoning and execution
Agent Architecture
Now that your environment is set up, let’s examine what we’re building under the hood.
This isn’t just a script that hits one tool.
You’re about to create a conversational agent that:
Loads tools dynamically from Composio’s MCP server
Knows how to call actions using those tools’ schemas
Maintains conversation context and memory
Chooses the right tool for the task — automatically
Executes tasks using GPT-4o from OpenAI
Setting Up the Agent Project (Node.js)
Now that you know what we’re building, let’s actually set up the project.
This part walks you through creating a Node.js environment, installing the required packages, and preparing the necessary files.
1. Create Your Project Folder
Open your terminal and run:
mkdir langchain-mcp-agent
cd langchain-mcp-agent
This will create and move you into a new directory for your agent project.
2. Initialize the Project
Set up a default package.json file:
npm init -y
This keeps track of all the dependencies and project metadata.
3. Install Required Packages
Install the core libraries that power the agent:
npm install dotenv readline @langchain/openai @langchain/core @langchain/langgraph @langchain/mcp-adapters
This will install:
LangChain core + OpenAI wrapper
LangChain MCP adapter
A lightweight readline interface for terminal interaction
dotenvfor managing environment variables
4. Connect Tools in Composio MCP and Get URLs
Connecting apps through Composio MCP will allow your agent to take action across various tools and platforms.
Here’s how:
Step-by-step:
1. Go to https://mcp.composio.dev
2. Search the application you want to add to your MCP agent: We will use the following
Gmail
Trello
GitHub
3. After connecting, hover over each integration and click "Cursor"
4. Copy the tool URL. It shows
It will look like this:
<https://mcp.composio.dev/tool_name/XXXXXXXX>
5. Add Your OpenAI Key
Create a .env file in the project root:
OPENAI_API_KEY=sk-your-openai-api-key
Writing the Agent Code (agent.js)
Now that your environment is ready and tools are connected in Composio MCP, it’s time to build your conversational agent.
This file will:
Load tools dynamically from the Composio MCP server
Use GPT-4o to interpret natural language prompts
Select the right tool and parameters automatically
Execute real-world actions via MCP
1. Create the File
In your project folder, create: agent.js
2. Paste the Code (Tool-Agnostic Version)
import { ChatOpenAI } from "@langchain/openai";
import { createReactAgent } from "@langchain/langgraph/prebuilt";
import { HumanMessage, AIMessage } from "@langchain/core/messages";
import dotenv from "dotenv";
import * as readline from "node:readline/promises";
import { stdin as input, stdout as output } from "node:process";
import { MultiServerMCPClient } from "@langchain/mcp-adapters";

dotenv.config();

// 🧩 Add any MCP tool URLs you’ve set up with Composio
const mcpServers = {
  // Example:
  // gmail: {
  //   transport: "sse",
  //   url: "<https://mcp.composio.dev/gmail/YOUR-GMAIL-ID>"
  // }
};

async function runChat() {
  const rl = readline.createInterface({ input, output });
  const chatHistory = [];

  const client = new MultiServerMCPClient(mcpServers);
  const tools = await client.getTools();

  const model = new ChatOpenAI({
    modelName: "gpt-4o",
    temperature: 0,
    openAIApiKey: process.env.OPENAI_API_KEY
  });

  const agent = createReactAgent({ llm: model, tools });

  console.log("Agent is ready. Type your message or 'exit' to quit.\\n");

  while (true) {
    const userInput = await rl.question("You: ");
    if (!userInput.trim()) continue;
    if (userInput.toLowerCase() === "exit") break;

    chatHistory.push(new HumanMessage(userInput));
    console.log("\\nAgent thinking...\\n");

    try {
      const result = await agent.invoke({ messages: chatHistory });
      const lastMsg = result.messages[result.messages.length - 1];
      const reply = typeof lastMsg.content === "string"
        ? lastMsg.content
        : JSON.stringify(lastMsg.content);

      console.log("Agent:", reply, "\\n");
      chatHistory.push(new AIMessage(reply));
    } catch (err) {
      console.error("Agent error:", err.message);
    }
  }

  rl.close();
  if (client?.close) await client.close();
  console.log("Chat ended.");
}

runChat();
How to Add a Tool
To connect a tool (like Gmail, Trello, or GitHub), just add it inside the mcpServers config.
For example, to add Gmail:
const mcpServers = {
  gmail: {
    transport: "sse",
    url: "https://mcp.composio.dev/gmail/YOUR-GMAIL-ID"
  }
};
You can add multiple tools to the same object. Based on your prompt, the agent will automatically load all available capabilities and use them as needed.
To Run the Agent
node agent.jsYour terminal should show:
Agent is ready. Type your message or 'exit' to quit.Now you're live. Let’s see what this agent can actually do.
Example 1: Send an Email with Gmail
Once you’ve connected the Gmail integration via Composio MCP, your agent can handle a wide range of email-related tasks, all triggered by natural language.
What Can the Agent Do with Gmail?
Using Gmail’s MCP integration, the agent can:
Send emails to any recipient
Create and save email drafts
Reply to existing threads
Fetch emails or thread data
Manage labels and metadata
Everything is schema-driven and validated through Composio MCP; no manual Gmail API coding is needed.
In this example, the agent will email someone using the Gmail tool. You will type a simple prompt that includes the email address, the subject, and the message.
The agent will understand your request, check what Gmail needs, and send the email using your connected account. You do not need to write any special code or deal with the Gmail API. The agent takes care of everything in the background.
Step 1: Add Gmail to Your Agent
You can use the full working code provided below to run this example.
👉 View the complete Gmail example here →
You can easily update your Gmail tool URL and OpenAI API key by replacing them in the right spots.
Step 2: One-Time Authentication Required
After setting up your tool in Composio, you will be asked to sign in and grant access to your Gmail account. Here’s how to authorise it:
This step ensures your agent can send emails securely on your behalf.
Once you see this message, you can close the tab and return to your terminal.
Step 3: Use This Prompt
After running your agent, enter this prompt in the terminal: (use your actual email ID)
Send an email to example@gmail.com with subject "Test" and body "This works."
Agent Output
Agent: The email has been successfully sent to raarthy1553@gmail.com with the subject "Test" and the body "This works."
The agent used your prompt to determine what Gmail needed, fill in the schema, and send the email through your connected account without manual setup.
Demo: Sending an Email (Gmail)
Example 2: Create a Task Card using Trello MCP
Once you connect the Trello integration via Composio MCP, your agent can assist you in managing boards and tasks with simple, natural language prompts.
What Can the Agent Do with Trello?
Using Trello’s MCP integration, the agent can:
Create new cards on any board
Move cards between lists
Update card descriptions, due dates, and members
Create new lists or boards
Read and organise tasks across your Trello workspace
Composio’s MCP schemas power everything, so you don’t need to touch the Trello API.
In this example, the agent will create a task card on a specific Trello board and list. You’ll describe the task in plain English, and the agent will handle the rest, connecting to your Trello account, finding the right board, and creating the card.
Step 1: Add Trello to Your Agent
To run this example, you can use the full working code provided below:
👉 View the complete Trello example here →
Just replace your Trello tool URL and OpenAI API key where needed, and you’re all set.
Step 2: One-Time Authentication Required
When you pass a query for Trello, the integration will ask for user authentication and once you complete it it will execute all the Trello actions.
You can now return to your terminal and run the example.
Step 3: Use This Prompt
With the agent running, enter this prompt:
Create a Trello card titled "Follow up with design team" under the list "To-Do" on the board "Team Tasks". Add a description: "Set up design sync and review open Figma comments."
Agent Output
Agent: The Trello card "Follow up with design team" has been created in the "To-Do" list on the "Team Tasks" board.
The agent understood your request, matched it to the Trello schema, and created the task card using your connected account; no manual input is needed.
Demo: Creating a Card in Trello
Example 3: Star a GitHub Repository
Once your GitHub integration is connected through Composio MCP, your agent can start interacting with repositories using natural prompts, such as beginning repos, creating issues, or posting comments.
What Can the Agent Do with GitHub?
With the GitHub MCP integration, your agent can:
Star or unstar public repositories
Create new issues
Comment on pull requests or issues
List commits or pull requests
Open new pull requests
Search repositories and more
All of this is possible through Composio’s managed interface without custom API code being written.
The agent will start a public repository based on your prompt in this example. You’ll simply mention the repo in plain language, and the agent will handle the rest.
Step 1: Add GitHub to Your Agent
To run this example, use the full working code provided below:
👉 View the complete GitHub example here→
Replace the GitHub tool URL and your OpenAI API key in the right spots.
Step 2: One-Time Authentication Required
This is the same as the previous two integrations; you need to authenticate your GitHub user account
Step 3: Use This Prompt
Start your agent and enter this prompt in the terminal:
Star the repository composiohq/composio on GitHub.<br>
Agent Output
Agent: The GitHub repository composiohq/composio has been successfully starred.<br>
The agent recognized the intent, matched the schema provided by the GitHub tool, and triggered the action securely, all using just natural language.
Demo: Starring a GitHub Repository
Wrapping up
What you’ve built is more than just a conversational agent. It’s a fully functional system that can take real action across your existing tools.
By combining LangChain and Composio MCP, you’ve created an agent that understands context, chooses the right capability, and executes tasks through a single, unified interface.
Composio offers access to over 100 MCP-powered capabilities out of the box, so you can expand your agent’s reach without worrying about individual integrations or API complexity.
This foundation opens the door to more advanced workflows, memory-aware agents, or even deploying your agent into production.
Now it's your turn to take it further.