OpenAI just dropped something big. Agent Builder is finally here, and it feels like n8n met ChatGPT. If you’ve been wanting to build a real AI agent without writing a line of code, this is it.
Now, let’s make it even cooler. We’ll connect Jira through Rube MCP. That means your agent can look into your Jira projects, add tasks, assign issues, and whatnot.
Sounds cool? Let’s go!
TL;DR
OpenAI just launched Agent Builder, part of its new AgentKit platform from DevDay 2025. A A no-code visual canvas for building and testing AI agents that connect to MCP tools.
With Rube MCP, you can hook up over 500 apps (like Slack, Gmail, Jira) directly into Agent Builder. In this example, the guide walks you through connecting Jira so your agent can read and manage tasks automatically.
The setup involves:
Adding Rube MCP as a server in Agent Builder
Getting OAuth credentials from Atlassian (Client ID and Secret)
Configuring permissions/scopes for Jira
Linking Rube with Jira
Testing it all inside Agent Builder’s chat preview
Once it’s live, your agent can handle Jira operations hands-free — no code required.
What is Agent Builder?
At DevDay 2025, OpenAI released AgentKit, a new end-to-end platform with a complete set of tools for developers and enterprises that lets anyone build, deploy, and optimize agents (no coding required).
It comes with three core components, among which is Agent Builder:
Agent Builder: It is a visual canvas for creating, versioning, and testing multi-agent workflows with drag-and-drop. (Should be familiar if you've worked with tools like n8n before. Nothing new!)
Connector Registry: It is a central hub for managing data sources, APIs, and any tools that connect across OpenAI products.
ChatKit: It is a customizable chat toolkit that lets you embed agentic UI directly in their products/websites.
There are also Guardrails, which are built-in safety and moderation tools, and Evals, which is a way to test and improve your agent's performance.
This came as a great surprise, not just to me but to many other no-code agentic builder companies. Seeing OpenAI releasing an n8n, Zapier alternative was not on my bingo card. 🙃
Read this how-to guide to get started with building AI agents with Agent Builder.
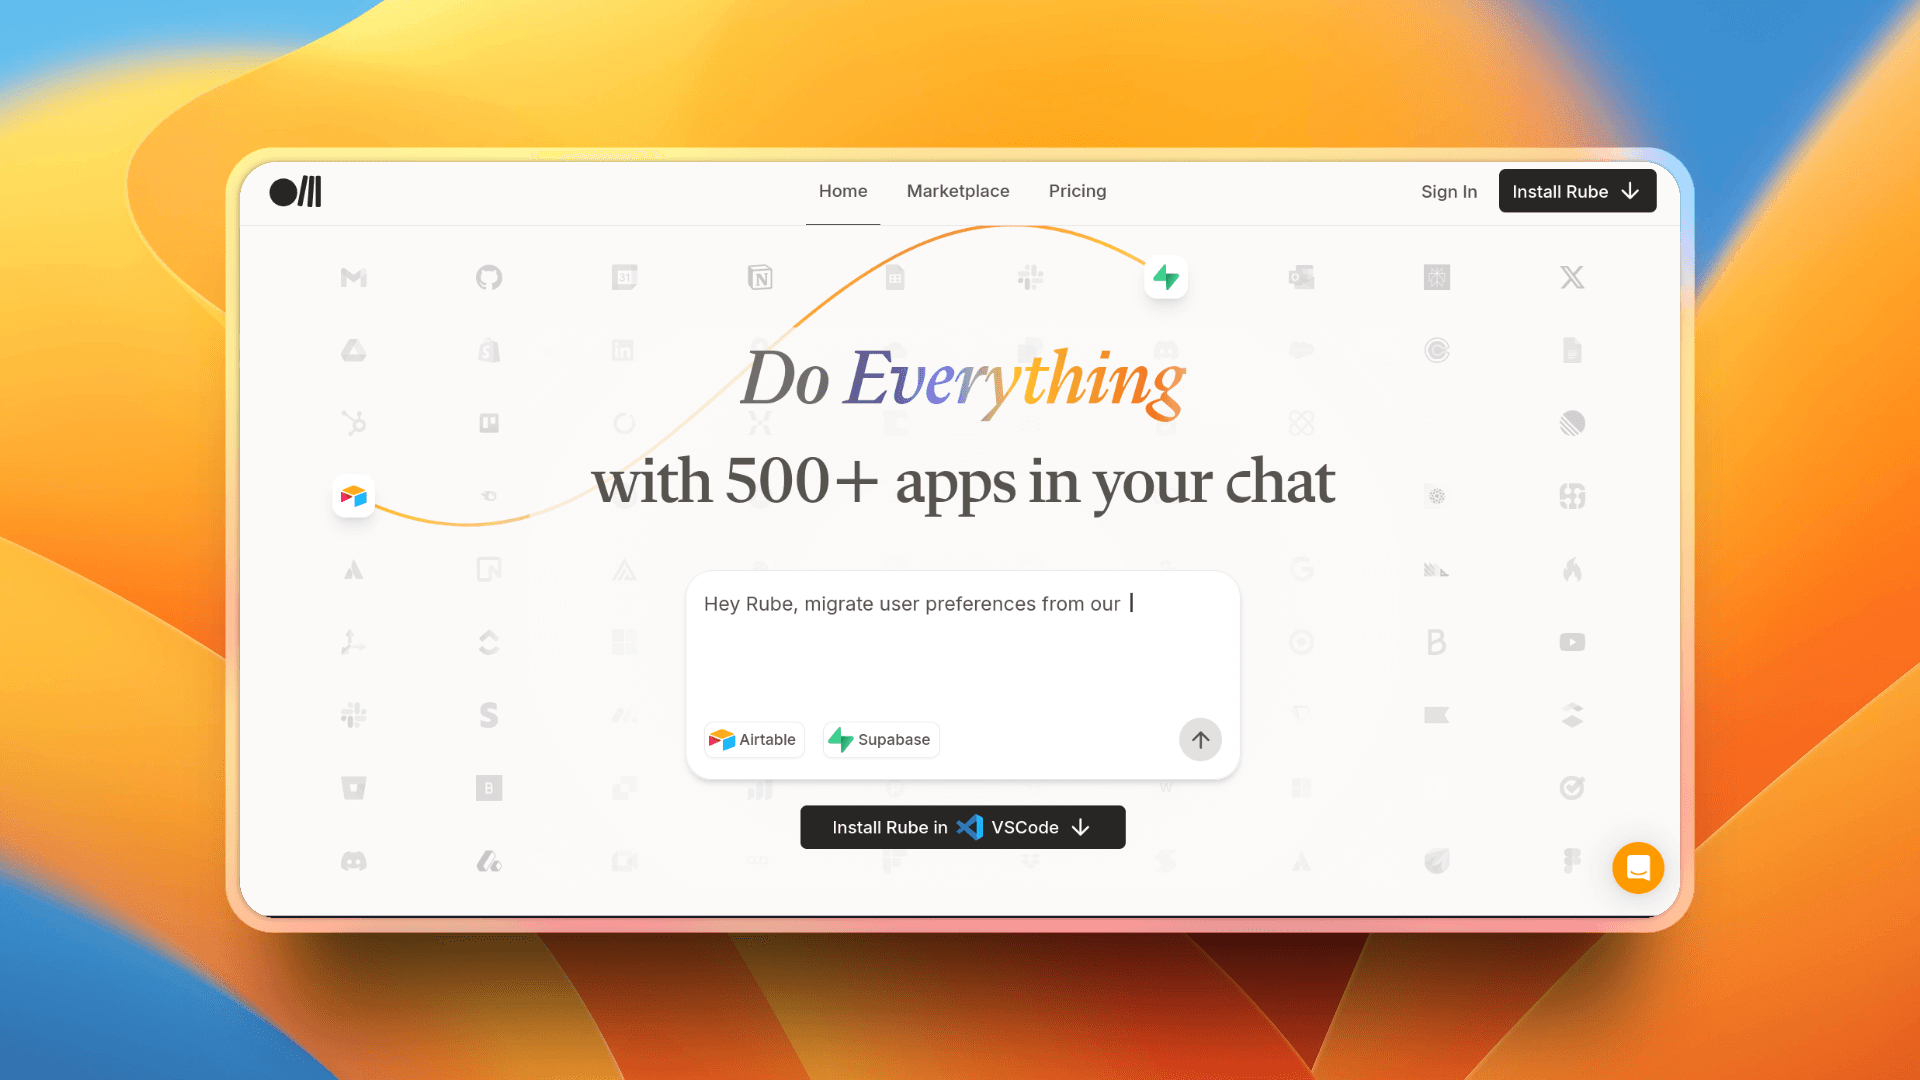
What's Rube?
ℹ️ MCP server that connects your AI tools with 500+ apps.
If you’ve come across the term MCP before, you know it stands for Model Context Protocol. In simple terms, it’s a bridge that lets AI models talk to external apps and services, giving them both data and the ability to take action.
Rube acts as a hosted MCP server that bundles integrations with popular tools such as Slack, Gmail, Facebook, and more. Instead of setting up servers and wiring APIs yourself, you instantly unlock access to over 500 apps right inside your AI chat tools.
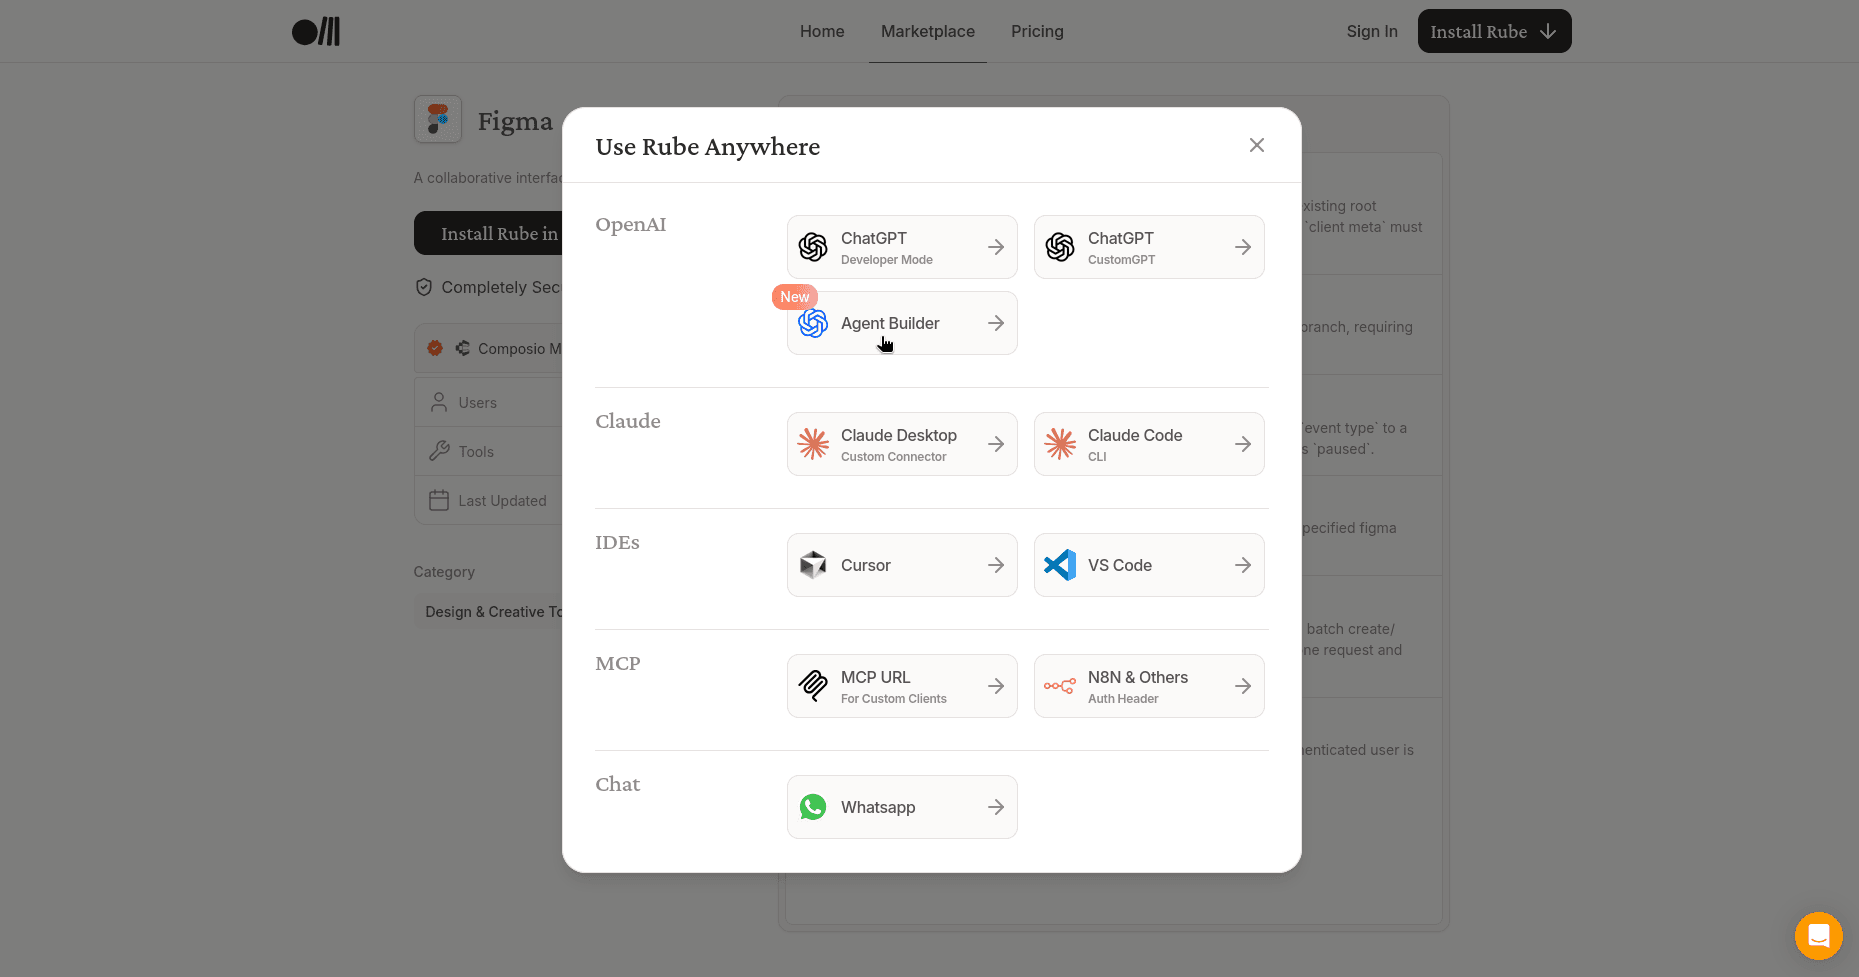
To see what’s available, you can browse the Rube marketplace, which lists all the supported apps.
Getting started is simple:
Install Rube on your preferred platform
Or,
Sign up on the web app, connect an app, and test it directly in your browser.
Here’s a quick demo that shows Rube in action 👇
Now that we have a quick overview of both tools, let's start creating our small Jira agent using Rube MCP and Agent Builder.
How to add MCP to Agent Builder
So, now we're ready to add MCP to our Agent Builder with Rube.
💁 You can obviously use any other custom-hosted MCP servers, but I suggest you go with Rube. It's a part of Composio, well-maintained, and supports over 500 apps, so why not?
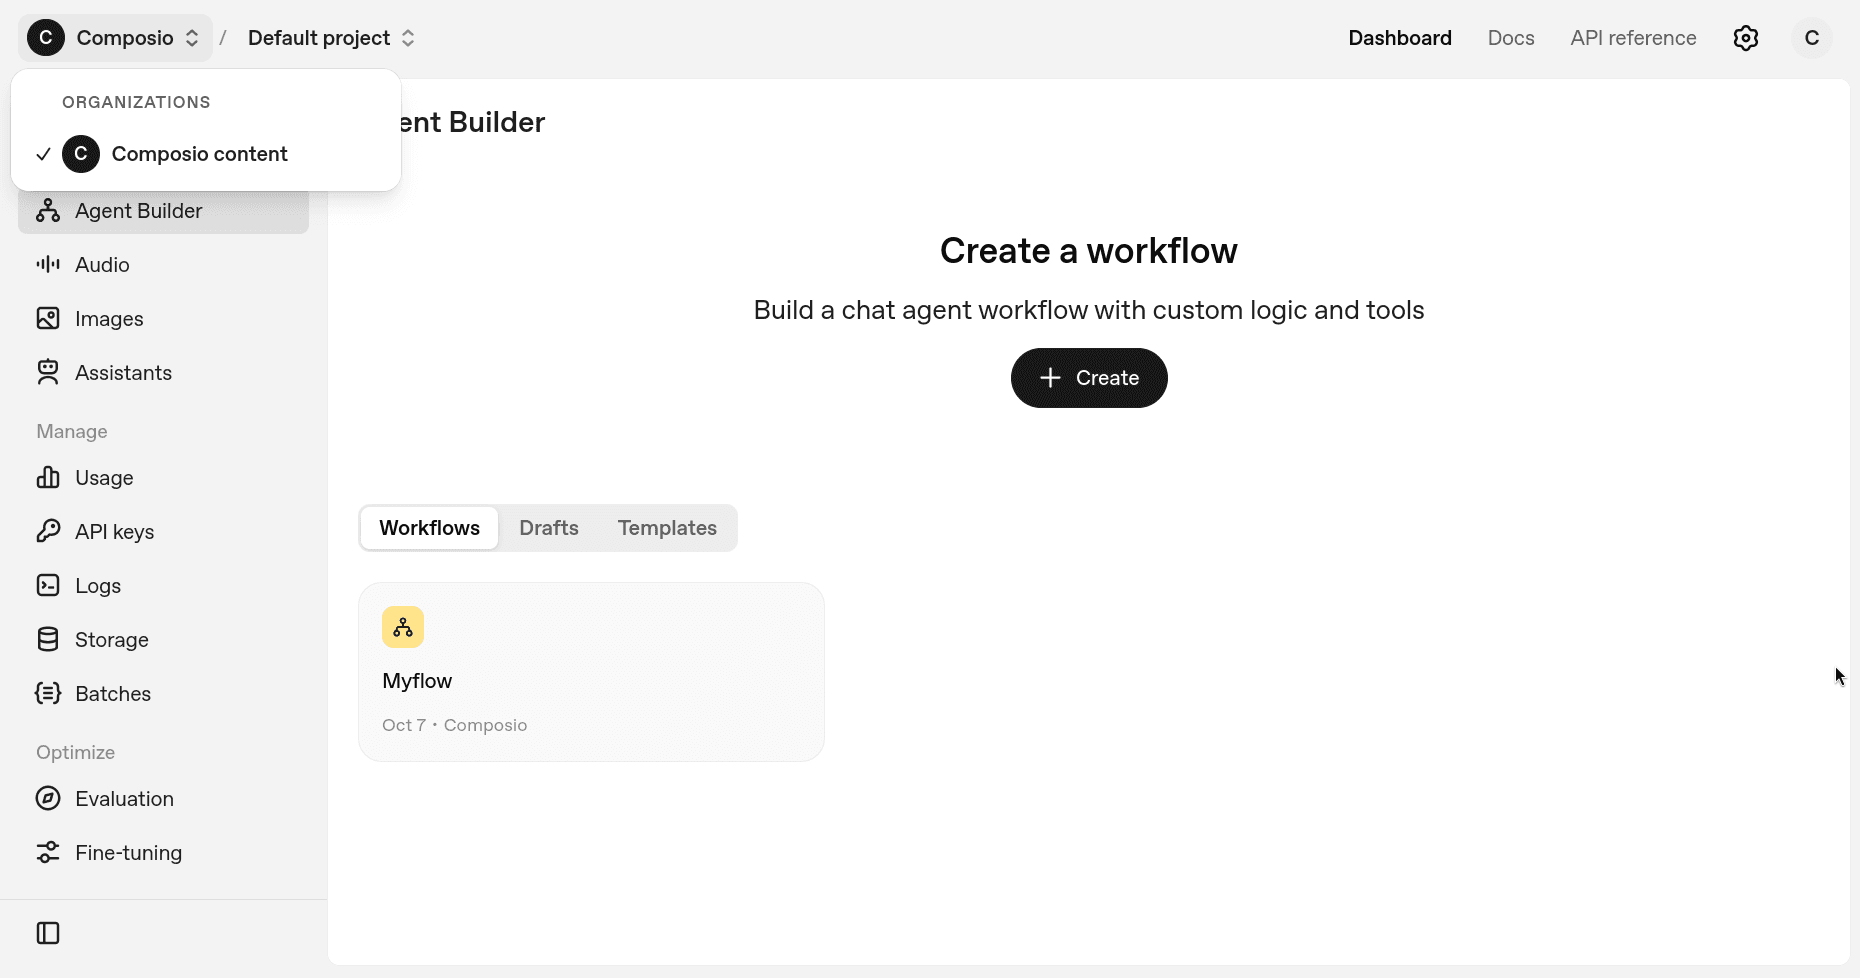
First, head over to Agent Builder and log in if you're not already.
Once in, create a new workflow or continue with your existing one.
Inside your workflow, you can add MCP support by clicking on the MCP button in the left sidebar.
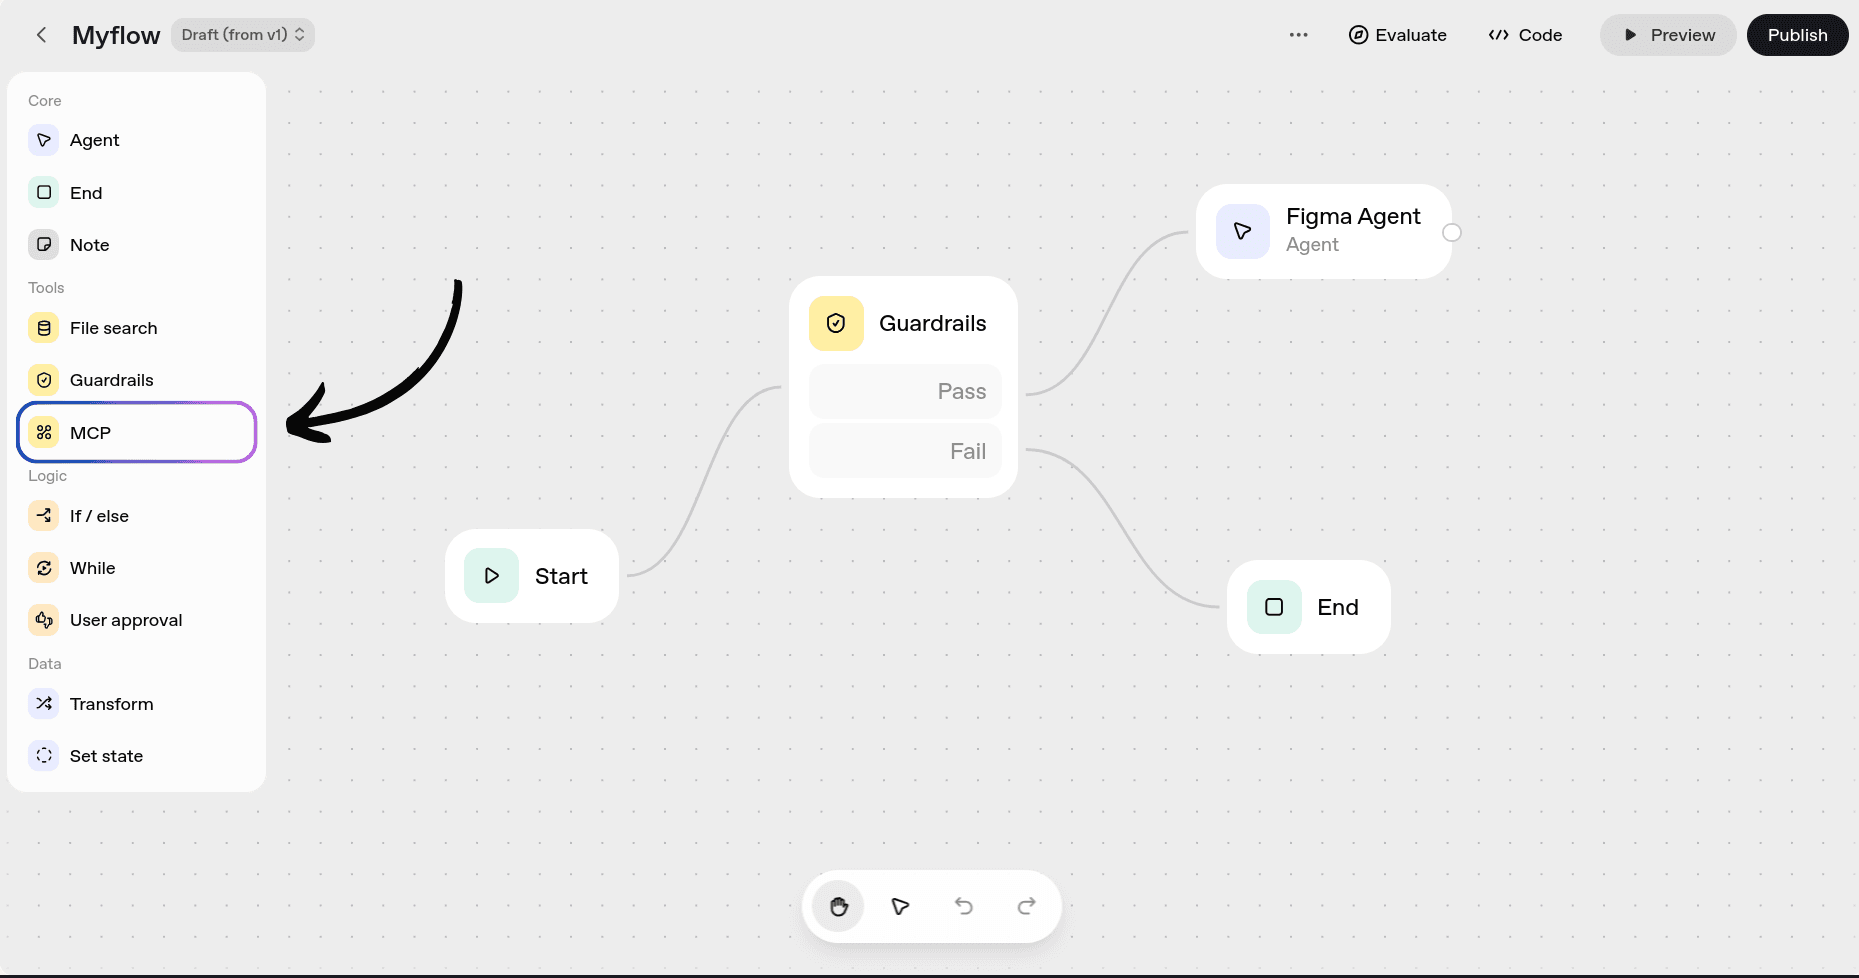
Once there, you can either choose the ones by OpenAI itself, other servers maintained by "Other Developers," or choose to add your own server, which in our case is exactly what we want.
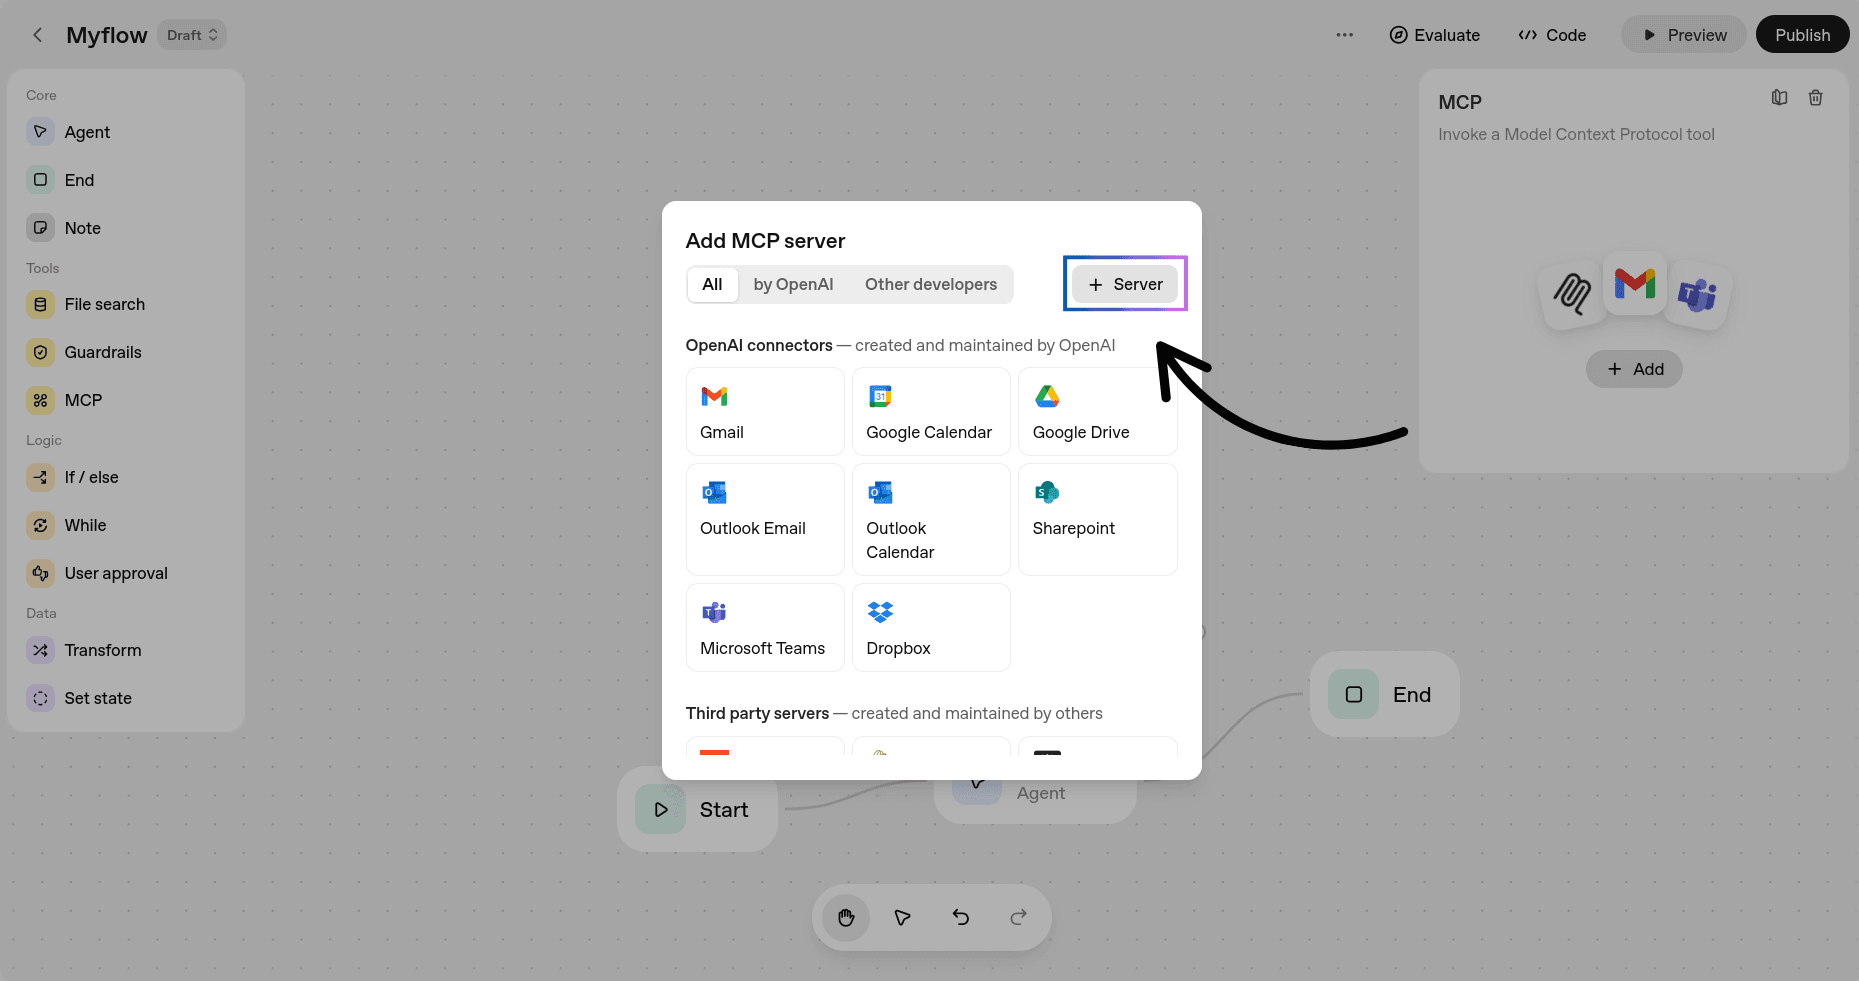
Click on the + Server button, and it will ask for the MCP server details and the Access Token/API Key.
Fill in the fields:
URL: https://rube.app/mcp
For Label and Description, you can add anything you want (show your creativity! 😉)
For the authentication token, you can get it from Rube. Head over to the Rube.
Click on the Install Button and select Agent Builder. Now you can follow the steps shown there or just generate the Access Token.
Now, head back to Agent Builder and, in the field for Auth Token/API Key, paste the generated token.
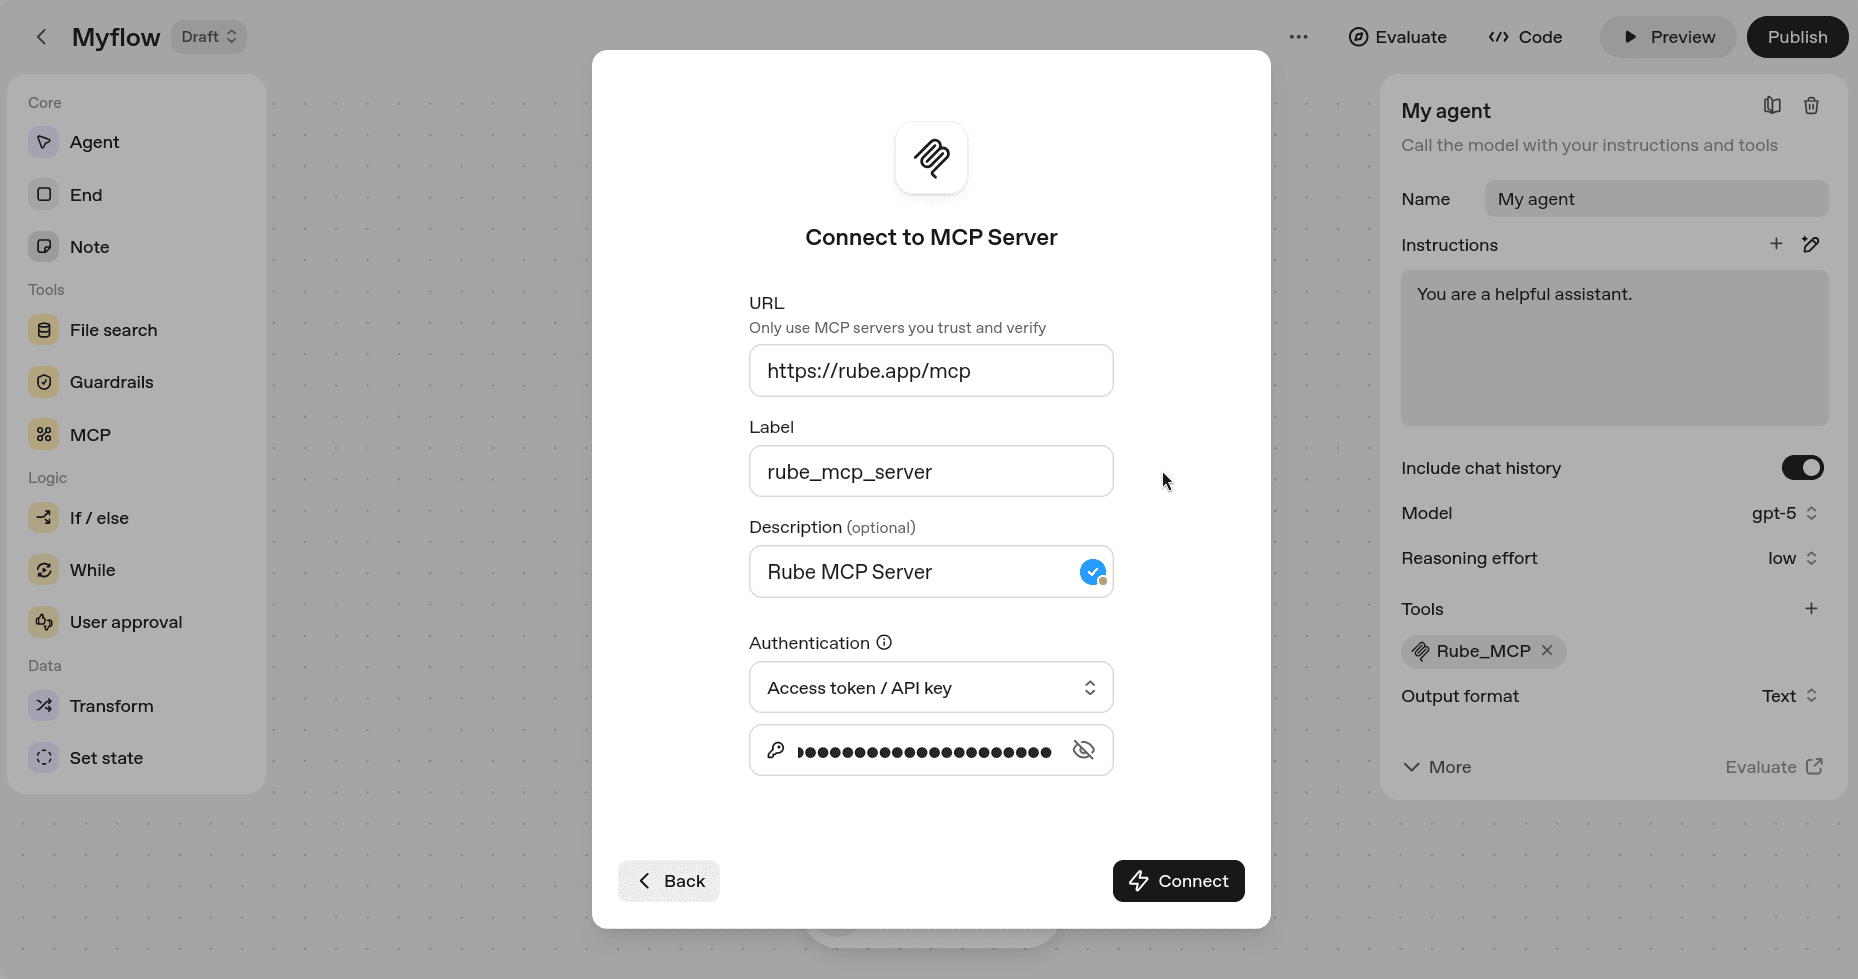
Click Connect, and if you see something like this, you're all set!
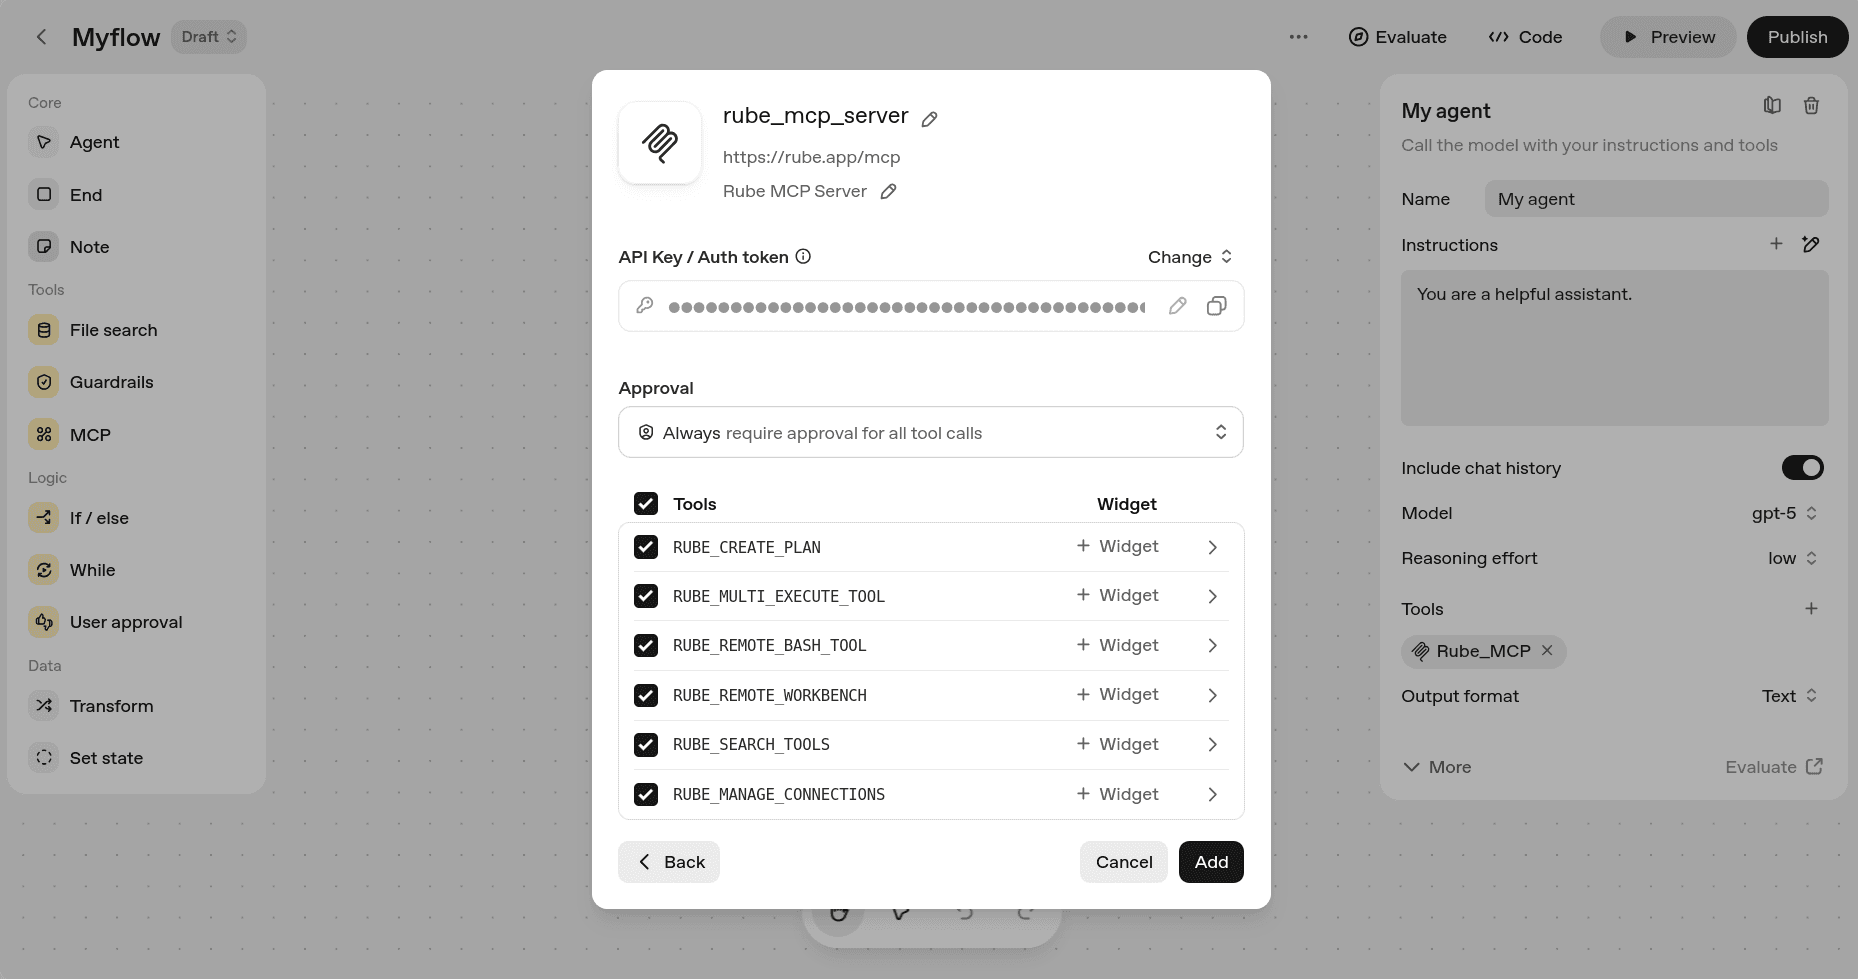
If required, you can limit the tools from the Rube MCP, but for this demo, I suggest you keep it as the default.
Click the Add button, and you've just added Rube to your Agent Builder and can access all their integrations right from Agent Builder. How cool is that?
Now, if you want to use the MCP server in an agent, create or go to your agent and, under the tools section, select MCP Server and follow the same steps.
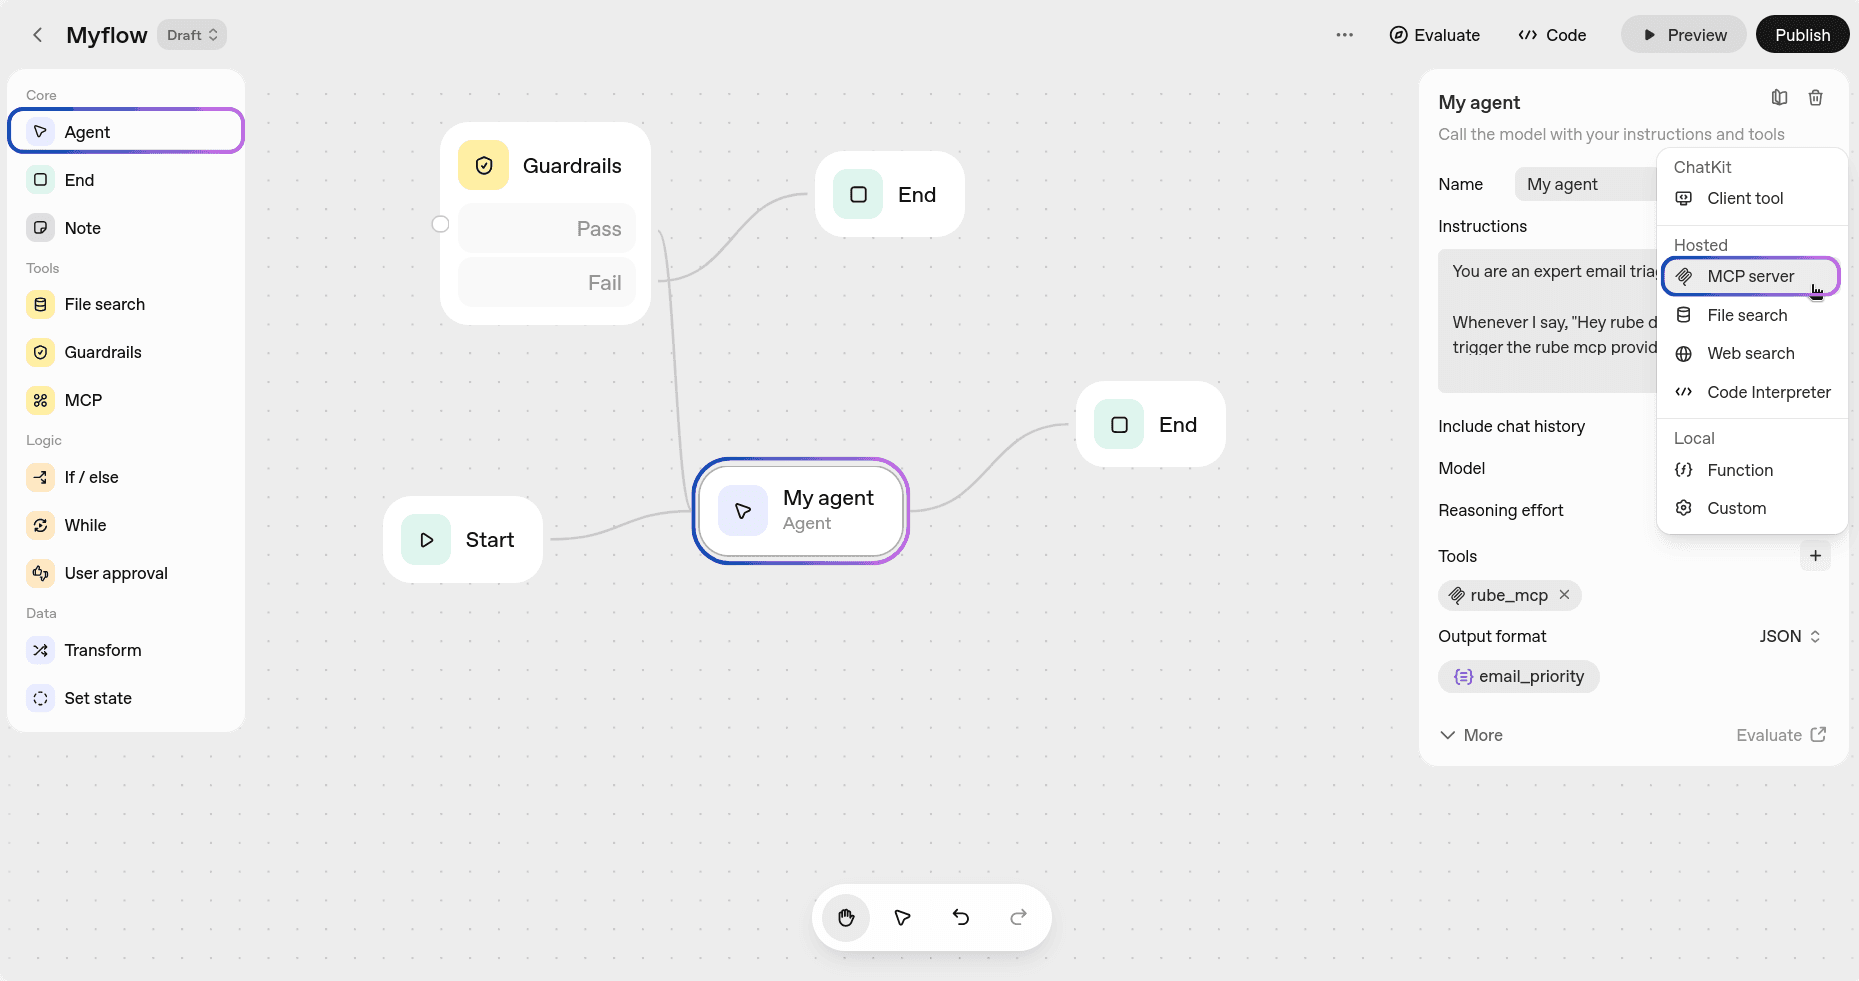
It's that simple!
Configuring Jira
For Jira, unlike many others like Figma, you need to get OAuth credentials (Client ID and Client Secret) to work with the Atlassian API. To get the OAuth Client ID and Secret, you’ll need to create an application first.
First, log in to the Atlassian Developer Portal or create an account if you don't have one yet.
💡 NOTE: Also, make sure that you have a note of your Atlassian sub-domain. You create one when creating your account or use your already created sub-domain.
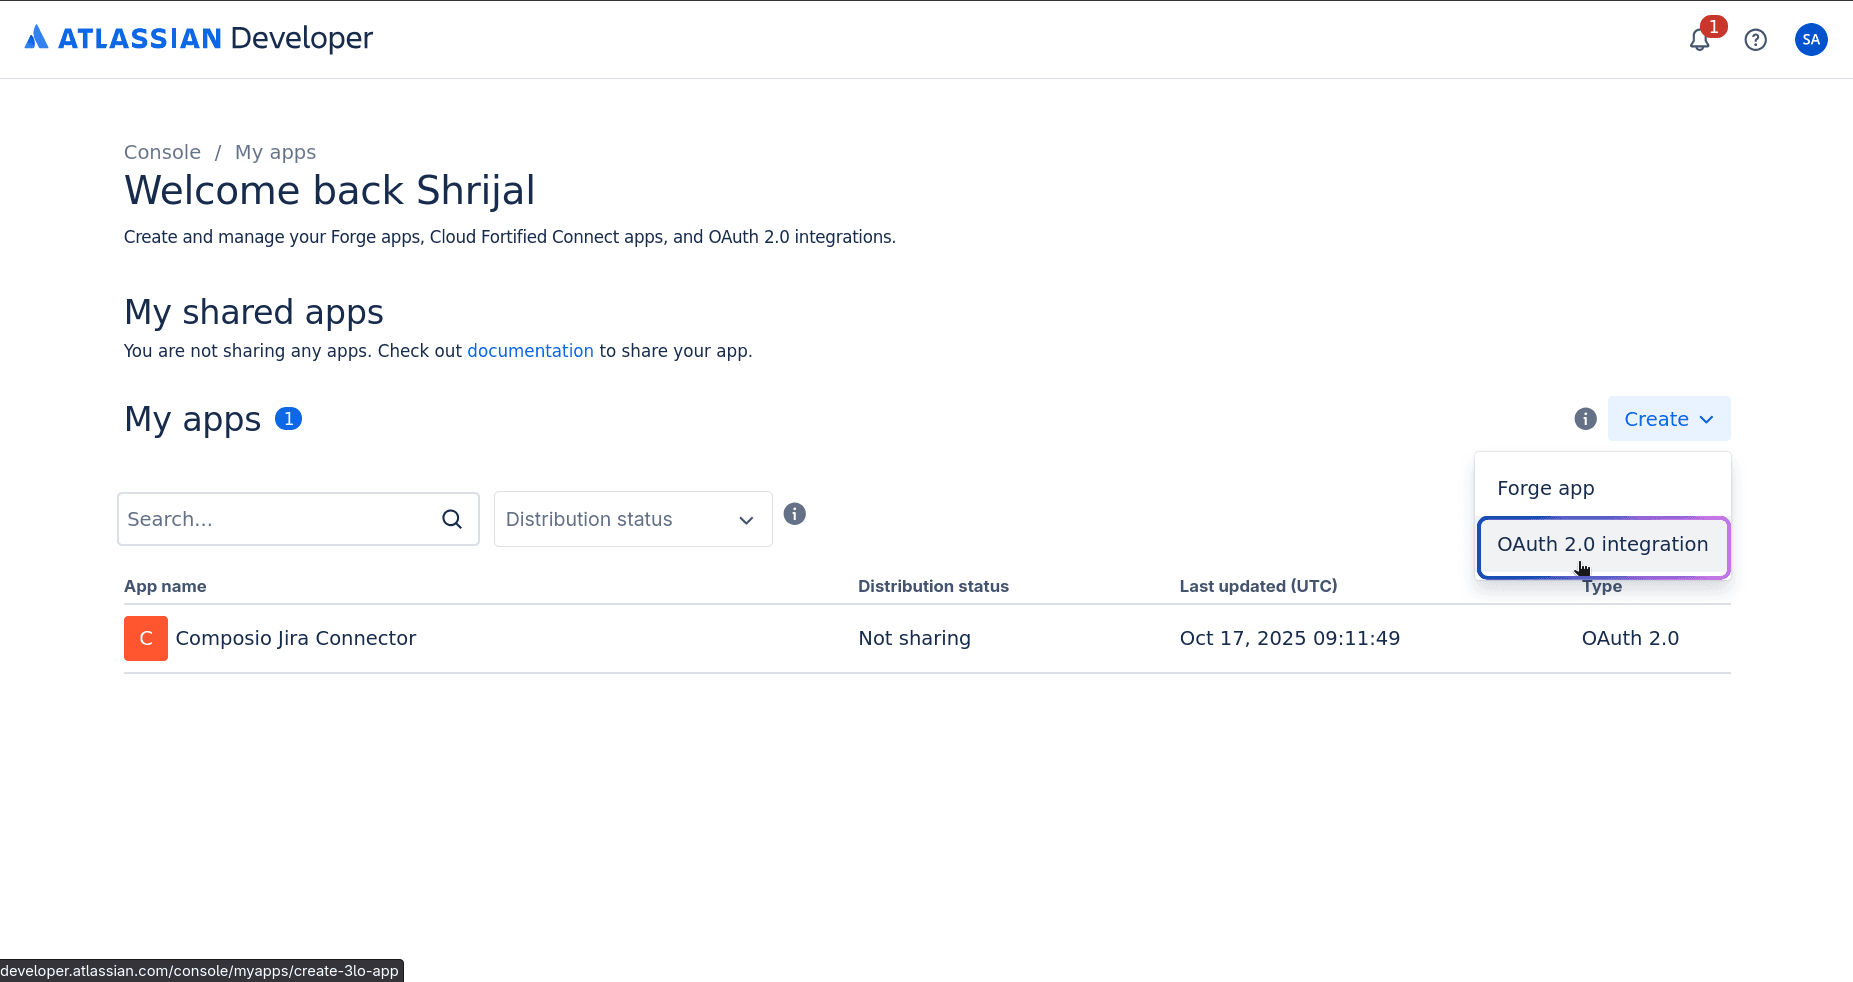
Step 1: Create an Atlassian Application
Now, head over to the Atlassian Apps Console and create an application of OAuth 2.0 Integration type.
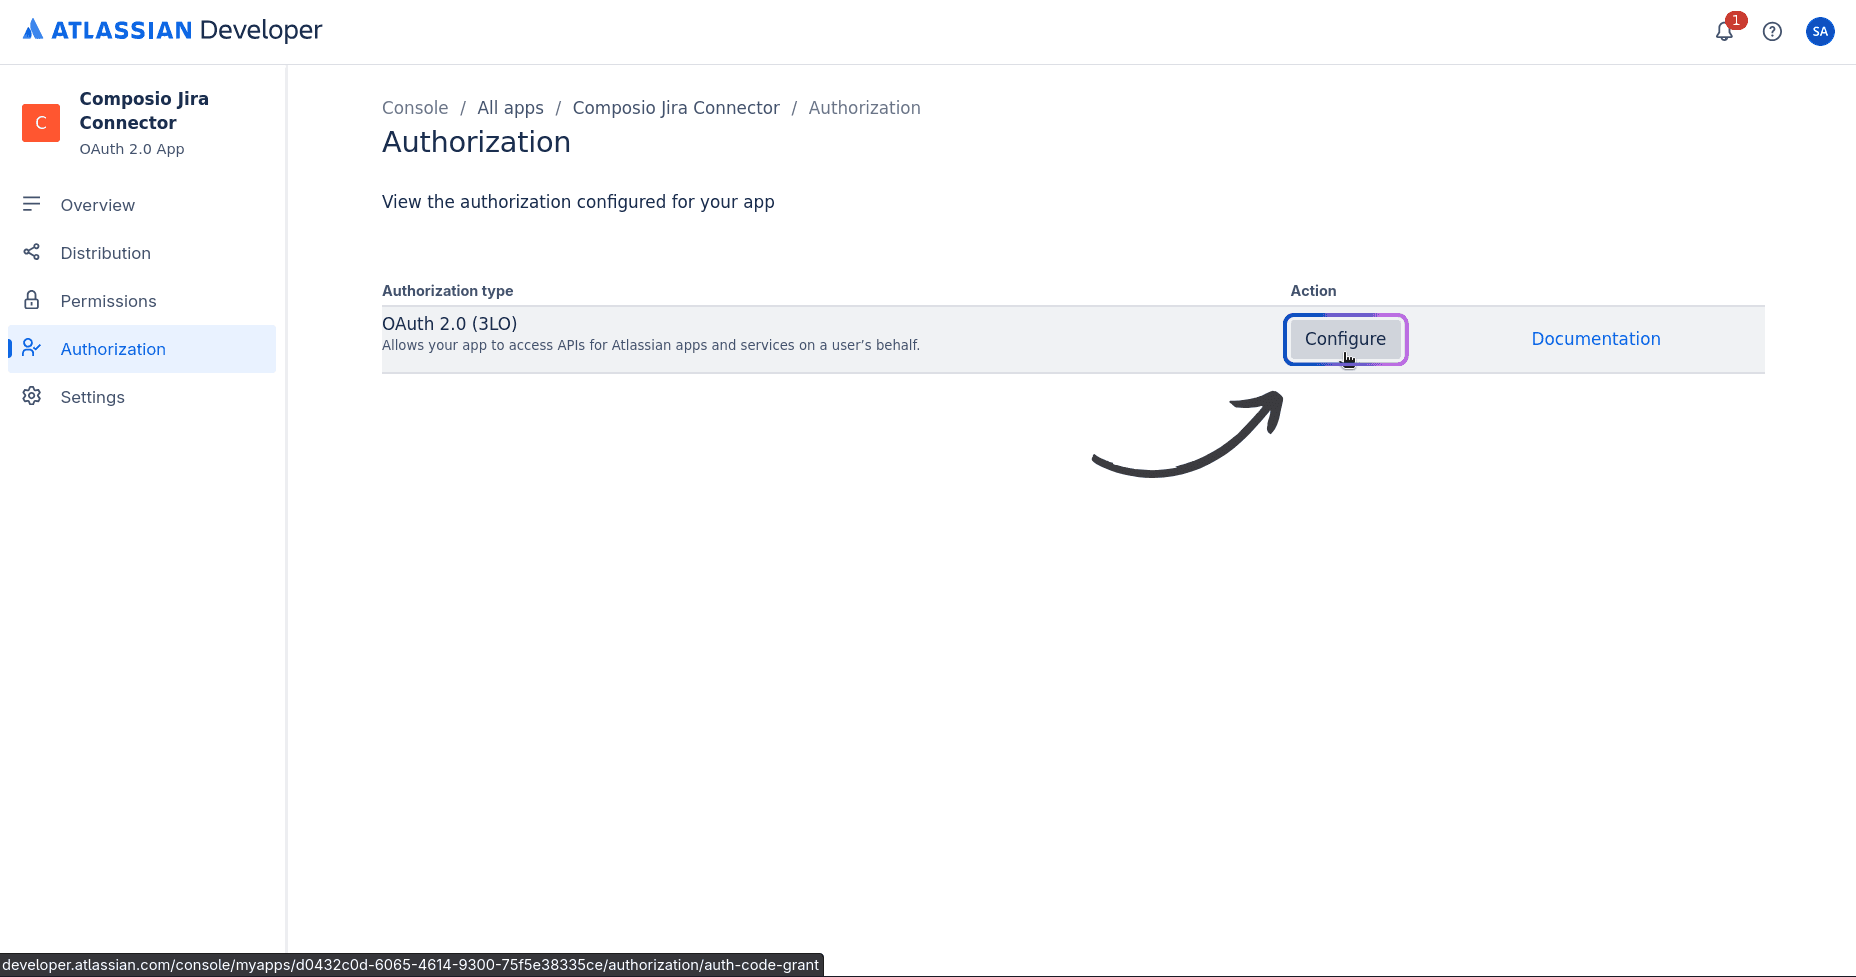
Step 2: Configure Authorisation with Callback URL
Next, go to the Authorisation tab in the left sidebar and click Configure. This will allow us to set up the Callback URL, which, in our case, will be Composio's.
There, you'll see an input field to add Composio's Callback URL. Enter the following URL:
https://backend.composio.dev/api/v1/auth-apps/add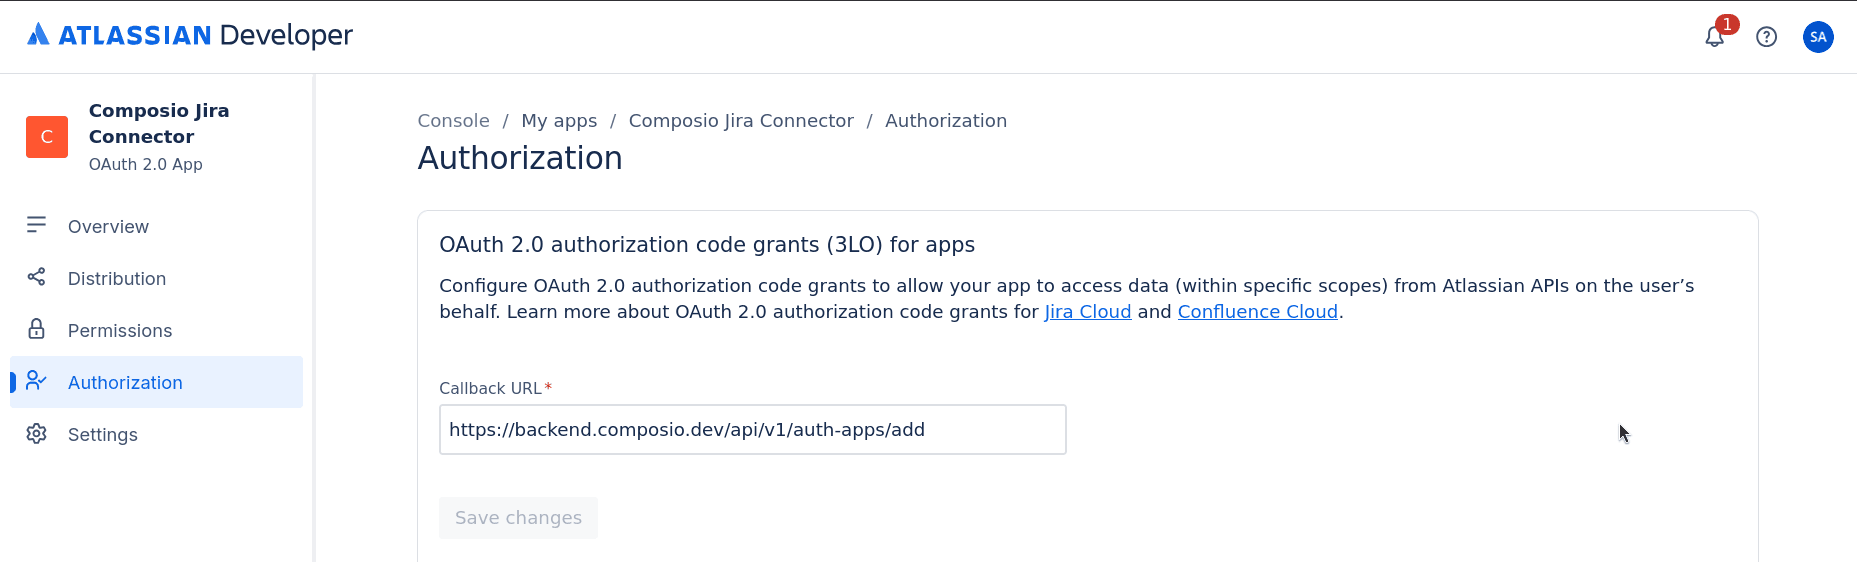
That's all the setup needed for the Authorization tab. Now, we just need to configure the application's scopes.
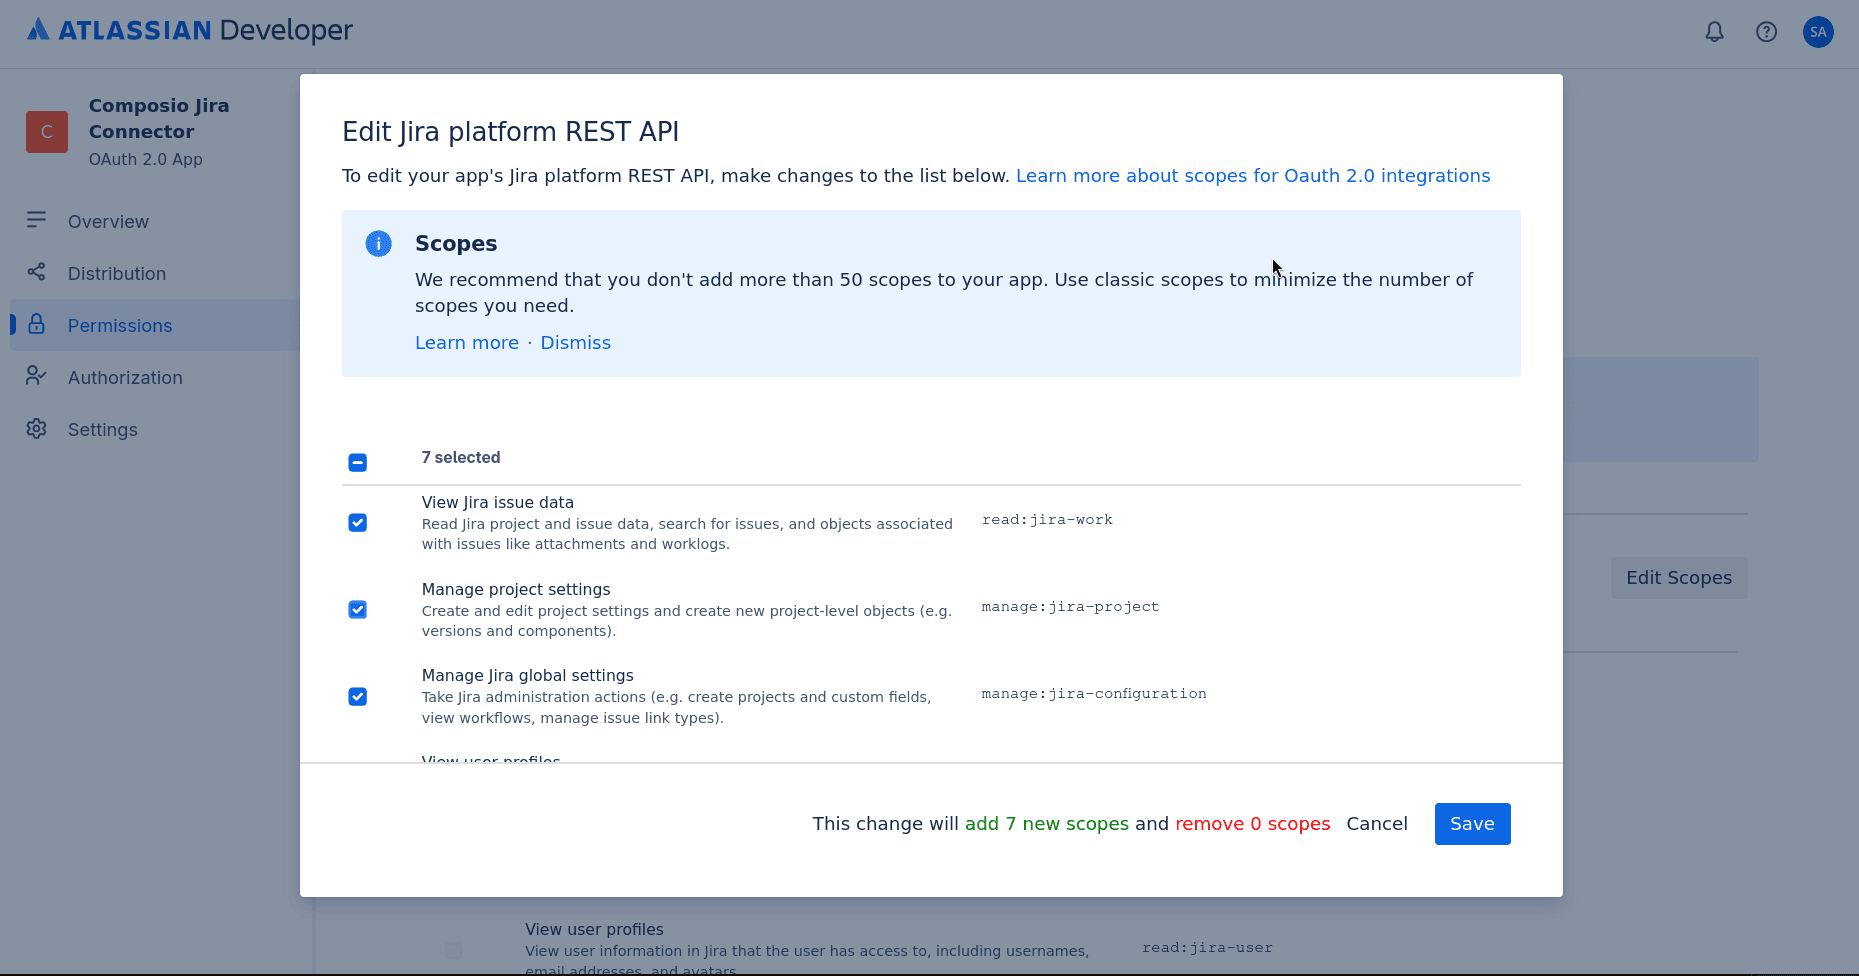
Step 3: Configure Scopes
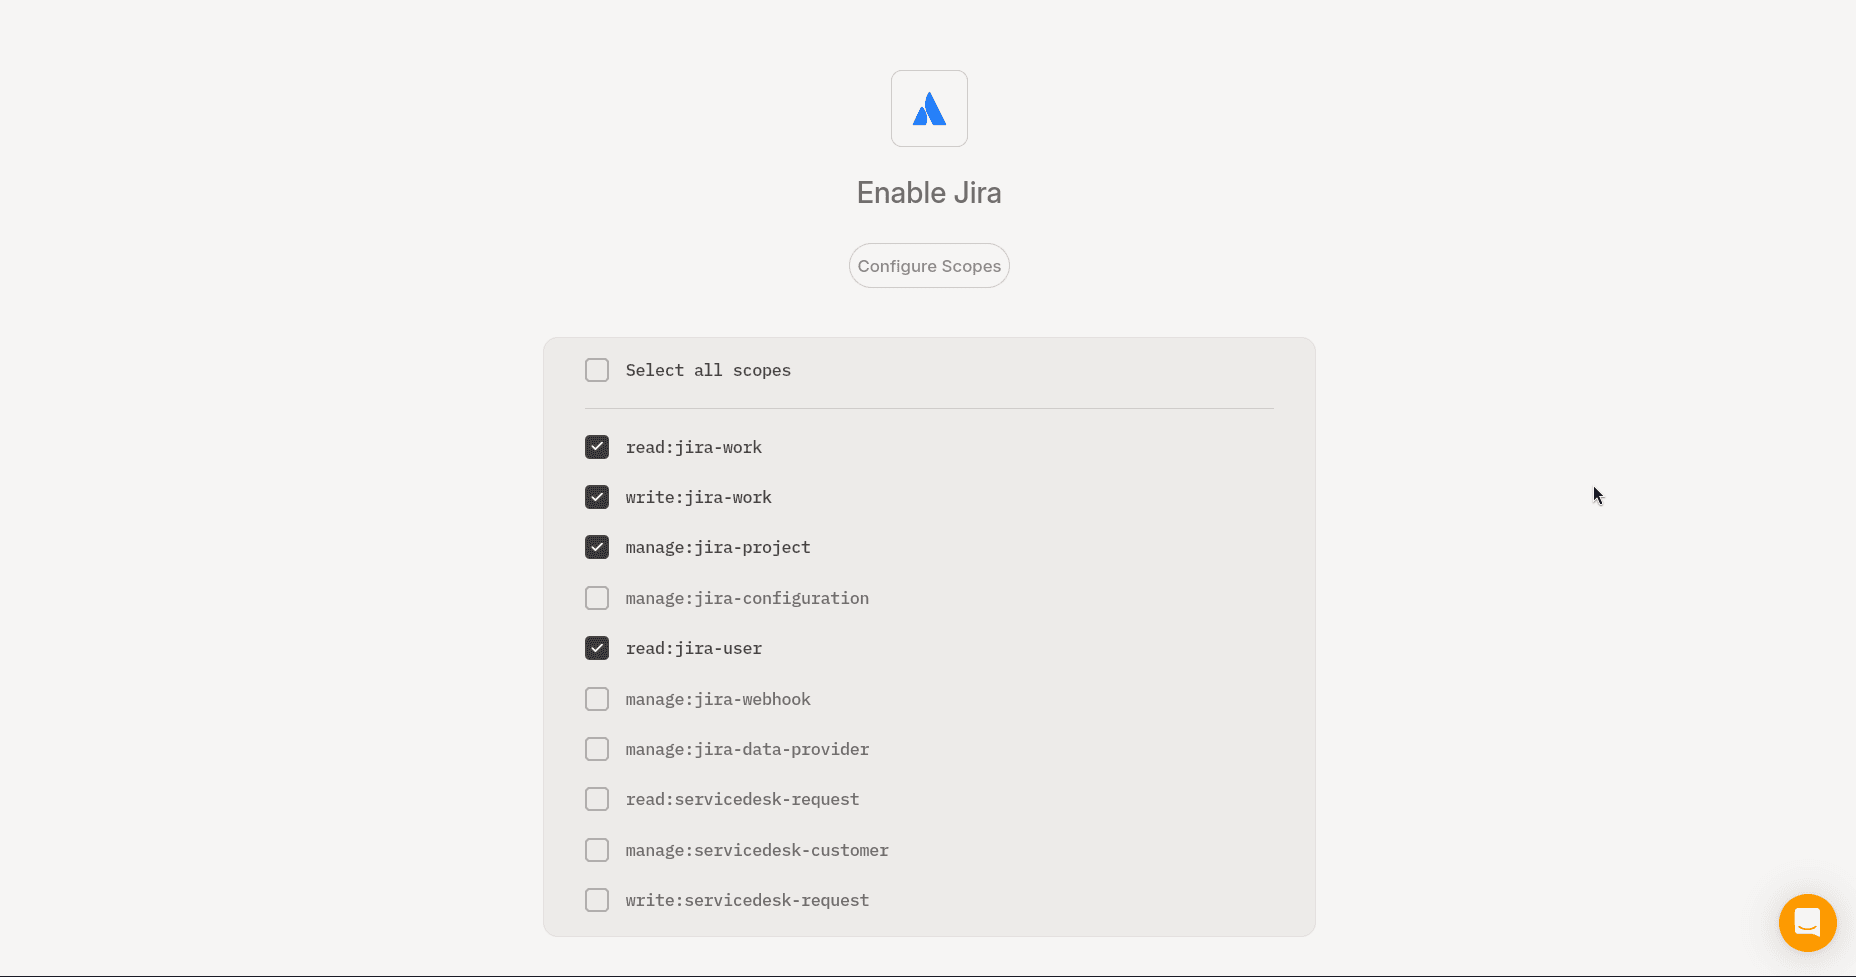
Configuring scopes in Jira can be a bit tricky. To identify the exact names of the scopes you'll be working with, I suggest this method to make it easier to select each one.
First, head over to the Rube for Jira and see a list of all the scopes that Rube supports by default.
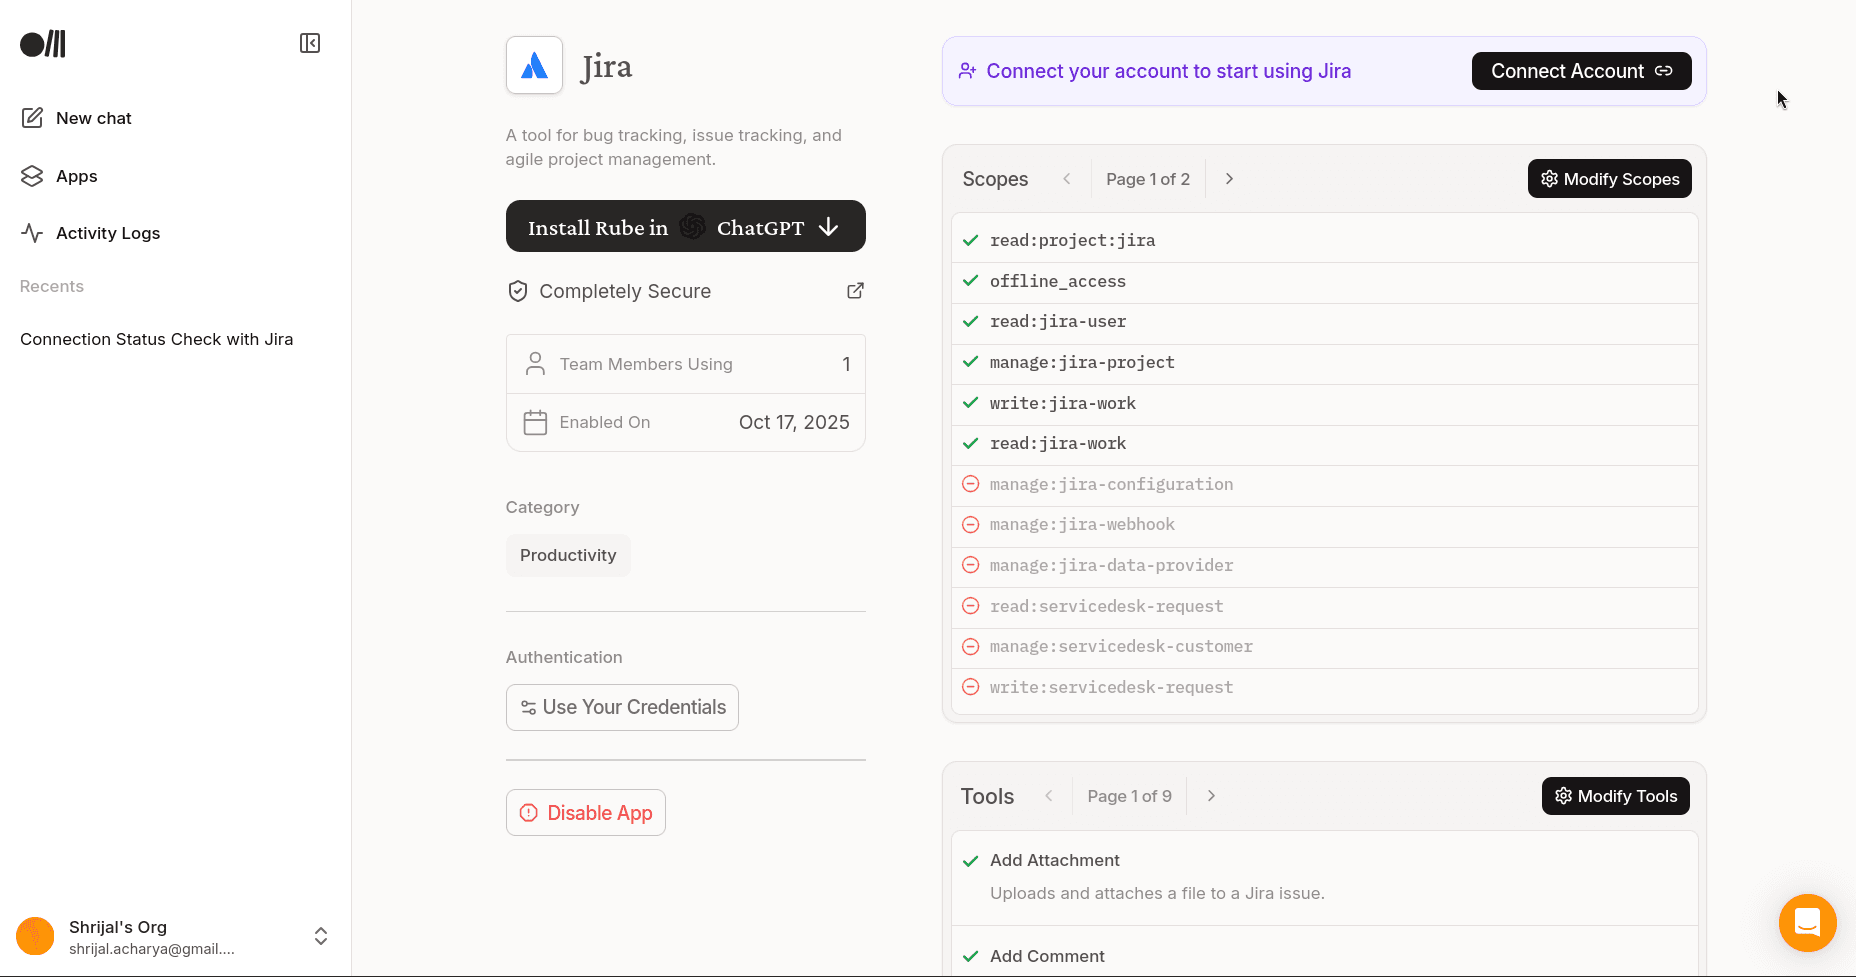
Here's all the scopes listed:
read:project:jira, offline_access, read:jira-user, manage:jira-project, write:jira-work, read:jira-work, manage:jira-configuration, manage:jira-webhook, manage:jira-data-provider, read:servicedesk-request, manage:servicedesk-customer, write:servicedesk-request, read:servicemanagement-insight-objects, read:sprint:jira-software, write:sprint:jira-software, read:board-scope:jira-software, write:board-scope:jira-software, read:issue-type-scheme:jira,Figure out all the scopes that you'll require in your workflow and keep a note of them.
Now, head back to the Atlassian Apps Console and click on the Permissions tab in the left sidebar.
You'll mostly be configuring these scopes inside the User Identity API and the Jira API. Click configure and tick the Classic or the Granular scopes that you plan on using from above.
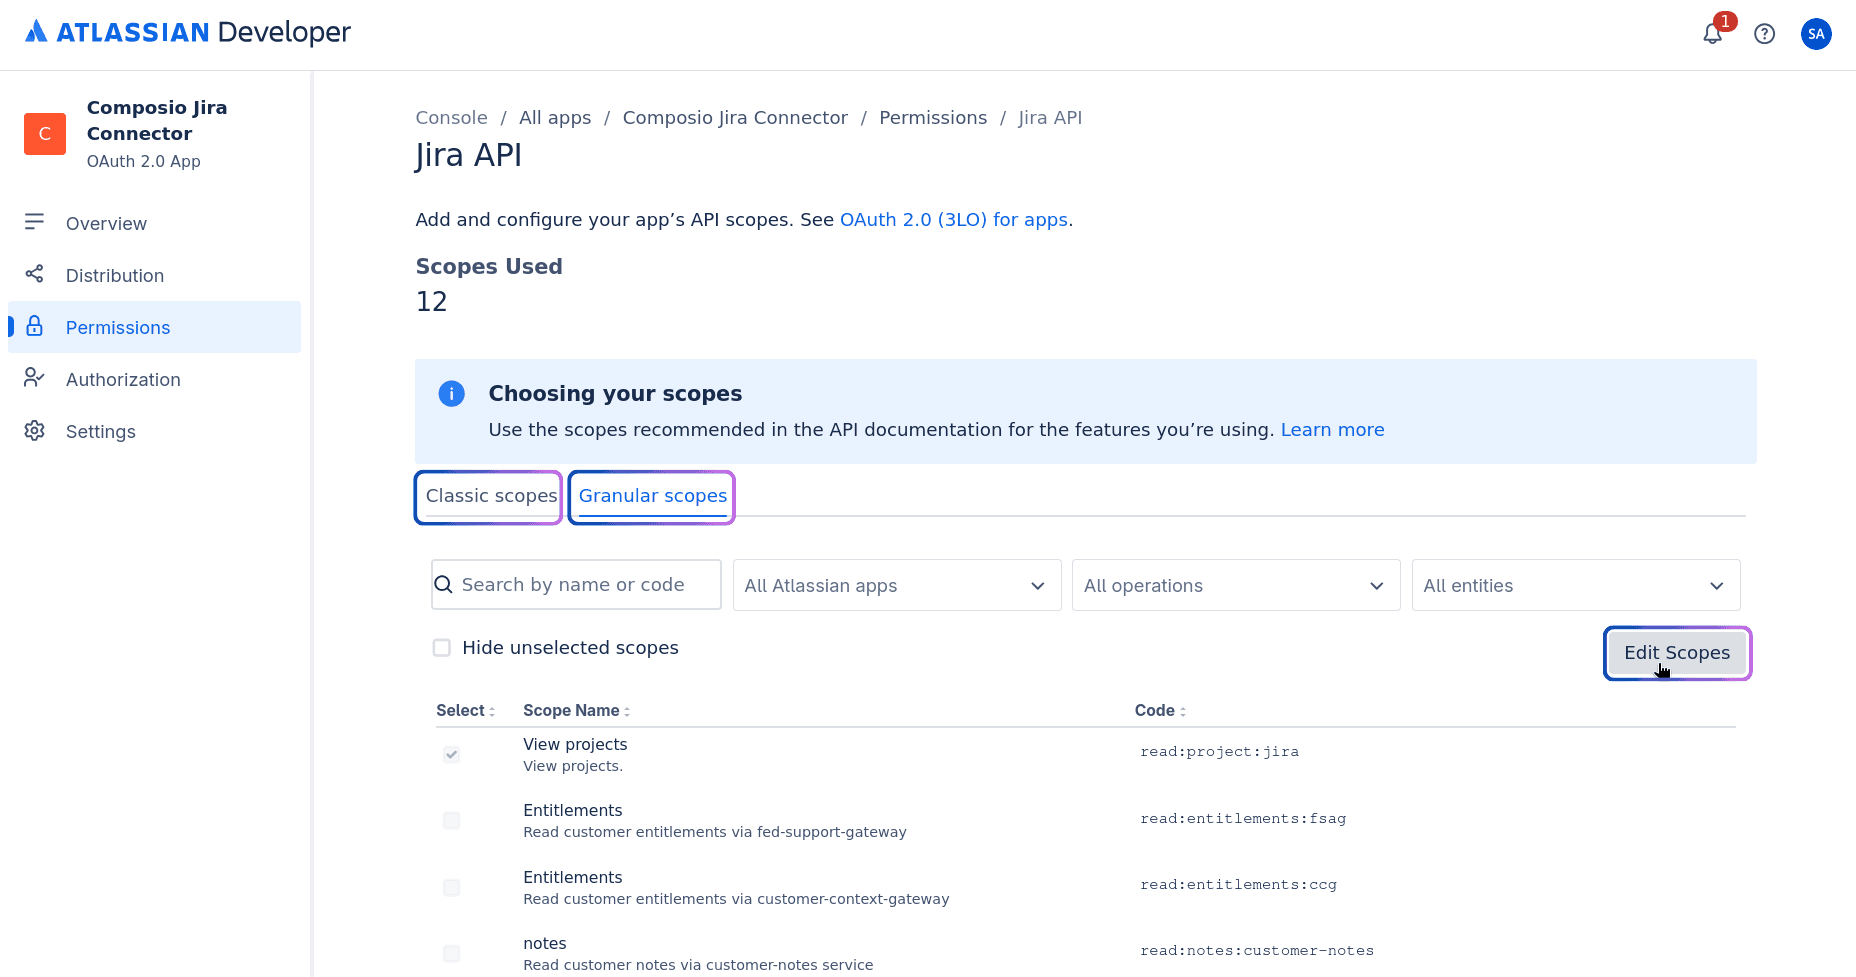
Check the ones you need and click Save.
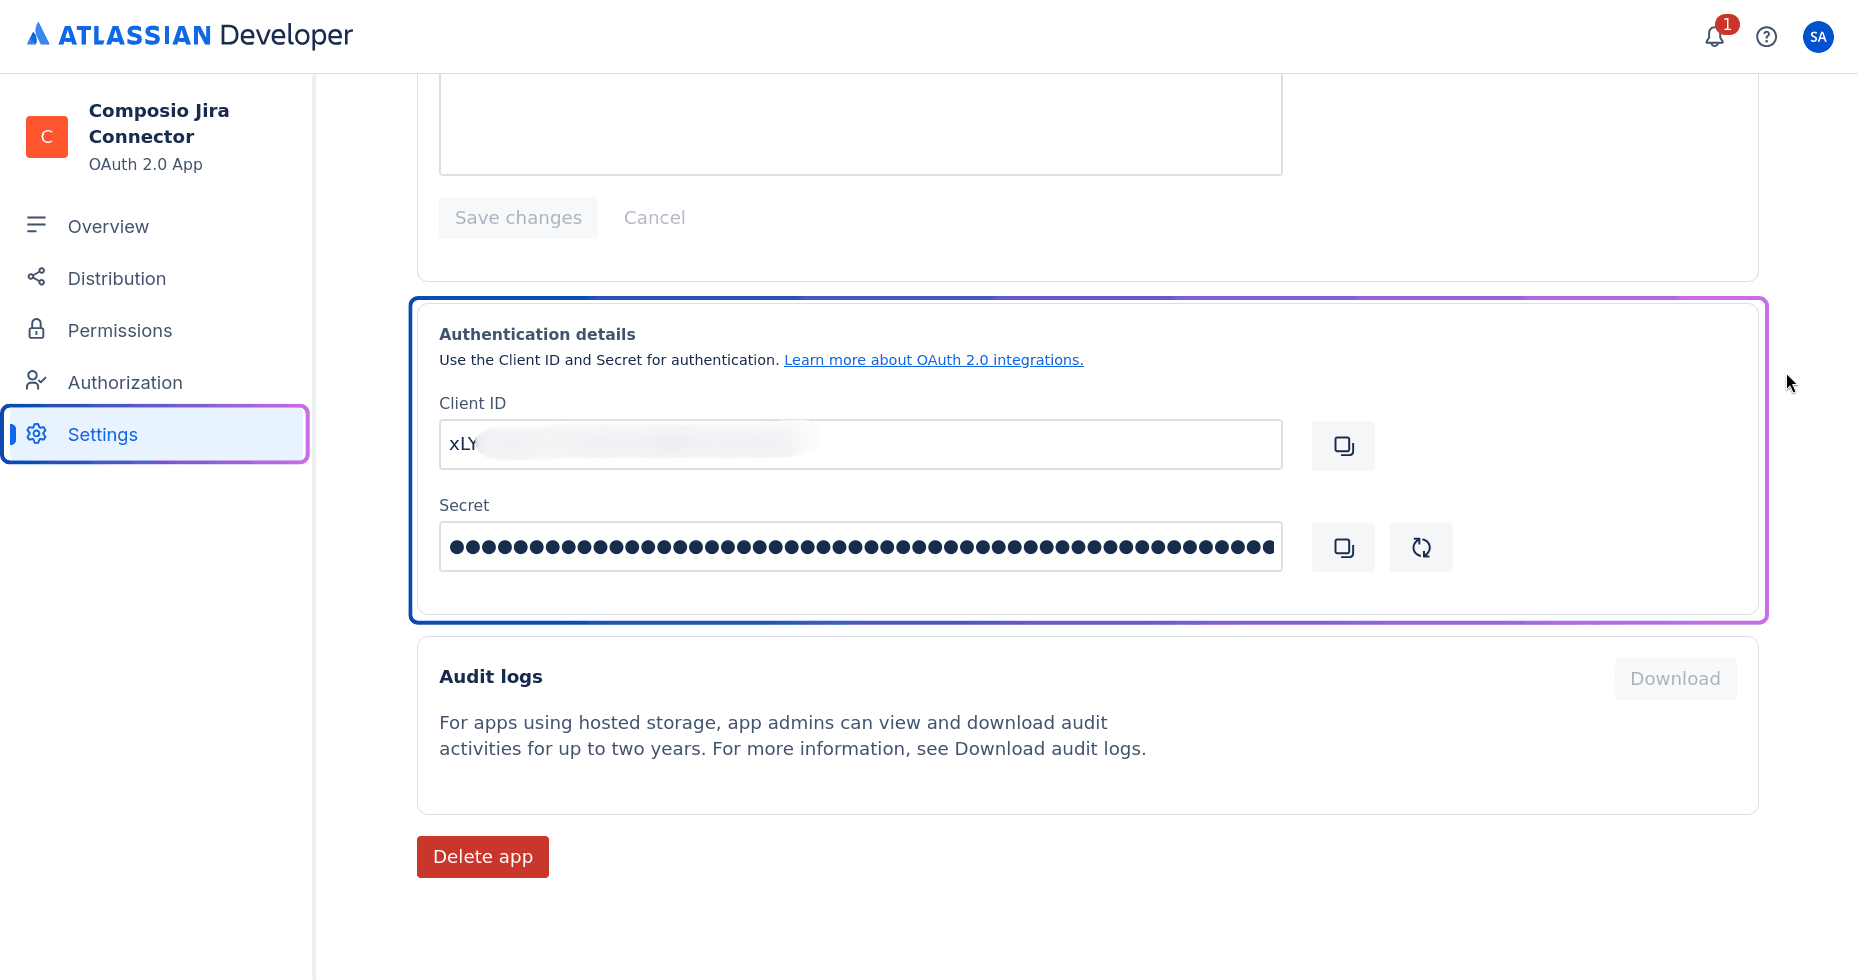
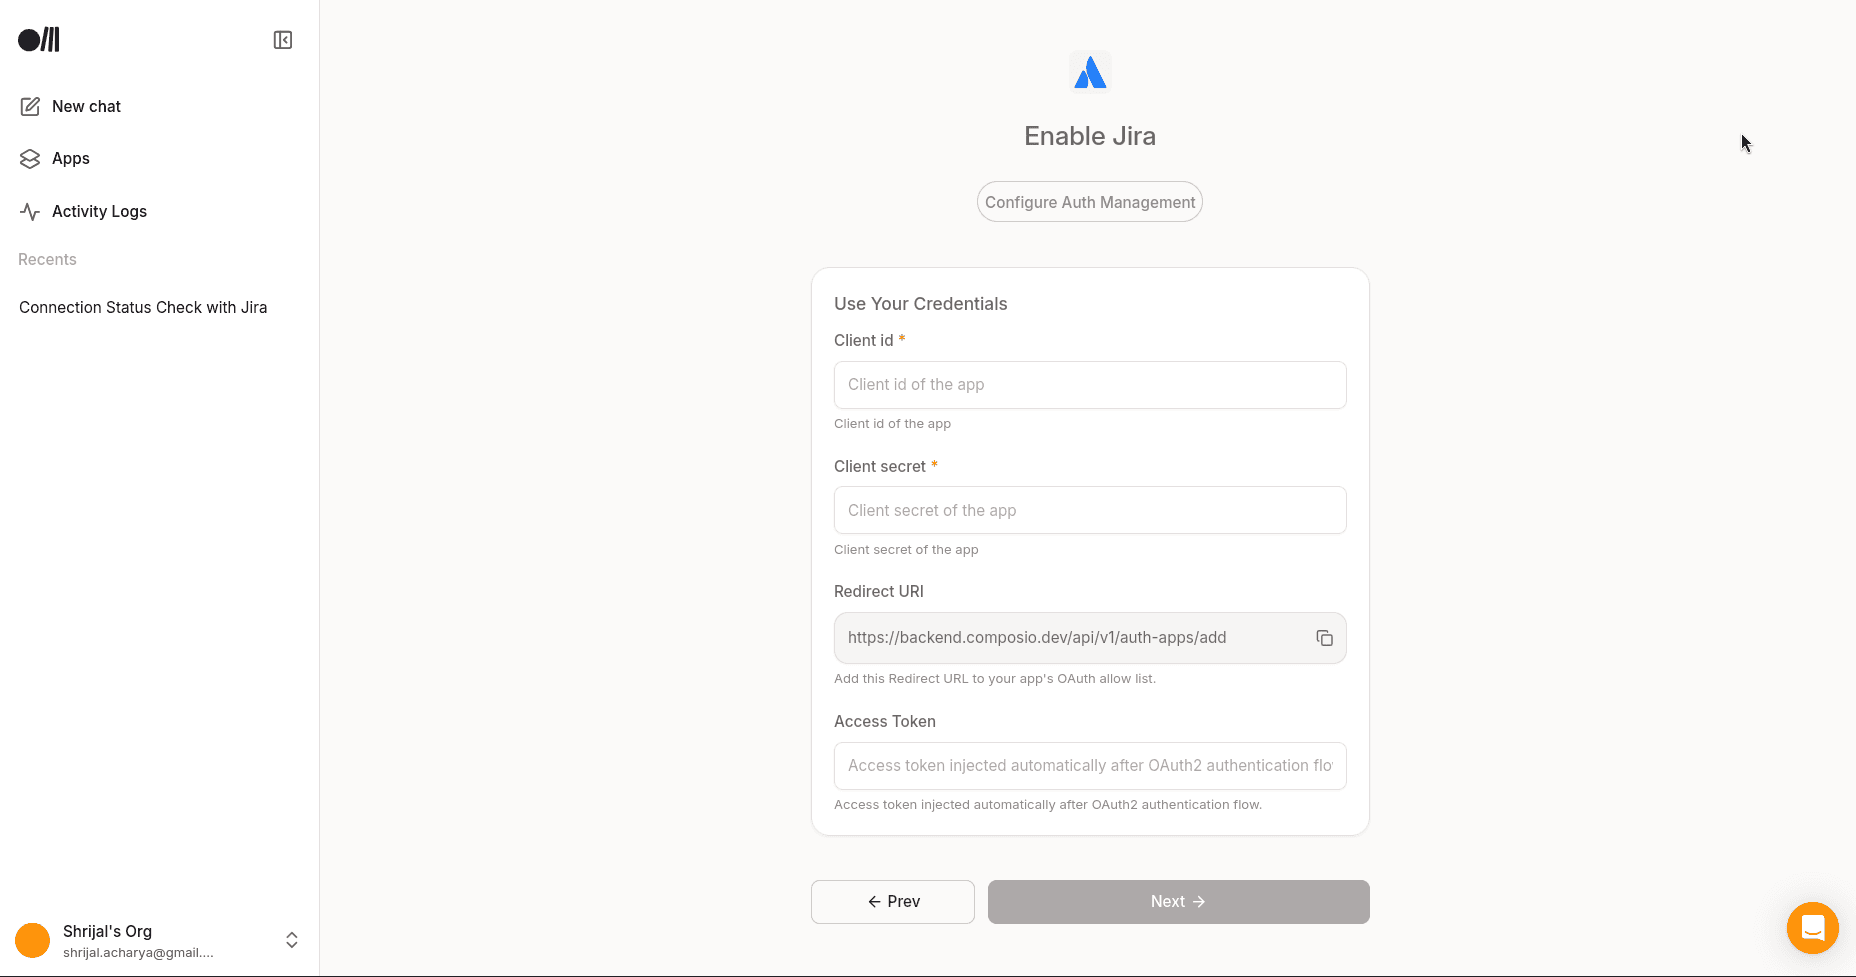
Step 4: Copy the OAuth Credentials
Finally, head over to the Settings tab, and just a little below, you'll find the Client ID and Client Secret in the Authentication Details section.
Copy these as we will need them when setting up Rube for Jira.
Configuring Rube for Jira
We're almost there. Now all that remains is to connect Rube with Atlassian (Jira). Once it's connected, you can directly use it in Agent Builder with no extra setup.
Head over to Rube for Jira and at the top, click on Connect Account, and it will prompt you for your Client ID and Client Secret.
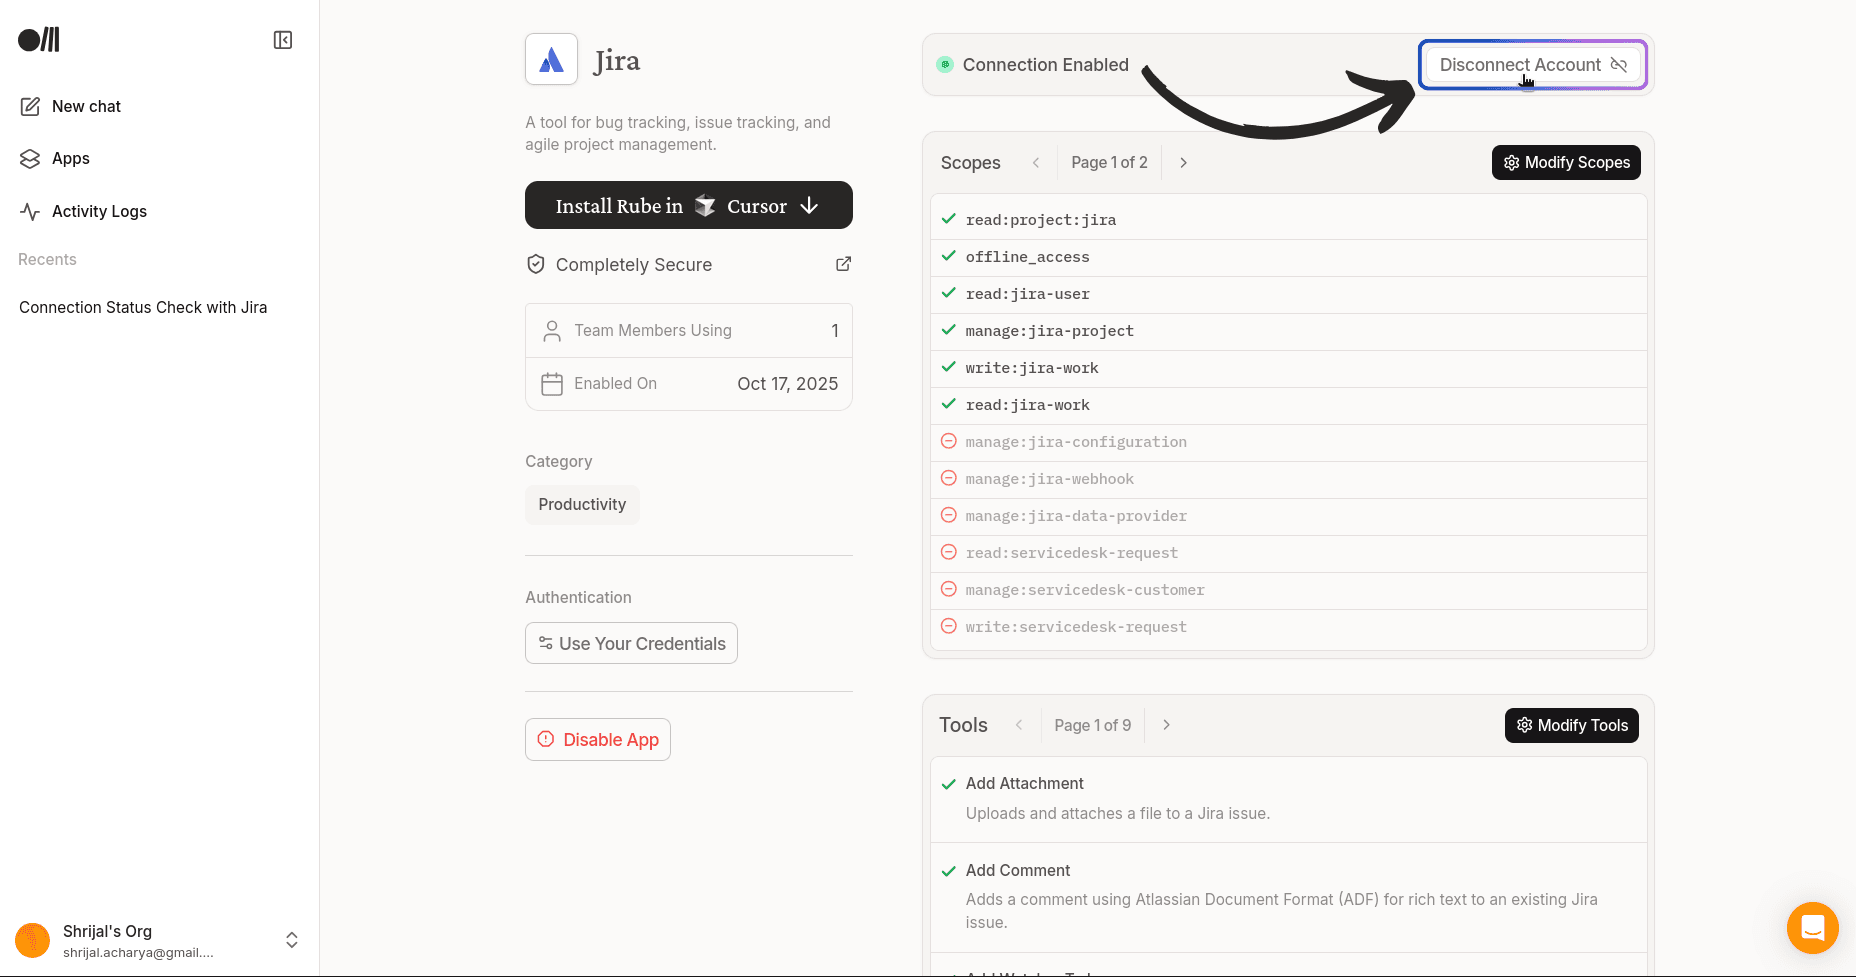
Since I've already connected, it shows Disconnect Account, but for you, it'll show Connect Account.
Now, you'll need to select the scopes again on Rube. Make sure you select just the ones you've marked on Atlassian Cloud.
For some reason, if you select any extra scopes that you've not configured on Atlassian, you'll get this Something went wrong error.
Then, hit Next, and if you see something like this, you're all good!
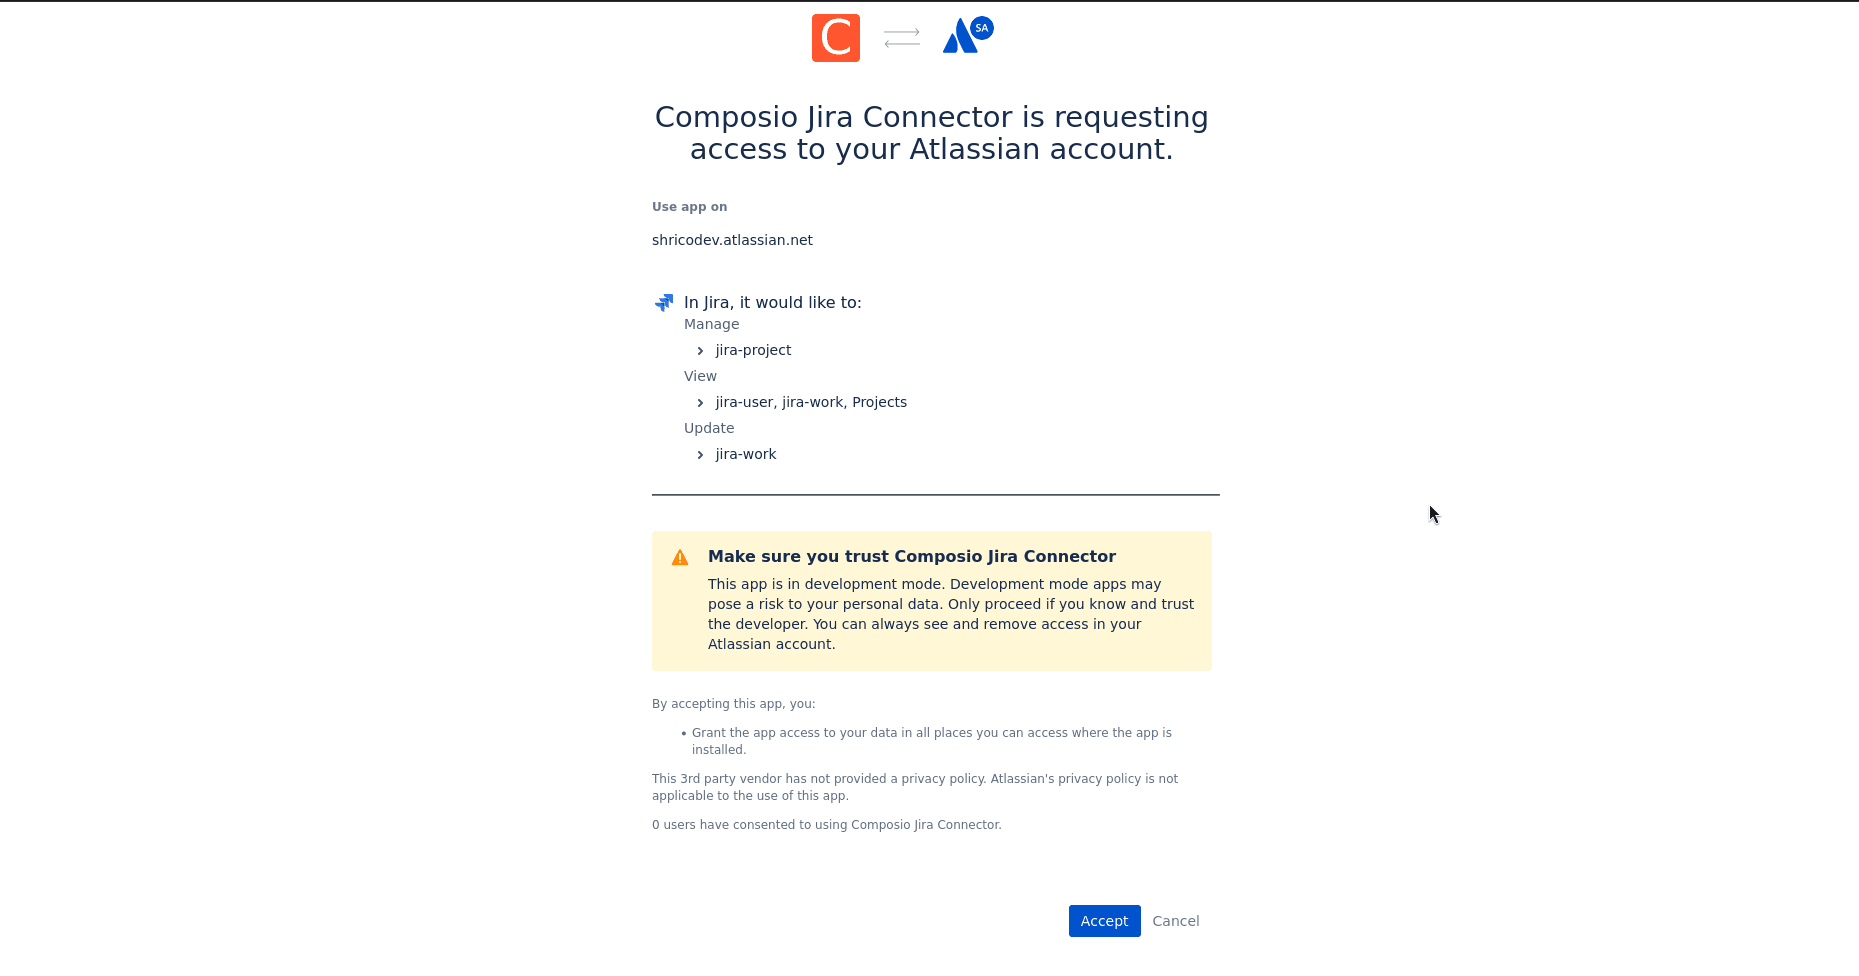
Select Accept and there you go. Rube is all connected with Atlassian Cloud.
Jira MCP in action
Now is the time to test the MCP server. If you haven't already, create an agent by clicking the Agent button in the left sidebar and grant it access to the tools with Rube MCP.
For the testing, head over to the Chat Preview at the top. First, make sure your connection to Jira is working, and once confirmed, just enter your query, and Rube will handle everything. 👌
How easily we can now access the Jira tools right from Agent Builder! All we need is an Agent with the Rube MCP provided in its tools.
This is a very naive example, and we've just touched the surface.
Conclusion
Obviously, there are a ton of new ideas you can accomplish once you have Jira set up inside the Agent Builder with Rube MCP. This is just one simple agent we built.
The sky is the limit! See all the ideas you can build with the help of Jira MCP.
If you are already a bit familiar with tools like n8n or Zapier, this will feel just the same. There's little to no learning curve, so now all I say is go ahead and build some crazy production agents, and happy hacking!
That's all for this! I will see you in the next one.
FAQs
What’s the difference between AgentKit and Agent Builder?
AgentKit is the full platform. Agent Builder is one of its components — the visual workflow editor.
Why use Rube instead of building my own MCP?
Rube is plug-and-play, supports hundreds of apps, and is maintained by Composio. It’s faster and more reliable in tool calling than hosting your own.
What’s needed to connect Jira?
You’ll need to create an Atlassian OAuth app, configure scopes (permissions), and get a Client ID and Secret, then plug those into Rube.
Can I use other MCP servers?
Yes, you can use any hosted or custom MCP server, but Rube is the easiest option to start with.
What can my AI agent do once connected to Jira?
It can read projects, create or assign issues, update tasks, and pull reports — basically anything Jira’s API allows.
Does this require coding?
No, the entire setup is no-code. You follow the configuration steps.
How safe is it?
AgentKit has built-in guardrails, authentication layers, and moderation tools to prevent misuse.