Cursor recently released their cursor agents SDK to the public, and it's quietly powering many teams to:
invoke agents directly from CI/CD pipelines,
create automations for end-to-end workflows,
and embedding agents into core products.
Basically, the SDK lets developers deploy agents without overthinking building and maintaining the entire agent stack
This blog gives a glimpse of what is possible with the cursor agents SDK and how to overcome the restrictions of limited tool access.
Let's start with a brief overview of cursor agents.
A Primer On Cursor Agents SDK
Building an agent from scratch is a massive headache. Cursor SDK skips the
plumbing.
Before the SDK, Cursor was strictly an interactive IDE, but its newly released SDK turns that
agentic power into headless infrastructure.
It uses the same **harness **that powers the desktop app, meaning you get IDE-grade code generation programmatically.
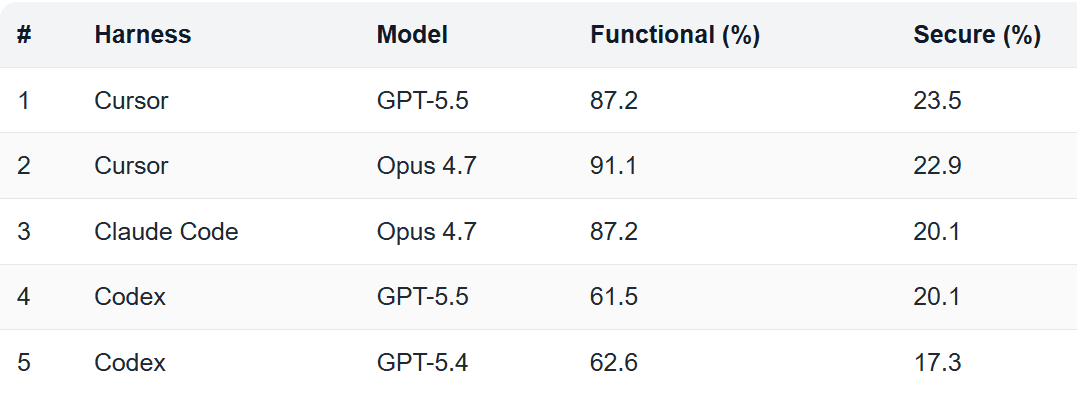
Harness: context engine, workspace management, and routingIn fact, the cursor harness matters more than the model. Endor Labs benched
GPT-5.5 natively at 61.5% functional correctness. Then, dropping the same model into Cursor's harness, it scored 87.2%.
Cursor spent years tuning the context management and tool dispatch; the SDK hands you that refined engine.
Here is the spec list for those who care:
Spec / Feature | Technical Detail |
The Harness | Built-in codebase indexing, semantic search, & instant grep. |
Execution | Cloud (sandboxed VMs with durable state), Self-Hosted, Local. |
Models | Agnostic. Uses `composer-2/composer-3` (default), Claude, or OpenAI. |
Integrations | Deep MCP support, auto-loaded `.cursor/skills/`, & hooks. |
Subagents | Main agent can spawn subagents with distinct prompts/models. |
This means we have a perfect stack to build our agent. Let’s get started with the setup.
How to Set Up Cursor Agents SDK
You can install it using npm to get started, then use Cursor's native cursor SDK skill for guidance.
So open your terminal and type:
npm install @cursor/sdkOutput
Once done, install the cursor skill for guiding the cursor / Claude Code. In the same terminal, run:
npm add skills /cursor-sdkBut there is a catch: by default, the Cursor SDK agents ship with a few default tools + MCP support.
However, this means connecting to or configuring multiple MCP servers is such a hassle for a production-grade product.
So let's automate it with Composio as the orchestrator, connect and configure it once, and you get secure access to 1000+ tools with optimized tool calls and context.
Building a Production Agent With Composio MCP + Cursor Agent SDK
Why Composio?
Composio offers a single MCP server you can plug into with the Cursor SDK to access 1000+ apps instantly.
When you’re building an agent that requires interacting with external applications, let’s say a Sales agent with Gong, HubSpot, Salesforce connectors, etc., you’d spend weeks on partnerships and integrations. Composio completely removes this friction, so you build what matters
So, let’s explore one example of a GitHub agent that pulls the repository, analyzes it, creates a dev branch, performs automatic refactoring, pushes the code, and opens a PR for review - a simple but powerful use case.
Let's begin!
Setup Workspace
Head to the terminal and run the following commands
mkdir cursor-agent
cd cursor-agent
npm init -y
npm install typescript ts-node @types/node --save-dev
npx tsc --init
The command will create a new project named cursor_agent , switch to the folder, initialize a blank npm project (ensure package.json gets created), install typescript support for development, and initialize the typescript compiler and linter.
Since our repository is set up, let’s configure environment variables.
Set up Environment Variables
Add a .env file to keep secrets secure and add the following values:
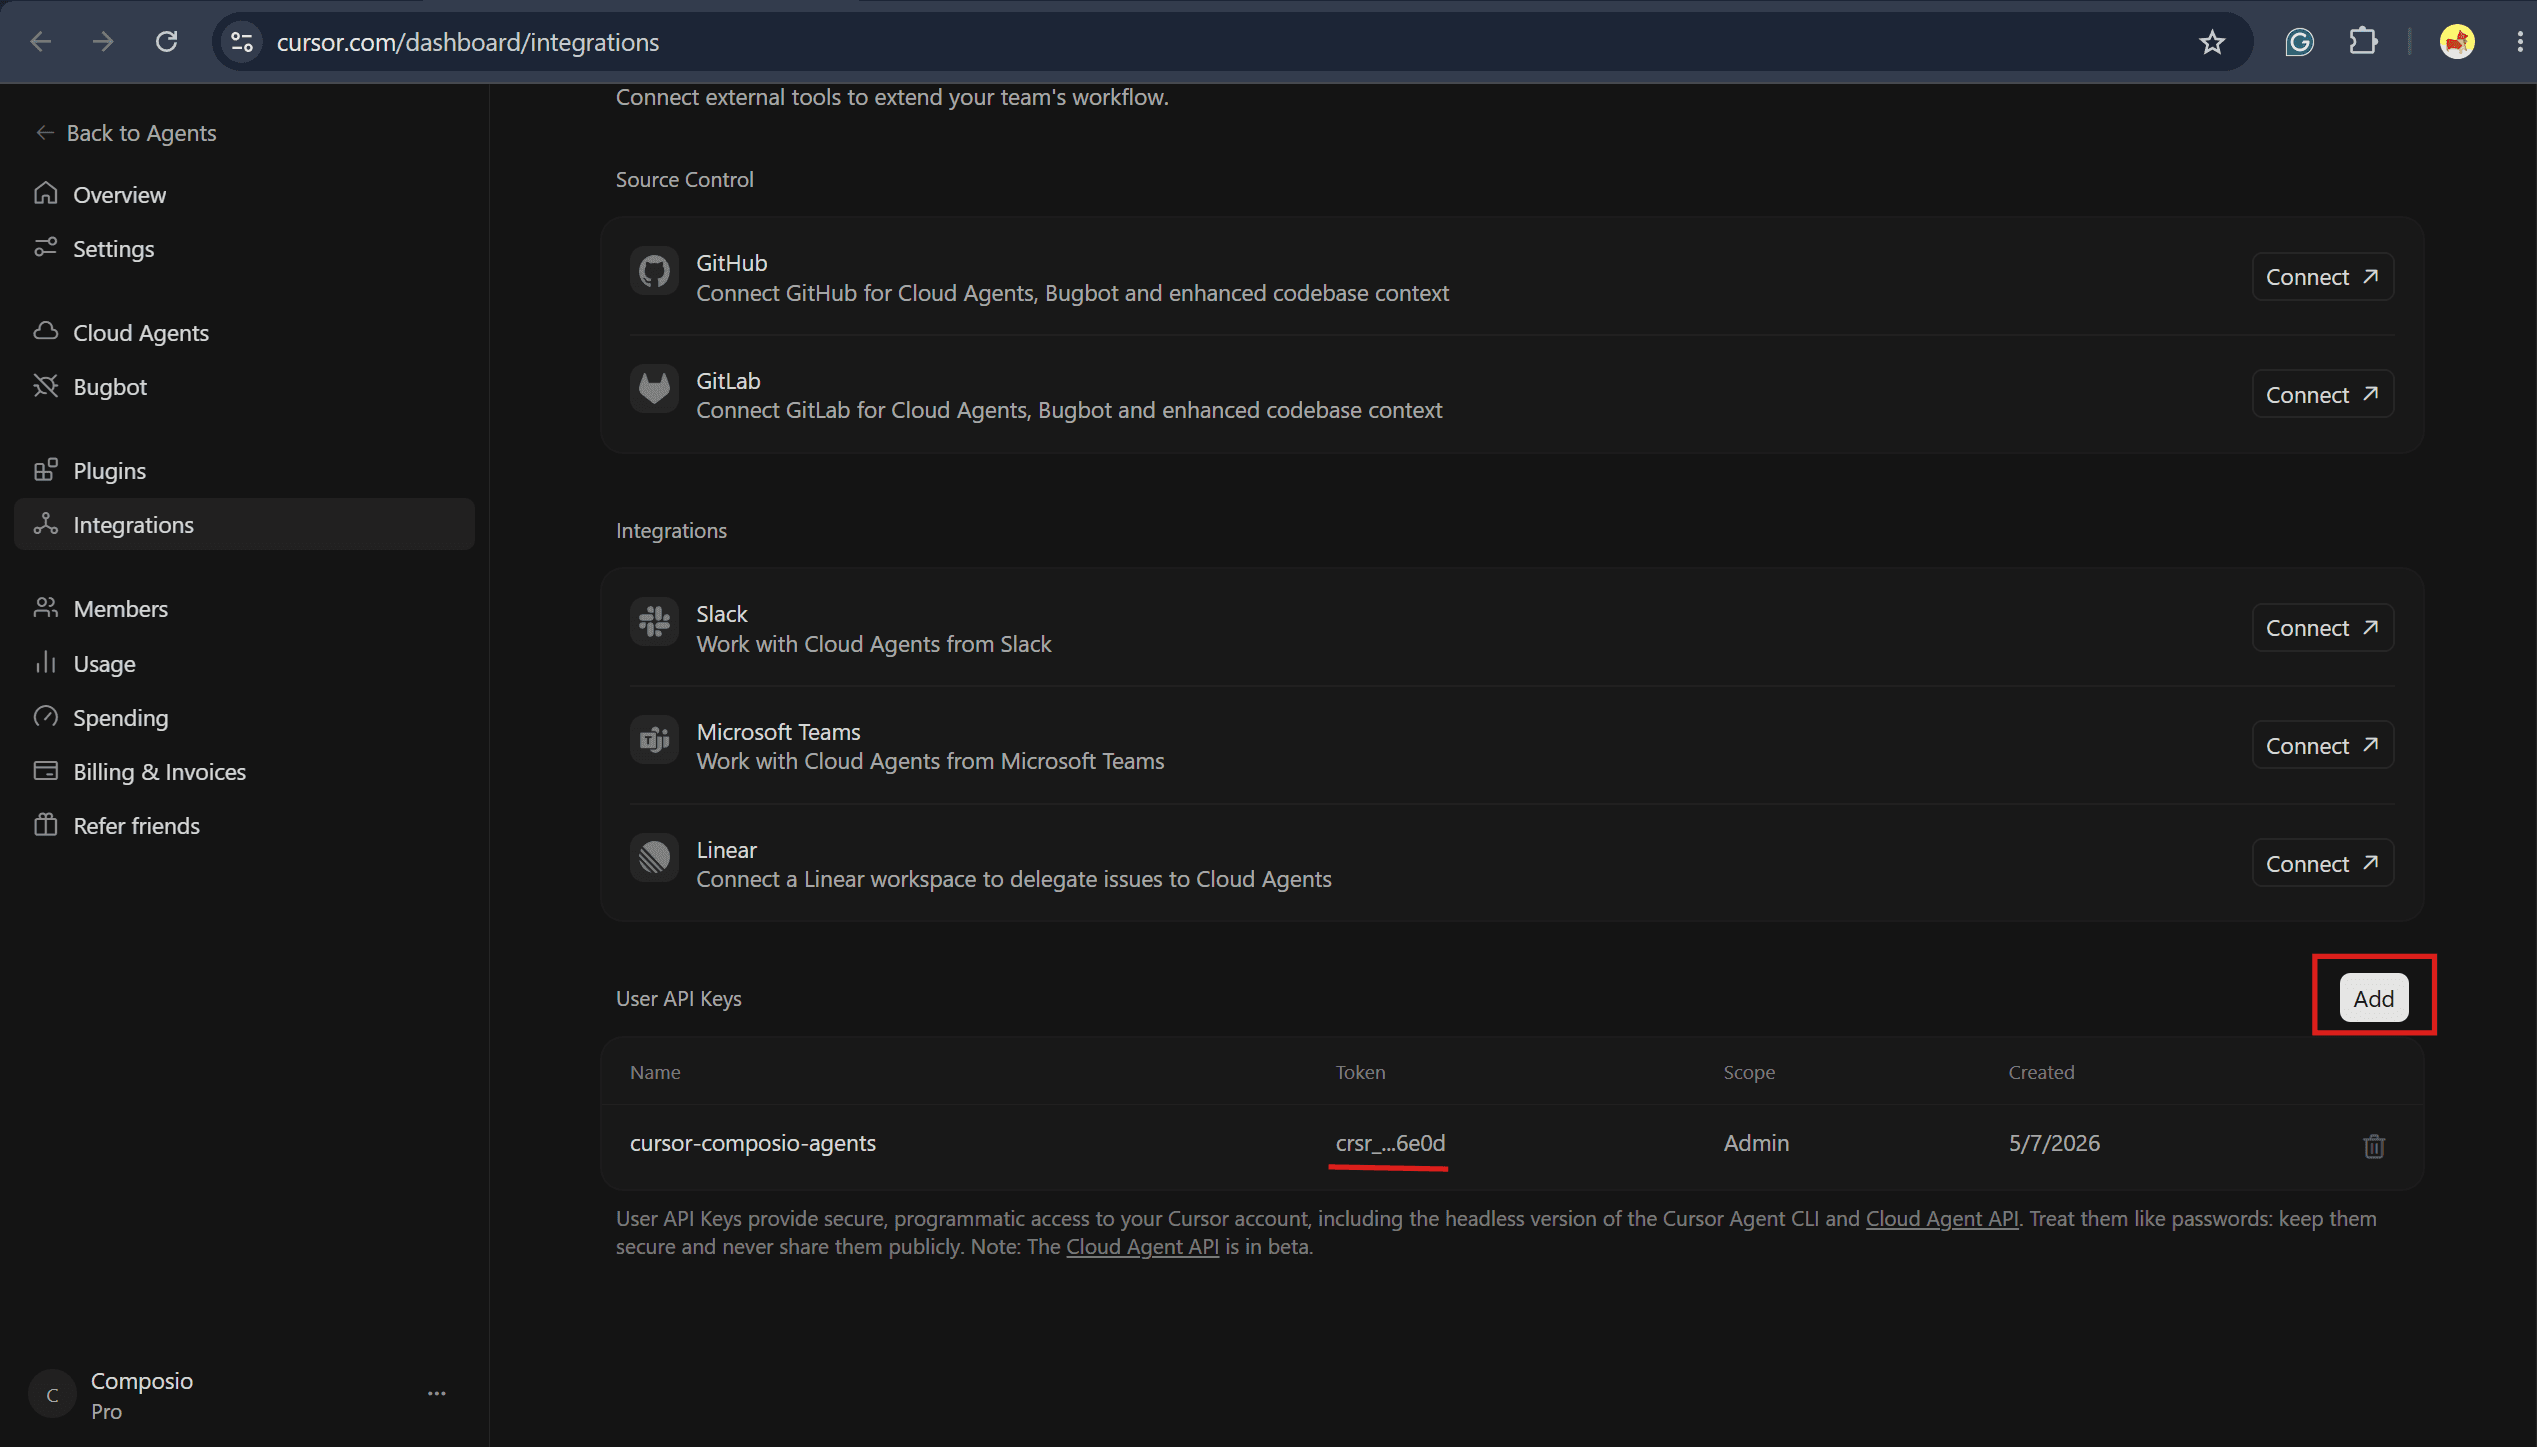
CURSOR_API_KEY=your-cursor-api-key
COMPOSIO_API_KEY=your-composio-api-key
You can get the CURSOR_API_KEY by going to the Cursor integration page and creating a new API key.
For COMPOSIO_API_KEY , visit the Composio Dashboard (Platform), log in/sign up to the account, and head to the default project (or create one) → profile→ API KEY.
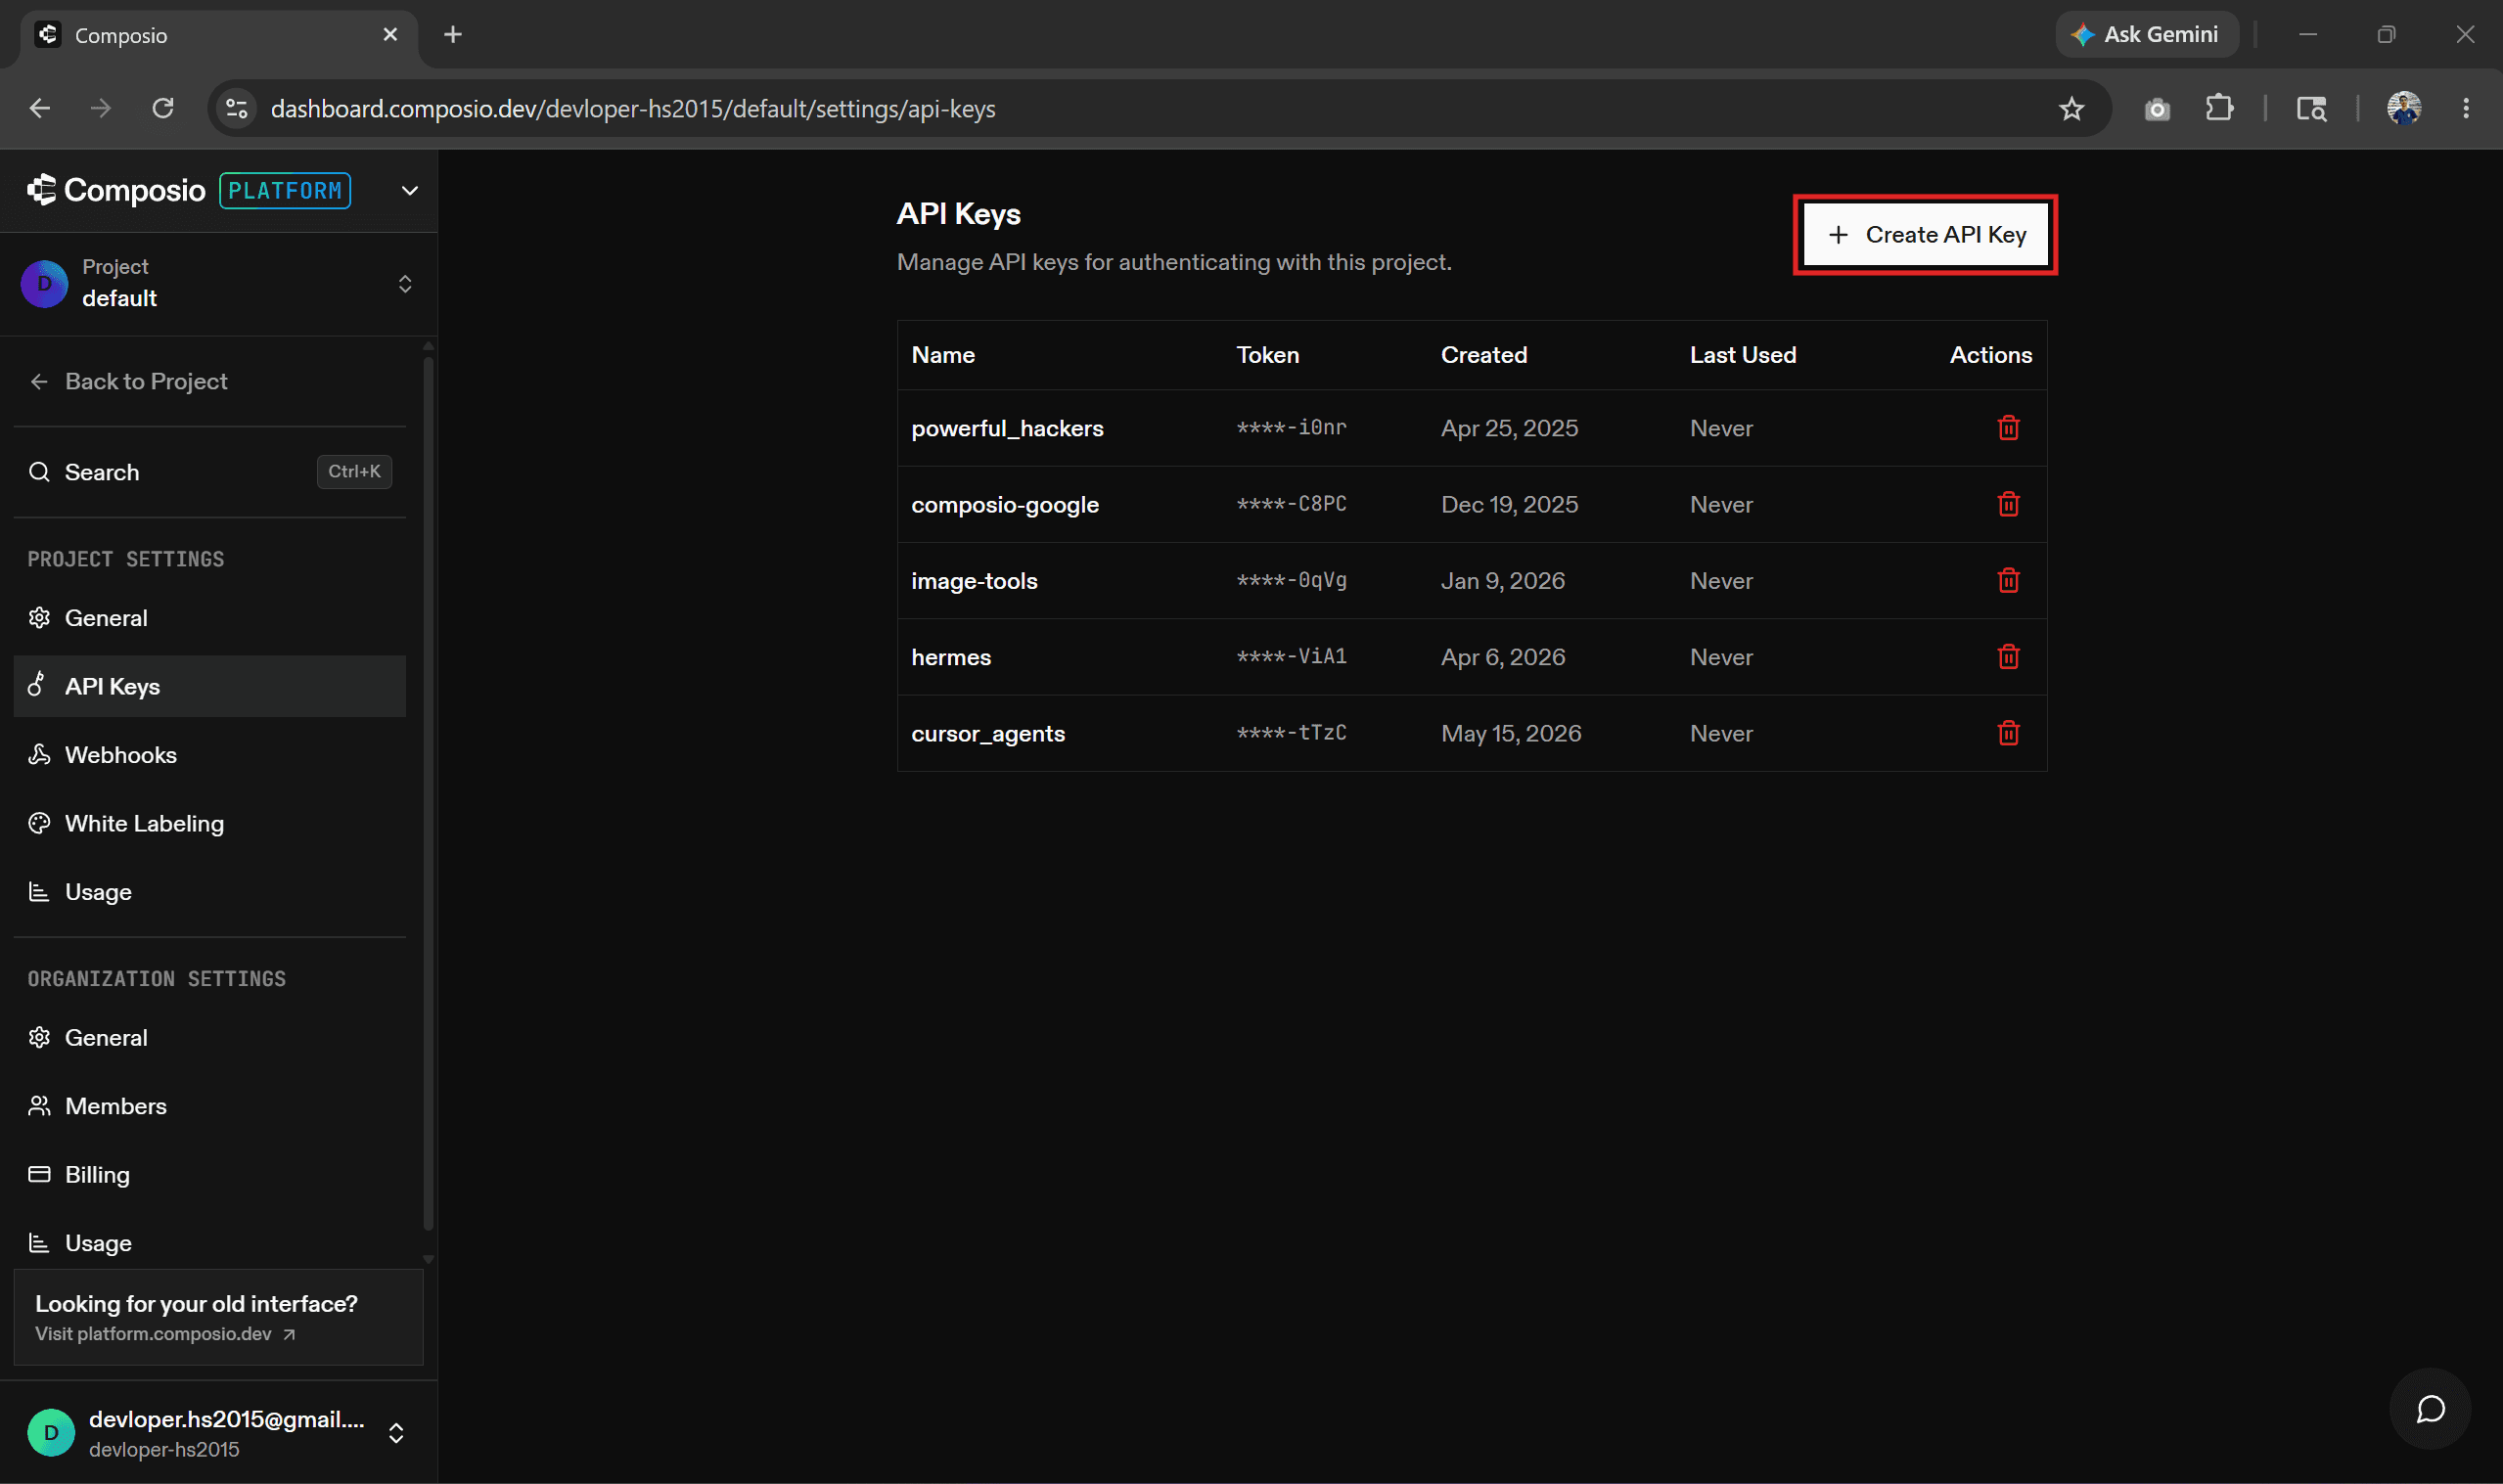
Click “Create One”, it creates one, copy and then paste it into .env . Make sure it starts with ak_ .
Time to write the code.
The Code
Now, create a new index.ts file and paste the following code.
// imports
import "dotenv/config";
import * as readline from "node:readline/promises";
import { stdin as input, stdout as output } from "node:process";
import type { SDKAgent } from "@cursor/sdk";
import {
  DEFAULT_USER_ID,
  disposeAllAgents,
  getComposioApiKey,
  getOrCreateRuntime,
  requireEnv,
} from "./runtime.ts";

// log tool calls to stdout
function logToolCall(
  name: string,
  args: unknown,
  status: "running" | "completed" | "error",
): void {
  if (status === "running") {
    console.log(`\n[tool: ${name}] ${JSON.stringify(args)}`);
  } else if (status === "completed") {
    console.log(`[tool: ${name}] done`);
  }
}

// stream assistant text and tool events - act as streaming handler
async function runAgentChatStreaming(agent: SDKAgent, message: string): Promise<void> {
  const run = await agent.send(message);

  process.stdout.write("\nagent > ");
  for await (const event of run.stream()) {
    if (event.type === "assistant") {
      for (const block of event.message.content) {
        if (block.type === "text") process.stdout.write(block.text);
      }
    } else if (event.type === "tool_call") {
      logToolCall(event.name, event.args, event.status);
    }
  }

  const result = await run.wait();
  if (result.status === "error") {
    throw new Error(`Agent run failed (${result.id})`);
  }
  process.stdout.write("\n\n");
}

// runs the chat loop, adds a readline interface and disposes agents on exit
async function main(): Promise<void> {
  requireEnv("CURSOR_API_KEY");
  getComposioApiKey();

  console.log("Setting up Composio session...");
  const runtime = await getOrCreateRuntime(DEFAULT_USER_ID);
  console.log(
    `Ready (user: ${runtime.userId}, session: ${runtime.sessionId}, tools: ${runtime.toolsCount}).`,
  );
  console.log("Type a message, or 'exit' to quit.\n");

  const rl = readline.createInterface({ input, output });

  try {
    while (true) {
      const userInput = (await rl.question("you > ")).trim();
      if (!userInput) continue;
      if (userInput === "exit" || userInput === "quit") break;

      await runAgentChatStreaming(runtime.agent, userInput);
    }
  } finally {
    rl.close();
    await disposeAllAgents();
  }
}

main().catch((err) => {
  console.error(err);
  process.exit(1);
});
Let's look at the code:
We start by loading dependencies from
.env,readline, and shared helpers fromruntime.ts(getOrCreateRuntime, API key checks, and cleanup)For a sanity check, we validate
CURSOR_API_KEYandCOMPOSIO_API_KEYbefore the chat loop starts (Composio is also checked whenruntime.tsloads).Next, we create a Composio session for the default user and spin up a Cursor agent on
composer-2with the Composio MCP server for tools (handled inruntime.ts).We keep the same agent in the loop for every message, so tools and sessions stay wired throughout the CLI session.
We run a terminal chat loop with readline: read input → send to agent → stream assistant text and tool status → repeat until
exitorquit.While streaming, we log tool calls on
runningandcompleted, and throw if the agent run ends in error.On exit, we close readline, dispose of agents via
runtime.ts, and log any failure frommain()before exiting with code 1.
If you encounter an issue, refer to the codebase in the project's GitHub repo. Feel free to clone it, tweak it to your liking, or use it as it is.
And that's it, all set, time to run the agent!
Run the agent
To run the agent in the terminal and at the project root, type:
npx ts-node index.tsand an interactive chat opens up where you can prompt it step by step / direct it to do the entire task at once. Here is a demo of me using it in chat mode (step by step)
As you can see, the cursor agent acts as the brain, calling the Composio GitHub tools to clone the repo, check for changes, create a dev branch, refactor the code, commit to the dev branch, and finally open a PR.
Usually, this takes many human hours, but with a cursor-agent, it takes only 5 minutes.
Also, with the new update, you need to add a GitHub token to use GitHub with the cursor/agent. Using Composio fixes this need as well.
Note: For simplicity I have used terminal , but you can add a ui layer on top of the agent.
With this, we have reached the end of the article. Here is my closing note.
Final Thoughts
In this article, we learned how to use the Cursor SDK and Composio MCP to build a GitHub chatbot while keeping it optimized for asynchronous operations and following best practices, such as masking sensitive variables.
But this is just the tip of the iceberg with what's possible with the cursor agent SDK. Feel free to experiment and build your own assistant/chatbot. You can explore more in the cursor-cookbook.
At the end of the day, building agents / multi-agent systems is not hard; planning and orchestrating them to work efficiently, collaboratively, and securely is. In fact, it's the next valuable skill in 2026.
So what are you waiting for? Get started with Cursor Agents while Composio MCP handles the tooling layer.