How to add 100+ MCP servers to VS Code in minutes (Updated)
MCP (Model Context Protocol) is quickly becoming a staple in developer workflows, especially for those leveraging AI-powered agents.
If you want to supercharge your VS Code environment by connecting it to a wide array of MCP servers—enabling everything from seamless API automation to collaborative coding—this guide walks you through the process in a clear, step-by-step manner
TLDR
The blog focuses on 5 core aspects to get you MCP-ready!
What are MCP Servers & What not
How MCP Server Works
Step-by-step guide to connect VS Code to Custom + Hosted MCP Servers
How to use MCP with VS Code Agent Mode
Practical Use Cases with examples
To orchestrate the workflow, I will use Composio's fully managed MCP Servers, which offer 200+ tool integrations and built-in authentication.
Let’s dive in
What Are MCP Servers & What Not
Model Context Protocol (MCP) is an open standard that lets AI models interact with external tools and services using a unified interface.
MCP acts as a bridge, allowing AI agents to access a diverse set of tools—ranging from file management utilities to cloud APIs—directly from your editor without defining or maintaining separate servers.
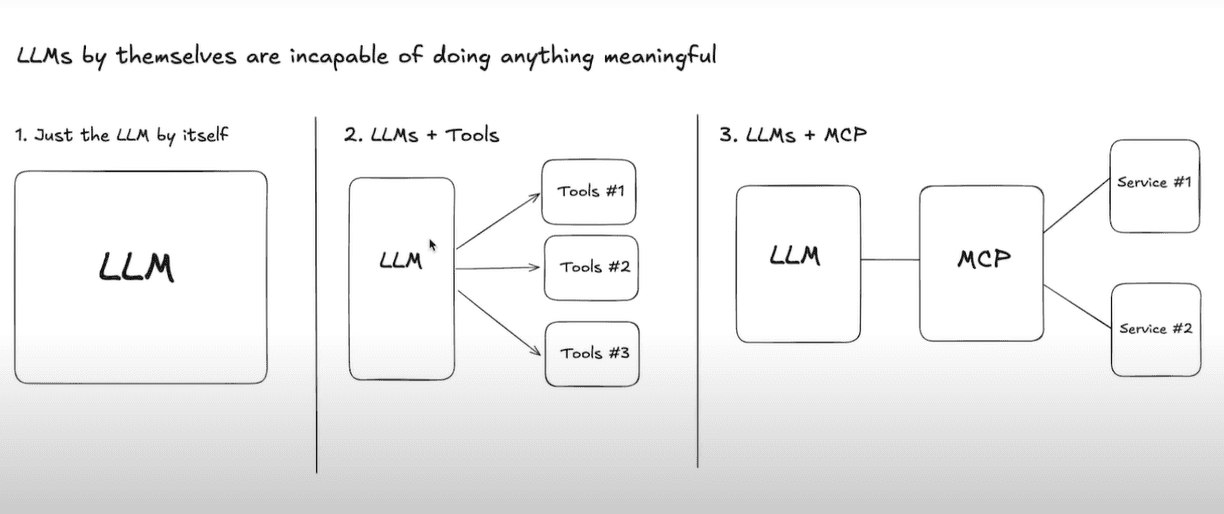
Think of MCP as a universal adapter for your AI agent. With MCP, your agent can:
→ Query databases.
→ Manipulate files.
→ Automate ticketing systems.
→ Trigger CI/CD pipelines.
→ Fetch data from APIs.
All at once, without leaving your code editor or juggling through multiple apps.

However, be considerate, MCP servers are not:
A direct API replacement: MCP servers often wrap APIs, but they provide a standardised interface rather than replacing native API endpoints.
Inherently complex: Many servers can be set up with minimal configuration, and templates are widely available.
A database: MCP servers serve as bridges, not as primary data stores.
& only download MCP Server from trusted sources!
How MCP Server Works
Under the hood, MCP follows a client-server architecture. Here is what happens using an example (leaving intricate details):
Scenario: Adding task/ ticket - fix login bug in website on high priority on Linear.

→ You give a prompt in VS Code, e.g: Add “Fix login bug” to my high-priority tasks.
→ The VS Code (MCP Client) requests LLM (Agent) to process this prompt.
→ Agent derives a plan of action and connects to two MCP servers:
• One for task management system (e.g., Linear, or Jira)
• Another for version control or code context (e.g., GitHub)
→ The Linear MCP server interacts with the Linear Account to find and update the “high priority” task list with a new entry: “Fix login bug”.
If needed, extra context.
→ The Agent may call GitHub MCP to inspect relevant commit history or open issues to link context or add metadata.
→ Both MCP’s Servers send their responses back to the MCP client.
→ VS Code (MCP client) aggregates the responses and forwards them to the LLM Agent, which displays the outcome in VS Code — e.g. a confirmation message, a summary of changes, or even suggestions based on linked issues or logs.
If you want to delve deep into the details about depth, lifecycle, protocol, drawbacks and all things MCP, check out this interesting blog.
Assuming you understood the flow, now let’s look at how to connect MCP Servers to VS Code (locally & online)
How to Connect VS Code to MCP Servers: Step by Step
There are many ways to connect VS Code to the MCP server, but let’s follow the simplest route.
I will use calculator_mcp_server.py for local MCP connections However feel free to build one yourself.
For reference, you can check out: MCP server: A step-by-step guide to building from scratch.
A quick bit of info:
VS Code / any client supports 2 ways to add MCP servers
Local Version - You develop the server, define its functionality, and expose it locally for the client to fetch. This is done using the STDIO (standard input output) connection method.
Hosted Version - Server developed by someone else and hosted somewhere. You gain access by using SSE (Server-Side Events) / HTTP connection method.
Keep the above in mind & let’s begin!
1. Prerequisites
Before we begin, ensure you meet the following prerequisites.
Python, Uv, NPX or NPM package manager installed.
Admin access to the VS Code
settings.jsonfile.A clear understanding of file paths in your OS. (a must!)
Assuming you met the criteria, let’s move on.
2. Enable MCP in VS Code
VS Code, by default, has the MCP server enabled. To verify hit CTRL+SHIFT+P (Windows & Linux) / CMD+SHIFT+P (Mac) and search MCP.

3. Add Hosted MCP Servers to VS Code
For demonstration I will use composio-mcp, because of its 200+ fully managed MCP Servers with built in authentication. Ya, it does my heavy lifting nowadays!
Let’s look at how to add one to VS Code using HTTP.
Follow the steps
→ Head to Composio MCP Server directory.
→ Ensure you are logged in, else sign up (it's free)
→ In the dashboard, head to the Install Section
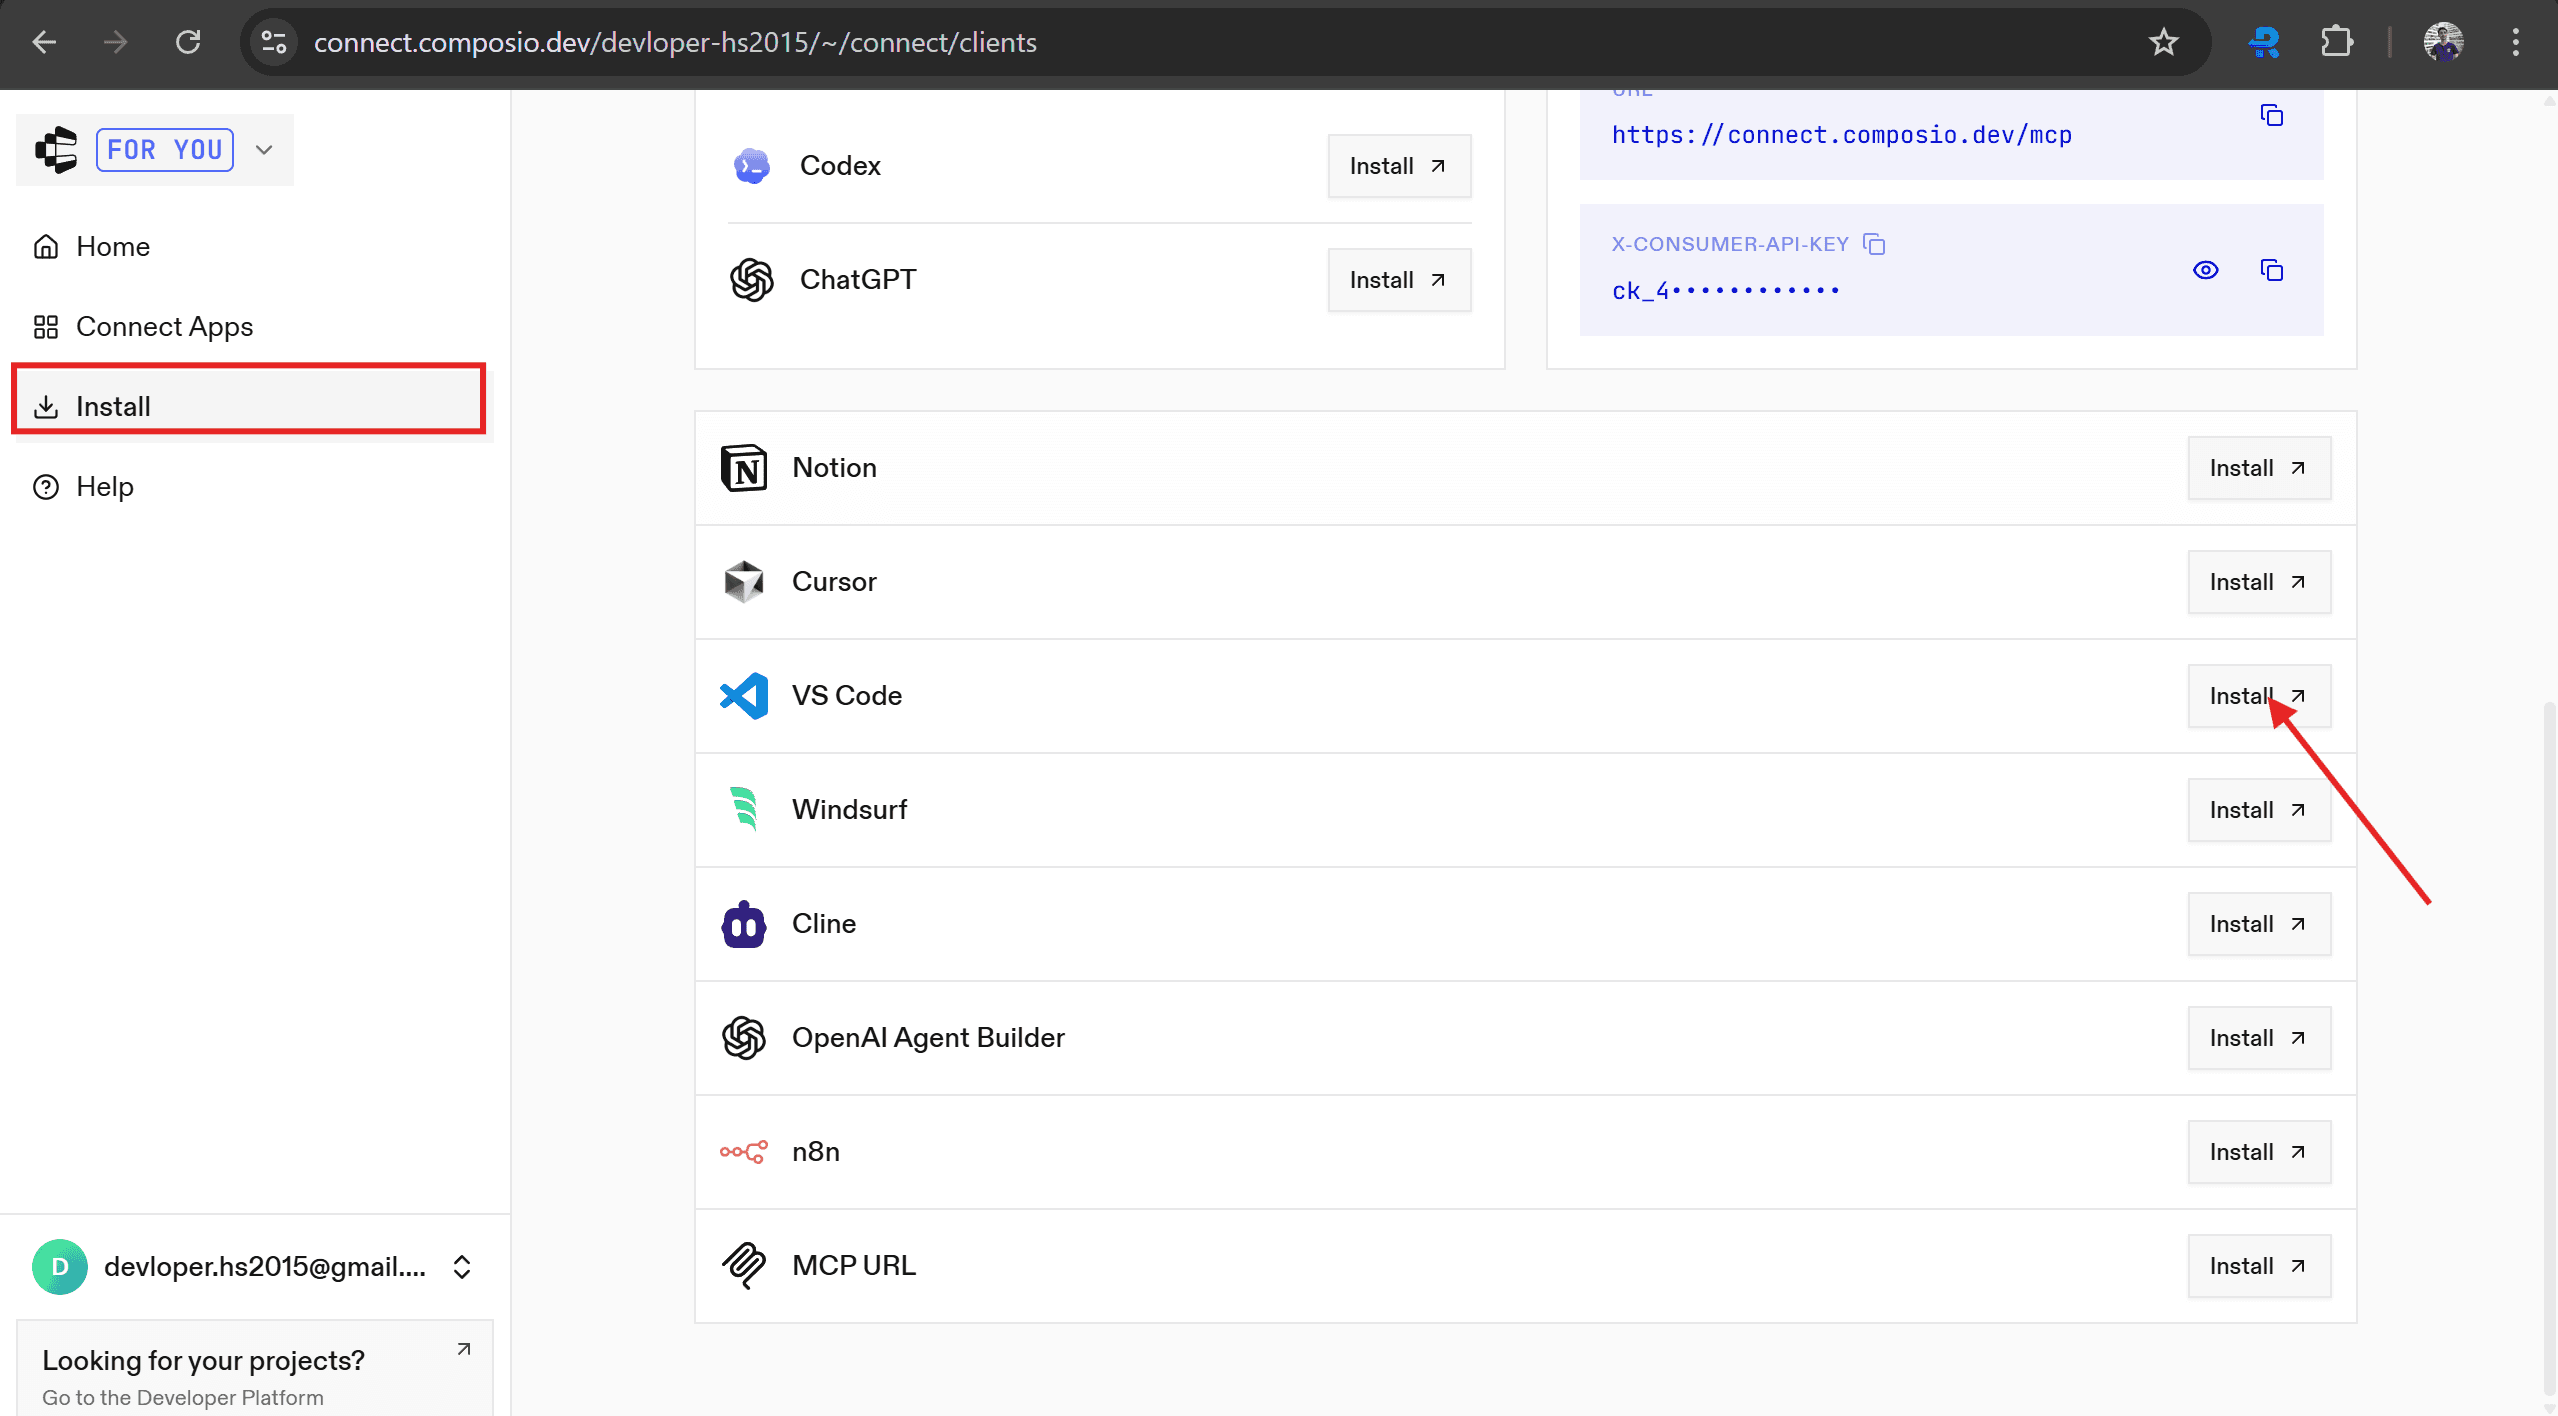
→ Select VS Code from the list, and click on Install.
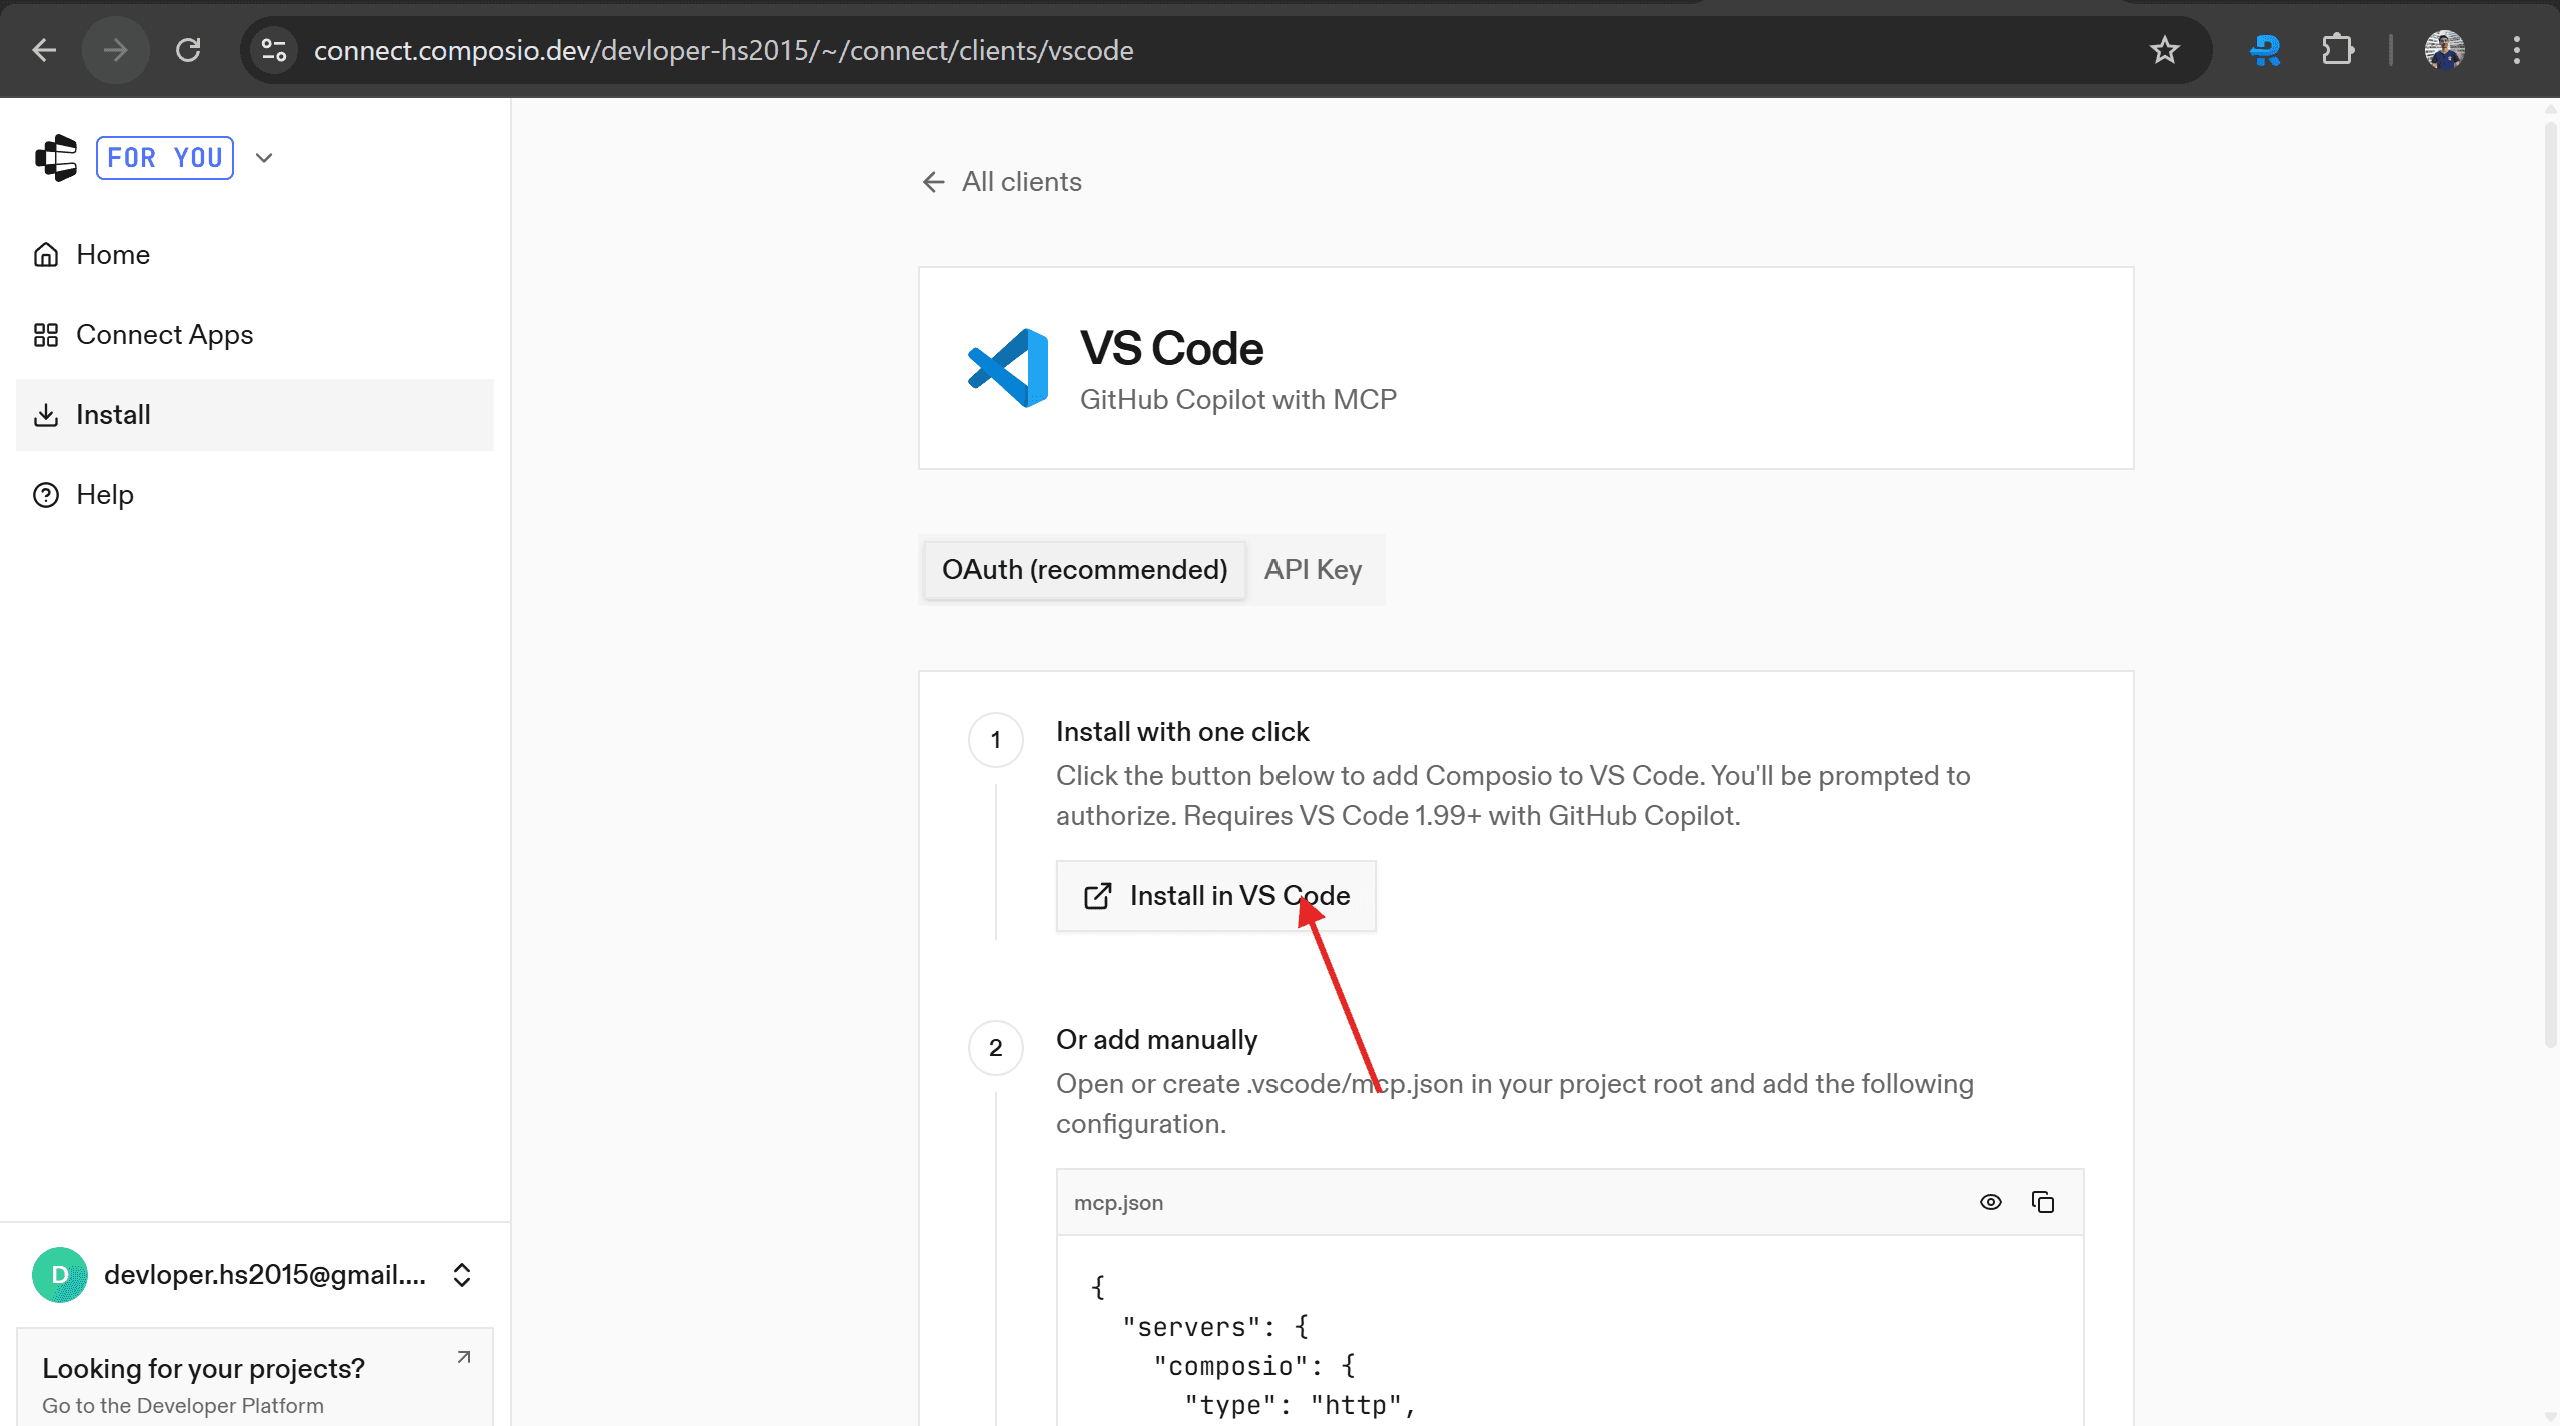
→ In the redirected page, click on “Install in VS Code”
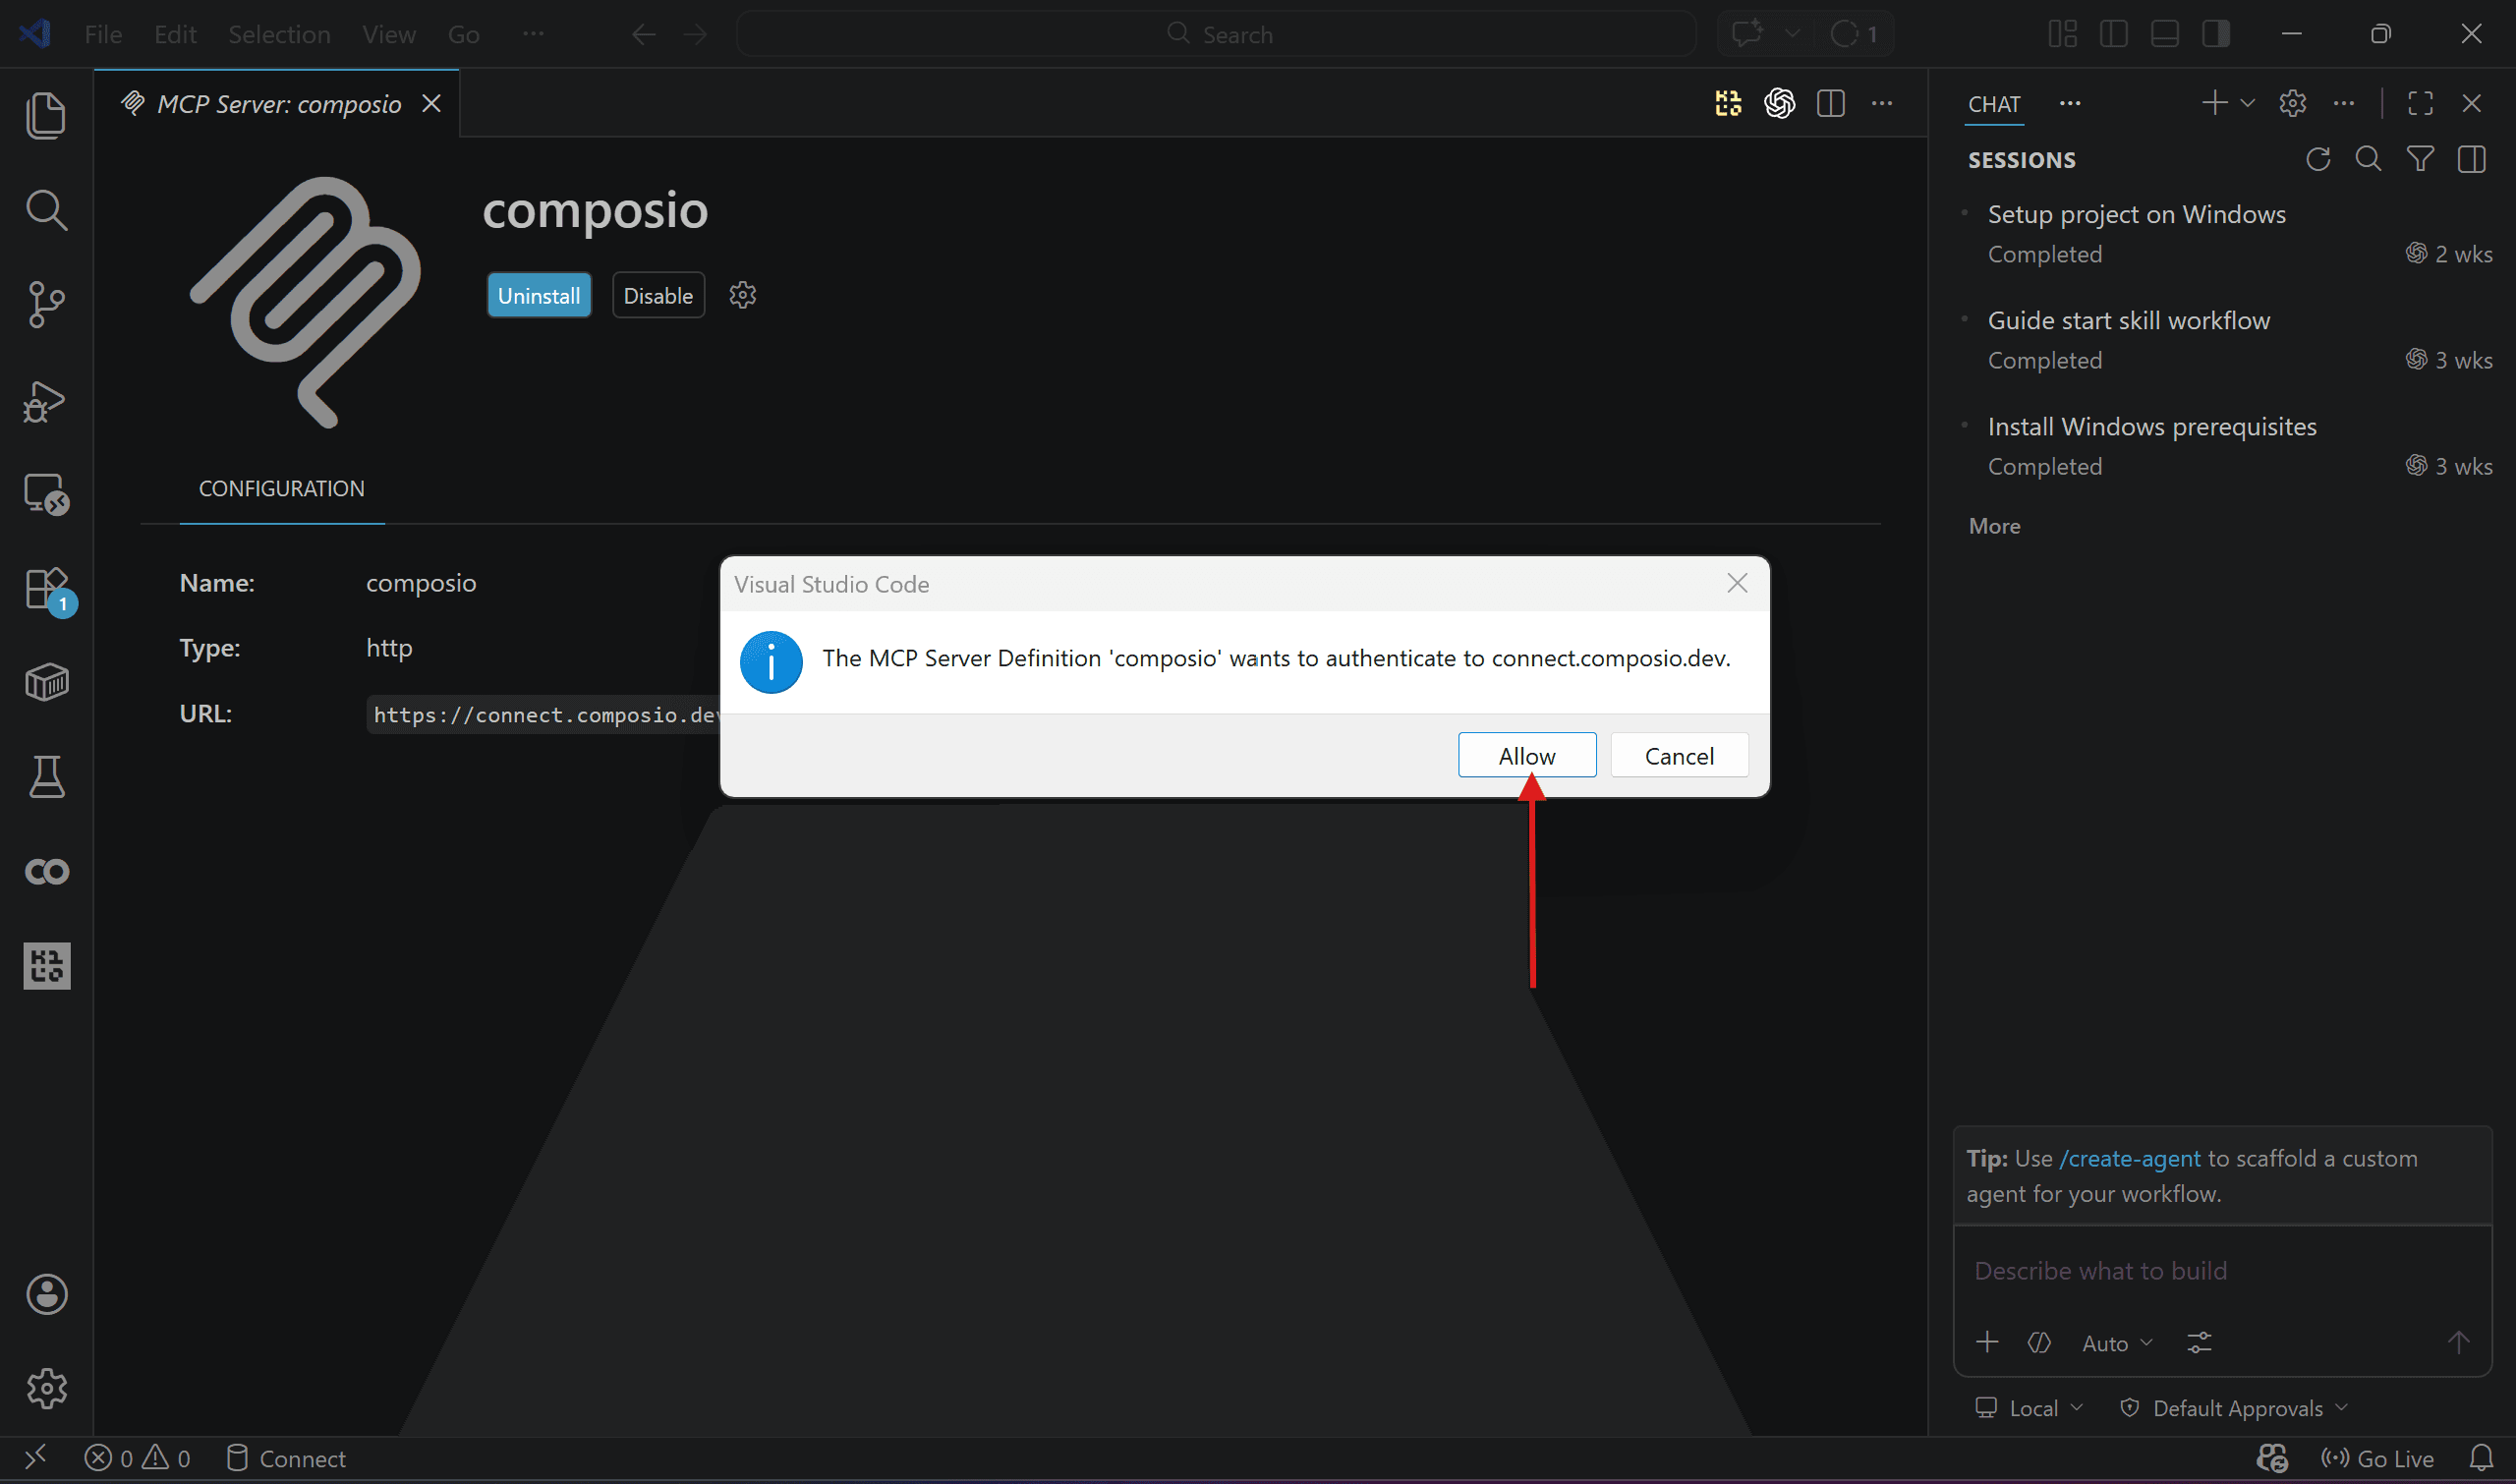
→ It will redirect to VS Code, and in the MCP server Page, click Install
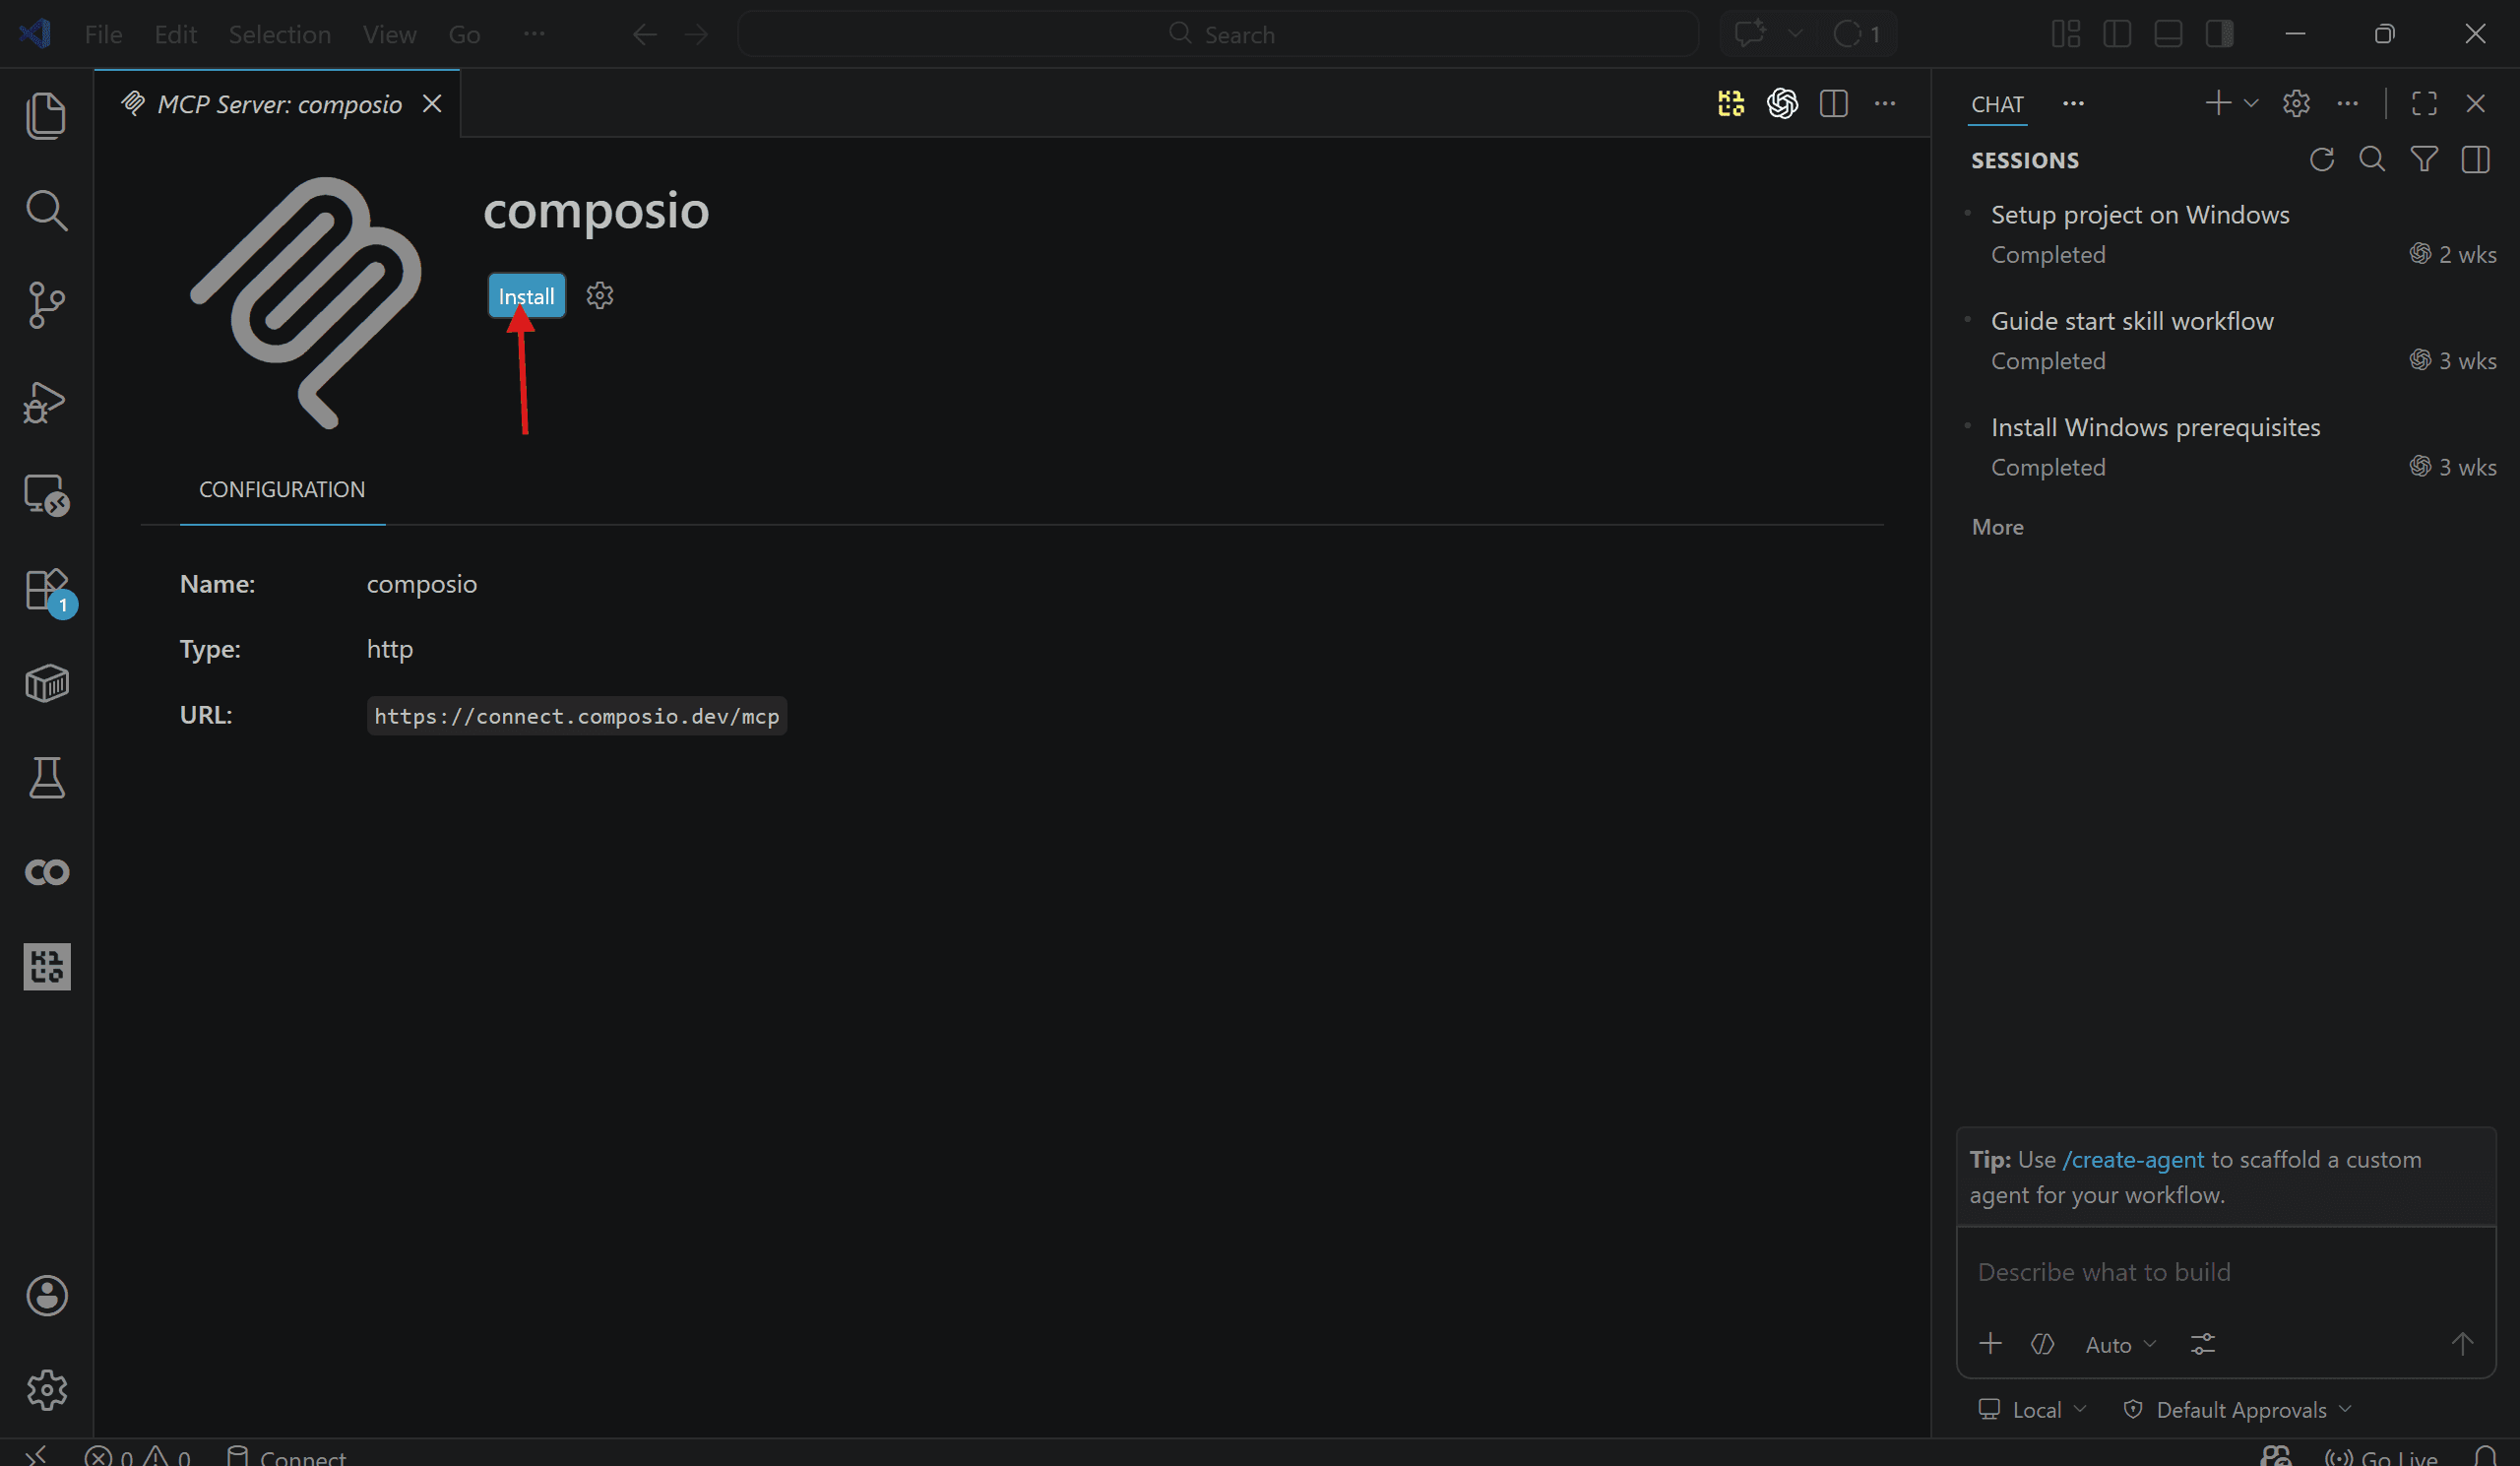
→ Once installed, it will ask you to authenticate, so click allow, log in to the website, give the permissions, and you are done!
Note : Go to
.vscode/mcp.jsonand start the server (press restart). Ensure in terminal it showsntools detected. A quick hack if the server is not showing tools.
Time to test it out in VS Code agent mode!
4. Add Local MCP Servers to VS Code
Click MCP: Add MCP Server & Select Command (stdio).
Now follow the instructions carefully on all tabs!
→ Enter Command: Enter the command to run the server. Ensure using an absolute path, so python calculator_mcp_server on Windows becomes
"C:\\Users\\Harsh\\Documents\\mcp\\mcp\\Scripts\\python.exe" "C:\\Users\\Harsh\\Documents\\mcp\\calculator_mcp_server.py"
→ Enter Server ID: Name your server - call it something meaningful.
→ Choose Config Saving:
**User Setting **- accessible everywhere, config gets added to
settings.json.**Workspace Settings **- only in the current project (highly suggested). This also creates a
mcp.jsonin.vscodefolder.
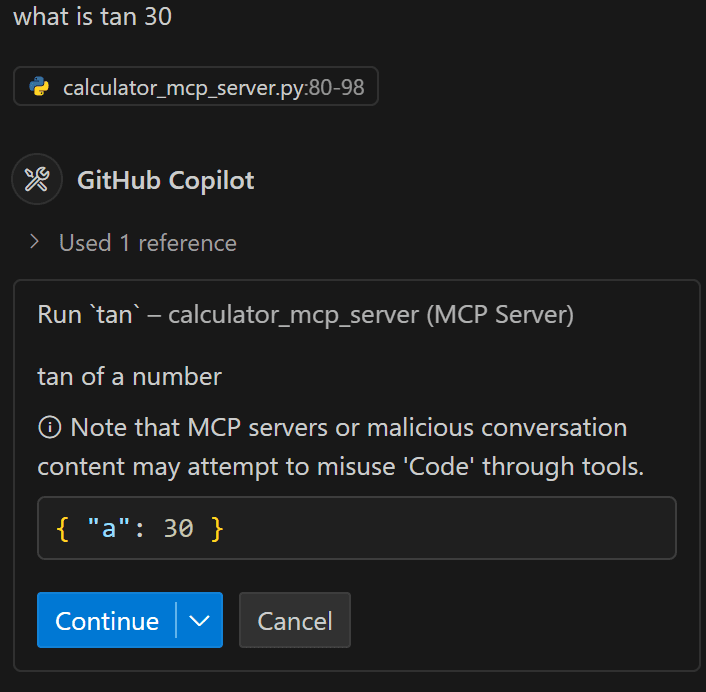
To verify in Copilot, choose agent mode & LLM and prompt for calculation, the agent will detect the custom tools defined in calculator_mcp.json . Make sure to give consent.
But how did all this happen? Time to dig behind the scenes?
Depending upon the workspace type, 2 files get created: settings.json and mcp.json . Both have a similar structure.
{
    "servers": {
        "calc_serve": {
            "type": "stdio",
            "command": "C:\\\\Users\\\\Harsh\\\\Documents\\\\mcp\\\\mcp\\\\Scripts\\\\python.exe",
            "args": [
                "C:\\\\Users\\\\Harsh\\\\Documents\\\\mcp\\\\calculator_mcp_server.py"
            ]
        }
    }
}
Important fields are:
name: Name of the MCP Server exposed to LLM. I named itcalc_servetype: what type of connection it is - SSE / STDIO / HTTP.Same needs to be configured in the transport parameter of mcp.run() withing sever
command: Base command used to run the serverpython, npx, npm , uv- are all potential candidatesMake sure to provide an absolute path to the same exe files. Can do a
which / wherename in terminalFor env, it's better to use the Python path in the .venv folder.
In case you select
User Settings-> insettings.jsonpath changes to \ instead of \\
args: additional arguments can be passed.If using stdio, ensure you use the full path to the file.py
for
npm / npx/ yarn-y or any command line args can be used here.args should be provided in the same manner as you would in a terminal
A quick tip 💡
Combine the
commandandargsin same manner as defined and run in terminal, if it fails that means it's wrong way to run. This can help you fix mcp servers’ issue (command not found) easily.
Local is relief, but in production, hosted MCP servers are used. Let’s look at how to connect those to your VS Code.
How to use MCP in VS Code Agent Mode
VS Code allows agent mode to use MCP. So, let’s test it out.
Let’s build a Notion listicle page / short blog using mcp server we just added 👇
For reference, here are the steps:
→ Head to Copilot
→ Switch to Agent Mode
→ Select Model - I choose Gpt4o, some models might perform even better.
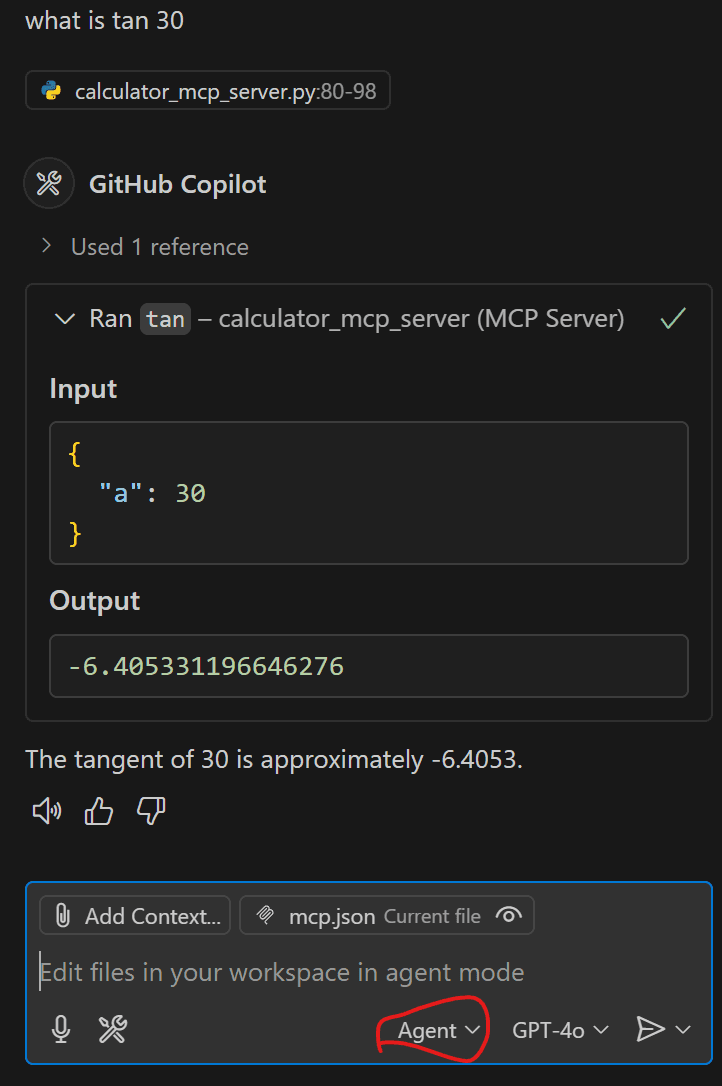
→ Ensure agents have access to tools. To check, click the 🛠️ icon and confirm that the MCP server is listed. If not, enable it and recheck
→ Enter your query and let the agent do the job!
So, what changed in vscode/mcp.json to enable **http **support? Let’s have a look
{
  "servers": {
    "composio": {
      "type": "http",
      "url": "https://connect.composio.dev/mcp"
    }
  }
}
Most parameter configuration is gone except name for url gets added. The URL is responsible for connecting to the server and exposing pre-defined tools in the Composio Notion toolset.
But there is more, much like building blocks, we can connect multiple MCPS and productively get work done. Let’s explore it with a real use case!
Practical Use Cases with examples
MCP really shines at automating multiple tasks across multiple apps. Let’s look at how you can turn your idea into a full-fledged working environment, which can:
→ Find Issues
→ Create a linear ticket & milestone
→ Send update to Slack channel
all without leaving your ide. Check it out 👇
Prompt
I need you to create me a Linear issue under this project: @web
https://linear.app/devloper-hs/project/park-manager-329e1aa897d8

Title the issue as: "Fix the circular import error asap! ⌛"
Add a comment to the issue saying: "Fix the circular import issue in app/__init__.py.!"

Then, post the status of whether the work was successful or not in my 'proj-park-manager' Slack channel. If it was successful, include a quick status update with the URL to the Linear issue: @web
https://devloperhs201-0lu6943.slack.com/archives/C08H18UBB19
Results 👇
What I liked about this is - Agent 1st plans the outline, then figures out the tools and finally executes it based on the settings in .vscode/settings.json . I hope you got an idea and now create powerful automation flows using the same - Just make your prompt specific!
With this, we have come to the end of this informative blog, and here are my final thoughts!
Final Thoughts
Integrating MCP servers with VS Code takes just a few minutes (using composio/anthropic/relevant sources) and unlocks a new level of automation and collaboration.
Whether you’re automating tasks, connecting to cloud APIs, or enabling team-wide agentic workflows, MCP makes it easy to scale your productivity—one server at a time.
Ready to get started? Open your .vscode/mcp.jsonAdd your first server and watch your project develop!