Everyone's building AI agents. And if you've watched a couple of tutorials, you already know the usual path: spin up in Python or JavaScript, integrate it with an LLM (either OpenAI or local models), add in a few local tools, and call it a day.
Nothing wrong with that. But that's not fun. I wanted something I’d actually use daily. Something that lives where I already work: the terminal. 😉
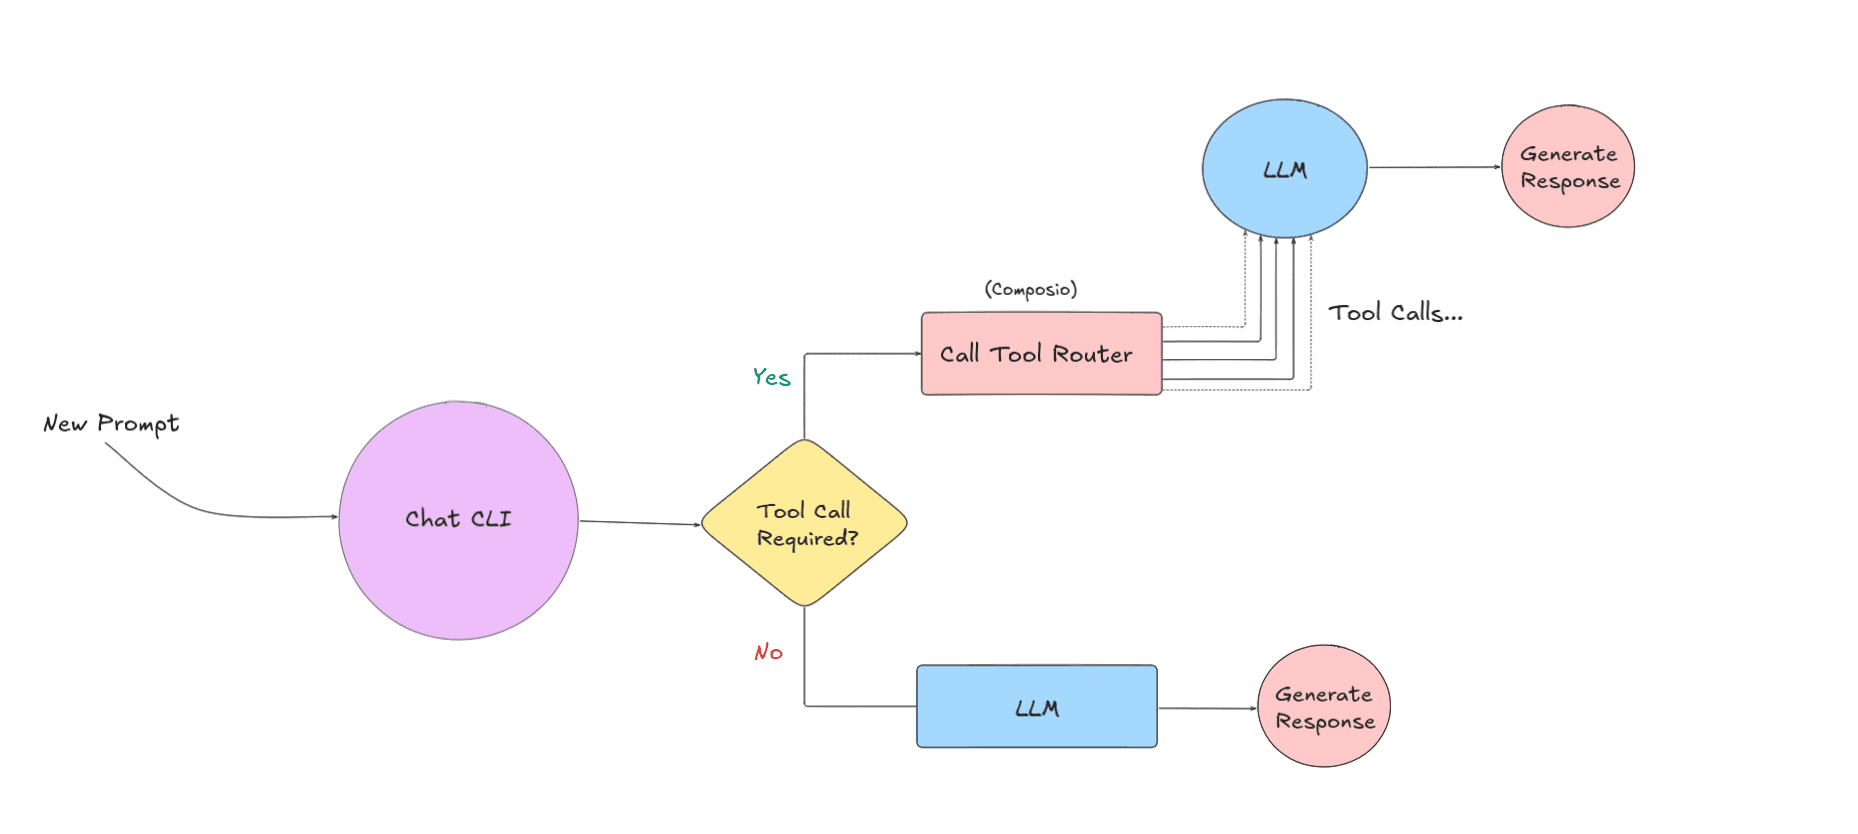
So, I built it myself. A fully functional CLI app that lets you talk with LLMs and, more importantly, lets the models take actions through real app integrations (Gmail, GitHub, Discord... you name it). The core idea is to keep the UX minimal (terminal-first) and keep the model layer flexible, so you can swap models easily and add tool support cleanly, which we will do with Composio Tool Router.
This is a fun side project, but it’s also my excuse to build a proper TypeScript CLI agent along the way.
If you want to play around, break it, or build on it, find the source code here: shricodev/agentic-terminal-workbench.
What I Wanted
I kept the goal pretty simple: a terminal chat app that feels fast, can switch between models, and can actually do things. Not just a "generative AI wrapper," but takes actions like creating Linear tickets, touching GitHub stuff… You get the idea. (All with the help of Composio Tool Router, which is now a stable release, out of beta.)
The biggest factor for me to consider is that there shouldn't be much manual work per integration. I wanted something that was easy to integrate and works out of the box. That's why I decided to go with Composio Tool Router, so there's not much work you need to do per integration. Tool Router handles all of it under the hood.
But isn't there something like Gemini, OpenAI Codex, or Claude Code for that already? Yes, but that's not the point.
I wanted to create something myself, something very simple that just works (also obviously to dogfood toolrouter). You can also extend this to add support for local models like Ministral 3b; you can use them and avoid model subscriptions entirely.
Here's how the flow goes:
Tech Stack
Here’s the stack I used to build this project:
Language: TypeScript
Runtime: Node.js, runs with Bun for local dev
LLM layer: OpenAI API (
openai) + OpenAI Agents SDK (@openai/agents)Tool routing + integrations: Composio Tool Router (
@composio/core,@composio/openai-agents)CLI UX:
cac(CLI args),ora(spinner),chalk(terminal styling)Streaming: SSE with
eventsource-parser
How I Built It?
I started by getting the CLI loop working: the prompt, a spinner, and streaming output, so it feels like a “real” chat app. The core OpenAI wrapper is intentionally small, and I let users choose streaming with the --stream flag. The streaming logic lives in src/gpt-api.ts and uses SSE under the hood.
// 👇 src/gpt-api.ts
if (stream) {
  fetchSSE(
    url,
    {
      method: "POST",
      headers,
      body: JSON.stringify(body),
      signal: abortSignal,
      onMessage: (data: string) => {
        if (data === "[DONE]") {
          result.text = result.text.trim();
          return resolve(result);
        }

        try {
          const response: types.openai.CreateChatCompletionDeltaResponse = JSON.parse(data);

          if (response.id) { result.id = response.id; }
          if (response?.choices?.length) {
            const delta = response.choices[0].delta;
            result.delta = delta.content;
            if (delta?.content) result.text += delta.content;
            result.detail = response;

            if (delta.role) { result.role = delta.role; }
            onProgress?.(result);
          }
        } catch (err) {
          console.warn("OpenAI stream SSE event unexpected error", err);
          return reject(err);
        }
      },
    },
    this._fetch
  ).catch(reject);
Then I wired the Composio Tool Router through a thin agent wrapper. We could do this without the tool router, but then we would have to handle each tool call manually, which is not really worth it. Then it creates a Composio session, pulls the tools, and drops them straight into the OpenAI Agents SDK. That’s basically it. 🥴
// 👇 src/composio-agent.ts
this.session = await this.composio.create(userId, { toolkits });
const tools = await this.session.tools();

this.agent = new Agent({
  name: "Composio Agent",
  instructions:
    "You are a helpful AI assistant with access to external tools...",
  model: this.model,
  tools,
});
On the logic side, it's just a switch. If you pass --toolkitsIt uses the Composio agent. Otherwise, it's the plain OpenAI chat wrapper.
// 👇 src/composio-agent.ts
async sendMessage(
text: string,
options: SendMessageOptions = {}
): Promise<ChatMessage> {
if (!this.agent) {
  throw new Error("Agent not initialized. Call initialize() first.");
}

try {
  // Create a custom event handler to capture tool calls
  const originalTools = this.agent.tools;

  // Wrap tools to intercept calls (if we want to show them)
  if (options.onToolCall && originalTools) {
    // Note: This approach might not work with the native integration
    // The @openai/agents SDK handles tools internally :(((
  }

  // Run the agent with the input
  // The @openai/agents SDK doesn't expose streaming or tool call events directly
  // It handles everything internally and returns the final result
  const result = await run(this.agent, text, {
    session: this.memory,
  });

  const responseText =
    result.finalOutput ||
    "I apologize, but I was unable to generate a response.";

  // Call progress callback if provided (for compatibility with existing UI)
  // Note: @openai/agents doesn't support streaming, so we send the full response
  if (options.onProgress) {
    options.onProgress(responseText);
  }

  return {
    id: Date.now().toString(),
    text: responseText,
    role: "assistant",
  };
} catch (error) {
  throw new Error(
    `Failed to send message: ${
      error instanceof Error ? error.message : error
    }`
  );
}
}
That’s pretty much it. It's a minimal TypeScript CLI that can chat, stream, and actually do stuff with real integrations.
Why Tool Router, and How It Works (Mental Model)
If you are familiar with Rube, which is basically an MCP server we launched about 4 months ago, you already know how it automatically picks the right app and tool for your prompt. That behavior is powered by the same thing I'm using here: Composio Tool Router.
The reason I like Tool Router for this CLI is simple: I wanted real integrations without having to maintain 20 different adapters myself. Tool Router handles all that manual work (tool discovery, auth, execution), and I just decide which toolkits the agent is allowed to use.
And that pretty much sums up why I chose to use Tool Router. 🥴
Why Tool Router (the practical benefits)
No per-integration work: I don't have to spin up a Gmail client, a Slack client, token refresh logic, error handling, and so on for every new app.
Toolkits keep things scoped: You explicitly whitelist what the agent can use (GitHub, Gmail, etc.), which keeps behavior consistent.
Less MCP-style context bloat: Instead of always stuffing a massive list of tools into the prompt, you keep access limited to a few toolkits, and Tool Router figures out the right tool when it’s actually needed.
Zero integration headaches: Auth and tool execution happen behind the scenes, so adding a new integration is usually “adding a toolkit name”.
Let me give you a quick rundown of how Tool Router works behind the scenes.
You create a session with your configuration and all the toolkits you want to use.
// Unique identifier of the user
const userId = "user_123";

// Create a tool router session for the user
const session = await composio.create(userId, {
  toolkits: ["github", "gmail", "slack"],
});
Now, the whole session is limited to just three toolkits: GitHub, Gmail, and Slack. You can add more as you prefer.
Once you give it a prompt, it searches for the right tools based on your prompt.
It then handles authentication if the toolkit requires it.
Finally, it executes the tool and returns the result.
💡 NOTE: This is just one way to use Tool Router and how I've done it in this project. You could even use it as a native tool, where Tool Router provides a single tool to your agent framework.
To learn more, check out the quickstart guide for Tool Router here: Using Tool Router as a native tool.
Try It Locally
First, clone the repo and install the dependencies:
git clone https://github.com/shricodev/agentic-terminal-workbench
cd agentic-terminal-workbench
bun install
Now you can run it in a few ways.
You will need to set the OpenAI API key for it to work (either in the .env file or as a shell environment variable):
OPENAI_API_KEY=<your-openai-api-key>I usually do one of these:
OPENAI_API_KEY=<your-openai-api-key> bun run cli -- "Write me a 2‑line summary of this repository"Interactive mode (best for daily use):
OPENAI_API_KEY=<your-openai-api-key> bun run cliWant tools? Make sure you have the Composio API key and pass toolkits in the command line flag:
COMPOSIO_API_KEY=<your-composio-api-key>
COMPOSIO_USER_ID=<your-composio-user-id>
Now, simply run the CLI with the toolkits you want to use:
OPENAI_API_KEY=... COMPOSIO_API_KEY=... COMPOSIO_USER_ID=... \\
    bun run cli --toolkits gmail "List my unread emails"
💡 NOTE: When toolkits are enabled, the agent handles tool calls internally, and streaming is disabled (the CLI warns you).
That's pretty much how you'd use it.
Here's a quick demo in action:
What's Next?
This project is still a work in progress, and I plan to add more features over time. I want to add more model backends (local + open-source) and make tool call traces visible in the CLI so you can actually see what’s happening.
The project will grow a lot over time, so expect a few rough edges. If you have feedback, run into a bug, or want to add features, feel free to open an issue or a PR in the repo. You can find the repository here: shricodev/agentic-terminal-workbench.