A step-by-step walkthrough for registering a PagerDuty OAuth 2.0 App and connecting it to Composio with your own developer credentials.
Overview
This guide walks you through the complete process of creating a PagerDuty OAuth 2.0 App and wiring it up to Composio using your own developer credentials. By the end, you will have a registered PagerDuty app, a Composio Auth Config backed by that app, and a live connected account ready for agents or automations.
What You Will Set Up
Navigate to PagerDuty’s Integrations menu and open App Registration.
Register a new OAuth 2.0 app with the correct redirect URL and scopes.
Save the Client ID and Client Secret shown after registration.
Create a PagerDuty Auth Config in Composio using OAuth2.
Connect a user account and approve the PagerDuty consent screen.
IMPORTANT
PagerDuty’s OAuth 2.0 App Registration supports two authorization types: Scoped OAuth (granular, resource-level permissions - recommended for new integrations) and Classic User OAuth (broad read/write access acting on behalf of users). This guide uses Classic User OAuth to match the Composio integration flow shown in the screenshots.
1. Open the PagerDuty Incidents Dashboard
Sign in to your PagerDuty account. You will land on the Incidents dashboard, which shows all open and recent incidents across your teams. This is your starting point - from here you will navigate to the App Registration area.
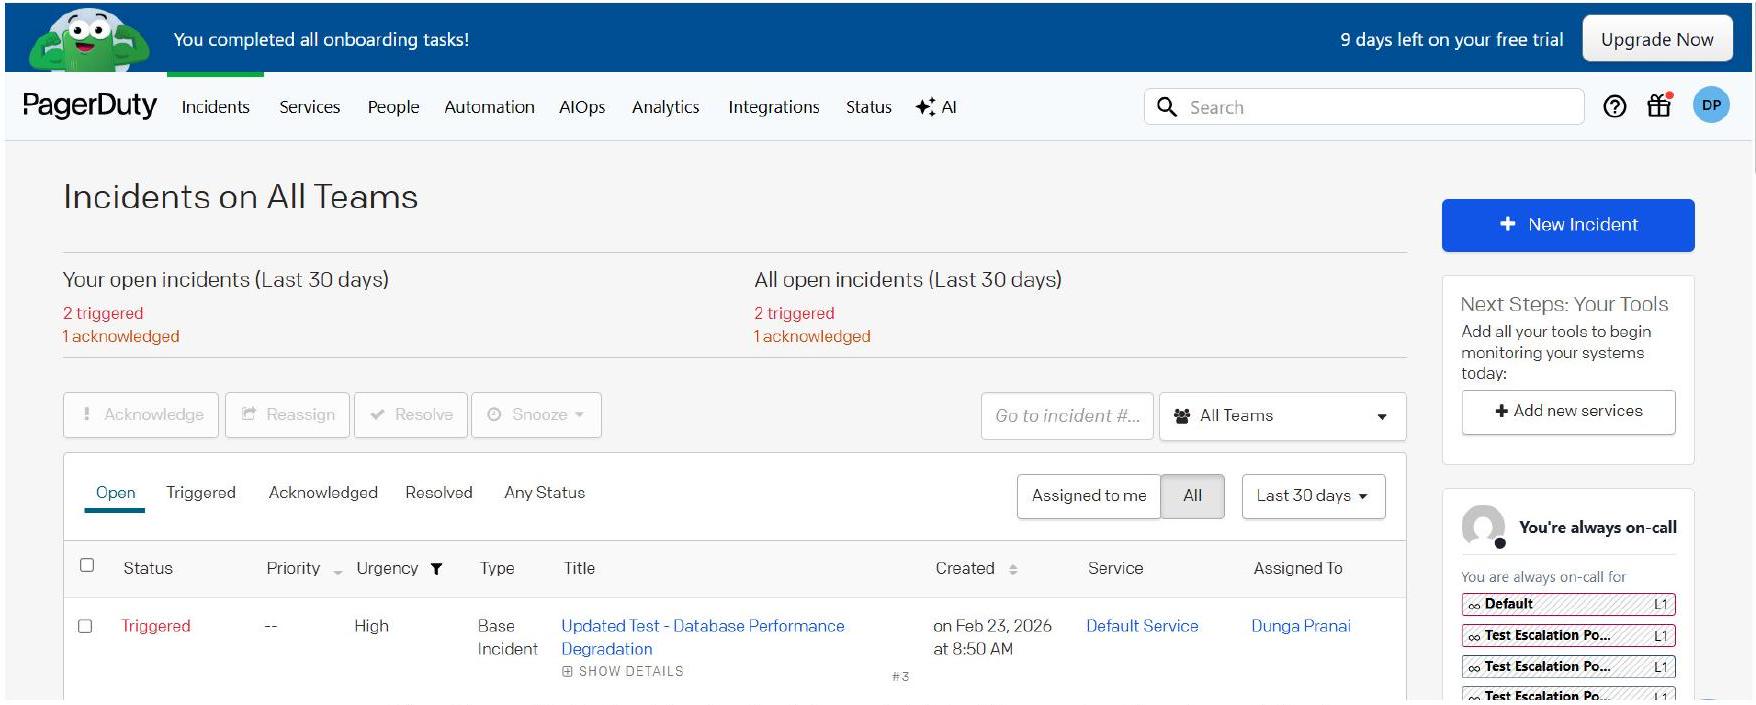
The PagerDuty Incidents dashboard. Note the navigation bar at the top.
PERMISSION NOTE:
Your PagerDuty account must have the Admin or Account Owner role to access App Registration under Developer Tools. If you do not see this option, contact your PagerDuty account owner.
2. Navigate to App Registration via Integrations
Click Integrations in the top navigation bar. A dropdown menu will appear with three sections: Your Integrations, Integrations, and Developer Tools. Under Developer Tools, click App Registration.
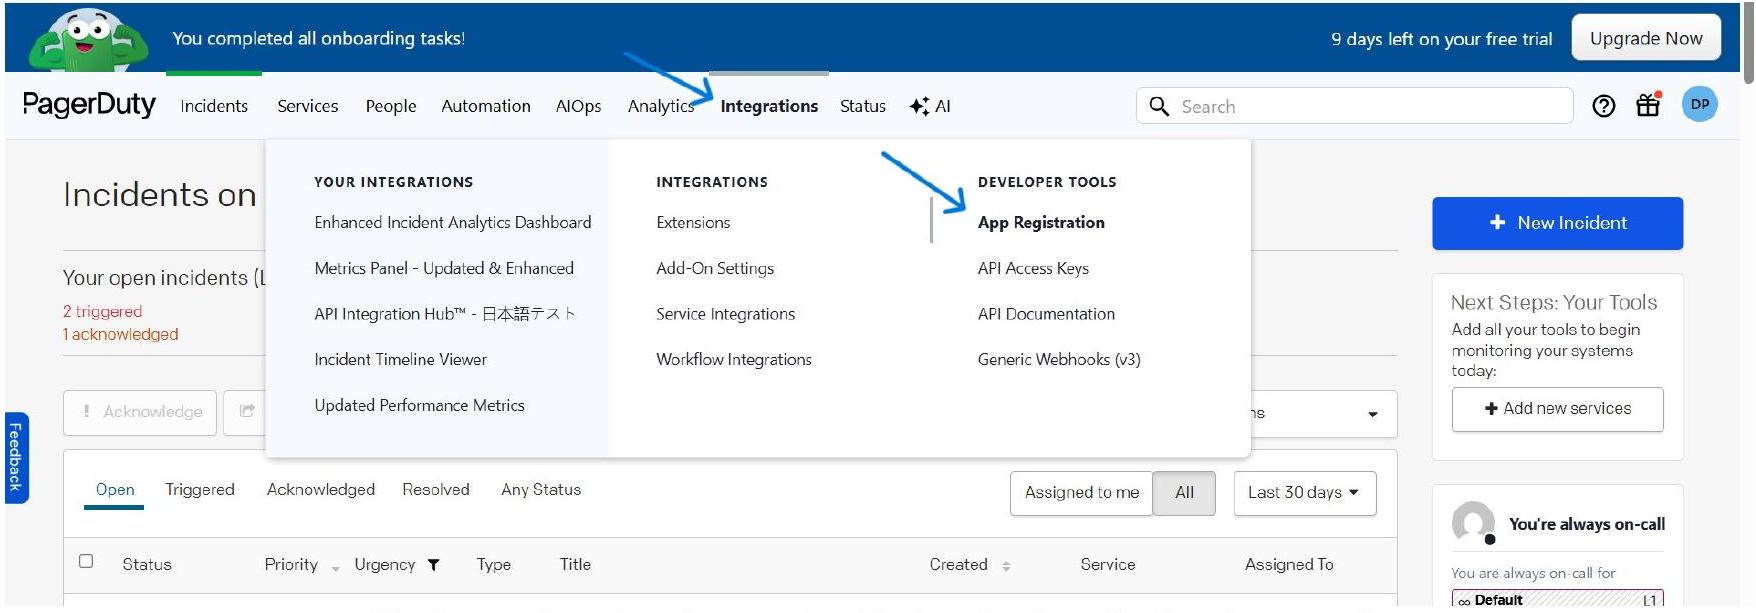
The Integrations dropdown - App Registration is under Developer Tools.
The Developer Tools section also contains API Access Keys, API Documentation, and Generic Webhooks. Make sure you select App Registration specifically - this is where OAuth 2.0 apps are managed.
3. Create a New App in App Registration
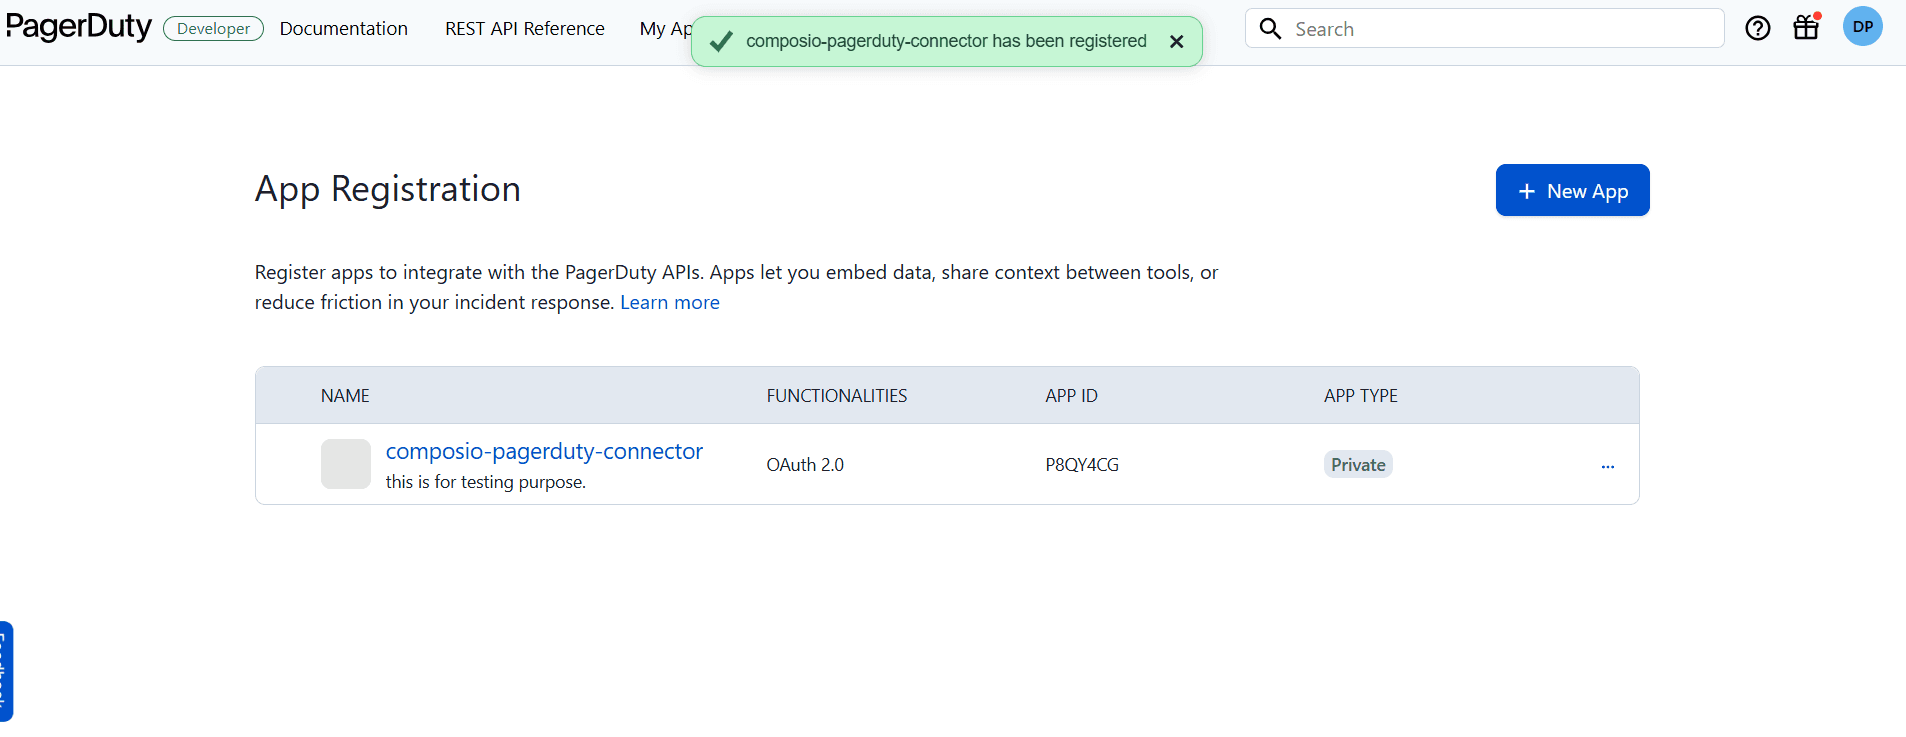
PagerDuty’s App Registration page lists all apps you have already created. Since this is a fresh setup, the list will be empty. Click the + New App button in the top right to begin registering your OAuth app.
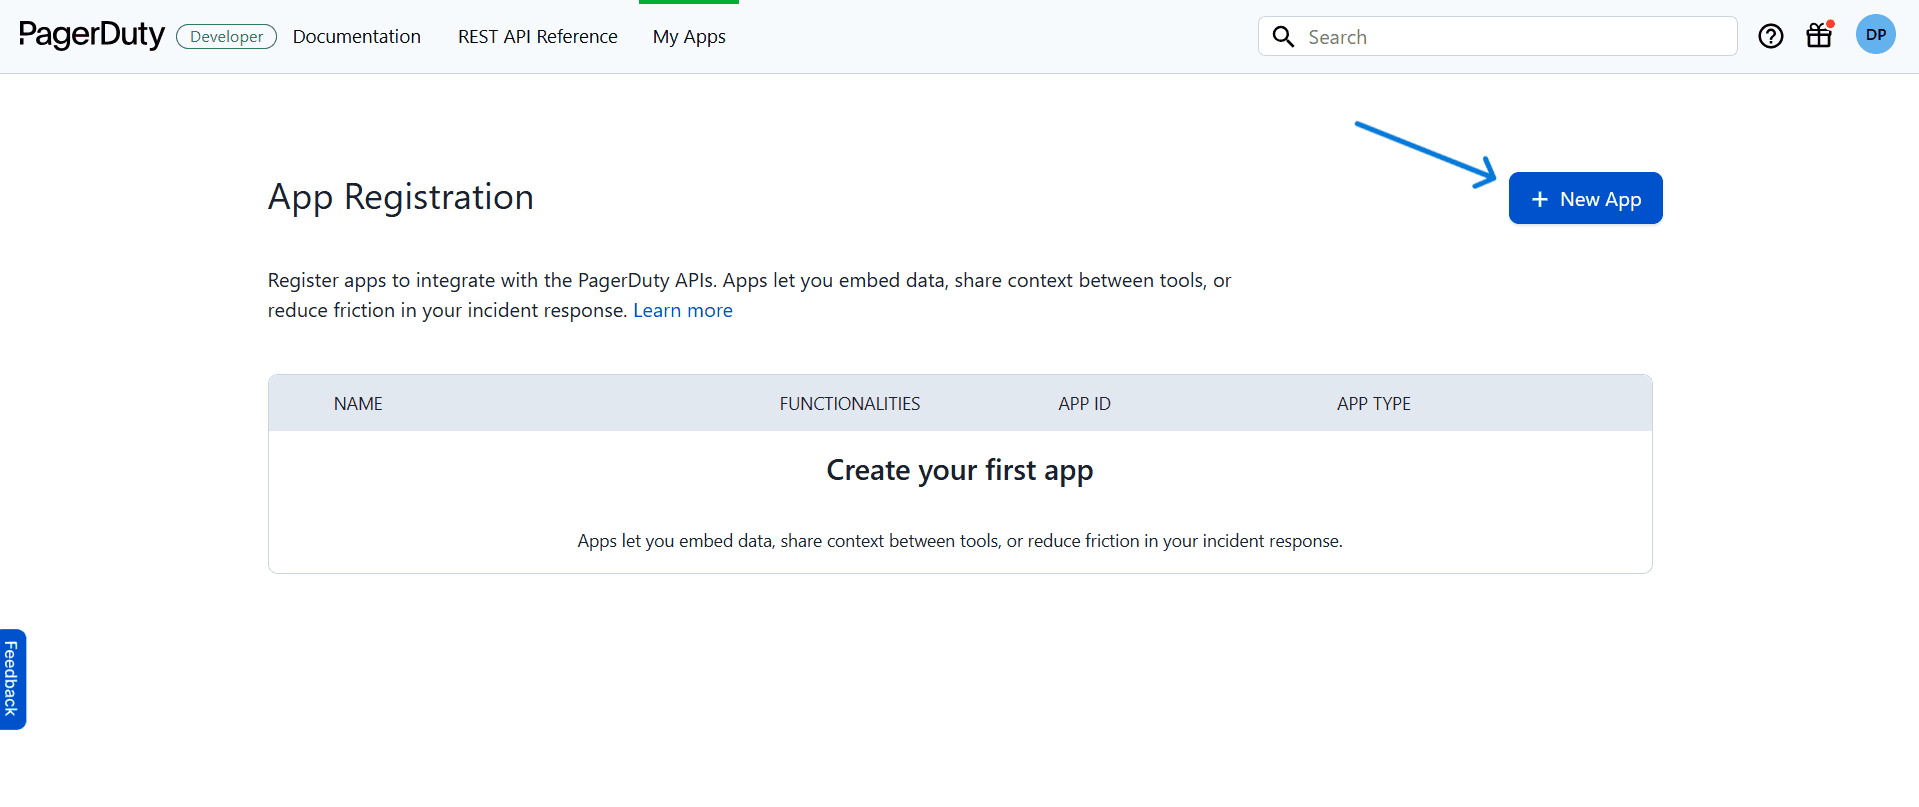
The App Registration page - click ‘+ New App’ to get started.
NOTE
Apps registered here are private to your PagerDuty account by default. They will not appear in the PagerDuty app directory unless you explicitly publish them. For a Composio integration, keeping the app private is the correct choice.
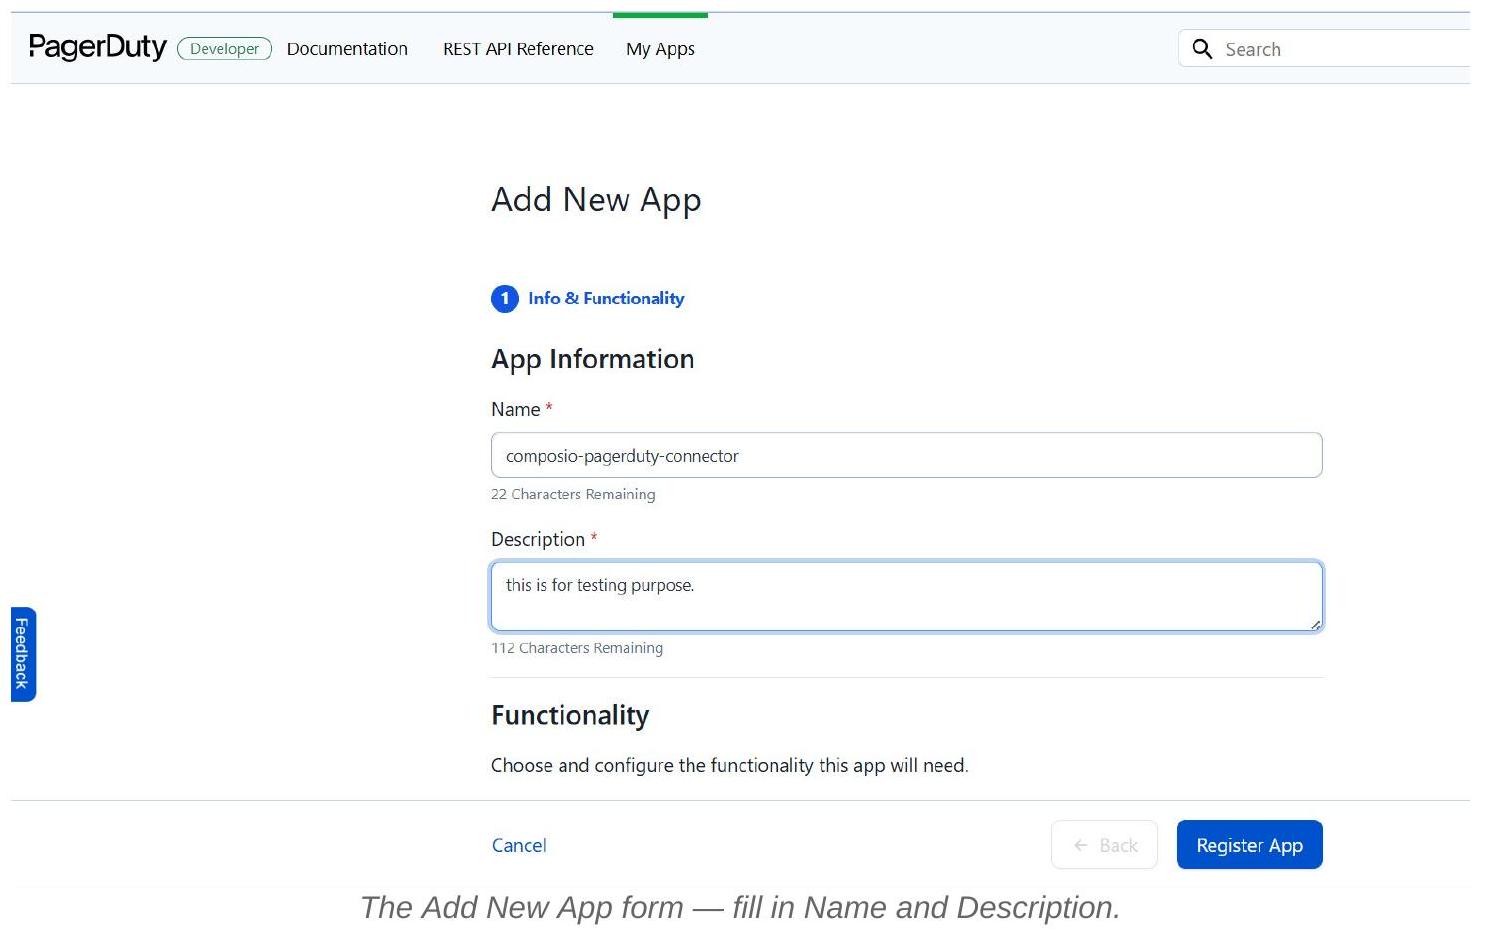
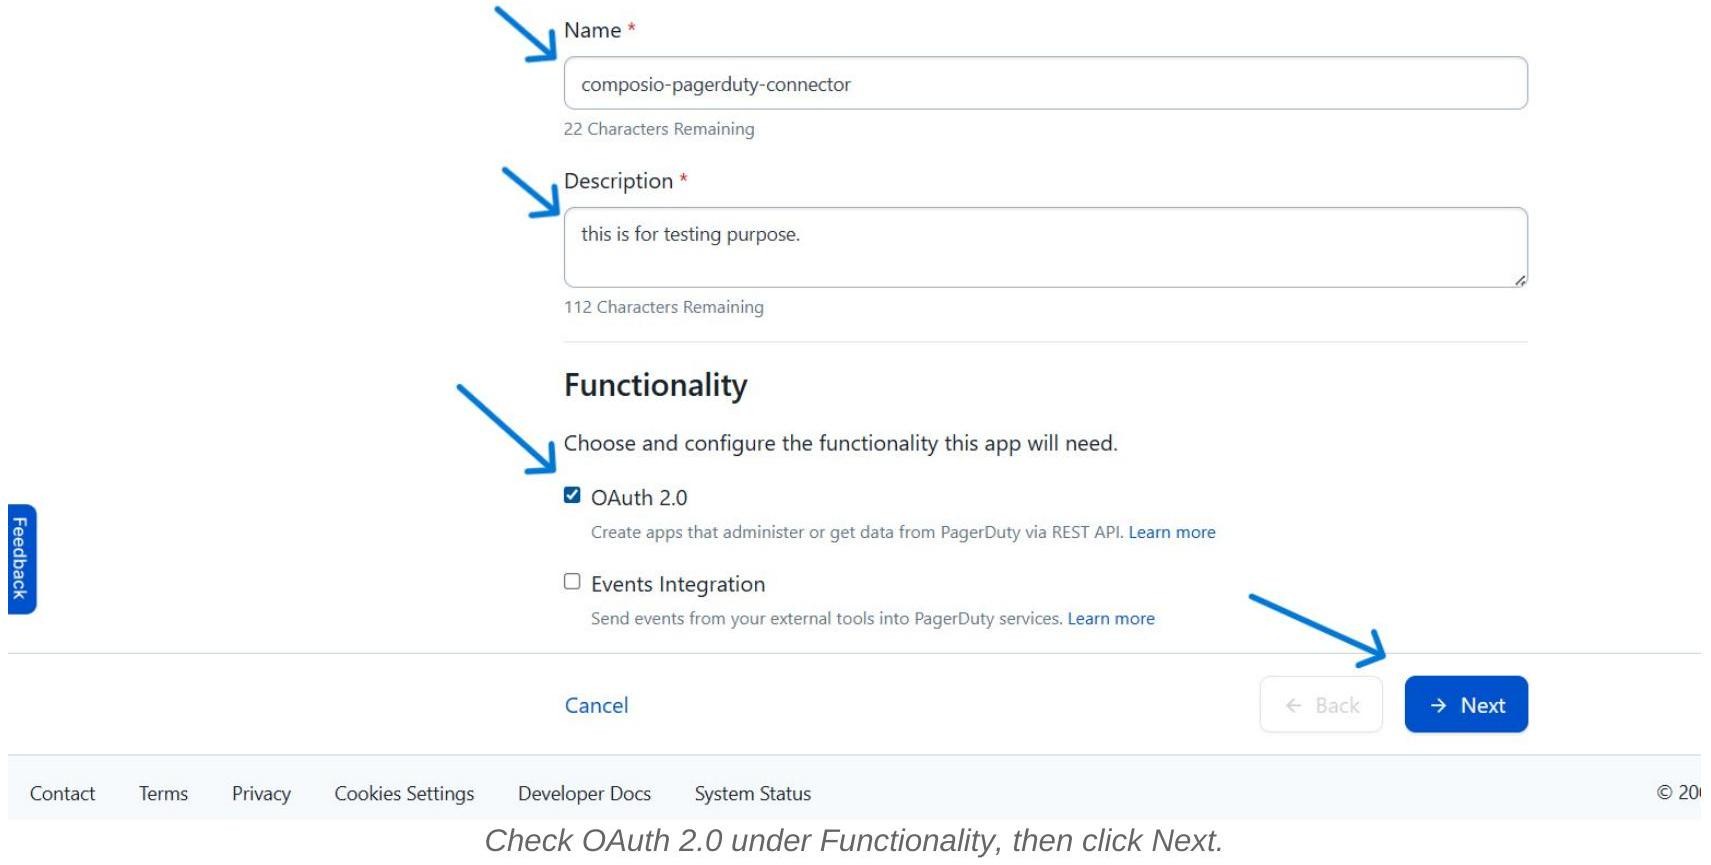
4. Fill In App Information
PagerDuty opens the Add New App form, starting with Step 1: Info & Functionality. Fill in the required fields carefully - this metadata represents your integration’s identity.
5. Enable OAuth 2.0 Functionality and Click Next
Below the app description, the Functionality section lets you choose what capabilities your app needs. Check the** OAuth 2.0** checkbox. This tells PagerDuty that your app will use OAuth to authenticate users and access PagerDuty resources via the REST API. Leave Events Integration unchecked unless you also need to receive PagerDuty events. Then click Next.
App Information
WHAT HAPPENS NEXT:
Once you check OAuth 2.0, the wizard adds a second step: Configure OAuth 2.0. This is where you will choose between Scoped OAuth and Classic User OAuth, set your redirect URL, and define the permission scope.
6. Choose the Authorization Type
In Step 2 of the wizard — Configure OAuth 2.0 - PagerDuty presents two authorization types:
Scoped OAuth - New OAuth client. Allows granular read or write access to specific PagerDuty resources (incidents, services, users, etc.) with fine-grained control. Recommended by PagerDuty for most new integrations.
Classic User OAuth - Existing-style OAuth client. Allows apps to act on behalf of users with broad read/write access to all PagerDuty resources. This is what Composio’s integration flow uses, as shown in the screenshots.
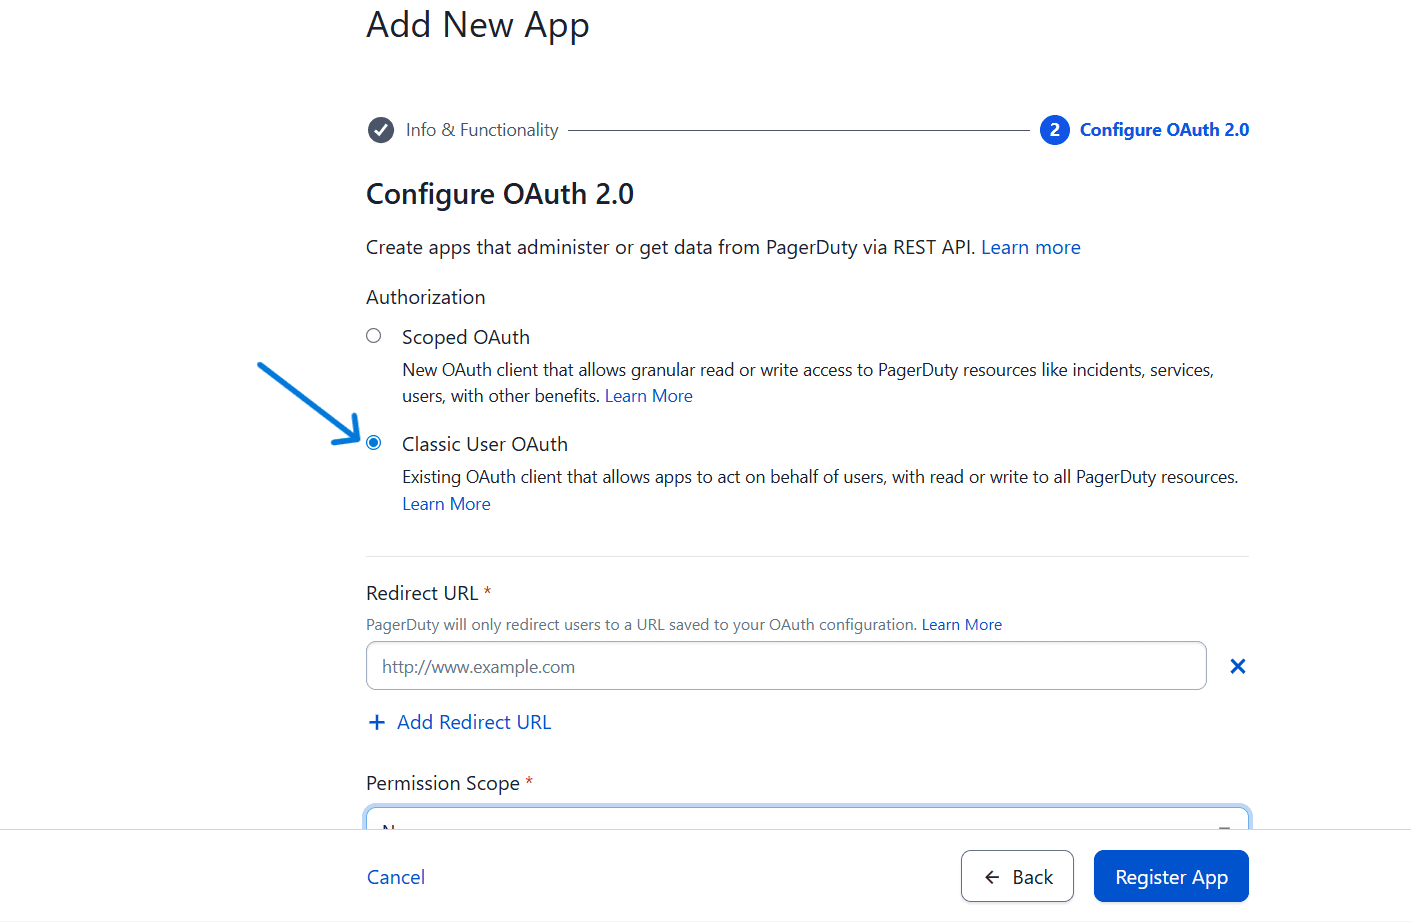
DECISION GUIDE
Which should you choose? Select Classic User OAuth for this Composio setup. It provides the broad access that Composio needs to manage incidents, services, and other PagerDuty resources on behalf of the authenticated user. If your use case is very narrow (e.g., read incidents only), Scoped OAuth gives better least-privilege control - but you would need to configure Composio accordingly.
7. Set the Redirect URL and Permission Scope
With Classic User OAuth selected, two required fields appear: the Redirect URL and the Permission Scope. These must be configured precisely - PagerDuty will reject OAuth flows if the redirect URL does not match exactly.
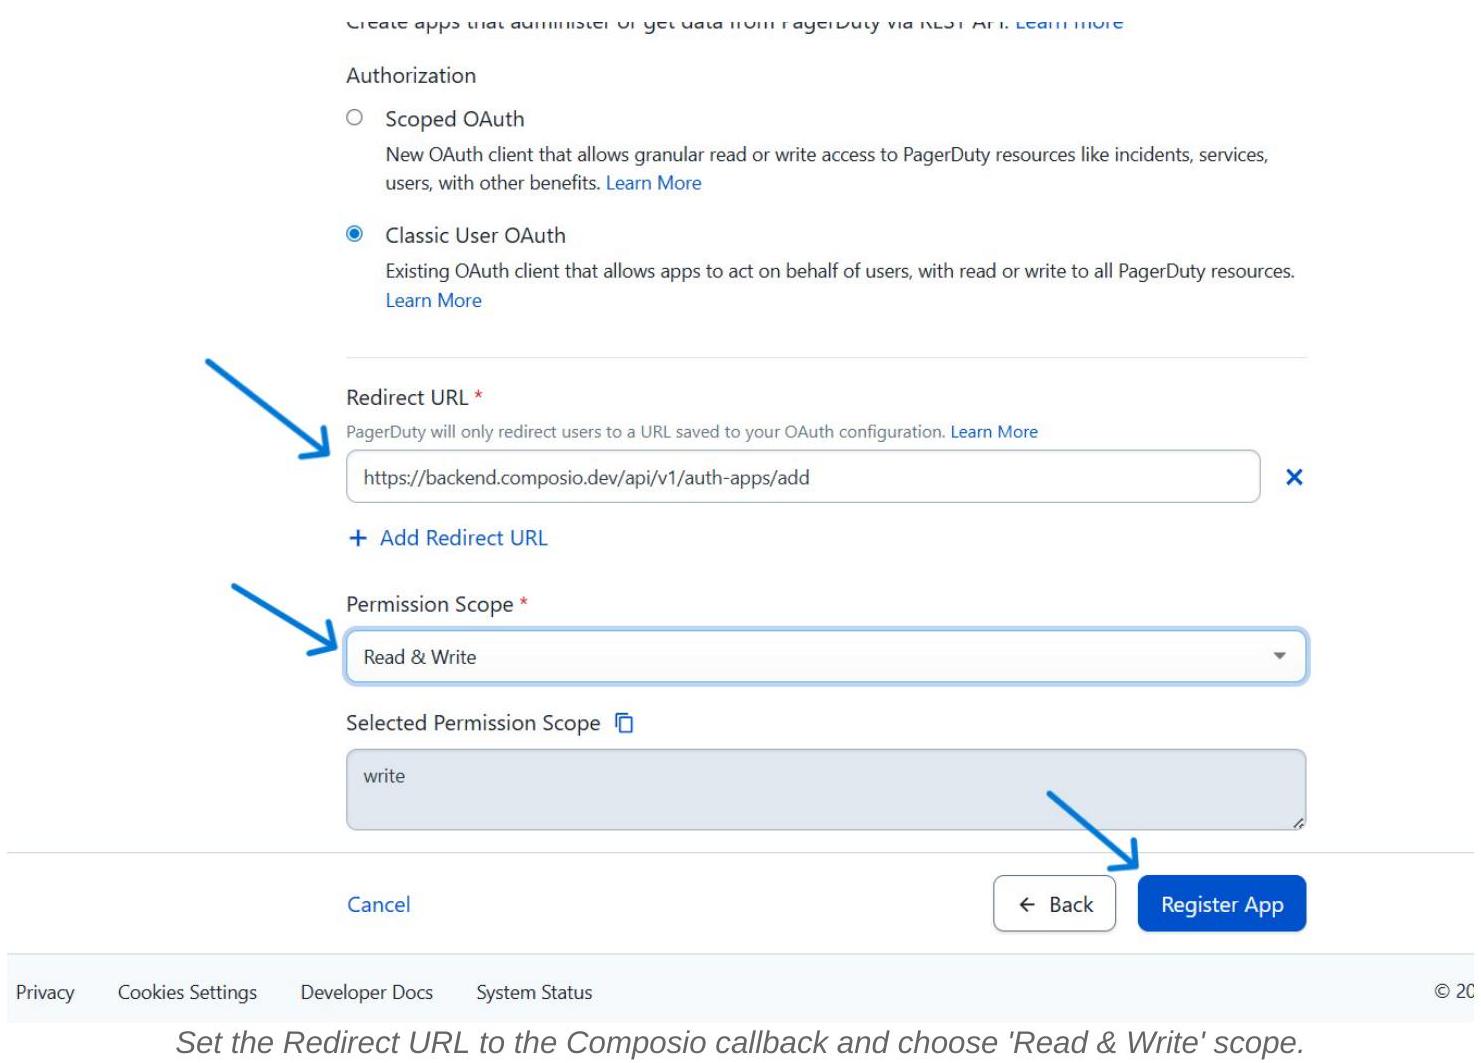
Redirect URL
Enter the Composio OAuth callback URL. The example in the screenshots uses:
https://backend.composio.dev/api/v1/auth-apps/add**IMPORTANT - URL VERSION
**Always verify the redirect URI in your current Composio Auth Config form - it may differ from older documentation. The value shown in your Composio dashboard is the authoritative one. Copy it from there and paste it here in PagerDuty.
Permission Scope
From the Permission Scope dropdown, select Read & Write. This grants the Composio connector both read and write access to PagerDuty resources on behalf of the authorized user. The Selected Permission Scope field will show write (which implicitly includes read in PagerDuty’s model).
8. Register the App and Save Your Credentials
Once the Redirect URL and Permission Scope are set, click Register App. PagerDuty immediately displays a modal dialog with your Client ID and Client Secret. These are the two values you will paste into Composio.
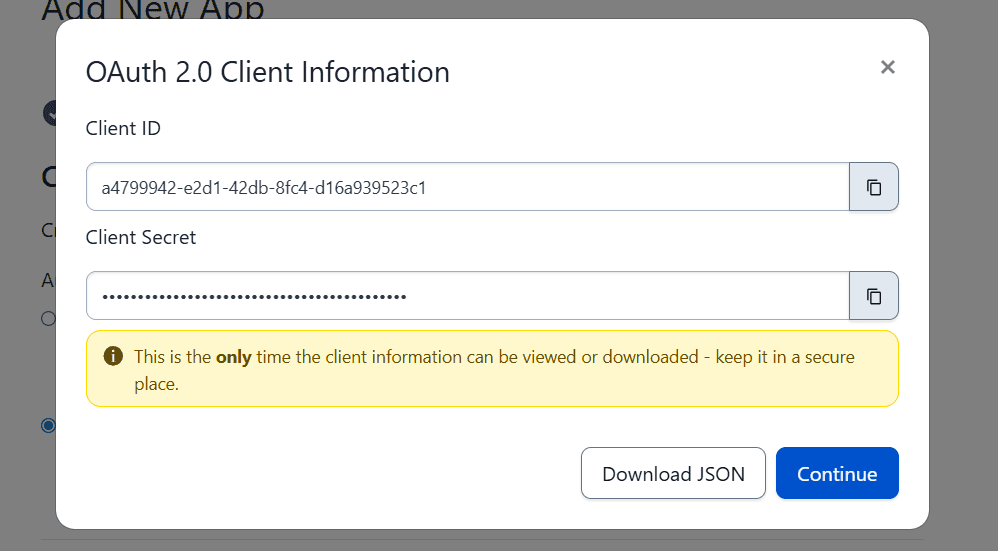
**CRITICAL SECURITY NOTE
**Security: This is the only time the Client Secret is shown. PagerDuty will never display it again after you close this dialog. Copy both the Client ID and Client Secret now and store them in a secure location - a password manager, secrets vault, or encrypted environment variable. If you lose the secret, you must generate a new one and update Composio.
After closing the modal, the app appears in your App Registration list.
9. Create the PagerDuty Auth Config in Composio
Switch to your Composio dashboard. Navigate to Auth Configs and click the + (create) button. In the search drawer that appears, type pagerduty and select PagerDuty with the OAuth2 badge.
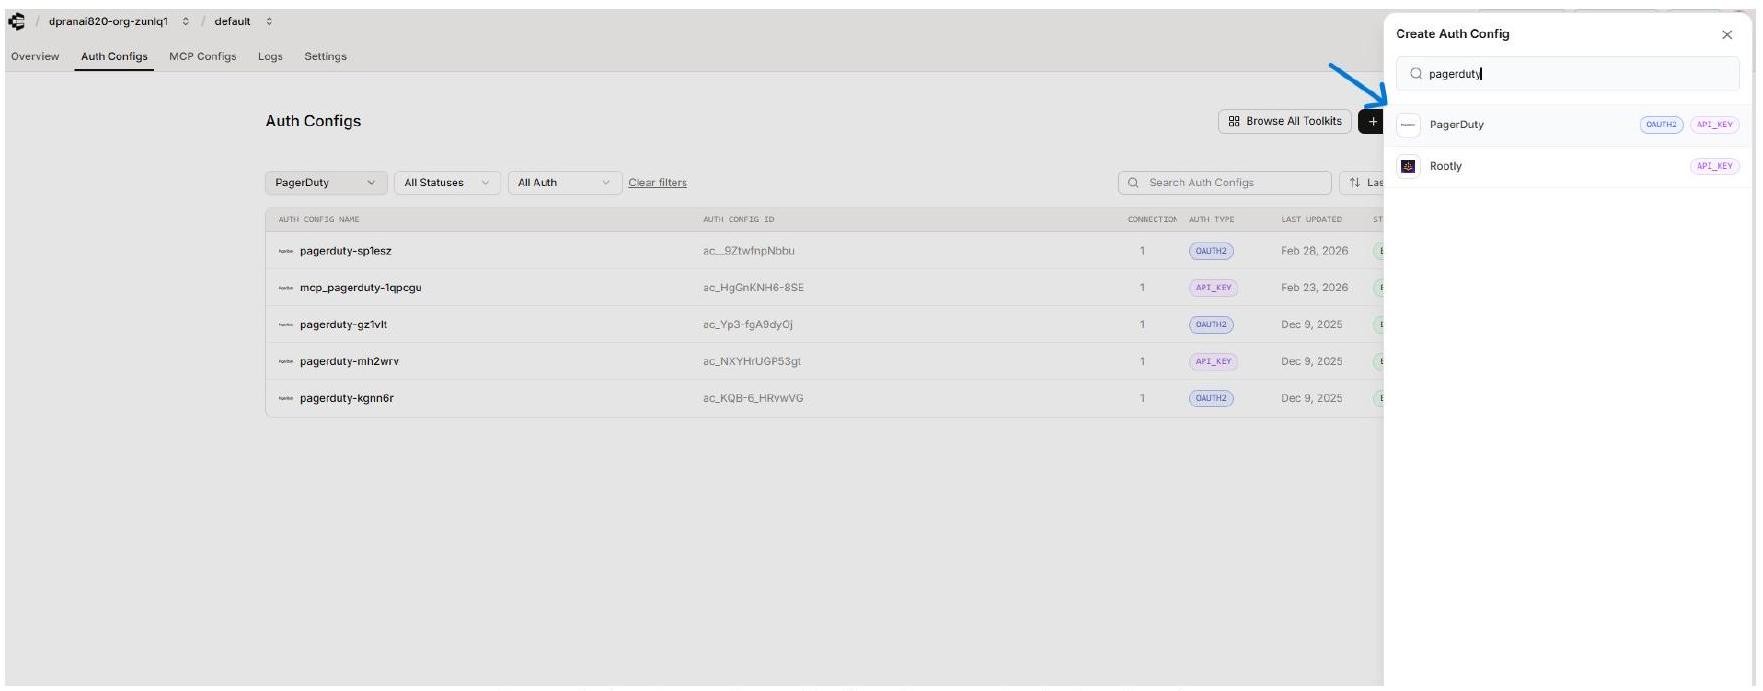
Search for PagerDuty in the Create Auth Config drawer.
An Auth Config is Composio’s reusable authentication blueprint for a toolkit. It stores the authentication method, scopes, and app-level credentials that all user connections to PagerDuty will rely on.
10. Configure the Auth Config with Your Credentials
The PagerDuty Auth Config form opens in a side panel. Fill in each section as described below.
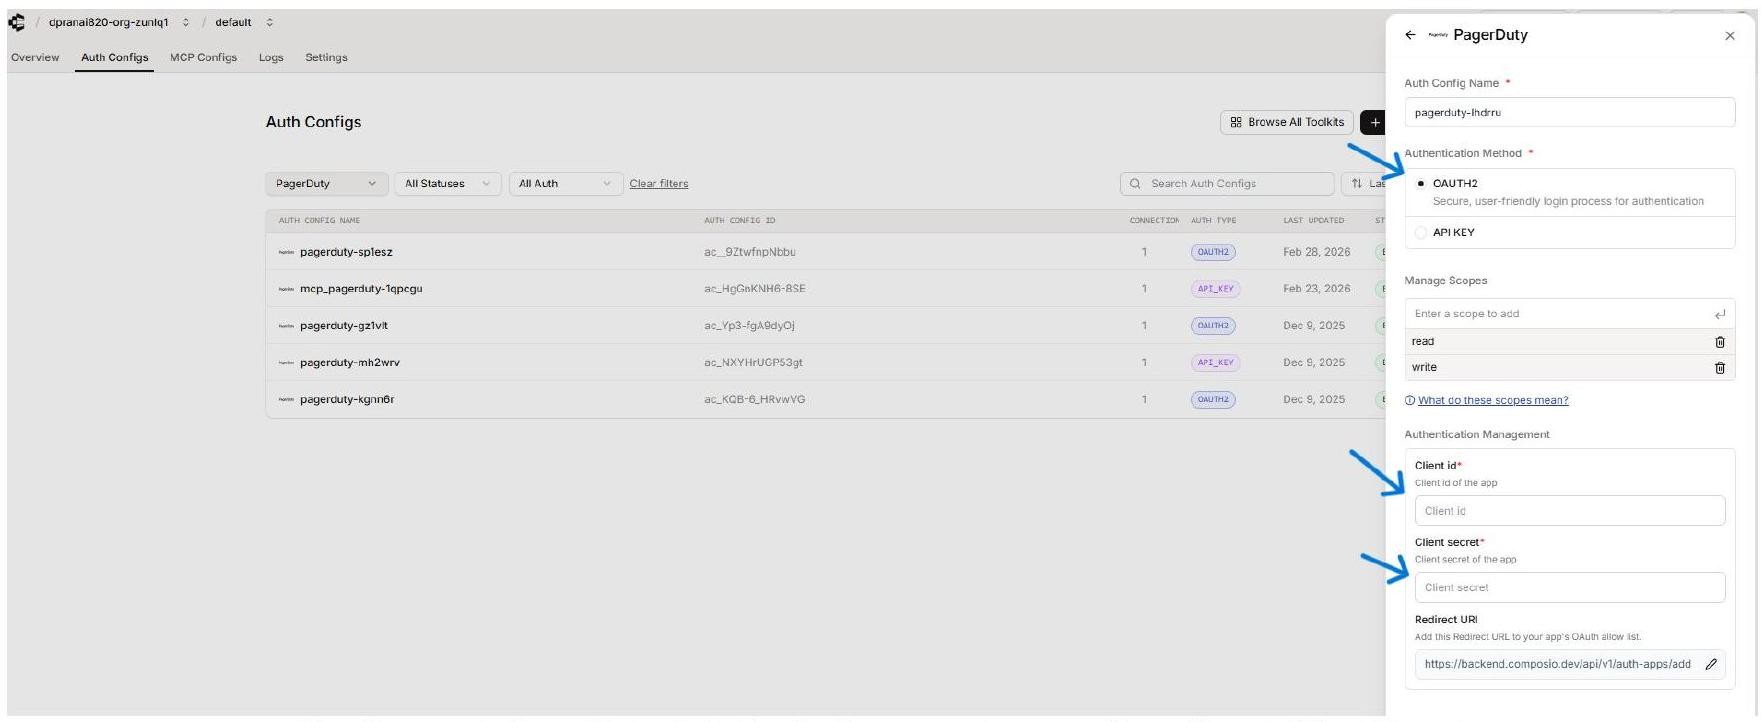
The Composio PagerDuty Auth Config form — enter your Client ID and Client Secret.
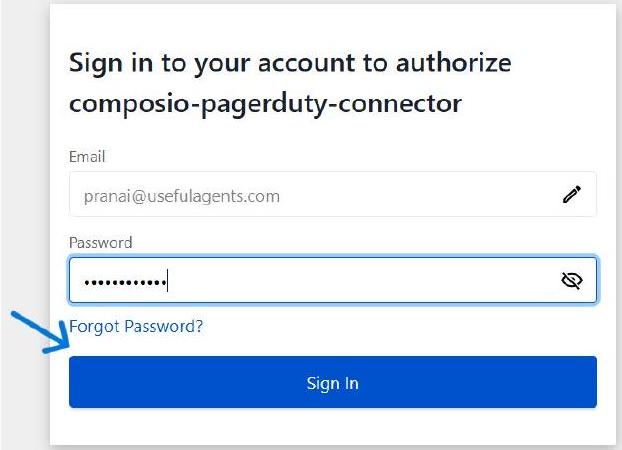
11 Connect a User Account - PagerDuty Login Flow
After saving the Auth Config, open it in Composio and click Connect Account. Composio will ask for an External User ID and then redirect to PagerDuty’s login page. The user signs in to authorize the connection.
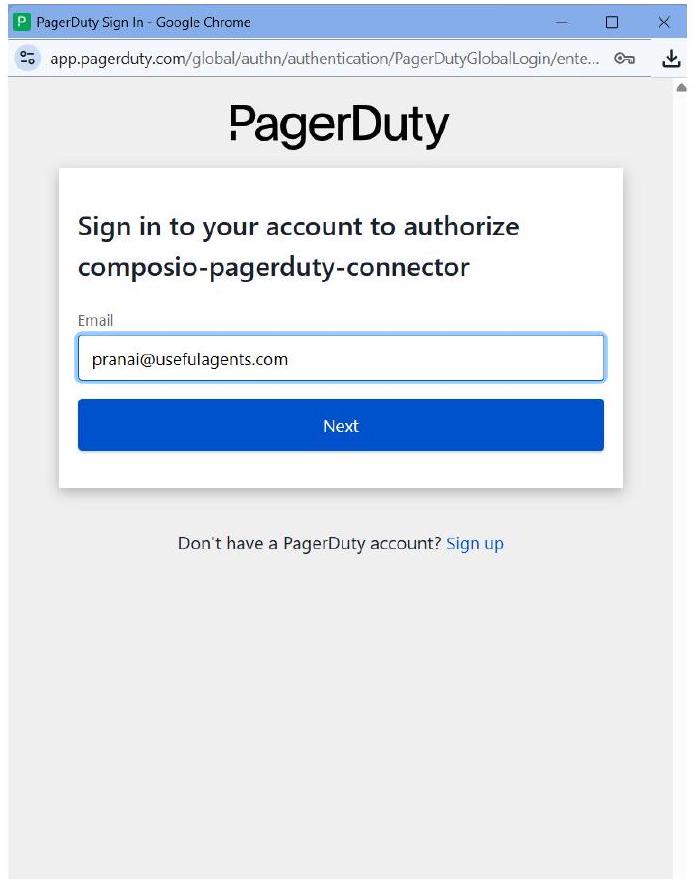
PagerDuty sign-in page - the user enters their email to begin authorization.
Enter the email address associated with the PagerDuty account you want to connect, then click Next. PagerDuty will prompt for the password on the following screen.
Don’t have a PagerDuty account? Sign up
12 Select the PagerDuty Account
If the user is associated with multiple PagerDuty accounts (subdomains), PagerDuty will display a Welcome back! screen listing all available accounts. Select the account you want to connect to Composio.
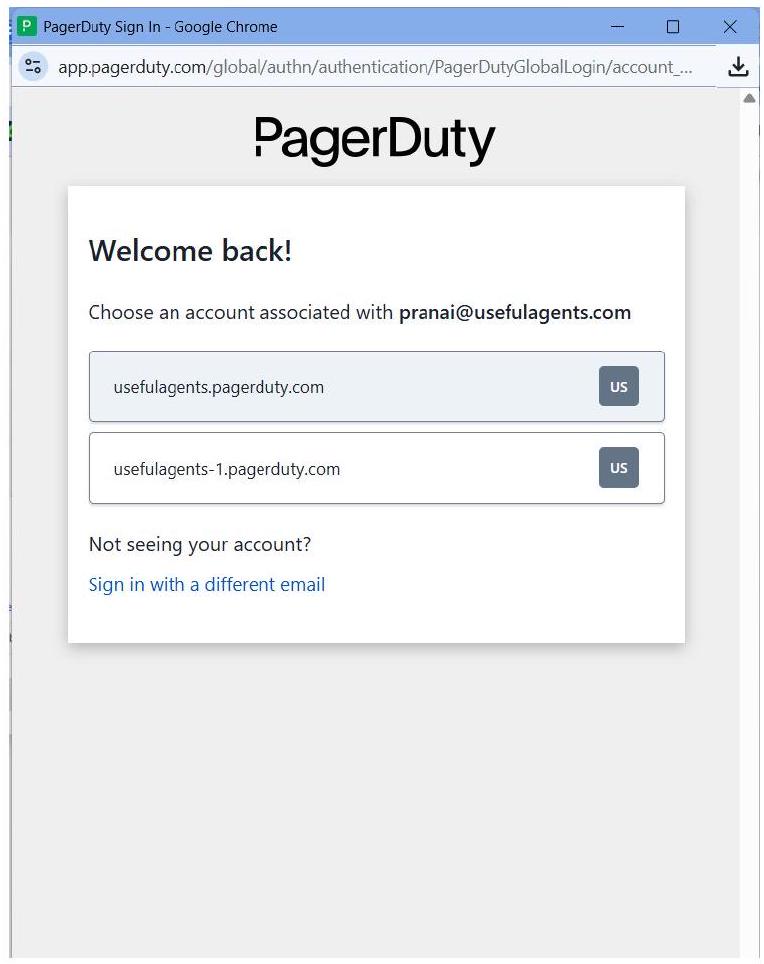
If the user has multiple accounts, select the correct PagerDuty subdomain.
MULTIPLE ACCOUNTS
In the example screenshots, the user has two accounts: usefulagents.pagerduty.com and usefulagents-1.pagerduty.com. Select the account whose incidents and services you want the Composio agent to manage.
13 Review Permissions and Submit Consent
PagerDuty now shows the Request for user consent screen. This displays the name of your app (composio-pagerduty-connector), the account being authorized, and the permissions being requested. Review them, then click Submit Consent to complete the connection.
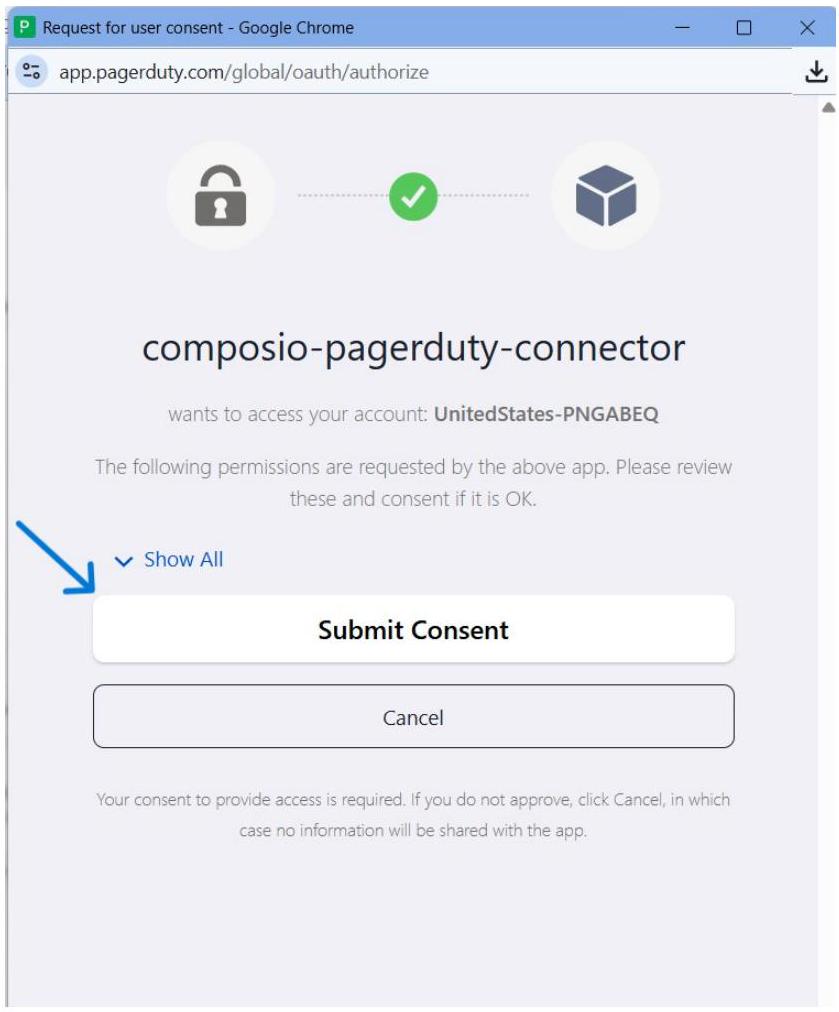
The PagerDuty consent screen — click Submit Consent to authorize.
CONSENT REVIEW
You can expand Show All on the consent screen to review the exact permissions granted to the app. After consent is submitted, PagerDuty redirects the user back through the Composio callback URL, and the connection becomes active.
14 Verify the Active Connection in Composio
After successful authorization, Composio redirects back to the Auth Config’s Connected Accounts tab. You should see your new connection listed with status ACTIVE. The connection is now ready for use by agents and automations.
The Composio Connected Accounts tab showing an ACTIVE PagerDuty connection.
Confirm the following before using the connection:
The Account ID appears in the Connected Accounts list with status ACTIVE.
The Authentication Method on the right panel shows OAUTH2.
The Toolkit Slug shows PAGERDUTY.
Copy the Auth Config ID if you plan to reference it from Composio Sessions, SDK code, or API calls.