OpenAI's Agent Builder gives you a straightforward way to build and deploy AI agents, combining models, tools, and logic into one visual workspace. This no-code design lets you focus on how your agent should work rather than dealing with the underlying infrastructure.
Sales teams often spend hours managing leads, updating contacts, and juggling follow-ups, repetitive tasks that take time away from closing deals. By connecting Agent Builder to external platforms like Salesforce through an MCP server (such as Rube), you can create agents that handle these tasks automatically. The MCP handles authentication, API calls, and data formatting, letting your agent focus on workflow logic rather than infrastructure.

In this guide, we’ll build a Salesforce Agent using the Rube MCP. This setup lets your agent manage contacts, update deals, and interact with leads automatically, so you can spend more time closing deals rather than managing data.
What is Agent Builder?
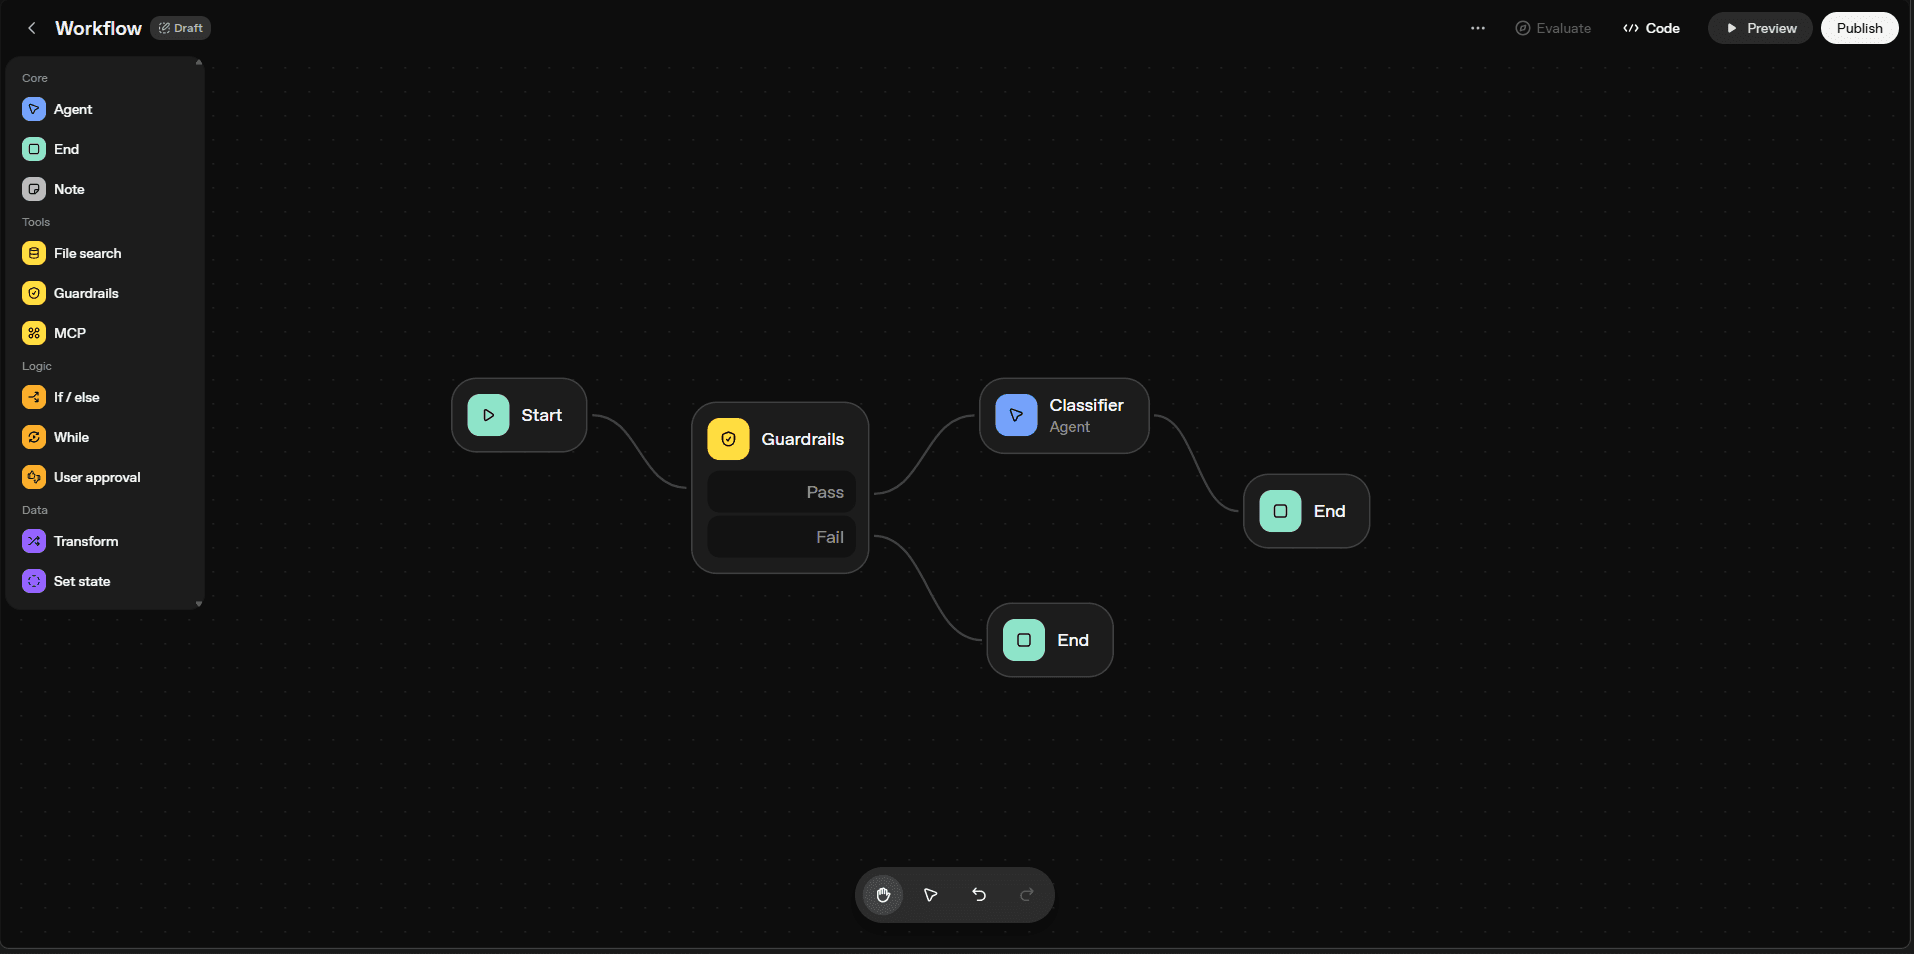
Agent Builder is OpenAI’s visual, no-code platform for designing, building and deploying AI workflows. Instead of writing lines of code, you can drag and drop components onto a canvas and connect them to define how your Agent should behave. Each element, or “node”, has a specific purpose. Some handle requests, others run the logic and enforce security rules, and others connect to external systems via MCPs.
With Agent Builder, you can create complex, multi-step workflows without worrying about the infrastructure or API layer. It also integrates with ChatKit widgets to display results in an interactive interface, and comes with inbuilt evaluation tools to test performance, identify bottlenecks. In Salesforce, this means you can automate repetitive tasks, manage leads and contacts, and orchestrate multi-step processes with minimal setup, all visually and in a straightforward way.
To learn more about Agent Builder, you can check out this how-to guide.
Why Rube MCP matters to your Salesforce workflow
When your MCP Client uses multiple MCP servers in a workflow, connecting them all directly can quickly consume the LLM’s context window, slowing down or breaking your workflow. Rube MCP (Model Context Protocol) solves this by acting as a single entry point for all your tool connections. Your agent communicates with Rube, which handles authentication, API calls, and data formatting for each external tool.
For Salesforce, using an MCP implementation like Rube means you don’t have to write custom OAuth flows or manage API keys for every endpoint. Rube provides a unified interface for hundreds of apps, including Salesforce, Gmail, Notion, and more. It also dynamically loads only the tools needed for a given context, keeping the agent’s workflow efficient and reducing the chance of context overload. This setup allows your Salesforce agent to focus on logic and decision-making, while the MCP handles the complexities of API integration and token management.
How to Add Salesforce to Agent Builder
Before we start building our Salesforce Workflow, we need to connect Rube MCP with Agent Builder. This will allow our agent to communicate with Salesforce securely through Rube’s unified MCP interface.
Step 1: Set up Rube MCP
Go to Rube, and open your Dashboard.
Navigate to Apps → Marketplace.
Search for Salesforce and click Enable App.
Choose the Recommended Composio approach, select the required scopes, and click Setup.
Add your Salesforce domain, click Connect, and authorize the app in the Salesforce authorization window.
I’ve attached a video you can follow, note you won’t see the scope/domain steps in the demo because Salesforce was already enabled on my account.
After the app is enabled, go back to the Rube dashboard and click Install Rube Anywhere.
In the modal, select Agent Builder and copy the MCP URL, you’ll need this in Agent Builder.

Scroll a little further and click Generate Token to create an access token. Copy the generated token, this is the value you’ll paste into Agent Builder (Authorization → Access token / API key).
Step 2: Connect Rube MCP inside Agent Builder
Open Agent Builder and create a new workflow by clicking “Create.”
You’ll see a canvas with two default nodes: Start and Agent. Delete the connecting edge between them for now, we’ll set up our workflow logic later.
Click on the Agent node and rename it to “Salesforce Agent”. Then, in the Instructions field, enter the following:
You are a helpful assistant.We’ll refine this agent later with Guardrails and Logical Nodes for better control.
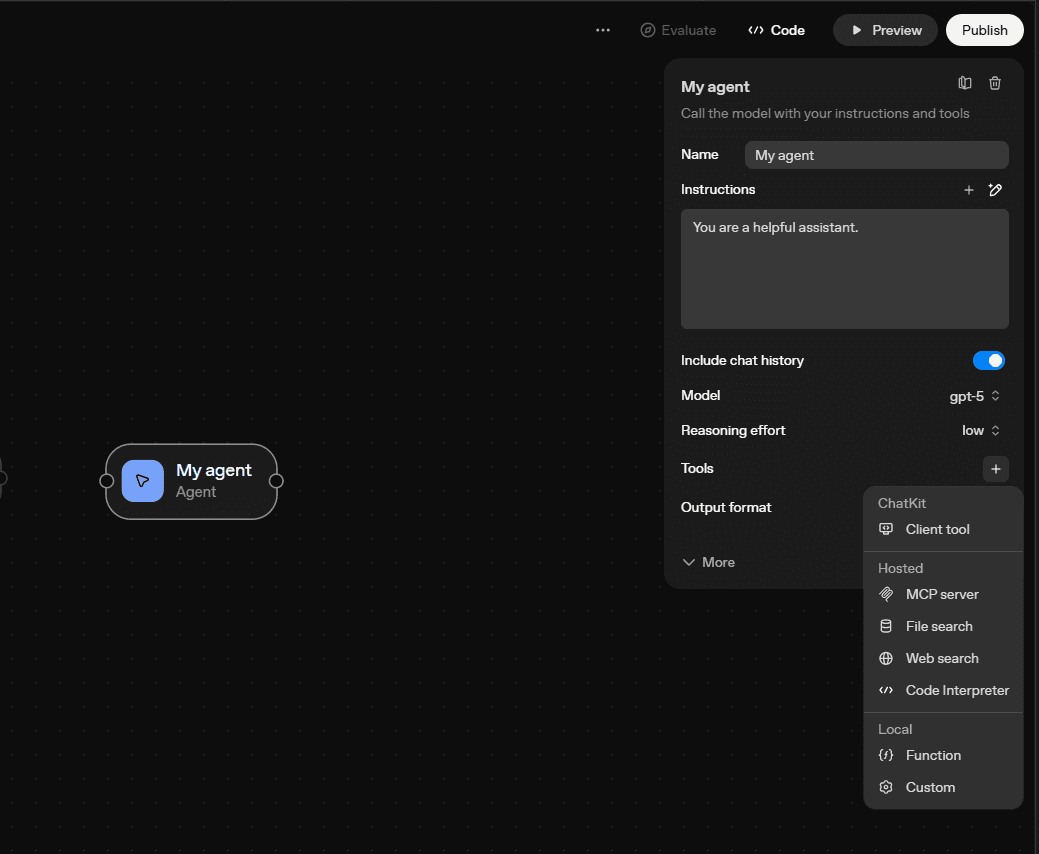
In the agent node’s configuration panel, click the “+” icon beside Tools. From the dropdown, select “MCP Server” → then click “+ Server”.
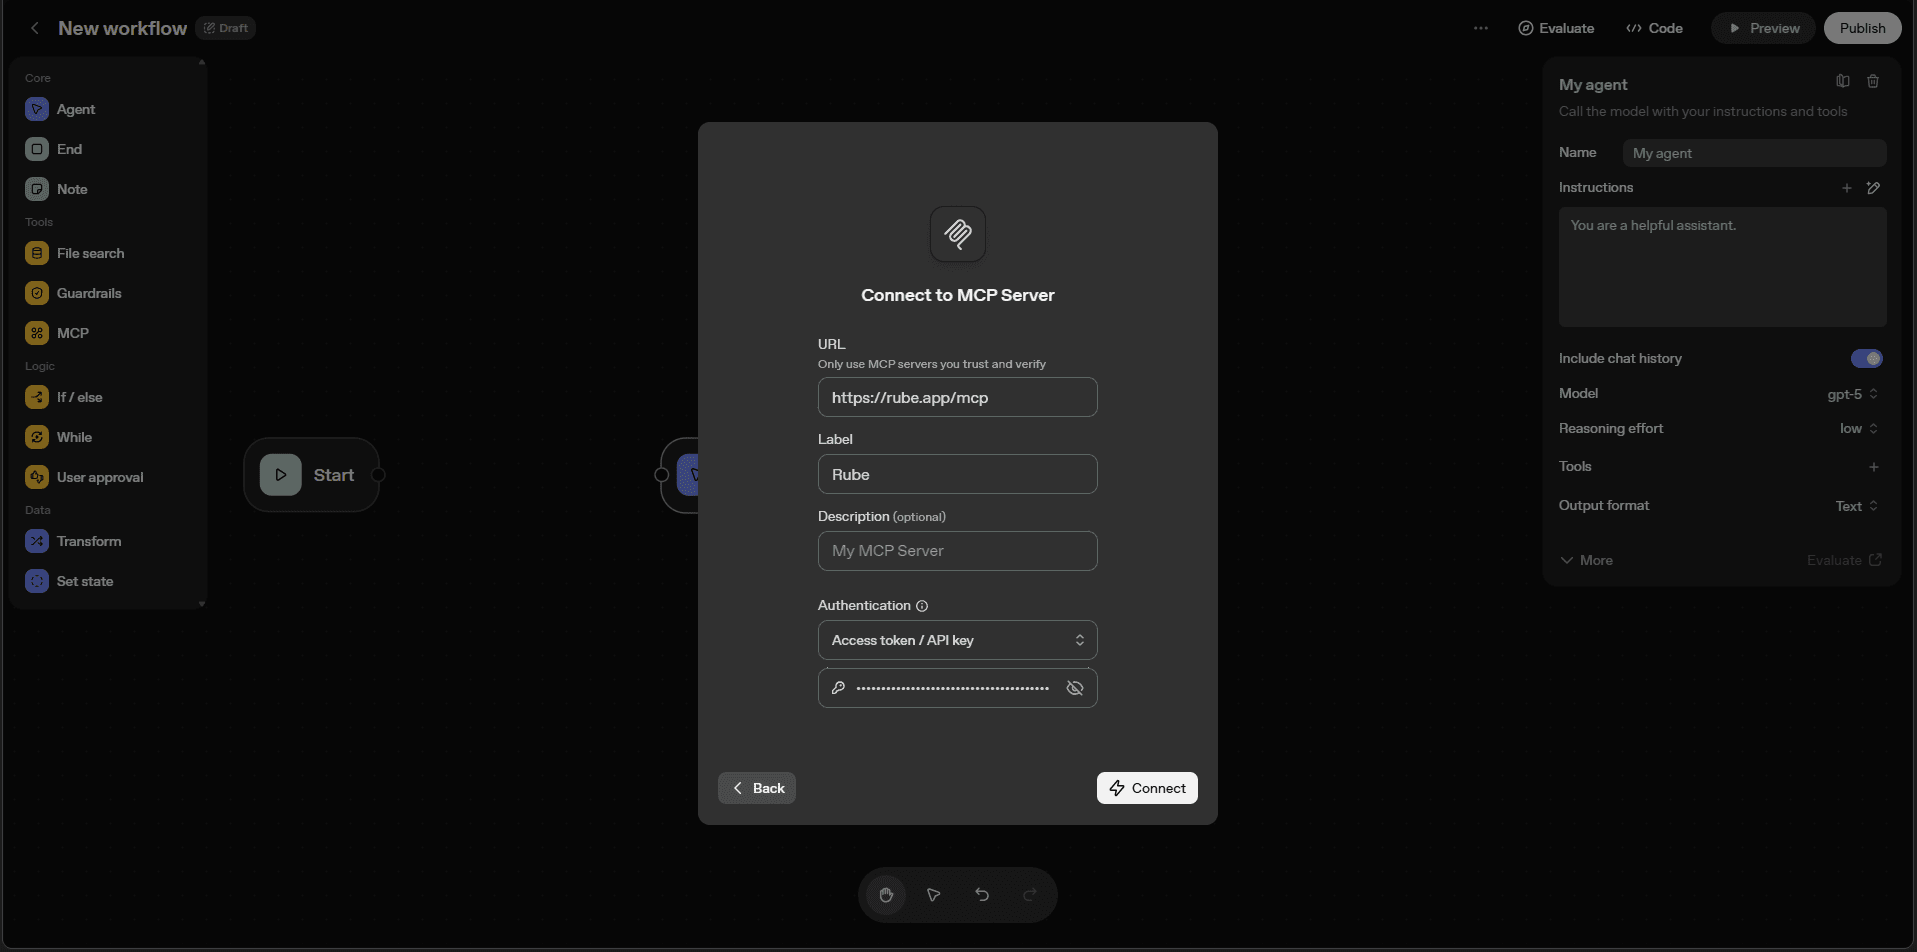
Paste the MCP URL you copied from Rube earlier. In the Authorisation field, choose Access Token / API Key and paste your generated token. Give your server a name like “Rube” and click Connect.
Building the Salesforce Agentic workflow
With the Salesforce connection ready inside Agent Builder, it’s time to make our agent actually do something useful, like creating or updating leads automatically. But before jumping straight to actions, we’ll make sure our workflow is secure, context-aware, and can correctly interpret what users want to do.
Step 1: Add GuardRails
Let’s start by protecting the workflow from misuse.
From the toolbar, drag the GuardRails node onto your canvas and connect it with the Start node.
Give it a label like “GuardRails” and enable the Jailbreak setting, this helps your workflow detect and block prompt injection attempts or malicious instructions.
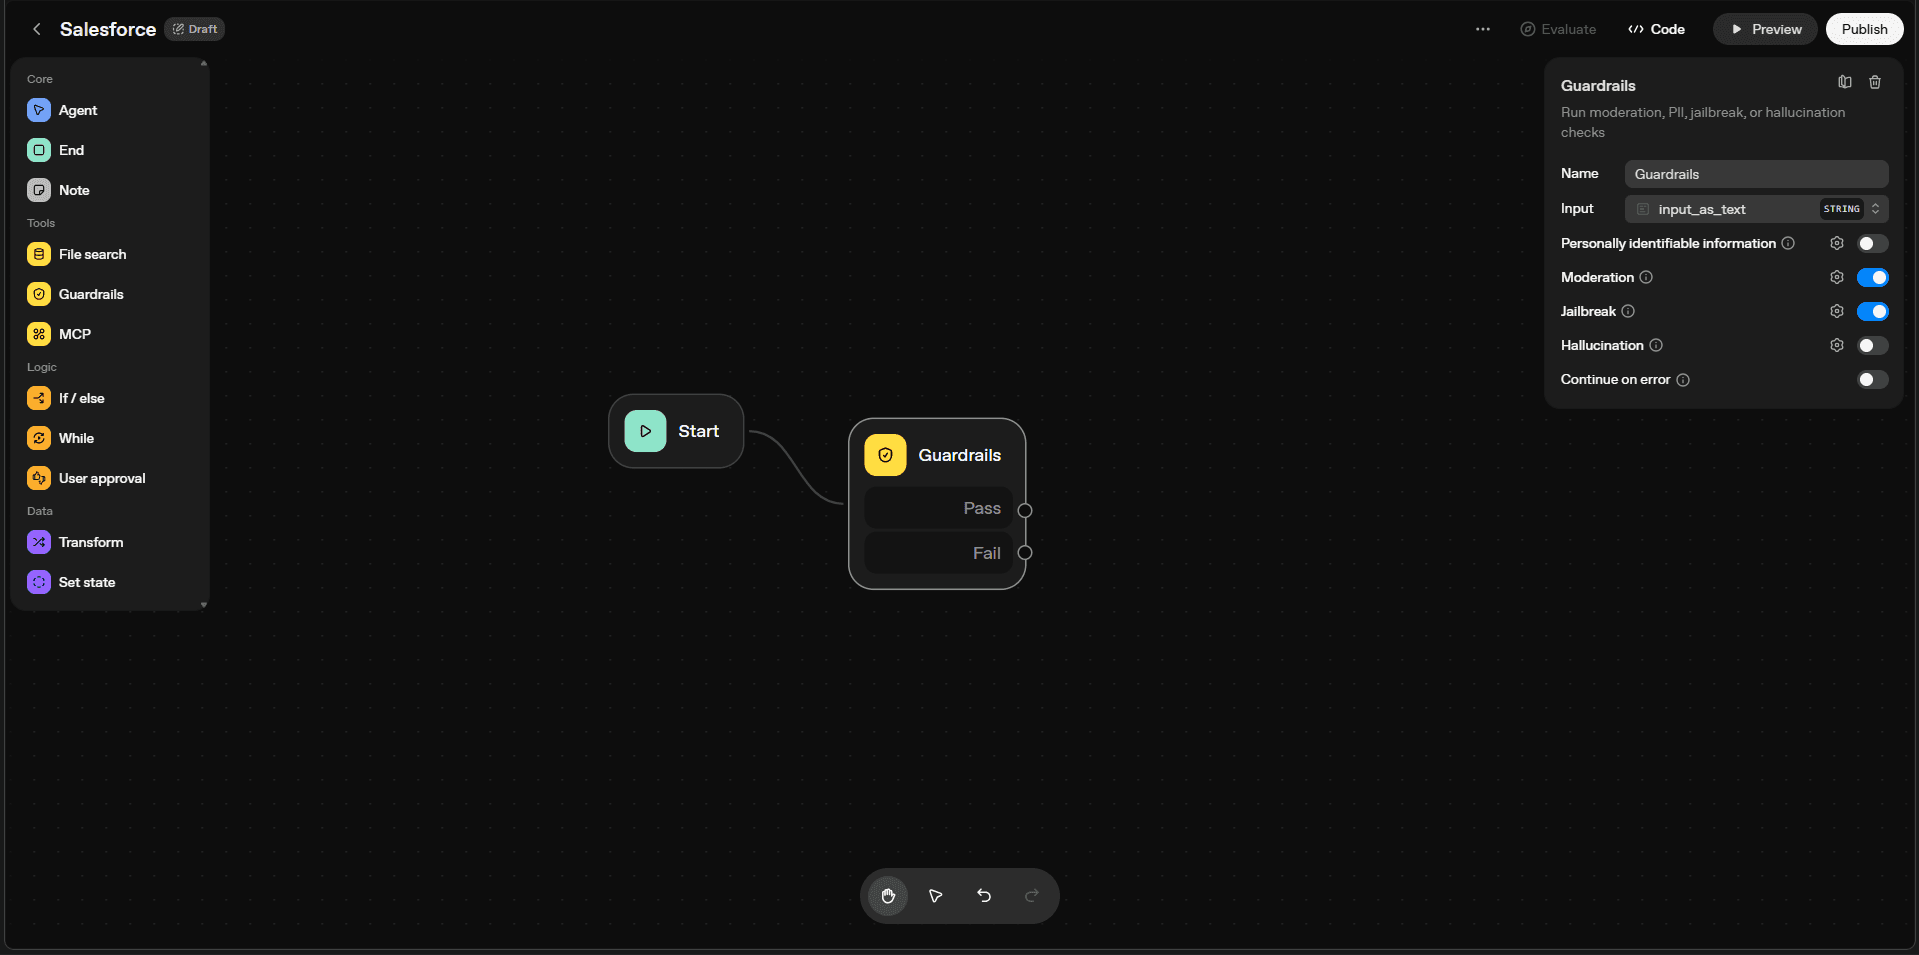
Optionally, you can enable “Sensitive data” checks if your workflow will deal with customer details like emails or phone numbers.
Step 2: Create an Intent Classifier
Next, we’ll teach the agent to understand what a user is asking, whether it’s to create a new lead, update contact info, or close an opportunity.
Add a new Agent node to the canvas and connect it to the “Pass” output of your GuardRails node, and label it “Intent Classifier”.
Give the agent this instruction:
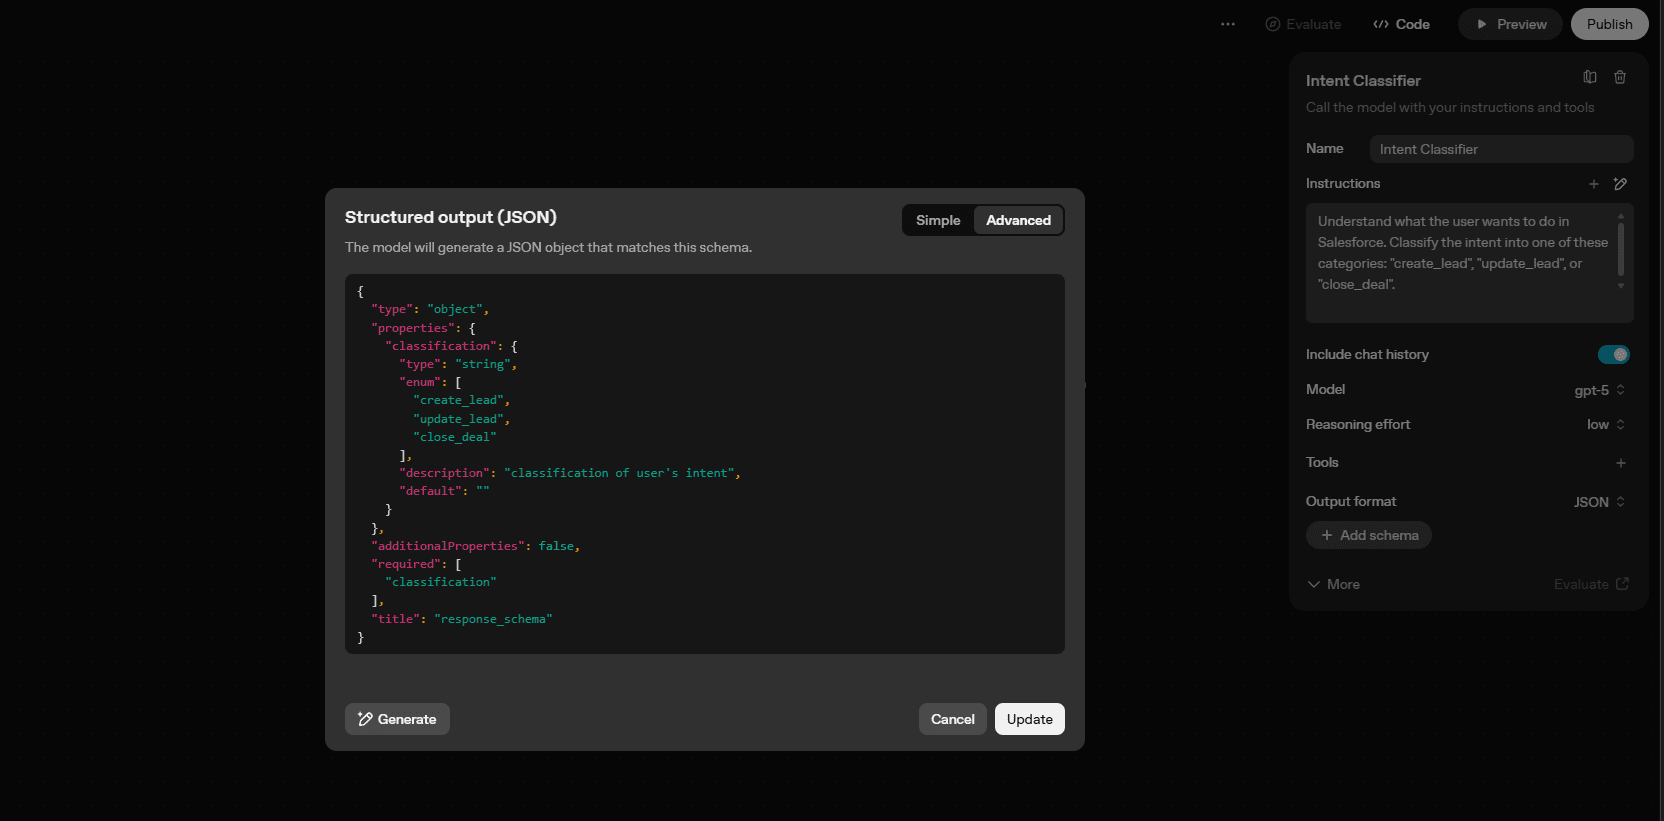
Understand what the user wants to do in Salesforce. Classify the intent into one of these categories: "create_lead", "update_lead", or "close_deal".
Change the Output format to JSON, then open Advanced Settings → JSON Schema and paste this schema:
{
  "type": "object",
  "properties": {
    "classification": {
      "type": "string",
      "enum": [
        "create_lead",
        "update_lead",
        "close_deal"
      ],
      "description": "classification of user's intent",
      "default": ""
    }
  },
  "additionalProperties": false,
  "required": [
    "classification"
  ],
  "title": "response_schema"
}
Update the schema and connect the Fail output of the GuardRails node to an End node.
Step 3: Add Logic Routing
We’ll now decide where each request should go depending on the classification output.
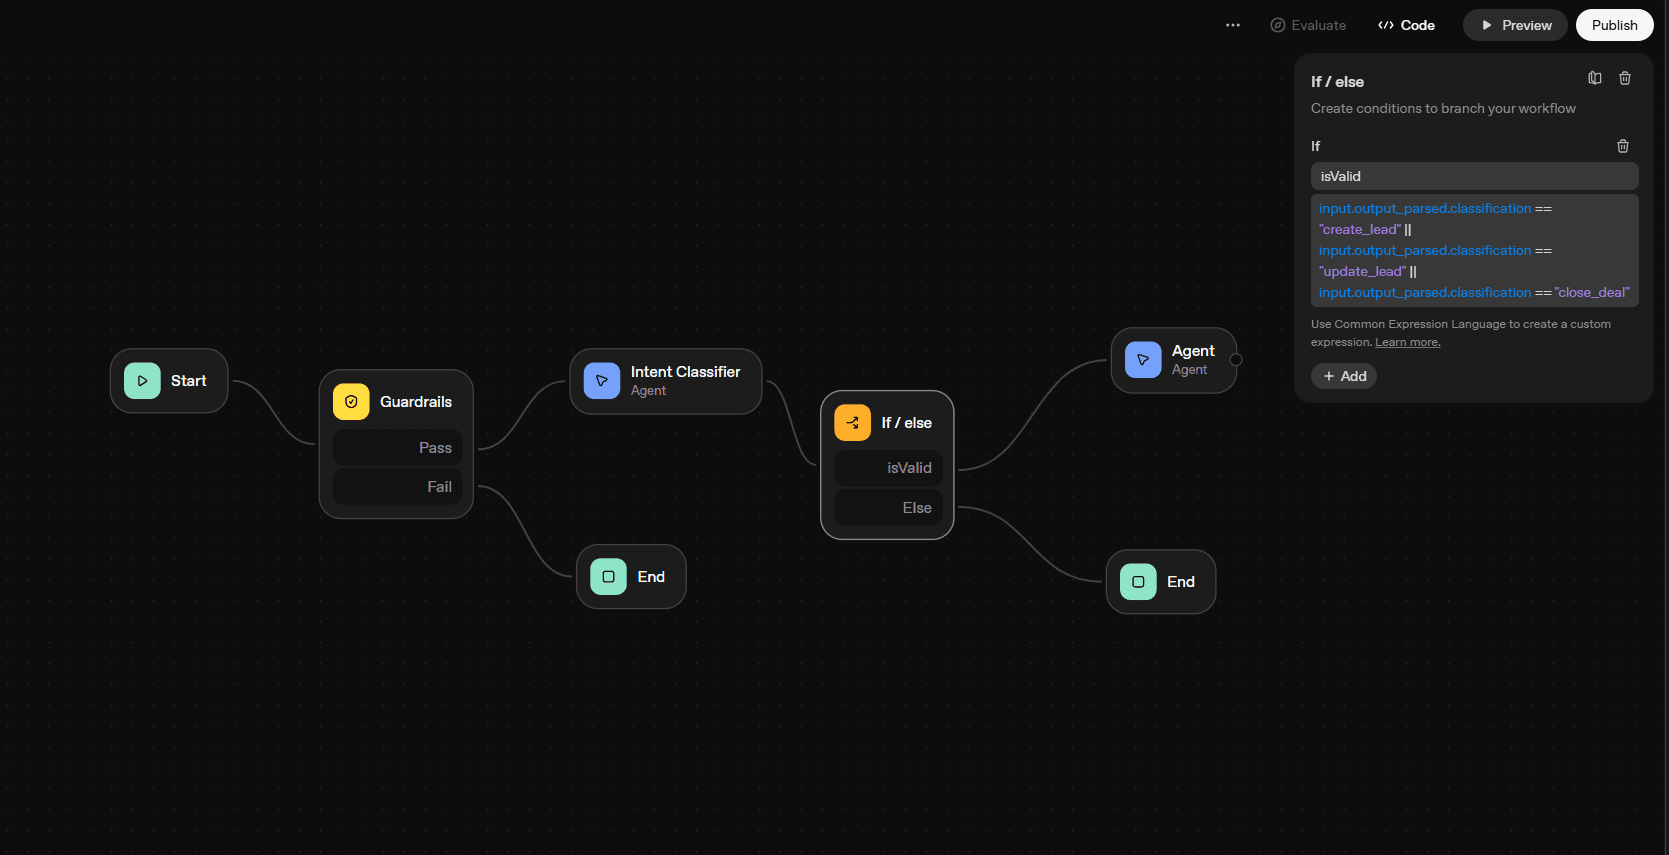
Drag an If/Else node and connect it to the Intent Classifier, and write the Case name as “isValid”
In the expression field, paste:
input.output_parsed.classification == "create_lead" ||
input.output_parsed.classification == "update_lead" ||
input.output_parsed.classification == "close_deal"
Connect the Else output to the End node so unrecognized intents terminate safely.
Step 4: Connect Salesforce Agent Node
Finally, connect the “If/Else” node to your Salesforce Agent node. In the Salesforce node’s configuration, update the instruction as:
You are a Salesforce CRM assistant. Perform the user’s intended action in Salesforce
based on this classification: {{input.output_parsed.classification}}.
Use the following user input to complete the task: {{workflow.input_as_text}}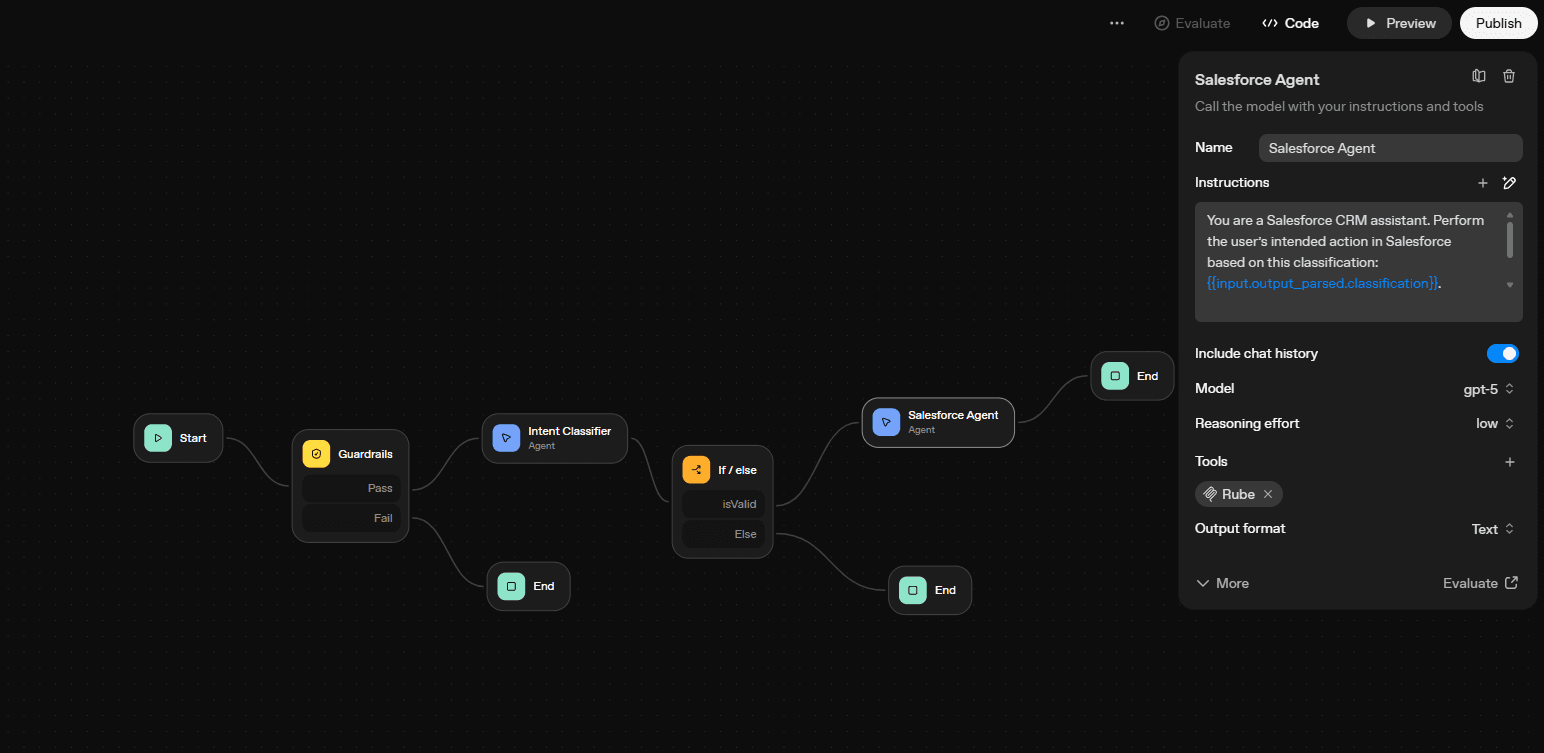
That’s it, you’ve built a Salesforce-specific, guard-railed workflow that can understand user goals, route them intelligently, and perform the right CRM operation securely.
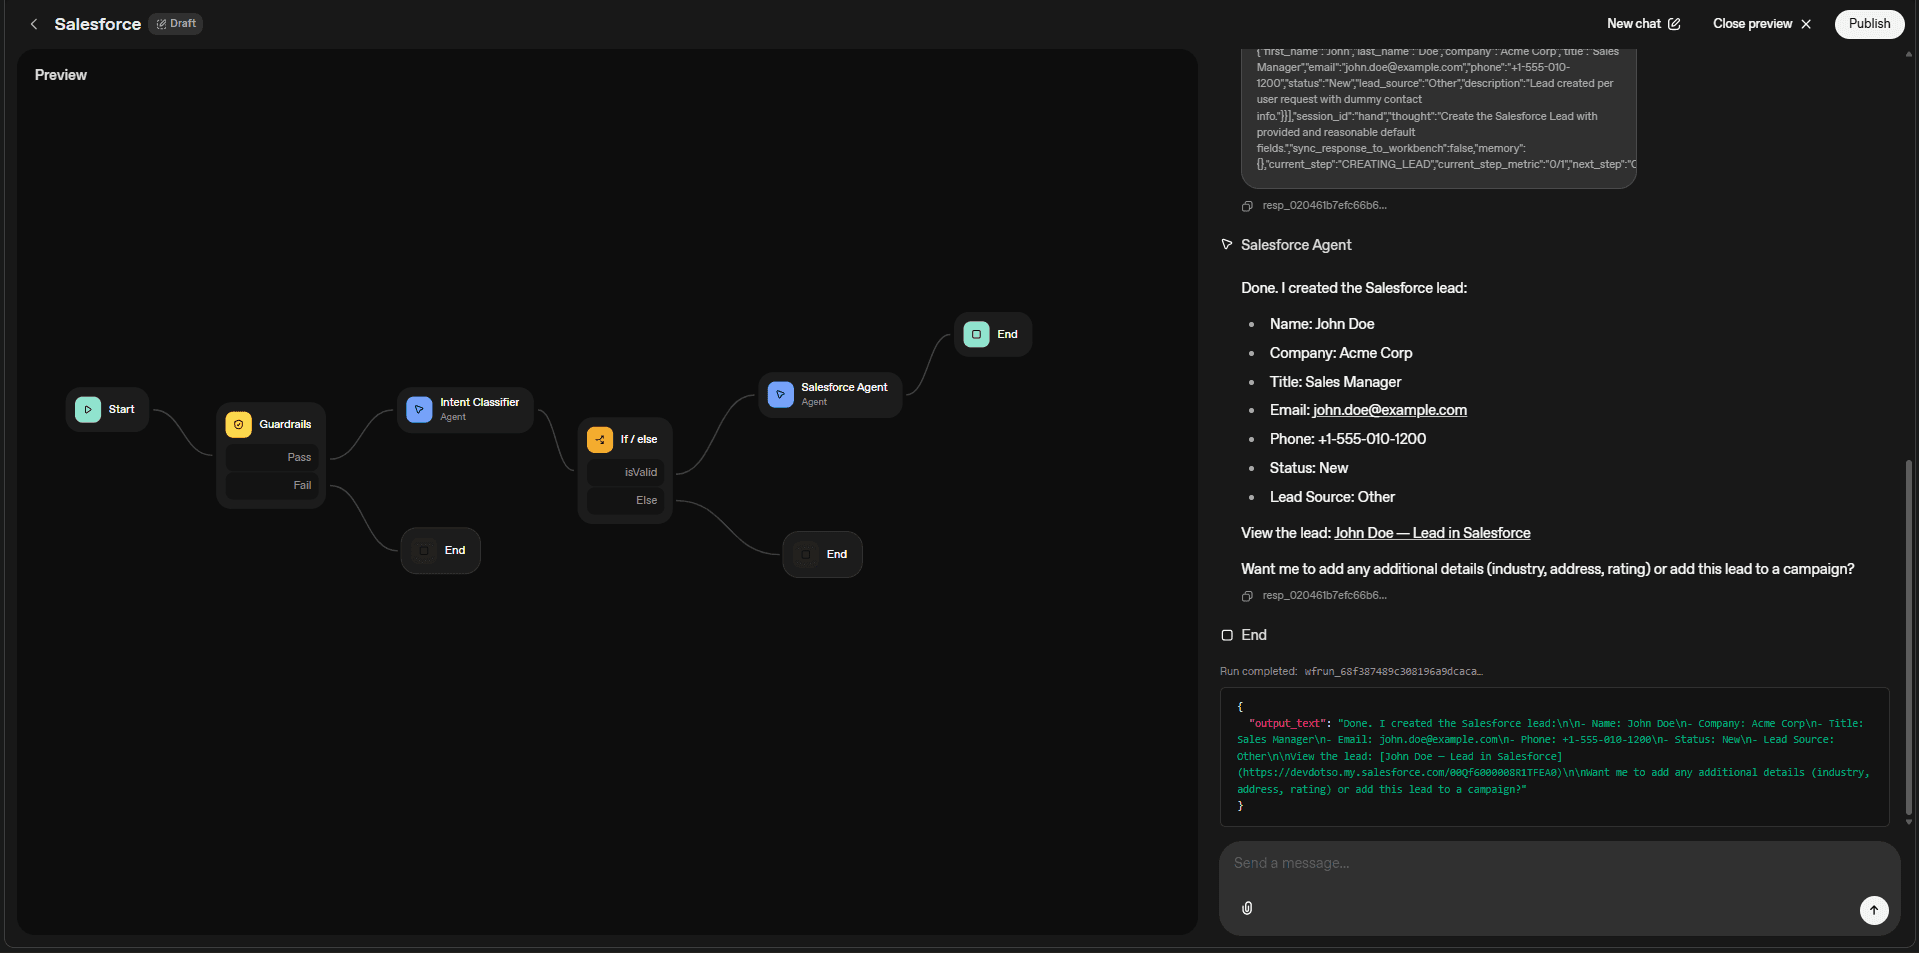
An Example Interaction
Click on the Preview button in the top-right corner of the canvas. This will open a sidebar with a chat interface where you can test the workflow by typing in natural language inputs like:
Note: At the end, If in the Preview Panel, Rube doesn’t detect your Salesforce Account, you can pass the domain name in the chat and ask the agent to authorize you. Click on the generated URL and you can login with your salesforce account.
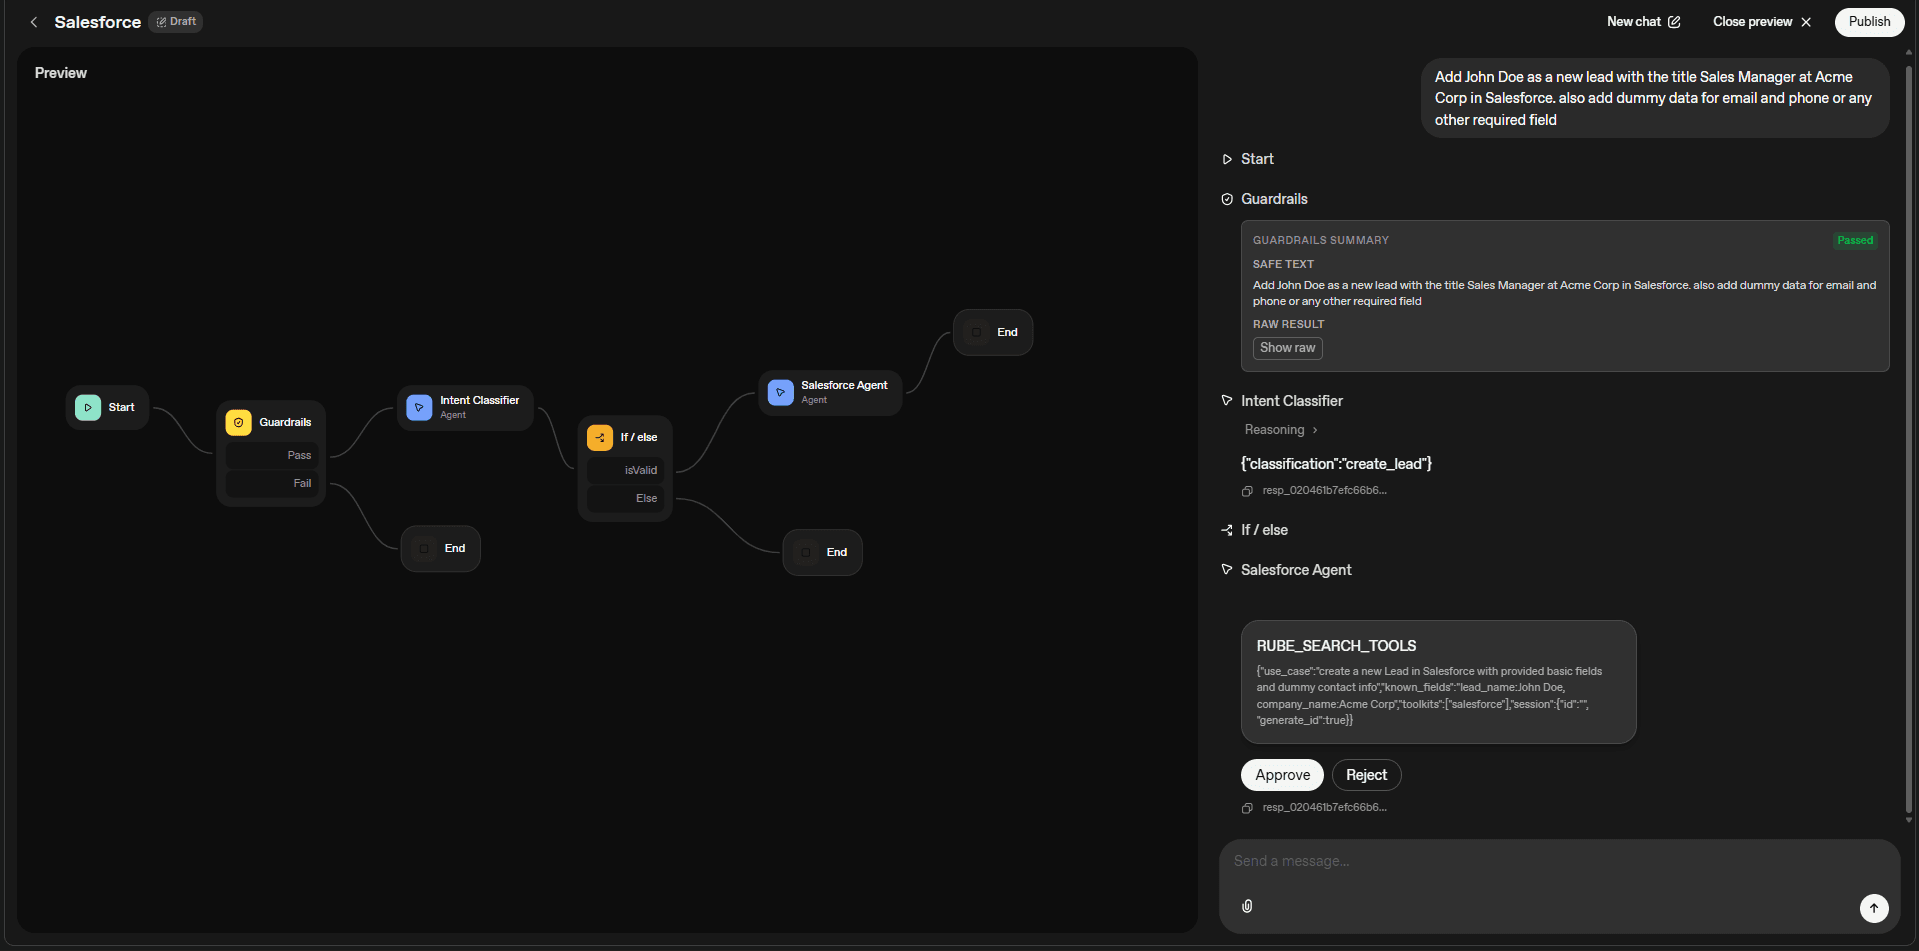
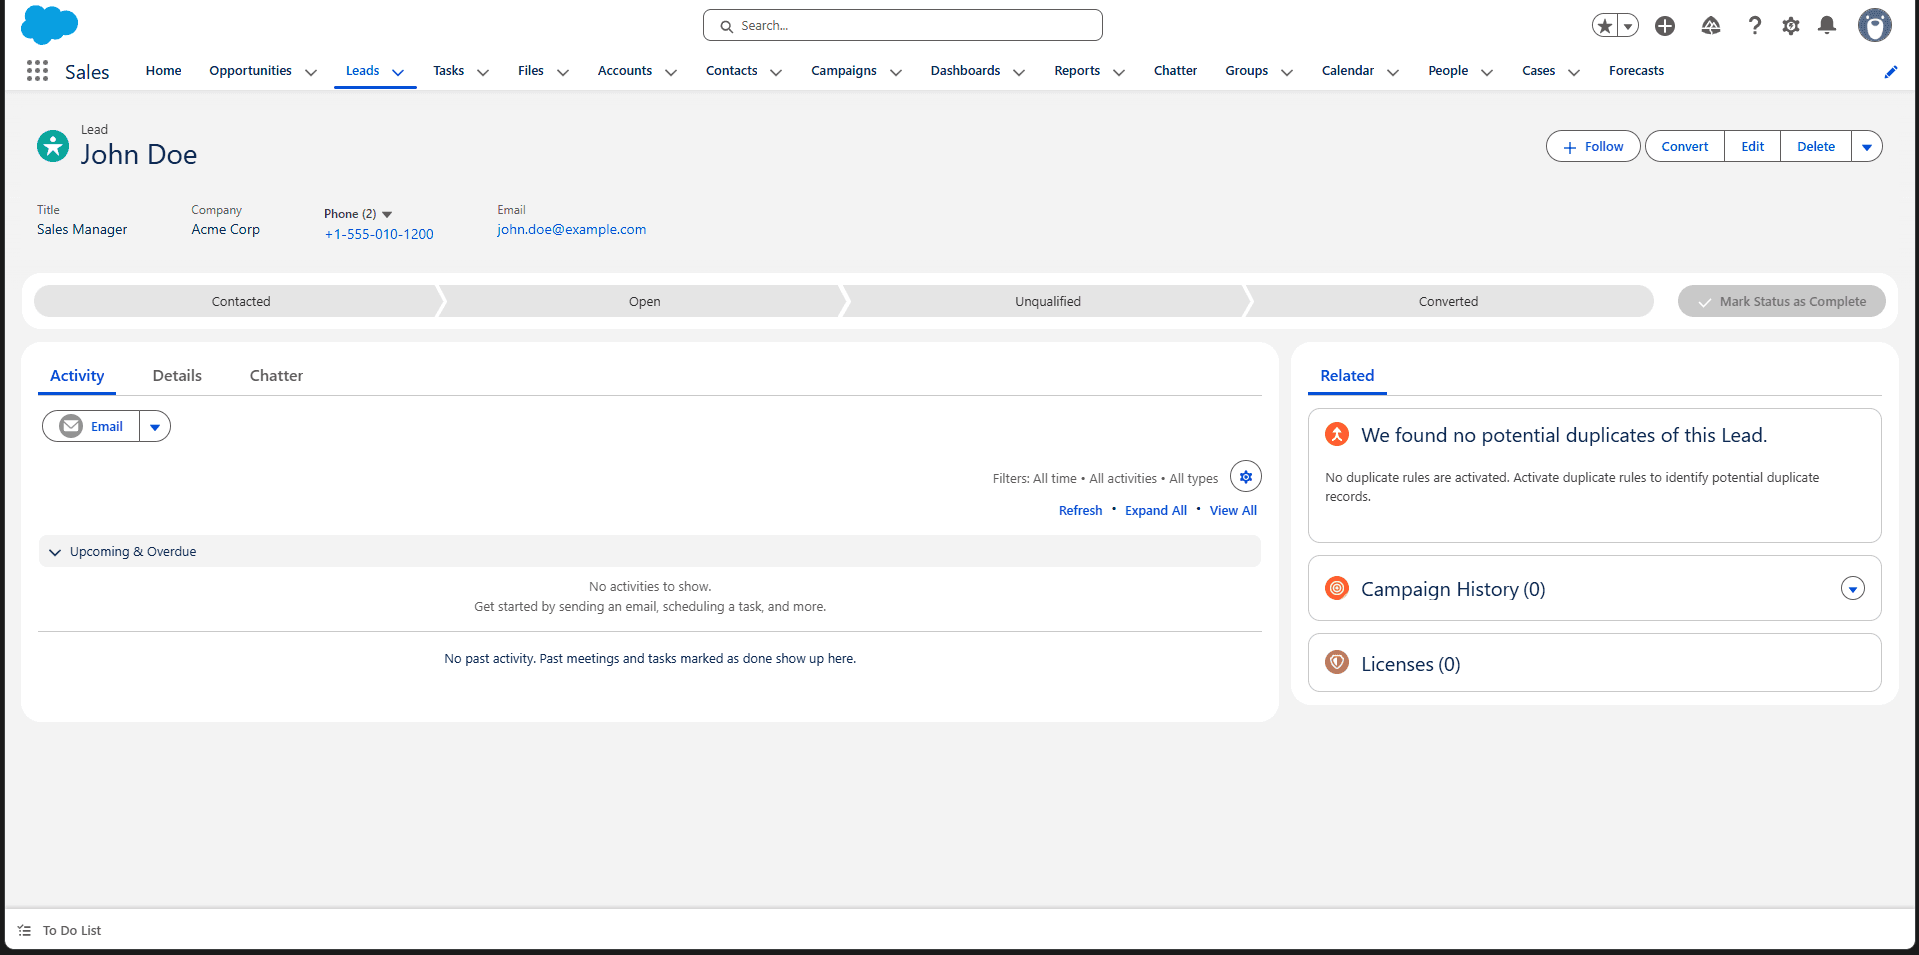
Add John Doe as a new lead with the title Sales Manager at Acme Corp.If everything is set up correctly, your agent should classify the intent, route it through the workflow, and create the record in Salesforce via Rube MCP. You’ll see the confirmation and logs right inside the preview panel.
What else can you build with this setup?
This setup is just the starting point. Once your Salesforce connection is stable, you can layer on additional automations to fit your sales workflow. While Agent Builder provides a powerful visual interface, developers who want full control can build these automations with code.
Our new developer's guide to 10 high-value sales & marketing workflows provides code-first blueprints for building advanced GTM agents from the ground up, including:
Multi-agent workflows: Combine Salesforce with Gmail or Slack to auto-send follow-ups when a lead status changes.
Deal tracking: Build a workflow that checks for deals stuck in the same stage for too long and notifies your team.
Weekly summaries: Have the agent generate and send a performance summary to your inbox every Monday morning.
Since the agent already runs through Rube MCP, connecting any new app is just a matter of enabling it in your Rube dashboard, no extra OAuth scopes or schema mapping.
Conclusion
Agent Builder with Rube MCP makes Salesforce automation accessible to everyone. You can build sophisticated CRM workflows without writing code, handle complex authentication automatically, and focus on the business logic that matters.
The combination of visual workflow design, built-in security, and seamless Salesforce integration creates a powerful platform for sales automation. Whether you're managing leads, updating opportunities, or orchestrating multi-step processes, this setup scales from simple tasks to complex enterprise workflows.
FAQs
1. What is an MCP Server, and how does it work with Agent Builder?
An MCP (Model Context Protocol) server is a bridge that allows AI agents to talk to external tools and services in a standardised way. Instead of writing one-off integrations for each API, MCP provides a consistent format for discovery, authentication, and communication.
In Agent Builder, you can add an MCP server (like Rube) as a “tool,” which your agent can then use to perform actions such as creating records, updating data, or fetching information from connected apps.
2. Why use Rube MCP instead of connecting Salesforce manually?
Rube MCP eliminates the need to handle OAuth flows, or manage API tokens. It provides a unified interface for 500+ apps, so you can connect multiple services through one integration. This saves development time and makes your workflows more maintainable.
3. How do I connect Salesforce to Agent Builder using Rube MCP?
First, add Rube MCP to Agent Builder using the URL https://rube.app/mcp and your API token from rube.app. Then, in Rube's interface, enable the Salesforce app and complete the OAuth flow for your Salesforce org. Your agent will then have access to Salesforce through Rube.
4. What can my AI agent do in Salesforce after integration?
Once connected, your agent can perform a range of CRM actions directly through Salesforce, without manual API calls.
Here are a few examples:
Create or update leads, contacts, and opportunities
Fetch deal details or account info on demand
Automate follow-ups or assign tasks to sales reps
Since everything runs through Rube MCP, you can keep adding more automations or apps to the same workflow without touching any backend code.