OpenAI's Agent Builder provides you with the most straightforward set of tools to build and deploy AI Agents with ease. It brings models, tools (including MCPs, Web Search, Sub Agents, etc.), and logic into a single visual workspace, allowing you to focus on what your agent should do instead of worrying about the underlying infrastructure.
In this guide, we'll build a CRM agent that can help you manage your contacts and deals in HubSpot CRM, so you can focus on the things that matter most to you. Before we begin, let’s understand what an Agent Builder is and why you would use one.
What is Agent Builder?
Agent Builder is a visual, no-code platform for designing, building, testing, and deploying AI workflows through an excellent drag-and-drop interface. There is a set of nodes included in the OpenAI Agent builder, including Agent, FileSearch, GuardRails, MCPs, Logical Nodes, and more. You can drag and drop these nodes on the canvas, configure them with the required inputs, and connect them with edges to create your own Agentic Workflow. All the nodes are designed to be used logically so that you can make a complex Agentic workflow with ease.
Check out this blog post on how to build agents with Agent Builder.
You can also use the ChatKit Widgets to output/display the results in a widget and let your users interact with it to get the results. You can learn more about the complete Agent Kit here: OpenAI Agent Kit, which describes building and deploying AI Agents from scratch. You can also play with the templates provided by OpenAI to get started with the Agent Builder.
They also provide a comprehensive Evaluation Tool to test the performance of your Agent and identify bottlenecks, so you don't need anything further to test your workflows.
Rube MCP
Let's say you use a lot of MCPs in your day-to-day workflow and connect all these MCPs directly with your client; they will quickly eat up the context window size. Rube solves this by providing a single point of entry for all your MCPs, allowing you to connect to Rube, which will handle the authentication and API calls for you.
It is a universal MCP Server built on top of Composio's existing toolkit infrastructure. Instead of writing custom OAuth flows for each MCP or managing API keys, you can use Rube as a unified MCP interface for more than 500 apps, including HubSpot, Salesforce, Google Sheets, Airtable, Notion, etc., which work seamlessly with the Agent Builder and most other MCP Clients.
You can ask Rube to authenticate you with the app (if your app works on OAuth2); it'll handle the OAuth flow for you and get the access token. If your app works on an API key, you can just provide the API key to Rube, and it'll use it to make the API calls for you.
How to Add HubSpot to Agent Builder
Before we start building our CRM agent, we need to have a few things in place:
Step 1: Set up Rube MCP
Go to Rube. Scroll down and click “Install Rube Anywhere”
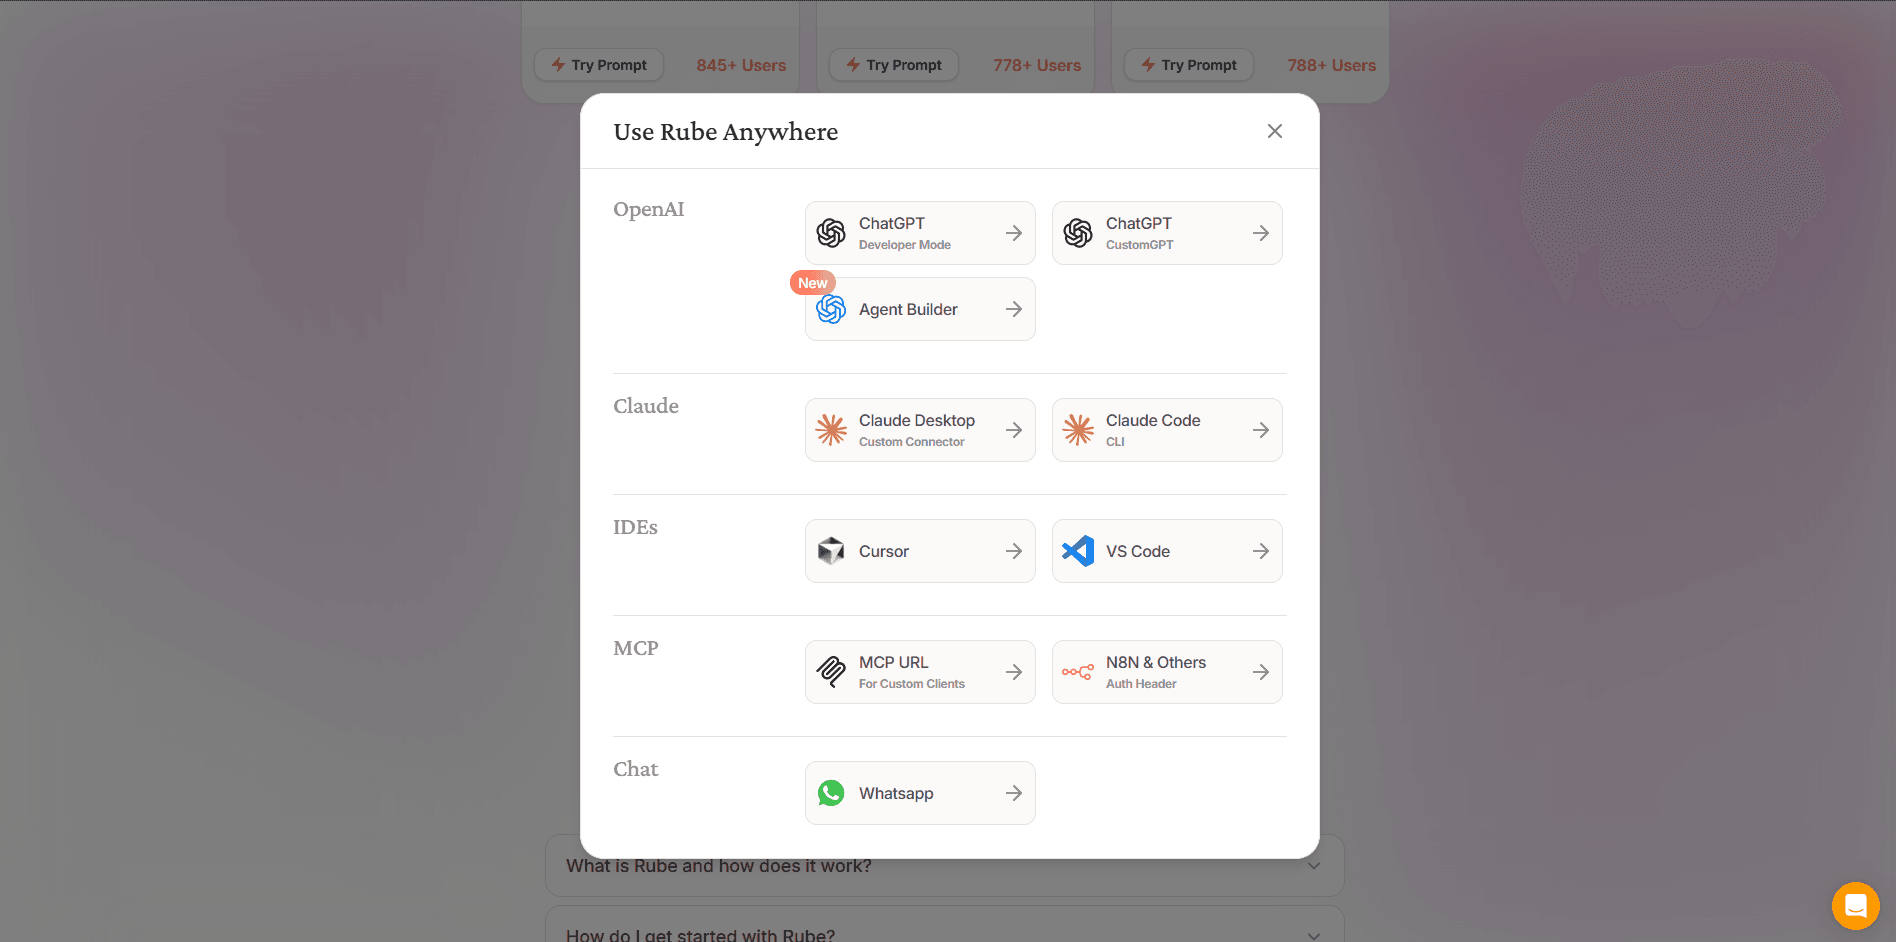
In the modal, select Agent Builder. Copy the MCP URL. We’ll paste this into Agent Builder soon.
Scroll a little further and hit the "Generate Token" button to generate the access token.
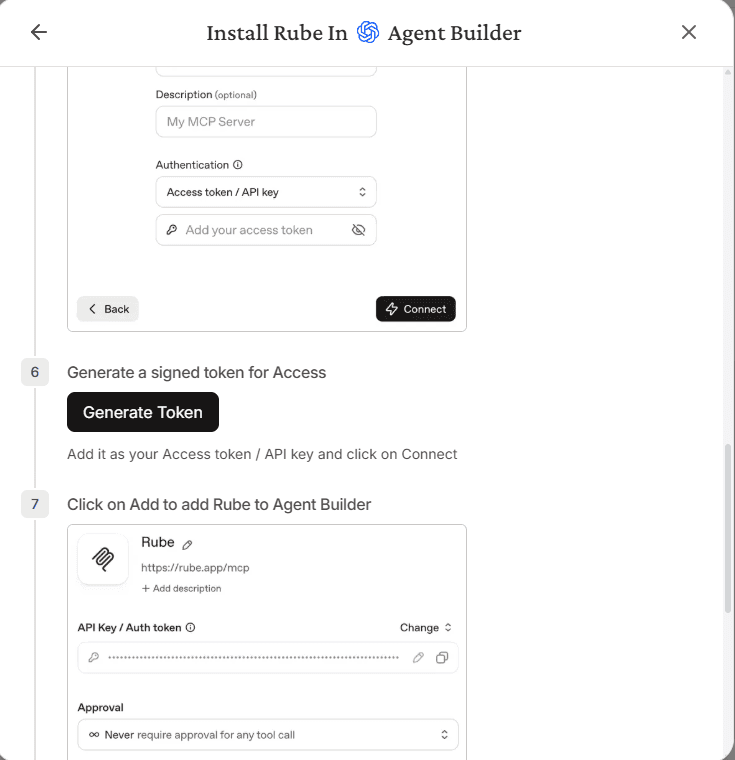
Copy that token; we’ll use it to authorise Agent Builder.
Step 2: Connect Rube MCP inside Agent Builder
Open Agent Builder and create a new workflow by clicking “Create”.
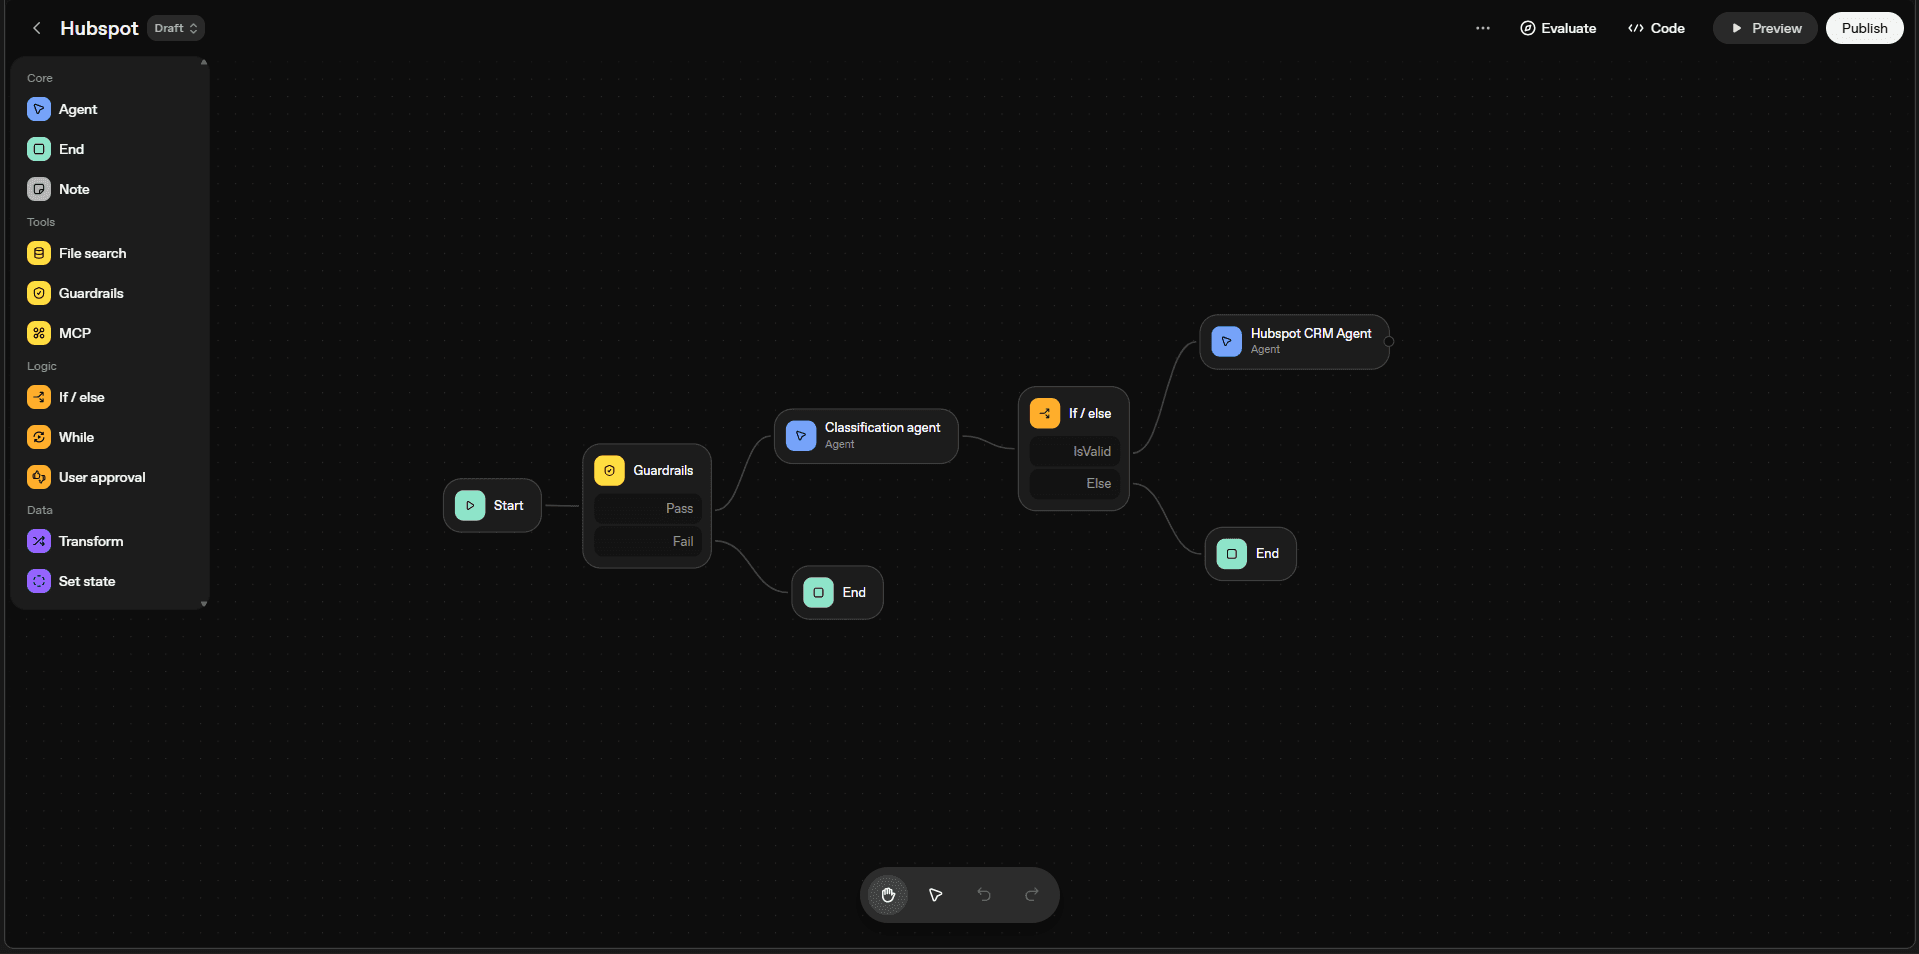
It will redirect you to a new page with a canvas and a toolbar on the top left. There are two nodes on the canvas: "Start" and "Agent." We'll use the same Agent node later for our multi-agent workflow. To delete the edge between both nodes, click on the edge and hit the delete icon on the configuration panel.

Click the "Agent" node, name the agent "HubSpot CRM Agent," and give the agent instructions as below:
You are a CRM agent that can help me manage my contacts and deals in HubSpot CRM.Note: We'll be editing this node later with the inputs for adding guardrails and logical nodes to the agent.
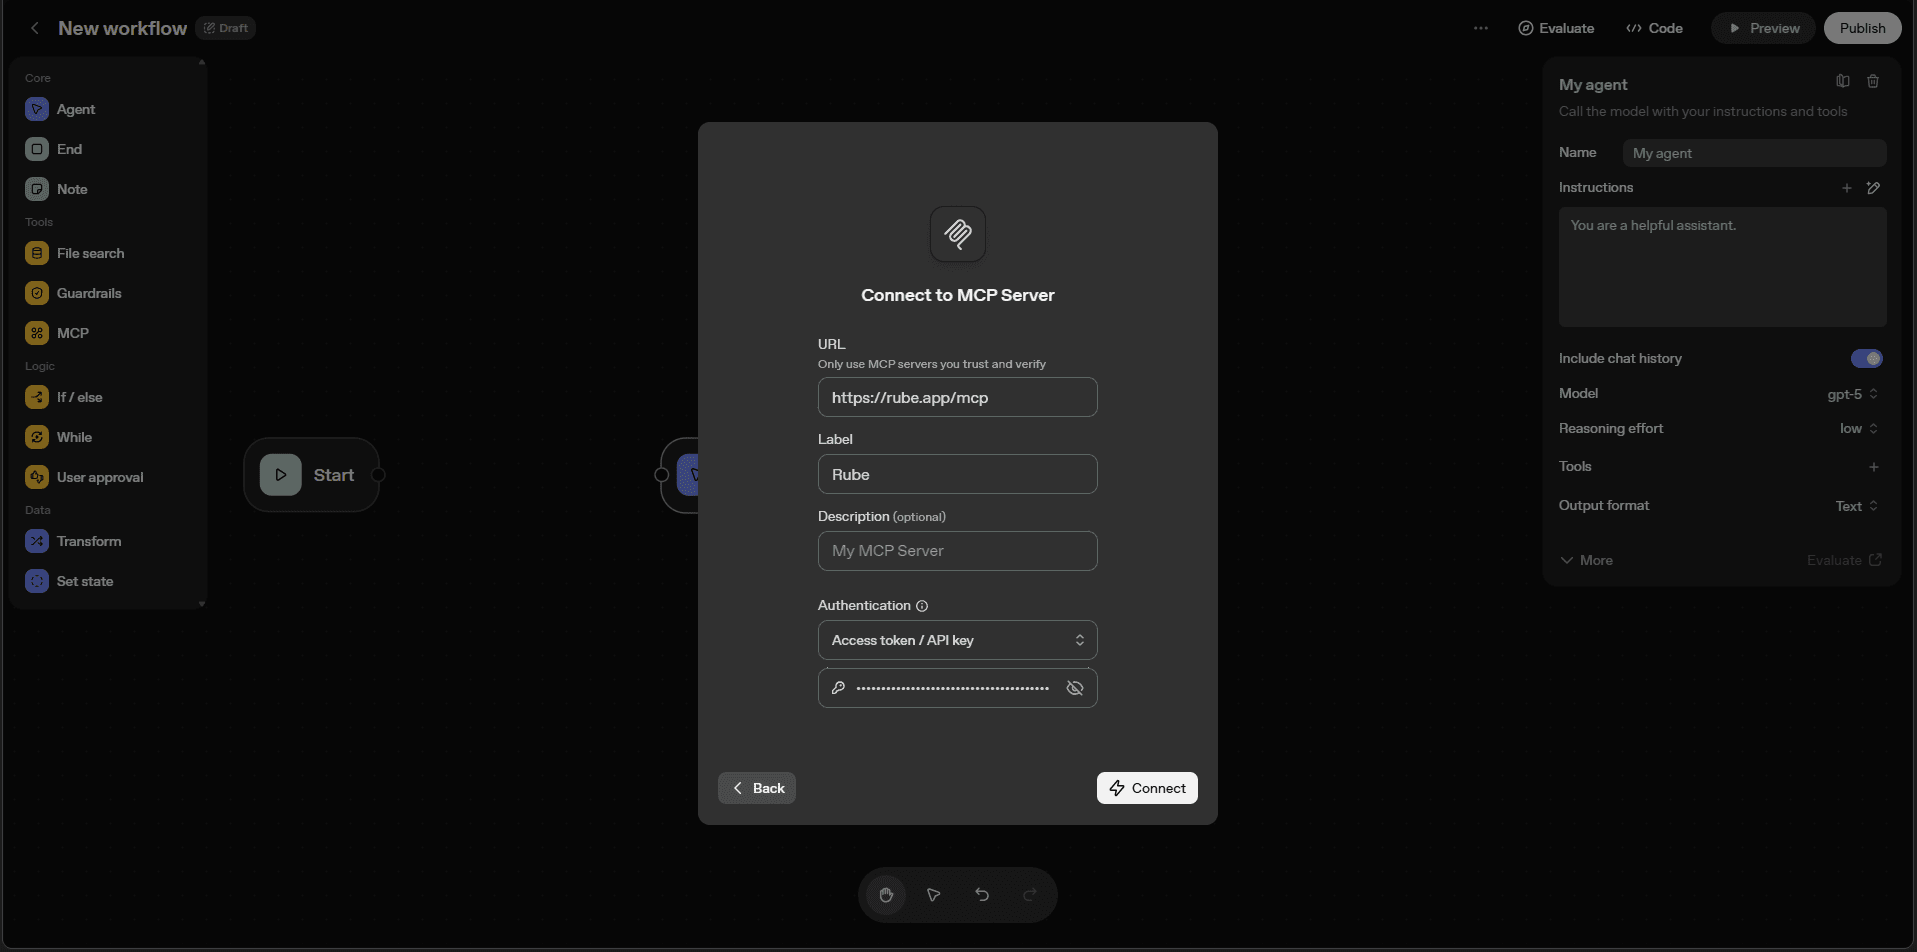
Click on the "+" icon beside Tools in the agent node's configuration panel. It will open a dropdown; select "MCP Server" → click the "+ Server" button in the dialogue that appears.
Paste the MCP URL you copied from Rube, and in the Authorisation field, choose Access token / API Key and paste the token you generated.
Paste the MCP URL you copied from Rube, and in the Authorisation field, choose Access token / API Key and paste the token you generated.
Give the server a label like “Rube” and hit Connect
We’ve now successfully connected HubSpot (via Rube MCP) to Agent Builder.
Building a Secure Workflow Using Agent Builder
Now that we have an Agent Node in our workflow, we need to add some guardrails and logical nodes to ensure users don't jailbreak the agent through prompt injection or other malicious attacks.
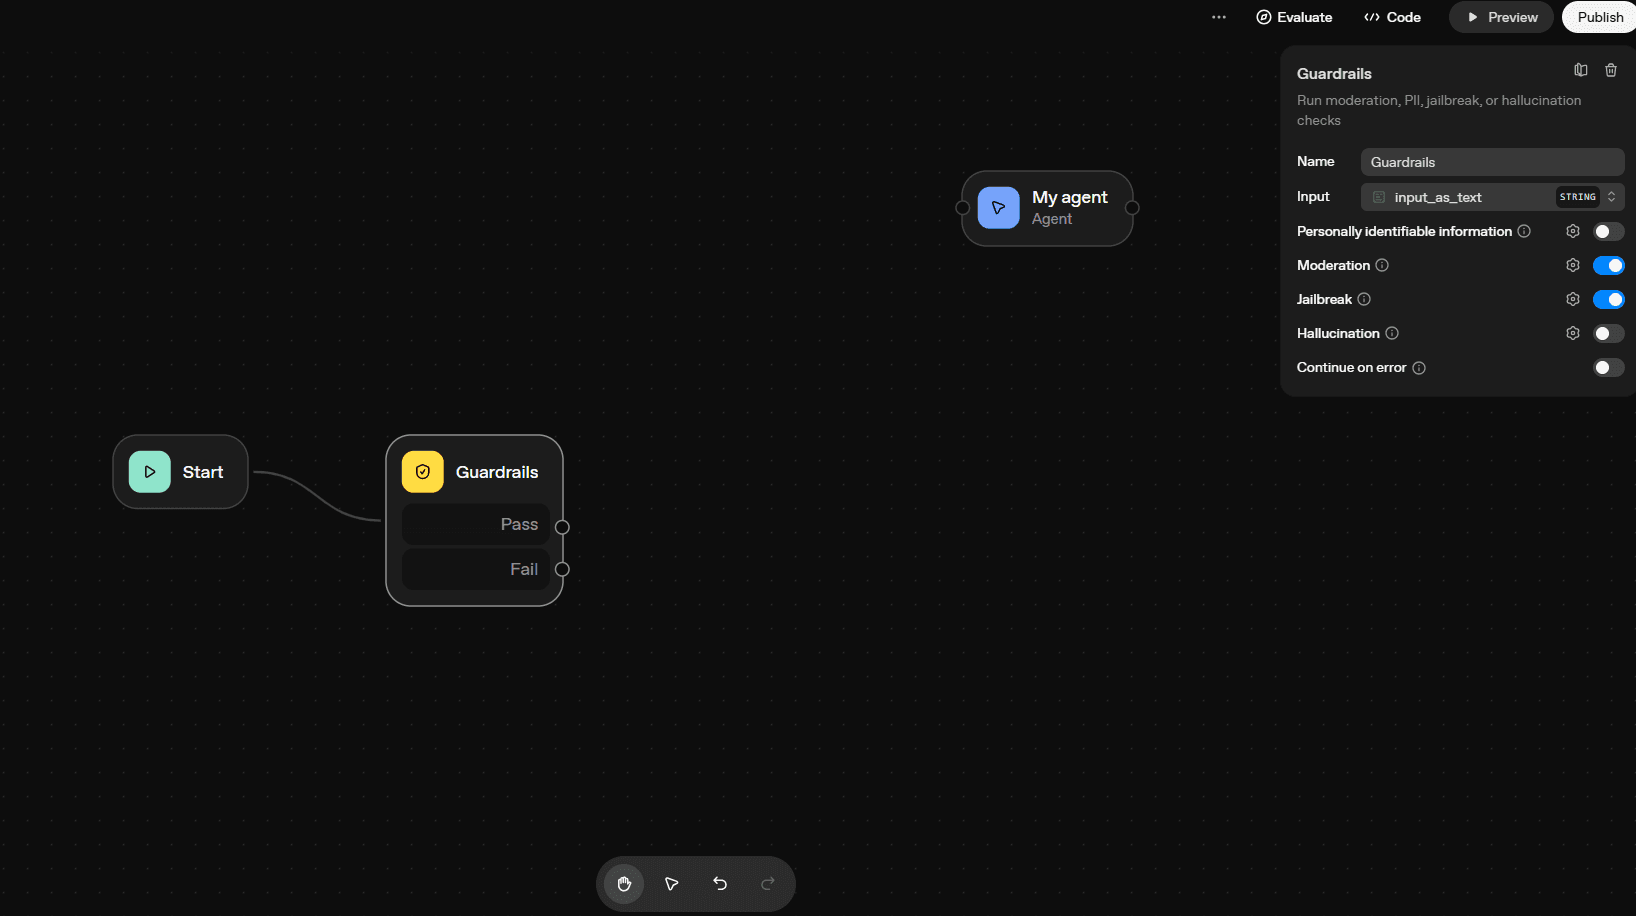
Step 1: Adding GuardRails
Select the GuardRails node from the toolbar and drag it onto the canvas. Connect it with the Start node, and in the configuration panel, give GuardRails a label of "GuardRails.” Enable "Jailbreak" to detect and prevent the agent from being used for malicious purposes.
Step 2: Add Intent Classification
Now, create a Classification Agent for the workflow to classify the user's intent and route the request to the appropriate node. For this guide, we'll focus on creating a simple classification agent to classify the user's intent to create, update, or delete a contact and route the request to the appropriate node.
Drag and drop the Agent node from the toolbar, connect it to the "Pass" option of the Guardrails node, and in the configuration panel, label the Agent as "Classification Agent." Give the agent instructions as below:
Classify the user’s intent into one of the following categories: "create_contact", "update_contact", or "delete_contact".For the output format, select "JSON," and in the JSON schema field, add the following schema by going to Advanced Settings:
{
  "type": "object",
  "properties": {
    "classification": {
      "type": "string",
      "enum": [
        "create_contact",
        "remove_contact",
        "update_contact"
      ],
      "description": "classification of user intent",
      "default": ""
    }
  },
  "additionalProperties": false,
  "required": [
    "classification"
  ],
  "title": "response_schema"
}
Update the schema by clicking the "Update" button in Advanced Settings. For the "Fail" option, we will use the "End" node to terminate the workflow, ensuring that if the GuardRails node fails, the workflow will conclude.
Step 3: Route Logic
Now, we need to use the output variables from the Classification Agent in the next node, which will be a logical node to route the request to the appropriate node based on the user's intent.
Drag and drop the "If/else" node from the toolbar, connect it with the "Classification Agent" node, and in the configuration panel, give a CaseName to the logic: "isValid." Then pass this expression in the next input field:
input.output_parsed.classification == "create_contact" || input.output_parsed.classification == "update_contact" || input.output_parsed.classification == "delete_contact"For the "Else" option, connect it with the "End" node to end the workflow.

Now, we need to use the "HubSpot CRM Agent" we created at the start of the workflow and connect it with the "isValid" option of the "If/else" node.
Click on the "HubSpot CRM Agent" node, and in the configuration panel, give the agent instructions as follows:
You are a HubSpot CRM assistant, perform user action based on user's intention: {{input.output_parsed.classification}}. User input: {{workflow.input_as_text}}
And that's it, you have a secured workflow that can classify the user's intent and route the request to the appropriate node based on the user's intention.
Testing the workflow
Click on the "Preview" button in the top right corner of the canvas. It will open a sidebar with a chat interface. You can test the workflow by typing in the chat input and seeing the results.
Evaluating the performance and publishing the workflow
To determine how your workflow is performing, you can use the "Evaluation" tool in the top right corner of the canvas by clicking the "Evaluate" button.

For deploying the agent, you can click the "Publish" button, give a name to your workflow, and click on the "Publish" button to deploy the workflow.

Taking things further with Chatkit
You can add more nodes to the workflow to enhance its robustness and further secure it according to your needs. You can also create ChatKit widgets to display the results and let your users interact with them.
OpenAI also provides you with the feature of publishing apps to OpenAI, which other users can access to use your workflow. You can learn about it here: ChatKit Overview, ChatKit Widgets, Custom ChatKit, Voice Agents (speech-to-speech architecture)
Conclusion
In this guide, we built a HubSpot CRM Agent using OpenAI’s Agent Builder, integrating it with Rube MCP and adding guardrails, logical nodes, and intent classification to make the workflow secure and efficient. In practice, when I was working with the MCP node, it became quite complex to parse the desired payload requests from the agents across MCPs for their schemas. Transform nodes can help stabilise the input, but using them can also make the workflow significantly more complex.
Nevertheless, Agent Builders are influential because they let you design complex AI workflows visually, combine multiple tools and APIs, and focus on the logic of your agents rather than the underlying infrastructure. They make it easier to automate repetitive tasks, connect with various services, and quickly iterate on your agent’s behaviour without writing a lot of boilerplate code.
What is OpenAI's Agent Builder, and how can I use it?
Answer: OpenAI's Agent Builder is a visual, no-code platform that allows you to design, build, test, and deploy AI workflows using a drag-and-drop interface. You can create workflows by connecting various nodes, such as agents, tools (like MCPs, Web Search, etc.), and logic nodes. It simplifies building AI agents by allowing you to focus on the logic and functionality rather than the underlying infrastructure. You can use it to create agents for tasks like managing CRM contacts, automating workflows, and more.
2. How do I connect Rube MCP to Agent Builder?
Answer: To connect Rube MCP to Agent Builder, follow these steps:
Go to Rube and click “Install Rube Anywhere.”
Select Agent Builder and copy the MCP URL.
Generate an access token by clicking the "Generate Token" button.
In Agent Builder, create a new workflow and click on the "+" icon beside Tools in the agent node's configuration panel.
Select "MCP Server" and click the "+ Server" button.
Paste the MCP URL and the access token in the respective fields, and label the server (e.g., "Rube").
Click "Connect" to complete the setup.
3. How do I add guardrails to my workflow in Agent Builder?
Answer: To add guardrails to your workflow in Agent Builder:
Drag the GuardRails node from the toolbar onto the canvas.
Connect it to the Start node.
In the configuration panel, give the GuardRails node a label (e.g., "GuardRails").
Enable features like "Jailbreak" to detect and prevent malicious use of the agent.
Configure other guardrail options like PII detection, moderation, and hallucination checks as needed.
4. How can I test and deploy my workflow created with Agent Builder?
Answer: To test your workflow:
Click the "Preview" button in the top right corner of the canvas.
Use the chat interface that appears to interact with your workflow and see the results.
To deploy your workflow:
Click the "Publish" button to create a new version of your workflow.
Once published, you can embed the workflow into your product using ChatKit or download the SDK code to run it yourself.
For ChatKit, follow the quickstart guide and pass in your workflow ID to embed the workflow into your application.
Is my HubSpot data safe?
Answer: Yes, Rube's HubSpot integration, built on top of Composio's integration infrastructure, ensures that your data is safe and secure. Composio is SOC 2 Type 2 compliant. Check Composio's trust centre for more details.