Workday OAuth API Client + Composio Integration Guide
A step-by-step walkthrough for registering a Workday API Client, configuring OAuth 2.0, and connecting it to Composio using your own credentials.
NOTE: Workday recommends an Integration System User (ISU) with the right domain permissions to use API clients. If your Workday admin hasn't set this up yet, see the Additional: ISU & Security Group Setup section at the bottom of this guide.
Overview
This guide walks you through the complete process of registering a Workday API Client (OAuth 2.0 app ) in Workday and connecting it to Composio using your own developer credentials. By the end you will have a registered Workday API client, a Composio Auth Config backed by those credentials, and a live ACTIVE connected account ready for agents or automations.
What You Will Set Up:
Search for ‘Register API Client’ in Workday and open the task.
Fill in the API Client registration form (name, grant type, redirect URI, scopes).
Copy the Client ID, Client Secret, Token Endpoint, and Authorization Endpoint.
Create a Workday Auth Config in Composio with OAUTH2.
Paste credentials and tenant-specific URLs into the Composio form.
Connect a user account by entering Workday tenant URLs in the Composio connect flow.
Verify the connection shows ACTIVE in Composio.
PREREQUISITE
You need an active Workday tenant with administrator access to run the ‘Register API Client’ task. You also need access to your Composio project. Have your Workday tenant name ready (e.g., glean_dpt1) — it appears in the Workday URLs and is required when connecting the account in Composio.
Search for ‘Register API Client’ in Workday
Sign in to your Workday tenant. In the search bar at the top of the page, type Register API Client and press Enter. Workday’s global search will return matching tasks and reports.
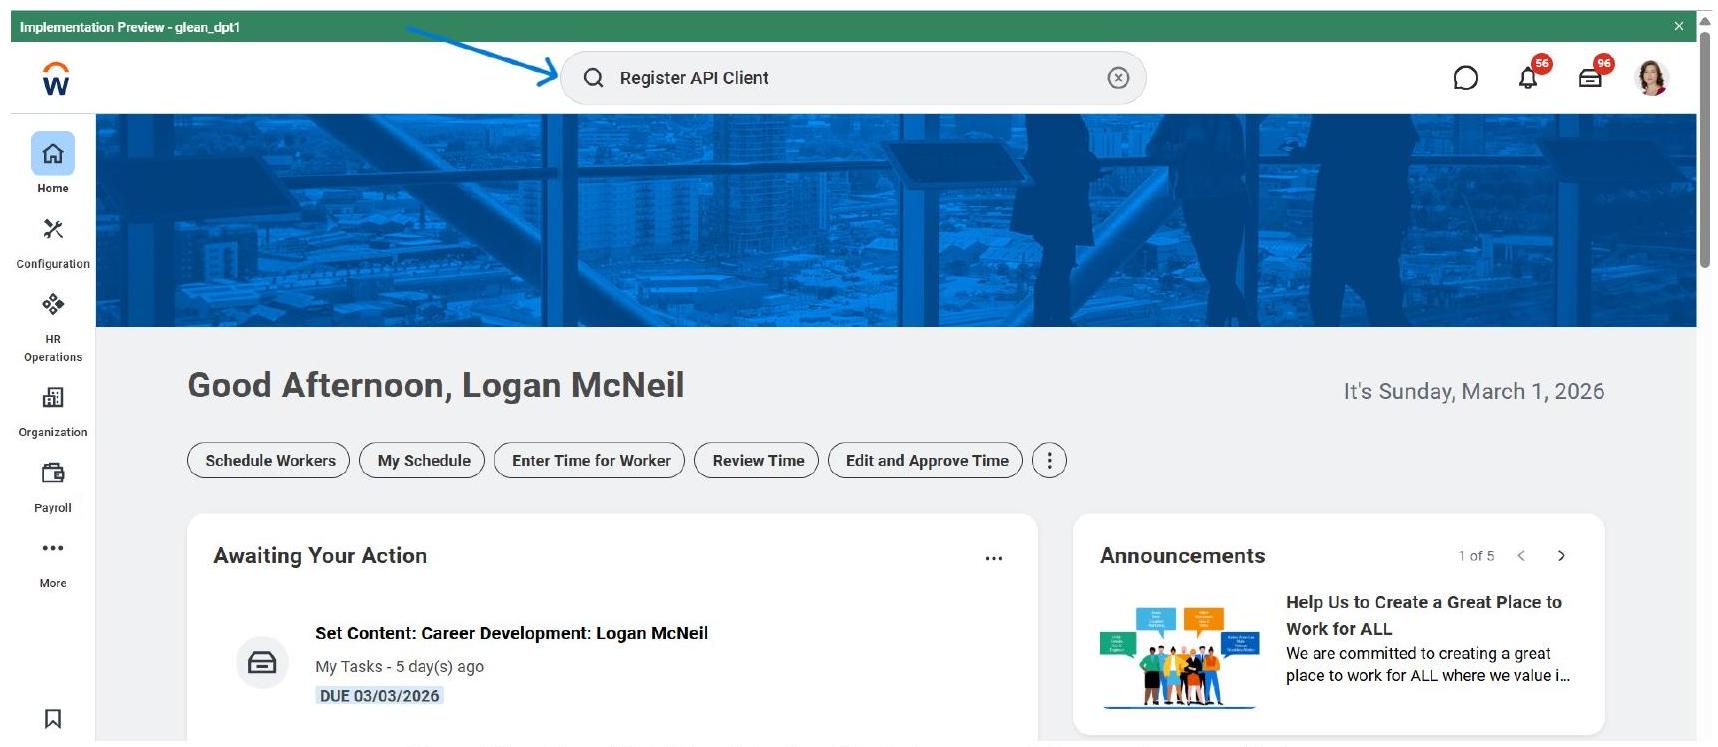
Type ‘Register API Client’ in the Workday search bar and press Enter.
NOTE
The search bar is available from any page in Workday. Make sure you are logged in with an account that has administrator or integration security permissions - otherwise the ‘Register API Client’ task may not appear in results.
Open the ‘Register API Client’ Task
In the search results, under the Tasks and Reports section, click Register API Client. You will see three related tasks - choose the first one simply labelled ‘Register API Client’ (not the Integrations variant or the External OAuth Client).
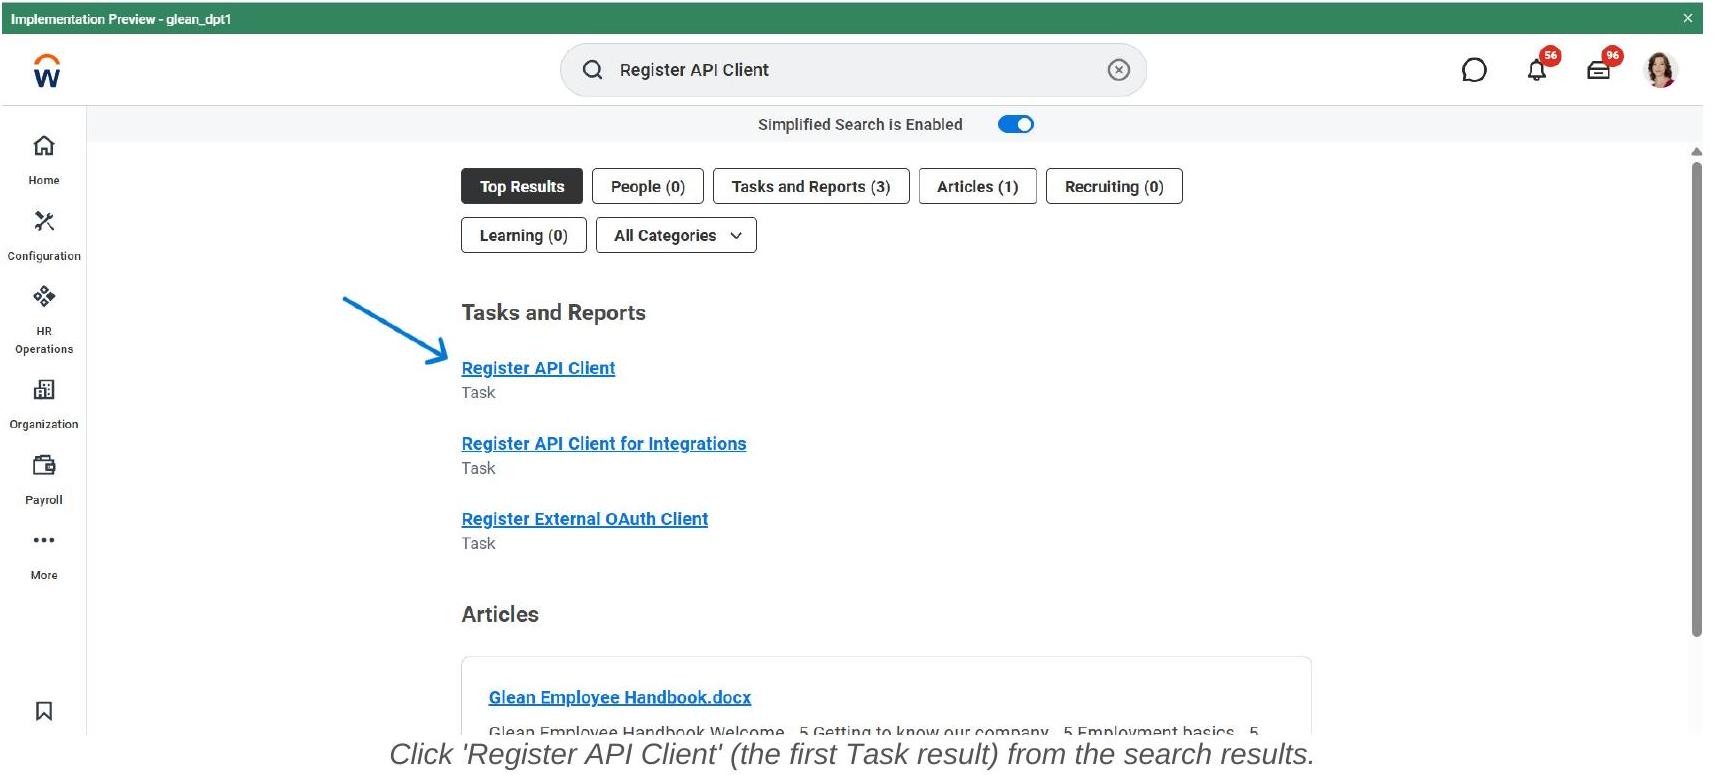
The three tasks you may see and what they are for:
Fill In the API Client Registration Form - Part 1
The Register API Client form opens. Fill in the required fields as follows:
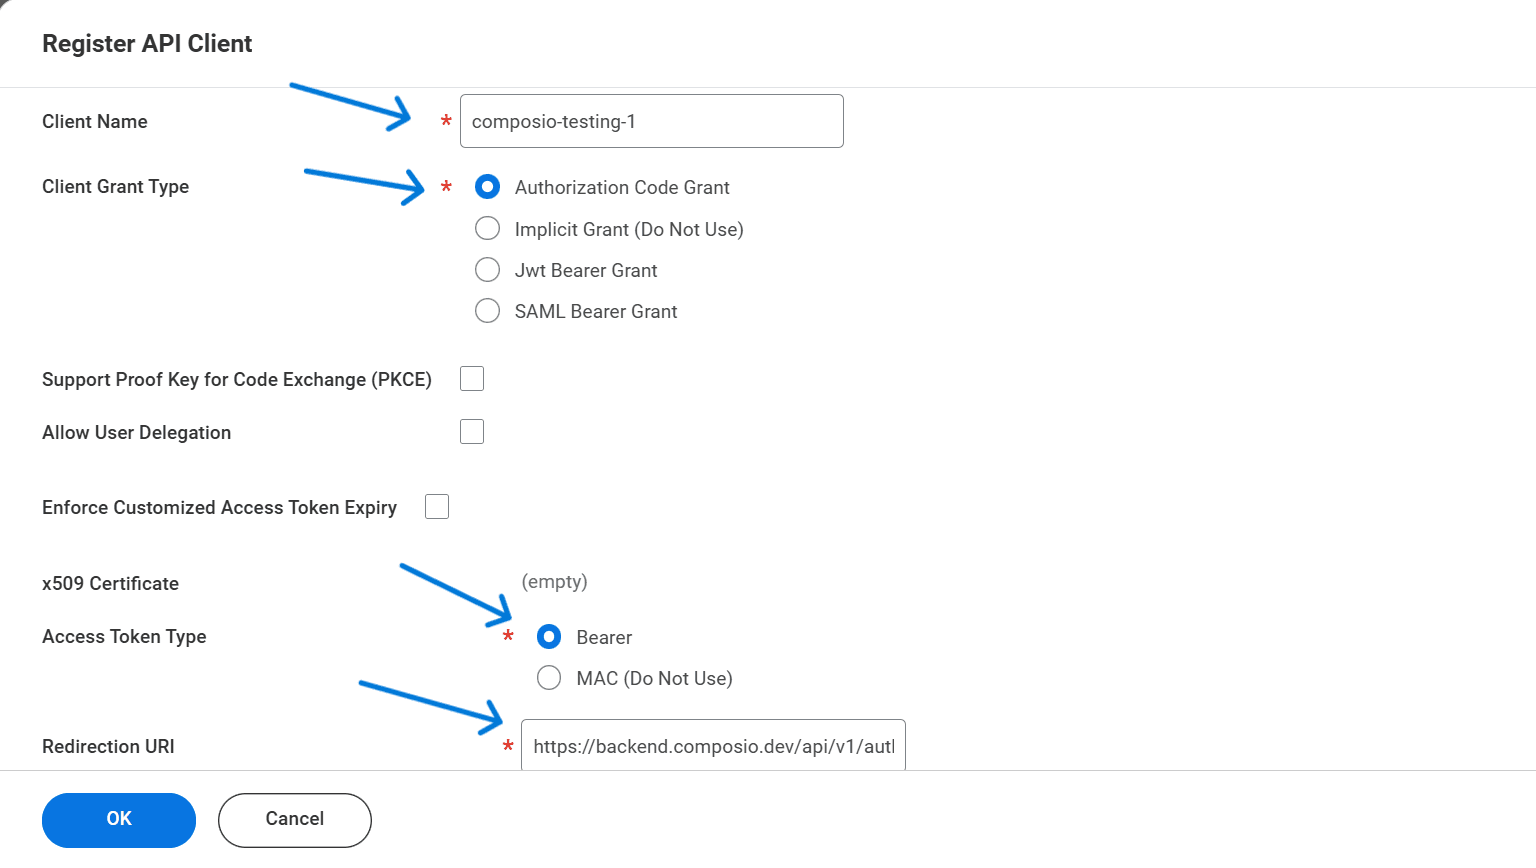
The Register API Client form - set Client Name, Grant Type, Access Token Type, and Redirect URI.
IMPORTANT - Redirect URI
The Redirection URI must match exactly what Composio sends during the OAuth flow. Copy it from your Composio Auth Config form to be sure. A single character mismatch will cause the connection to fail with a redirect_uri_mismatch error.
Fill In the Registration Form - Part 2 (Scopes & Options)
Scroll down in the same form to configure token settings and functional scopes.
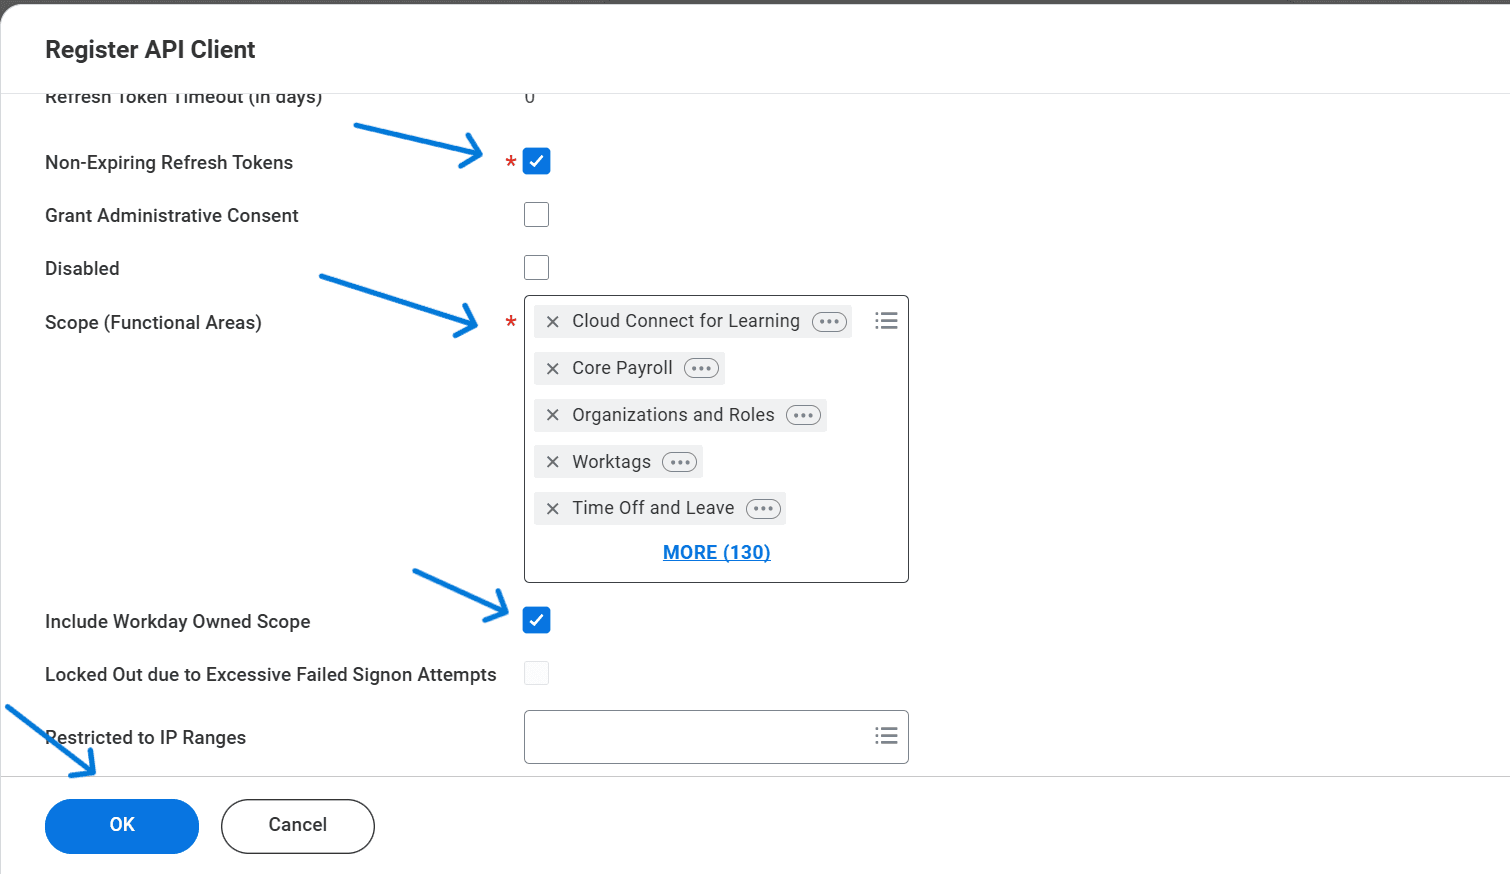
Scroll down: enable Non-Expiring Refresh Tokens, set Scopes, and check Include Workday Owned Scope.
After completing all fields, click OK to register the client.
Review the Registered Client Summary
After clicking OK, Workday displays the confirmation summary of your registered API client. Verify the key settings match what you entered.
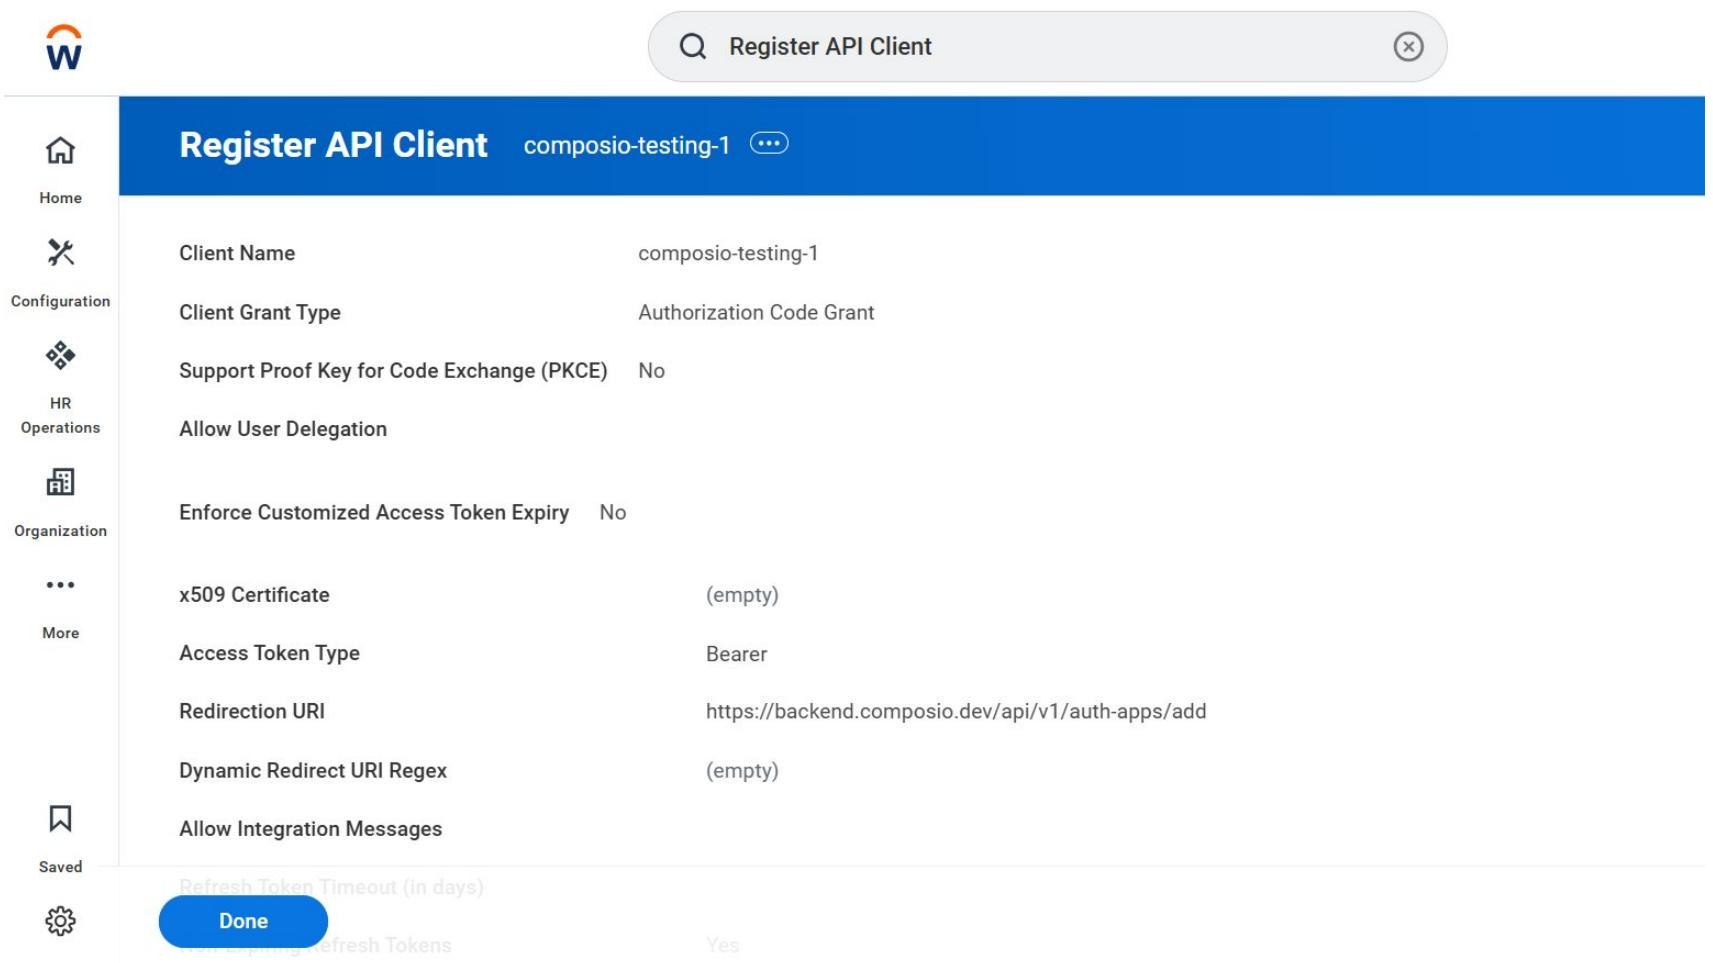
The registered API Client summary — verify all settings before proceeding.
Confirm the following are correct:
Client Name: composio-testing-1 (or your chosen name)
Client Grant Type: Authorization Code Grant
Support PKCE: No
Access Token Type: Bearer
Redirection URI: https://backend.composio.dev/api/v1/auth-apps/add
Non-Expiring Refresh Tokens: Yes (visible further down the page)
Click Done to complete the registration and proceed to the credential screen.
Copy Your Client ID, Client Secret, and API Endpoints
After clicking Done, Workday shows the full client detail page including your generated credentials and tenant-specific API endpoints. Copy all of these - you will need them in Composio.
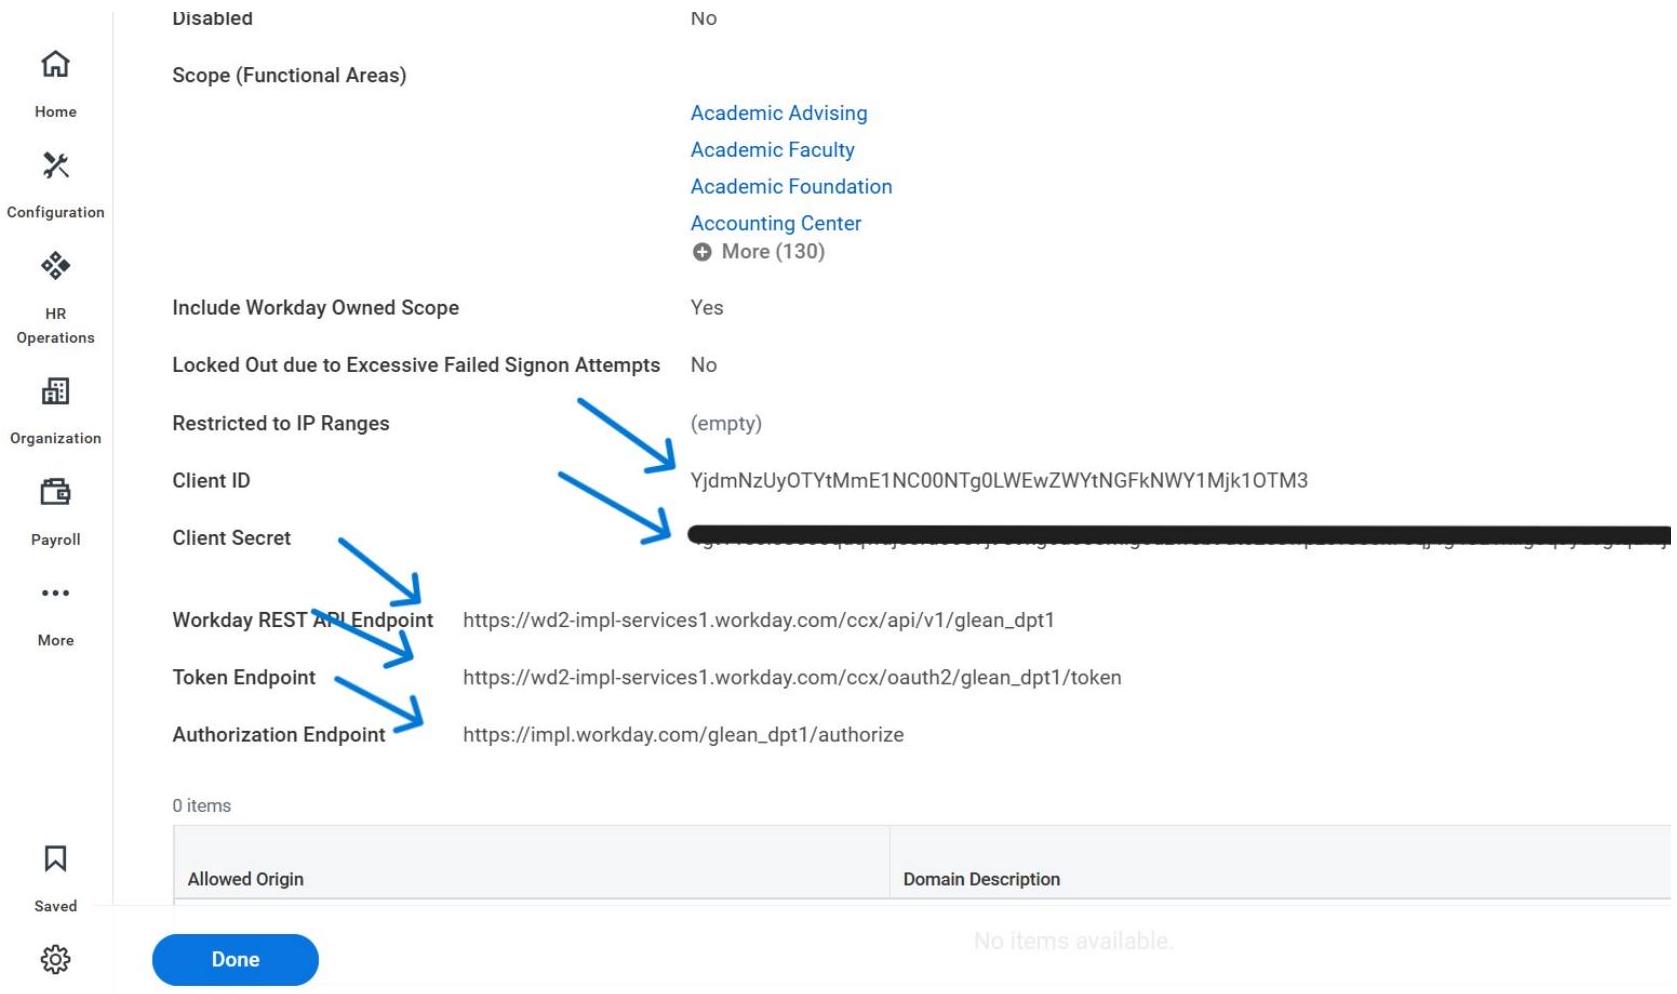
Copy the Client ID, Client Secret, REST API Endpoint, Token Endpoint, and Authorization Endpoint.
WARNING - Save All Values Now
The Client Secret may be masked if you navigate away. Copy all five values (Client ID, Client Secret, REST API Endpoint, Token Endpoint, Authorization Endpoint) into a secure location before proceeding. If you lose the Client Secret, you will need to regenerate it in Workday and update your Composio Auth Config.
Open Composio and Create a New Auth Config
Switch to your Composio dashboard. Navigate to Auth Configs and click + Create Auth Config. In the search drawer that opens, type Workday and select Workday with the OAUTH2 badge.
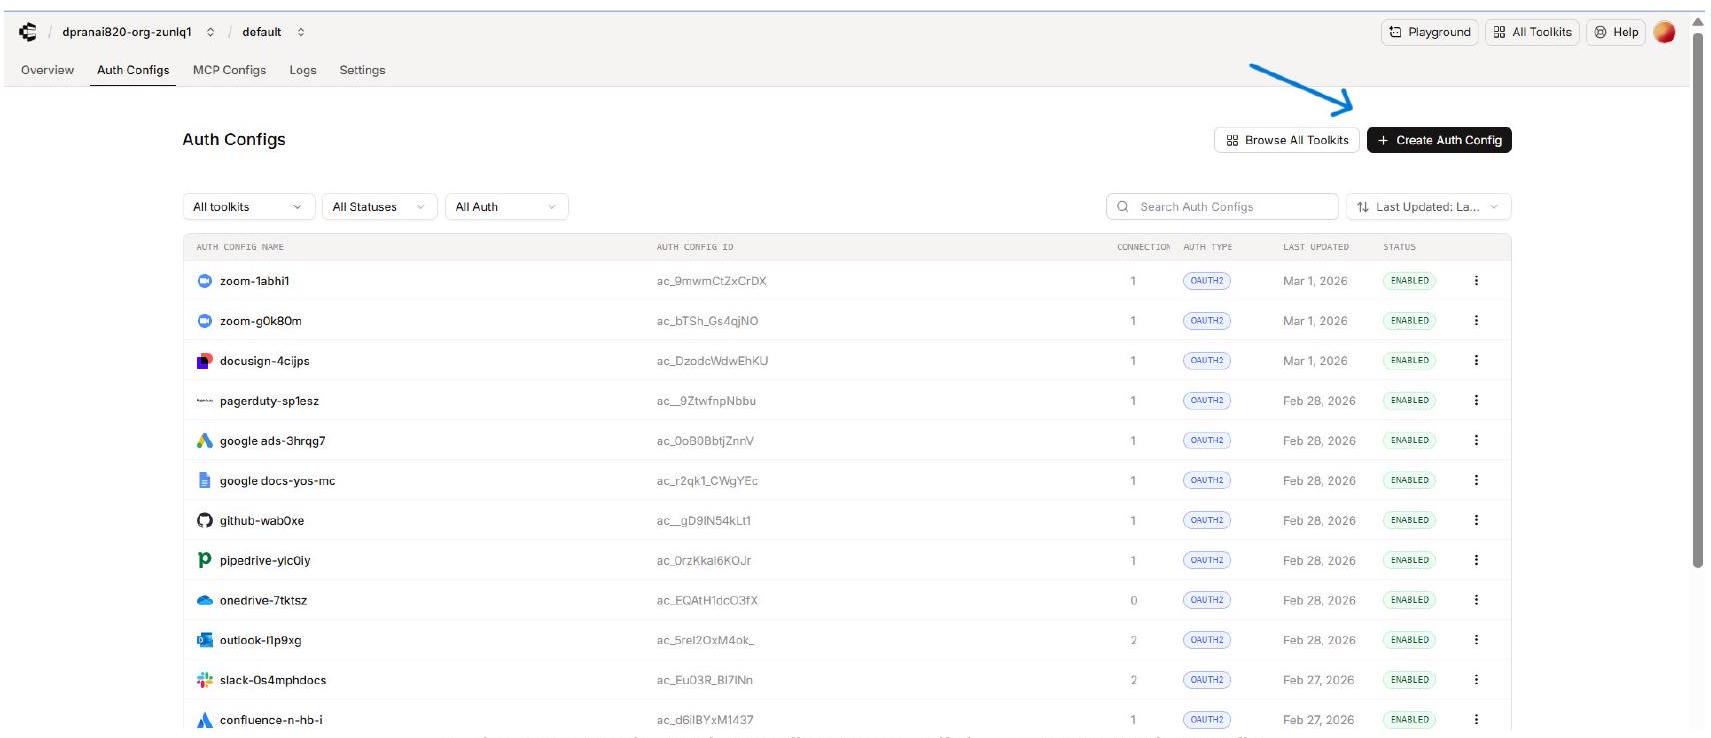
In the Composio Auth Configs page, click + Create Auth Config.
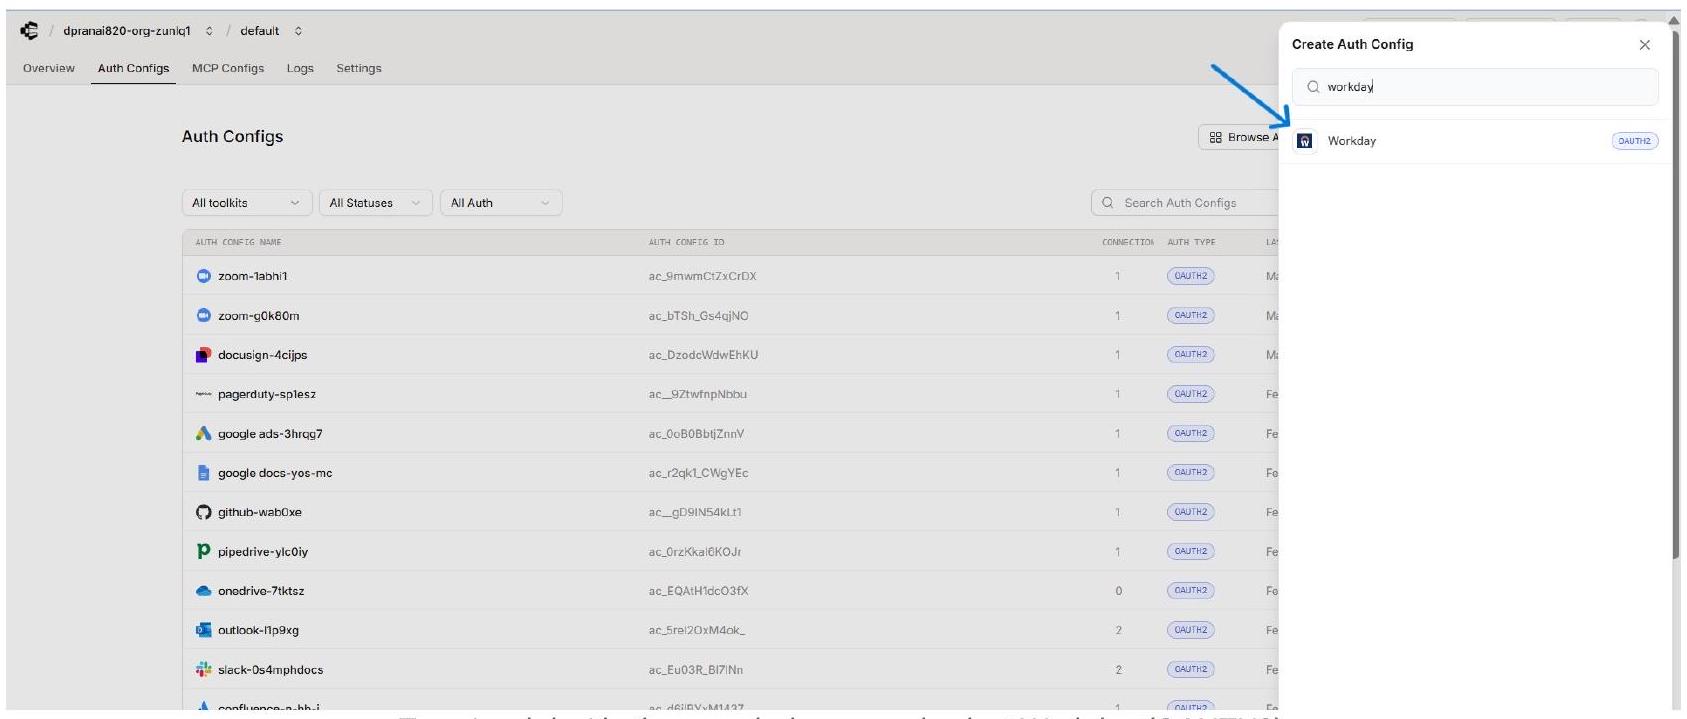
Type ‘workday’ in the search drawer and select Workday (OAUTH2).
Fill In the Composio Workday Auth Config Form
The Workday Auth Config form opens in the right panel. Fill in each field using the credentials you copied from Workday.
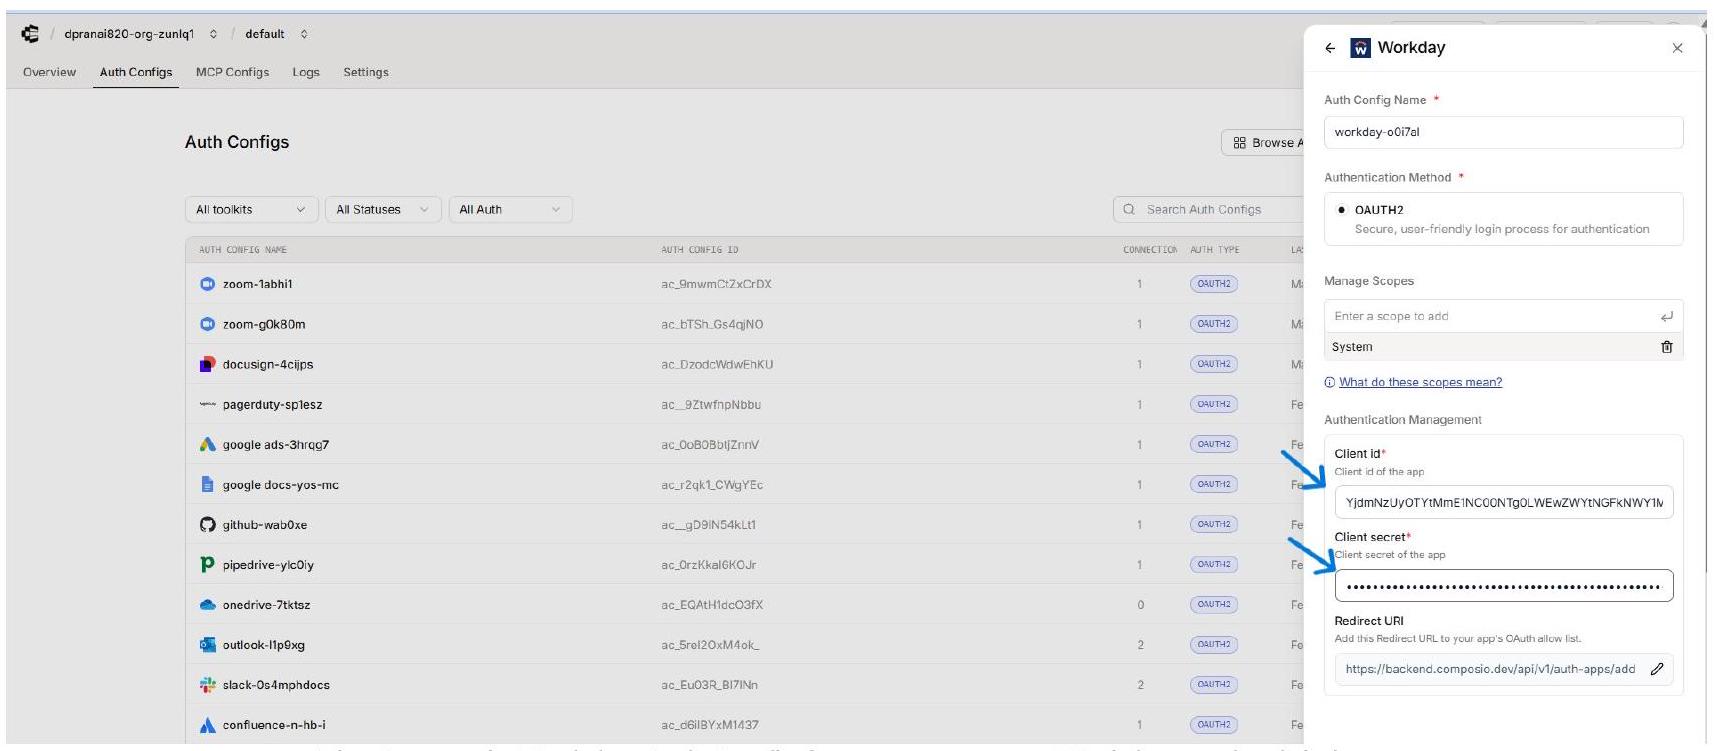
The Composio Workday Auth Config form - paste your Workday credentials here.
NOTE - Redirect URI in Composio
The Redirect URI field in the Composio form is shown for reference - it is the same URL you already added to Workday’s Redirection URI field. You do not need to change it here.
Connect a User Account - Enter External User ID
After saving the Auth Config, open it in Composio and click Connect Account. A modal dialog appears asking for an External User ID. Enter a stable, unique identifier for the user from your own system, then click Connect Account.
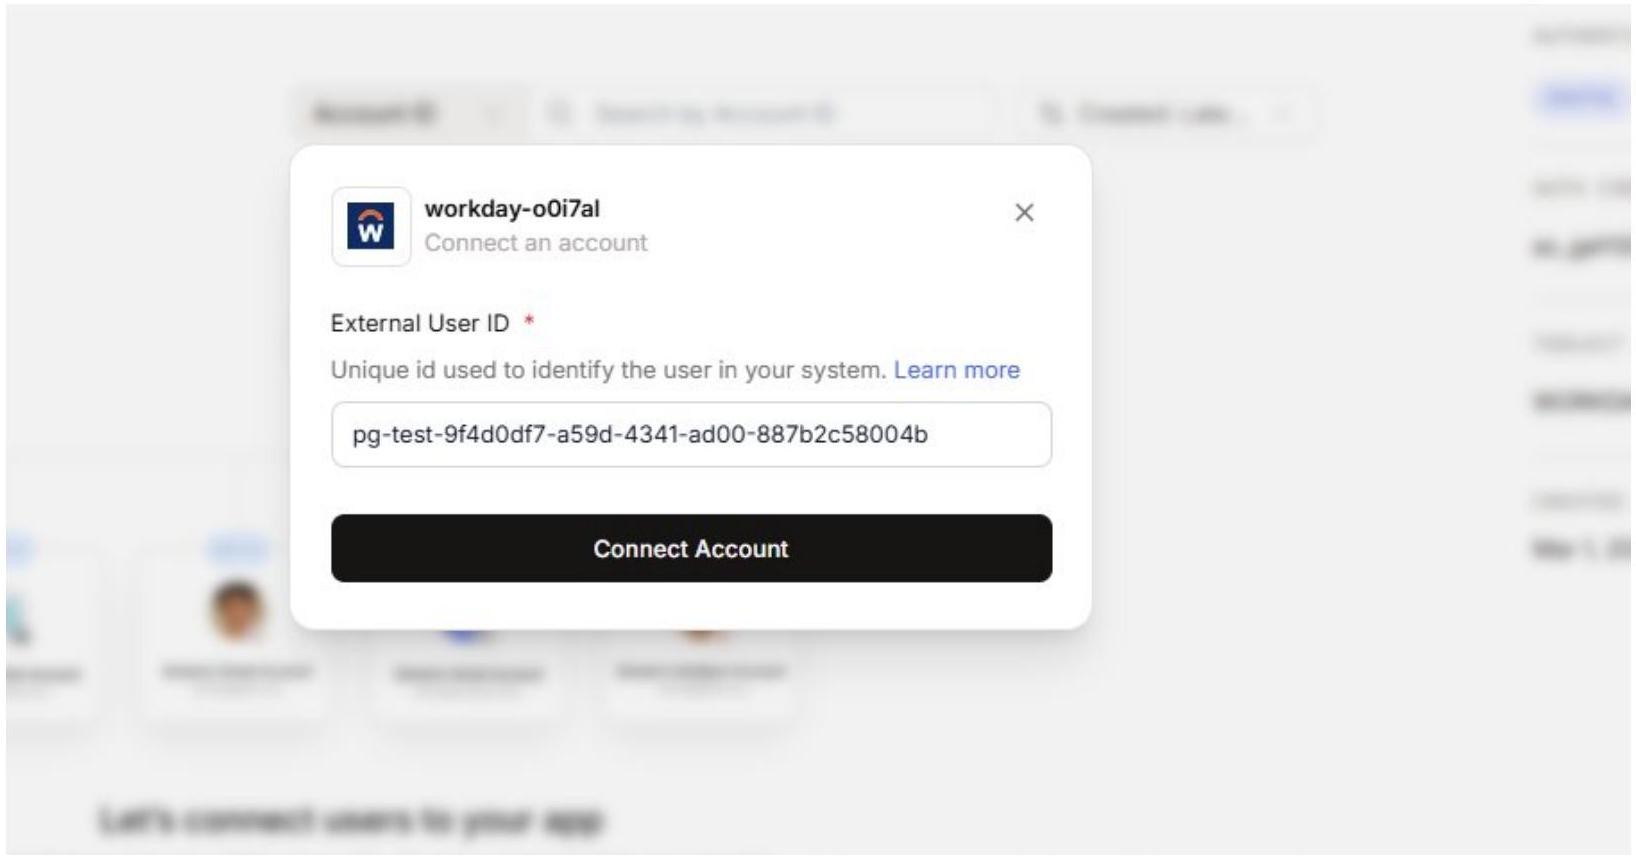
Enter a stable External User ID for the user being connected, then click Connect Account.
EXTERNAL USER ID
Use a consistent, stable ID such as a UUID from your own user database. Composio uses this to associate the Workday connection with the correct end user when your agents or apps make tool calls. Do not use temporary or session-based IDs.
. Enter Workday Tenant URLs in the Composio Connect Screen
Unlike most OAuth flows, Workday requires you to provide your tenant-specific API endpoints during the connection step. A Composio screen opens in the browser with three required fields. Copy the values from the Workday credential page you saved in Step 6.
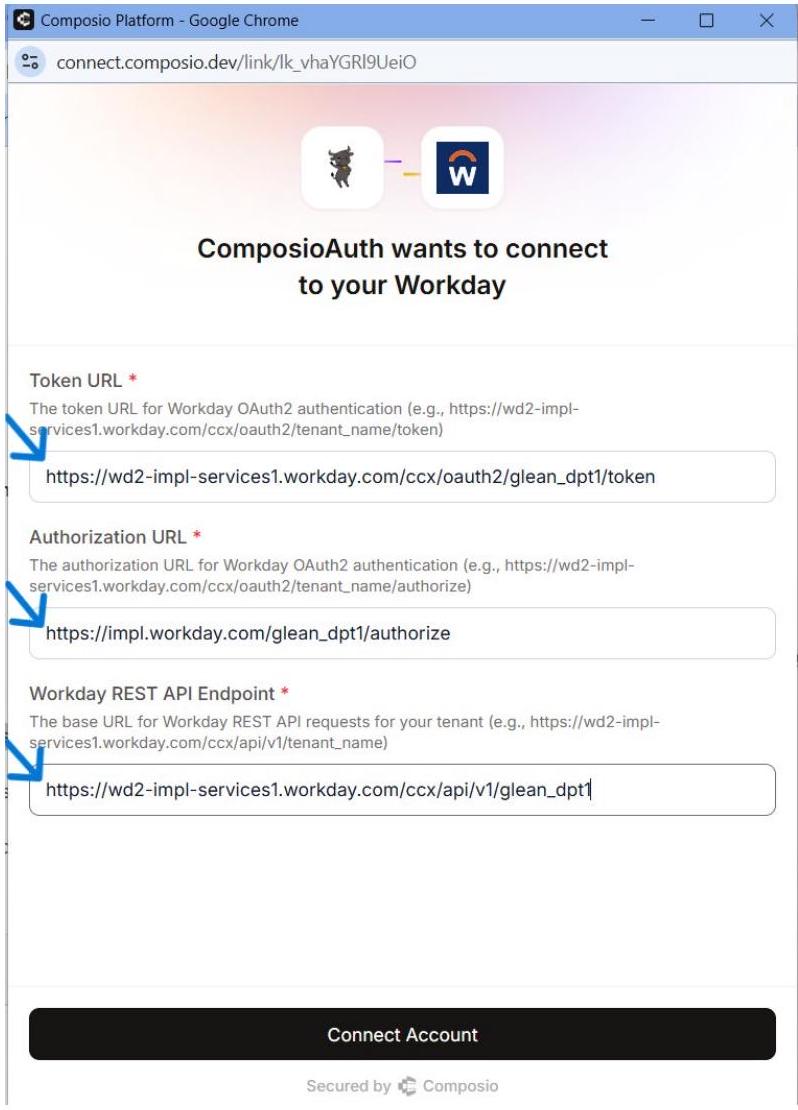
Enter your Workday tenant Token URL, Authorization URL, and REST API Endpoint, then click Connect Account.
TENANT-SPECIFIC URLS
All three URLs are unique to your Workday tenant. Replace ‘glean_dpt1’ in the examples with your actual tenant name. These exact URLs were shown on the credential confirmation page after you registered the API Client in Step 6. Do not use generic Workday URLs - they will not work for OAuth token exchange.
After entering all three fields, click Connect Account. Workday’s OAuth consent flow will complete the connection.
Verify the Active Connection in Composio
After the OAuth flow completes, Composio returns you to the Auth Config detail page. The Connected Accounts tab now shows your connection with status ACTIVE.

The Composio Connected Accounts tab shows an ACTIVE Workday connection.
Confirm the following before using the connection:
The Account ID appears in the Connected Accounts list with a status of ACTIVE.
The authentication method in the right panel is OAuth2.
Toolkit Slug shows WORKDAY.
Note the Auth Config ID (e.g., ac_geY005ZFyZo2) for use in SDK calls or API requests.
Additional: ISU & Security Group Setup
Most Workday tenants will have this configured by an admin. If you're unsure, check with your Workday admin before proceeding.
Create an Integration System User (ISU)
An ISU is a dedicated service account for integrations — it keeps API operations separate from regular user accounts.
Type Create Integration System User into Workday's search bar and select the task.
Enter a username and set a password.
Set Session Timeout Minutes to
0prevent the ISU from timing out.Select the Do Not Allow UI Sessions checkbox to restrict UI logins.
Navigate to the Maintain Password Rules task and add the ISU to the System Users exempt from password expiration field.
Create a Security Group
Search for Create Security Group in Workday and select the task.
Select a security group type:
Integration System Security Group (Unconstrained) — access to all data instances.
Integration System Security Group (Constrained) — access scoped by context.
Add your ISU as a member of the security group.
Click Done.
Grant Domain Permissions
Search for Maintain Permissions for Security Group and select the task.
Select your security group, then go to the Domain Security Policy Permissions tab.
Ensure the security group has GET permissions for:
Integration BuildIntegration ProcessIntegration DebugIntegration EventWorker Data: Current Staffing InformationWorker Data: Public Worker Reports
Click OK, then Done.
Search for Activate Pending Security Policy Changes, enter a comment, and confirm.